
I'm a little late with this challenge, but better late then never right? I combined this challenge with the SCCSC157 sketch
challenge on Stampin Connection to knock two challenges out at once. Take a
look!
- Stamps: Secret Garden, Delightful Dozen
- Card Stock: Pool Party, Calypso Coral, Whisper White
- Ink: Pool Party, Lucky Limeade, Calypso Coral, Black Stazon
- Markers: Blender Pen, Calypso Coral, Tangerine Tango, Primrose Petals, Rose Red
- Accessories: Sycamore Street Ribbon, Honeycomb embossing folder, Paper Snips
- Stampin’ Dimensionals, Rhinestones, Stampin’ Sponge

So here is the "Mashup" Challenge:
- Make a project "using your Markers (thumping,Color Spritzing,Coloring etc.)".
- Or Make a project with "Texture".
- Or "Mash it Up" and create a project with "Texture using your Markers".
Here is the sketch that was created by Liz Goldhawk:

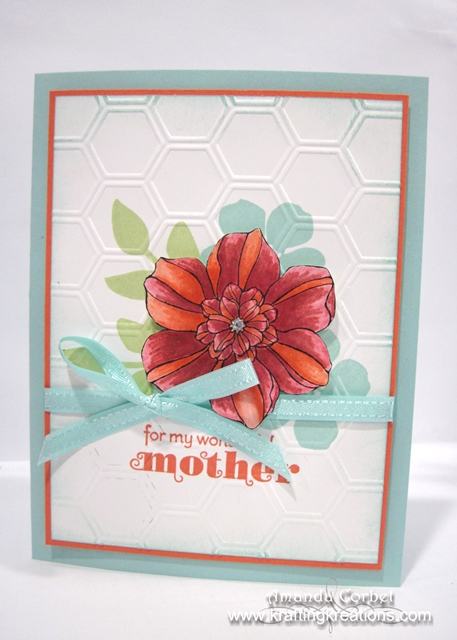
I started off by cutting a piece of Pool Party card stock
5-1/2” x 8-1/2” and scored it at 4-1/4”.
Next I cut a piece of Calypso Coral card stock 3-3/4” x
5” and a piece of Whisper White card stock 3-5/8” x 4-7/8”.
I stamped the leaf image from Secret Garden onto the
center of the Whisper White card stock in Lucky Limeade ink, and the small
solid blossom image from Secret Garden in Pool Party ink. Next I stamped the
greeting from Delightful Dozen in Calypso Coral ink below the leaves and
flowers. I ran this piece of card stock through the Big Shot in the Honeycomb
embossing folder. I sponged around the edges of the panel with Pool Party ink
then adhered the card stock onto the Calypso Coral card stock.

I wrapped a piece of Pool Party ribbon around the panel
and tied it into a knot. This is some of the ribbon in the Sycamore Street
Ribbon and Button pack that you can get for FREE during Sale-A-Bration, and it
is gorgeous! I adhered the panel onto the card front with Stampin’
Dimensionals.
I stamped the large flower image from Secret Garden onto
a scrap of Whisper White card stock in Black Stazon ink. Coloring in the flower
took several steps. First I squeezed the center of the closed Calypso Coral and
Primrose Petals ink pads and opened them half-way. I used my Blender pen to
pick up a little bit of Calypso coral and colored in every other section of
petal. Then I picked up a little bit of Primrose Petal ink and colored in the
remaining petal sections. At this point you have a very light colored flower.

Next I used the Calypso Coral and Primrose Petals markers
to color on the respective petal sections about 2/3 the way down the length of
each petal. Then I used Tangerine Tango on the Calypso Coral sections and Rose
Red on the Primrose Petals sections to color about 1/2 way down the length of
the petals. I went over the petals one more time with the Tangerine Tango and
Rose Red marker only coloring about 1/4 way down the length of the petal this
time. Finally I colored over the entire thing with just the Blender pen with no
ink to blend the colors a little bit better.
I cut out the flower with Paper Snips and adhered it onto
the card front with a Stampin’ Dimensional. Then I added a small Rhinestone
into the center of the flower just to add a little bit of sparkle!
What do you think?
If you have a chance head on over to The Friday Mashup to
see what the rest of the design team created! I hope you get a chance to play
along!
