Monday, July 30, 2012

Craft Project Central!

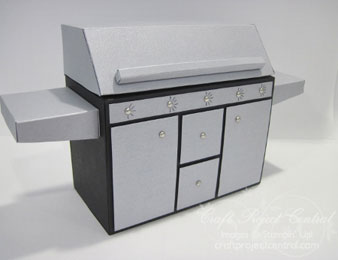
Rag Tutu and Birthday Card: 
Do you know a little girl that likes to dress up or has a birthday coming up?  Here is a cute little tutu that you can make along with a coordinating tutu birthday card!  Change the fabric colors and designs and you have a cute little tutu for other events and holidays too!  


This adorable project was created by Heidi! If you have a chance please head on over to Craft Project Central and leave Heidi a comment on her project.


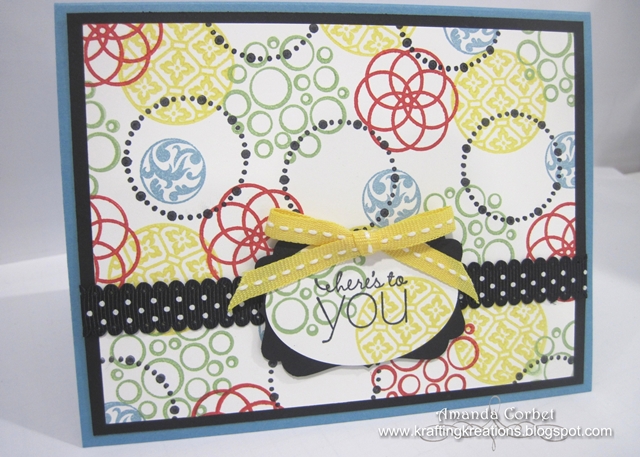
International Bazaar Cards and Folder: 
I’m just loving the new Stampin’ Up! catalog and all of the great new stamp sets and accessories in it!  This packet of cards made using new stamps and accessories is fun to make and easy to assemble!  The folder holds four cards and envelopes and makes a great gift or class project!  You’ll need to make more then one set though, as you’ll want one for yourself!


This beautiful project was designed by LaurieIf you have a chance please head on over to Craft Project Central and leave Heidi a comment on her project.  

This is also the bonus project for July. To get the instructions for Laurie’s project, just subscribe to July and meet one of the bonus project requirements of subscribing to two or more months in a row, putting the Craft Project Central badge on your blog, or referring a friend and when they subscribe, letting us know.


If you would like to subscribe to the July edition of Craft Project Central and get 10 wonderful tutorials for just $10.00 then click HERE


Also there is a fabulous special going on until the end of the day tomorrow. Here is all the info:


Pick Your Projects Promotion!


Here are the details for this fun promotion:

  • Any project posted on the site is eligible to be picked (including bonus projects)! To view the projects available, click on the months in the menu bar!
  • All projects are only $2 each!
  • A minimum of 5 projects must be picked, no maximum!
To get your projects, just download the Pick Your Projects (PYP) Promotion Order Form
  • Download and complete the PYP order form* and email it to contactus@craftprojectcentral.com
  • We’ll send you a PayPal invoice for the total of your picked projects
  • Upon receipt of your paid PayPal invoice we’ll email you your picked project tutorials!
  • Please allow up to 24 hours to receive your invoice and project tutorials.
*Order form is in Word format.  If you don’t have Word, send an email with the name of the project, month project was posted, and your PayPal email address.  In addition, if you are receiving this information via our email updates, you’ll need to come to the site to download the order form.  Thanks!

Click below to download the order form!

If you have any question regarding this promotion, just email us at contactus@craftprojectcentral.com.


Thanks for stopping by! 


Thursday, July 26, 2012

Patio Party Birthday!


Hello everyone! Today I have a sketch card that I created a while ago to share with you. This was created for the SCCSC116 sketch challenge on Stampin’ Connection. Take a look:


  • Stamps: Itty Bitty Banners
  • Card Stock: Whisper White, Summer Starfruit
  • DSP: Patio Party
  • Ink: Midnight Muse
  • Accessories: Bitty Banners Framelits, Stampin’ Dimensionals


Here is the sketch that was created by Susie Nelson:


This card has a lot of layers but is pretty simple to put together. I started off by cutting a piece of Summer Starfruit card stock 5-1/2” x 8-1/2” and scoring it at 4-1/4”. Then I cut a piece of Patio Party DSP with the butterflies on it 3” x 4-1/4” and adhered it onto a 3-1/4” x 4-1/2” piece of Whisper White card stock. I adhered this panel onto the card front.

For the next layer I cut a piece of Midnight Muse card stock 1-1/2” x 2-3/4” and adhered it onto a 1-3/4” x 3” piece of Whisper White card stock. I adhered this panel onto the card front with Stampin’ Dimensionals to make it pop up a little.


Now for the greeting I stamped the image from Itty Bitty Banners onto a scrap of Whisper White card stock in Midnight Muse ink. I cut out the greeting banner with the Bitty Banners Framelits and adhered the banner onto the card front with a couple Stampin’ Dimensionals.

That’s it! The part that took the longest was deciding how big to cut each layer. I really love the stripes combined with the busy butterfly pattern! What do you think? Have you been combining different patterns lately?

Thanks for stopping by!


Monday, July 23, 2012

Craft Project Central!

Flower Basket Card Set: 


Everyone needs to send a little note from time to time, and this card set is perfect for just that!  The Flower Basket is a pretty way to store the six 3" x 3" cards with matching envelopes, and can also be used as a little gift basket after the cards are gone.  The set is also a pretty little gift (you’ll have to make more than one set as you won’t be able to part with the set if you make just one)!  This project is also a great class, club or camp project!


This beautiful project was created by Christy! If you have a chance please head on over to Craft Project Central and leave Christy a comment on her project! 


Storybook Friends Cards & Candy Box: 


This fun gift box with four greeting cards and envelopes also includes a special chocolate treat in a separate compartment!  This project makes a great and inexpensive gift for those that like to send out cards and also like chocolate.  The tutorial includes measurements for three different box sizes, including A2 size cards with six nuggets, note cards with five nuggets, and 3" x 3" gift cards with three nuggets!


This adorable project was created by KimIf you have a chance please head on over to Craft Project Central and leave Christy a comment on her project! 


Savvy With 6" x 6" Sheets:


Ever wonder what you can do with those 6" x 6" pieces of Designer Series Paper that you have?  Well, this plethora of small projects will give you a great way to use up those 6" x 6" pieces in a fun and easy way, and you’ll be ready for lots of gift-giving! With eight sheets you can make them all – a Candy Bar Pocket, a Tall and Thin Milk Carton, a Gate Fold Card, an Open Top Box, a Tied Up Carousel of Treats, a Double Pocket Pouch, and a Cute Cone!


This fantastic project was created by Julie! If you have a chance please head on over to Craft Project Central and leave Christy a comment on her project!  


Serene Silhouettes Masculine Card Set: 


Do you struggle with designing masculine cards?  I sure do!  Well here’s a set of cards and a matching box that is a great gift for men.  Your kids’ male teachers will be impressed with your creativity and will appreciate having the cards on hand.  The cards are also perfect for sending to the men in your life!  This project is also a fun class project!


This gorgeous project was created by Sharon! If you have a chance please head on over to Craft Project Central and leave Christy a comment on her project! 


If you would like to subscribe to the July Edition of Craft Project Central and get 10 wonderful tutorials for just $10.00 then click HERE!  


Thanks for stopping by! 


Thank You Friday Mashup 68

Okay, this is late, but better late than never right? Here is the card that I created for the Friday Mashup #68 challenge:


  • Stamps: Everything Eleanor, Betsy's Blossoms, Bring on the Cake, Delightful Dozen
  • Card Stock: Whisper White, Tempting Turquoise, Basic Black
  • Ink: Tempting Turquoise, Basic Black, Black Stazon
  • Accessories: 3" Circle Die, 2-1/2" Circle Punch, Stampin' Dimensionals, Rhinestones, Paper Snips


Here is the Masup Challenge:


So here is the "Mashup" Challenge:
  1. Make a project with "the Sketch."
  2. Or Make a project w/ a "Lazy Summer Day theme (under the shade of a tree/ biking / Swimming / Sitting in an adirondack chair)."
  3. Or "Mash it Up" and create a project w/ the "Sketch & the Lazy Summer Day Theme."


I really didn't go with a summer theme, but I followed the sketch! I was really short on time and threw this card together quickly with some scraps that were on my table, and I really like how it turned out.

I started with a piece of Whisper White card stock that was cut at 5-1/2" x 8-1/2" and scored at 4-1/4". I stamped the swirl from Everything Eleanor onto the card front in Tempting Turquoise ink to create a background pattern. Then I took a scrap of Tempting Turquoise card stock that was about 1/2" x 4" and stamped the greeting from Delightful Dozen on the the left side in Basic Black ink and used Paper Snips to trim one end into a pennant shape before adhering it onto the card front.

Next I used a scrap of Basic Black card stock and ran it through the Big Shot on the 3" circle die. I stamped the blossom from Betsy's Blossoms in Black Stazon ink onto a scrap of Whisper White card stock and punched out the flower with the 2-1/2" Circle punch. The two circles were adhered together and then they were adhered onto the card front with Stampin' Dimensionals.


I stamped the bird onto a scrap of Whisper White card stock in Tempting Turquoise ink and cut it out with Paper Snips. I adhered the bird onto the stamped circle with a Stampin' Dimensional and added a Rhinestone for the bird's eye.

If you have a chance head on over to The Friday Mashup and join in on the fun!

Thanks for stopping by!


Blog Candy Winner!!!

It has been a crazy busy summer, but my husband and I have been having a blast! I completely forgot to draw the winner of the July Craft Project Central subscription last Thursday. I was busy getting ready for the Make and Take that took place last Thursday and Friday that I just completely forgot. So, I'm sorry that this is later than planned, but now it's time to draw the winner! 


And the winner of the July Craft Project Central subscription is...........

Dawn DuVal

And here is her comment: 

Amanda,

I have been following your blog for sometime and love to see your creativity. The cake takes the cake!! What an amazing idea. I actually thought it was a real cake until I read your post. I would love to win a subscription.

Thank you for sharing your creativity.

Dawn

Congratulations Dawn! Thank you everyone for commenting on my cake box and entering for a chance to win. Make sure to come back next month for a chance to win a subscription for the August edition of Craft Project Central! 

Thanks for stopping by! 


Sunday, July 15, 2012

Craft Project Central!

Gift Cards and Tags Set: 

This project makes the perfect gift for a teacher, friend, or co-worker!  It’s also a wonderful project to make for yourself so you’ve got coordinating mini card enclosures, wine tags, and gift tags for those last minute occasions!  Pop on a wine tag and head on over to a new neighbors house, or slip a little note card into a bouquet of flowers.  When you’ve used them all, you’ll have the sturdy box to hold your next round!  This project is also a fun class, club or camp project!


This beautiful project was created by Tara! If you have a chance please head on over to Craft Project Central and leave Tara a comment on her project!

If you would like to subscribe to the July edition of Craft Project Central and get 10 wonderful tutorials for just $10.00 then click HERE!

Thanks for stopping by!


Friday, July 13, 2012

Birthday Poppies Friday Mashup 67

It's Friday again! That means there is another wonderful Friday Mashup Challenge! Here is the card and envelope that I made: 


  • Stamps: Pleasant Poppies, En Francais, Itty Bitty Banners
  • Card Stock: Primrose Petals, Pink Pirouette, Whisper White
  • Ink: Black Stazon, Sahara Sand
  • Reinker Colors: Pink Pirouette, Primrose Petals, Raspberry Ripple
  • Markers: Pink Pirouette, Certainly Celery, Gumball Green
  • Accessories: Blender Pen, Stampin' Sponge, Decorative Label Punch, 1-3/4" x 7/8" Oval Punch, Bitty Banners Framelits, Raspberry Ripple Stitched Satin Ribbon, Stampin' Dimensionals, SNAIL Adhesive


Photo Source 

So here is the "Mashup" Challenge:
  1. Make a project with a "Banner or Flag."
  2. Or Make a project with a "Matching Envelope."
  3. Or "Mash it Up" and create a project with a "Banner / Flag & a Matching Envelope."


I know that there is only one little bitty banner on my card, but I had just recently gotten Pleasant Poppies and my fingers were just itching to play with it and color! So I started off this card by cutting a piece of Primrose Petals card stock 5-1/2" x 8-1/2" and scoring it at 4-1/4". Then I cut a piece of Whisper White card stock 4" x 5-1/4". I wanted to add a subtle background behind my flowers so I inked up En Francais with Sahara Sand ink and stamped it onto a piece of scrap paper before stamping it onto my Whisper White card stock. This leaves a very subtle color background. Then I stamped the poppies from Pleasant Poppies on top of my light text in Black Stazon ink.

Now for the fun part...coloring! I put a drop of each color re-inker into a piece of plastic packaging and used my blender pen to pick up just a little bit of color at a time. I started off by coloring the flowers with Pink Pirouette reinker. Then I used the Pink Pirouette marker to add a little bit more depth to the shadows. Then I added a bit of Primrose Petals reinker to the shadows, and finally just a tiny bit of Raspberry Ripple reinker. By picking up just a little bit of reinker color on the Blender Pen at a time I was able to really blend the colors together well to create the shadows on the flowers.

For the stems I colored them in with the large tip of the Certainly Celery marker and added a shadow with the fine tip of the Gumball Green marker. Once all the coloring was complete I sponged around the edges of the card stock with Sahara Sand ink. I wrapped a piece of Raspberry Ripple Stitched Satin ribbon around the panel and adhered it onto the back. Then I adhered this panel onto the card front.


Now for the greeting! I stamped the greeting from Itty Bitty Banners onto a scrap of Whisper White card stock and used the Bitty Banners Framelits to cut out the shape in the Big Shot. I used the 1-3/4" x 7/8" Oval Punch on a scrap of Pink Pirouette card stock and the Decorative Label punch on a scrap of Primrose Petals card stock. Then I sponged around the edges of all three pieces with Sahara Sand ink. I adhered the pieces one on top of the other and then adhered it onto the card front with a couple Stampin' Dimensionals. 


Now for the Mashup part of the challenge, creating a matching envelope. I stamped just a portion of the poppies in the lower left hand corner of the envelope and colored them in using the same steps that I used on the panel for the card front. Then I sponged around the edges of the envelope in Sahara Sand ink to make it match the card.


Here is a closeup of the envelope coloring.


Now I will admit it took a looooong time to complete the card front and the envelope. It's definitely something I would not want to make multiples of, but it's really pretty! I ended up giving this card to my mother for her birthday with some handmade jewelry that I will share with you next week.

So now it's your turn! Head on over to the Friday Mashup and play along with the challenge!

Thanks for stopping by!


Thursday, July 12, 2012

Birthday Cake Gift Box and Blog Candy!

It's time for me to share my project for the July edition of Craft Project Central! I really wanted to make an extra special birthday gift box for someone special so I came up with this gift box that looks like a real cake!

Birthday Cake Gift Box: 
Here is an extra special gift box that is sure to please a girl on her birthday! This birthday cake shaped gift box, complete with icing around the edges, is big enough to fit a pretty large gift. The inside of the box is 5-1/2” wide x 8-1/2” long x 2-3/4” tall. The sparkling frosting swirls and beautiful flowers finish off this cake and make it look good enough to eat!


If you would like to subscribe to the July edition of Craft Project Central and get 10 fabulous tutorials for just $10.00 then click HERE!

Blog Candy!!!

As usual I'm giving away a FREE July subscription to Craft Project Central! All you have to do is leave a comment on this post to enter! I will draw the winner at noon on the 19th! Good luck!

Thanks for stopping by!


Butterfly Birthday

Good afternoon everyone! I hope you're enjoying  your summer so far! Sorry I've been mostly MIA for a while. I've been super busy lately. I actually have two orders for my Krafting Kreations Invitations business so far and I'm super excited. One is a friend and the other is a distant family relation, but it's a start! Remember, if you know someone who would might be interested in some handmade invitations for a wedding or a party, or Christmas cards, or favors please point them my way!

This card I whipped up last night for the SCCSC127 Sketch Challenge on Stampin' Connection. Take a look:


  • Stamps: Papillion Potpourri, Bring on the Cake
  • Card Stock: Soft Suede, Midnight Muse, Summer Starfruit, Marina Mist
  • DSP: Comfort Cafe
  • Ink: Midnight Muse, Summer Starfruit, Marina Mist
  • Accessories: Delicate Butterfly Punch, 1 Inch Square Punch, Rhinestones, Mini Glue Dots, Sponge Dauber

Here is the sketch that was created by Liz Goldhawk: 


I really wanted the pendants and the butterflies to stand out on this card, so I stuck with more neutral colors for the card base and background. I started off with a piece of Soft Suede card stock cut at 5-1/2" x 8-1/2" and scored at 4-1/4". Next I cut a piece of Comfort Cafe DSP 4" x 5-1/4", stamped the greeting from Bring on the Cake in the lower right hand corner with Midnight Muse ink, and adhered the DSP onto the card front. 

I cut strips of Midnight Muse, Summer Starfruit, and Marina Mist card stock 1" x 3-1/4". To create the dove-tail shape in the end I used the 1 Inch Square Punch. This makes it easy to get the cuts straight, centered, and even. I adhered the strips onto my card and then trimmed off the excess that extended past the fold of the card.  One helpful tip, when adhering three strips that you want evenly spaced across the card I find it easier to adhere the two outside ones first and get them close to the same distance away from the edge of the card, then you can adhere the center one evenly between the outside two. That way if you are off just a little bit it's not quite as noticeable as it is when the middle spaces are uneven.

Now I was ready for the butterflies. I really liked how the print in this particular butterfly image mimics the pattern in the DSP. I stamped one butterfly in Midnight Muse, Summer Starfruit, and Marina Mist onto a scrap of Whisper White card stock. The butterflies were punched out with the Delicate Butterfly Punch and the edges were sponged with their respective colors.


I adhered the butterflies onto the card front with Mini Glue Dots and added three rhinestones into the center of each butterfly to add a bit of sparkle! Because you gotta have some sparkle!  

I just got lots of new goodies from the Holiday Mini Catalog yesterday. Hopefully I will get a chance to play with them some this weekend to share with you next week!

Thanks for stopping by!


Wednesday, July 11, 2012

Grill Recipe Box!

Did you get a chance to get this tutorial? If not you will want to hurry! It was posted on Craft Project Central August 2011 and will be deleted August 1st to make room for this year's tutorials. If you would like to subscribe now to get the instructions for this project then click HERE! Hurry up though! Once the 1st of August comes around it will be gone for good!

Grill Recipe Box: 
Here is a very special recipe box, perfect for anyone who loves to grill!!  Open the grill lid and inside are recipe dividers and cards for a bunch of yummy recipes to cook on the grill!! You’ll really wow the guys (and gals) in your life with this great grill recipe box gift!!


If you already subscribed to August 2011, you’ll want to make sure to download all of the project instructions before August 1st too!


Also, some of these projects are starting to take up too much room around my house. Since I'm a regular designer at Craft Project Central I need room to come up with more fabulous tutorial ideas. So, the actual finished products from some of my tutorials will be available for sale in my Etsy shop! There will only be one of each item posted, and the items posted for sale will only be those that I do not use as gifts. So if you like the project, but don't want to have to make it then check to see if it is available in my Krafting Kreations Store


Thanks for stopping by! 


Tuesday, July 10, 2012

Craft Project Central!

Flower Basket Card Set: 
Everyone needs to send a little note from time to time, and this card set is perfect for just that!  The Flower Basket is a pretty way to store the six 3" x 3" cards with matching envelopes, and can also be used as a little gift basket after the cards are gone.  The set is also a pretty little gift (you’ll have to make more than one set as you won’t be able to part with the set if you make just one)!  This project is also a great class, club or camp project!


This beautiful project was created by Christy! If you have a chance please head on over to Craft Project Central and leave Christy a comment on her project!

If you would like to subscribe to the July edition of Craft Project Central and get 10 wonderful tutorials for just $10.00 then click HERE!

Thanks for stopping by!


Saturday, July 7, 2012

Craft Project Central!

Patio Party Pinwheels: 

Pinwheels are all the rage right now!  Make your next party a hit using pinwheels on your decorative projects, including your centerpiece!  This great party ensemble includes the centerpiece, favor bags, and a card that you can use for invitations, thank you cards or whatever you’d like!


This fabulous project was designed by Laurie! If you have a chance please head on over to Craft Project Central and leave Laurie a comment on her project! 


If you would like to sign up for the July edition of Craft Project Central and get 10 wonderful tutorials for just $10.00 then click HERE!


Thanks for stopping by! 


Friday, July 6, 2012

Circle Circus Friday Mashup 66

 It's Friday again! That means it's time for another Friday Mashup challenge! Here is the card I made!


  • Stamps: Circle Circus, Friendly Phrases
  • Card Stock: Marina Mist, Basic Black, Whisper White
  • Ink: Marina Mist, Basic Black, Real Red, Daffodil Delight, Wild Wasabi
  • Accessories: XL Oval Punch, Decorative Label Punch, Daffodil Delight Stitched Grosgrain Ribbon, Basic Black Scalloped Dots Ribbon, Stampin' Dimensionals, Mini Glue Dot. 


Photo Source


So here is the "Mashup" Challenge :

  1. Make a project with "The Olympic Colour Combination of Marina Mist, Basic Black, Daffodil Delight, Wild Wasabi & Red."
  2. Or Make a Project using "Multiple Circles."
  3. Or "Mash it Up" and create a project with the "Olympic Color Combo and Multiple Circles."


This card was pretty quick and easy to put together. I started off by cutting a piece of Marina Mist card stock 5-1/2" x 8-1/2" and scoring it at 4-1/4". Next I cut a piece of Whisper White card stock 3-3/4" x 5". I stamped the images from Circle Circus all over the card stock in the various ink colors. After all the stamping was done I adhered this panel onto a piece of Basic Black card stock cut at 4" x 5-1/4". I wrapped a piece of Basic Black Scalloped Dots Ribbon around the panel and then I adhered the panel onto the card front.

Now for the greeting! I stamped the greeting from Friendly Phrases onto a scrap of Whisper White card stock. Then I stamped one of the circle images over it in Wild Wasabi ink and another in Daffodil Delight ink. I punched out the greeting with the XL Oval Punch. Next I used the Decorative Label punch on a scrap of Basic Black card stock. I adhered the stamped oval onto the label and then the label onto the card front with a couple Stampin' Dimensionals. To finish it off I tied a bow with a piece of Daffodil Delight Stitched Grosgrain Ribbon and adhered it onto the top of the label with a Mini Glue Dot.


That's it! Simple, easy, and fun! I usually don't go for the busy patterns like this one, but I had fun with this challenge and all these patterned circles!

Stop on by the Friday Mashup blog to see what everyone else on the Design Team created! I hope you get a chance to play along!

Thanks for stopping by!


Wednesday, July 4, 2012

Craft Project Central!

Pleasant Poppies Notes and Tote: 

When I first started stamping I used to heat emboss all the time!  I loved watching the embossing powder melt like magic before my eyes and always loved the pretty end result!  For some reason I haven’t embossed for a while, but this project gives me a good reason to get out my embossing powders and heat tool!  The cute little tote is filled with six embossed note cards and envelopes.  It’s perfect for gift giving or as a class, club or camp project!  Warm up your heat tool and have fun making this one!


This fabulous project was designed by Leena! If you have a chance please head on over to Craft Project Central and leave Leena a comment on her project! 


If you would like to sign up for the July edition of Craft Project Central and get 10 wonderful tutorials for just $10.00 then click HERE!


Thanks for stopping by! 


Monday, July 2, 2012

Craft Project Central!

Artistic Etchings Mini Journal and Card: 

Make this simple but elegant mini journal for yourself or someone who likes to write or draw.  Perfect for taking along on a vacation without taking up too much space!  It’s also great used as a note pad for lists, or as a mini scrapbook!  Easy to make and to personalize!


This fabulous project was designed by Monika! If you have a chance please head on over to Craft Project Central and leave Monika a comment on her project! 


If you would like to sign up for the July edition of Craft Project Central and get 10 wonderful tutorials for just $10.00 then click HERE!


Thanks for stopping by!