Sunday, March 31, 2013

Happy Easter!

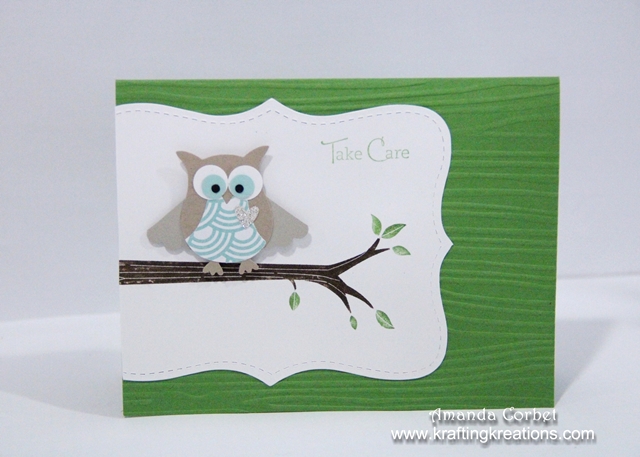
I hope everyone is having a wonderful Easter! I wanted to hop oh here real quick and share with you the Easter card that my guests made at the March Make and Take! Take a look! 


  • Stamps: Wacky Wishes, Woodgrain
  • Card Stock: Crumb Cake, Whisper White, Pink Pirouette, Island Indigo, So Saffron, Lucky Limeade
  • Ink: Soft Suede, Versamark, Crumb Cake, Certainly Celery
  • Markers: Crumb Cake, Island Indigo
  • Accessories: Punches for bunny (listed below), Itty Bitty Shapes Punch Pack, Little Leaves Sizzlit, Pool Party Embossing Powder, 2-1/2" Circle Punch, Stampin' Dimensionals, Sycamore Street Ribbon Pack, Silver Dazzling Details, Stampin' Sponge, Heat Tool


This card was a bit time consuming, but totally worth it! I started off with a 5-1/2" x 8-1/2" piece of Crumb Cake card stock and scored it at 4-1/4". I stamped the Woodgrain background onto the card front in Soft Suede ink. I stamped the greeting from Wacky Wishes onto the bottom of the card front in Versamark. I covered the stamped image with Pool Party embossing powder, tapped off the excess, and heated it with my Heat Tool. Next I used the 2-1/2" Circle Punch to punch a hole in the card front. Then I cut a 4" x 5-1/4" piece of Certainly Celery card stock and adhered that on the inside of the card. 

Run the Little Leaves Sizzlit with a piece of Lucky Limeade card stock through the Big Shot. Adhere the leaves below the window in the card front. Use the Itty Bitty Shapes Punch Pack to punch out three flowers. Adhere the flowers onto the leaves. Add Silver Dazzling Details into the center of the flowers. 


Below is a little instruction sheet that I made for punching and assembling the cute little bunny rabbit. Click on the picture and you can make it larger. 


Head: Use the Ornament Punch on a scrap of Whisper White card stock and cut off the top of the ornament.  Sponge around the edges with Crumb Cake ink. 

Eyes: Use just the wing from the Bird Punch twice and sponge around the edges with Pool Party ink. Adhere just the rounded ends of the wings together. Use the 3/8" Circle punch from the Itty Bitty Shapes Punch Pack on a scrap of Island Indigo card stock to punch out two circles. Use the Island Indigo marker to add pupils into the punched circles. Adhere the circles onto the wings. Now adhere your eyes onto the head. 

Cheeks: Use the Small Oval punch twice on a scrap of Whisper White card stock. Sponge around the edges with Crumb Cake ink. Adhere the ends of the two ovals together. Use the 3/8" Circle punch on a scrap of Pink Pirouette card stock. Sponge around the edges with Crumb Cake ink. Adhere the pink circle onto the center of the ovals. Use the Crumb Cake marker to add whisker lines and dots to the cheeks. Adhere the cheeks onto the head with a couple Stampin' Dimensionals. 

Ears: Use the Large oval punch twice on a scrap of Whisper White card stock. Use the 1-3/8" x 5/8" Oval punch (retired) twice on a scrap of Pink Pirouette card stock. Sponge around the edges with Crumb Cake ink. Adhere the pink oval onto the white oval. Bend the end of one oval at an angle to make it look like the ear is folded down. Adhere the ears behind the head. 

Body: Use the 1-3/4" Circle punch once on a scrap of Whisper White card stock. Sponge around the edges with Crumb Cake ink. 

Feet: Use the Large oval punch twice on a scrap of Whisper White card stock. Use the 1-3/8" x 5/8" Oval punch (retired) twice on a scrap of Pink Pirouette card stock. Sponge around the edges with Crumb Cake ink. Adhere the pink oval onto the white oval. Adhere the feet onto the bottom of the body. 

Tail: Use the Boho Blossoms punch twice on a scrap of Whisper White card stock to punch out two of the largest flowers. Sponge around the edges with Crumb Cake ink. Use a Stampin' Dimensional to adhere one flower onto the feet side of the body. Use a Stampin' Dimensional to adhere the other flower onto the opposite side of the body. 


Adhere the body and feet onto the inside of the card front so that most of the 1-3/4" circle is inside the circle window. Adhere the head onto the card front with a Stampin' Dimensional. 

Front Feet: Use the Small Oval punch once on a piece of Whisper White card stock. Sponge around the edges with Crumb Cake ink. Use the Crumb Cake marker to add three lines to separate the toes. Use Paper Snips to cut the oval in half and adhere each oval half on either side of the bunny's head.  


Finally wrap a piece of Pool Party ribbon around the card front and tie it into a bow. That's it! Done! This card was cased from Delila at Delila Paper World's Blog.


Friday, March 29, 2013

Hey There!

Are you ready for another Friday Mashup challenge!


  • Stamps: My Paper Pumpkin
  • DSP: Comfort Cafe
  • Card Stock: Midnight Muse, Early Espresso, Very Vanilla
  • Ink: Early Espresso, Sahara Sand
  • Accessories: Essentials Paper Piercing Pack, Linen Thread, Essentials Piercing Pack, Stampin’ Pierce Mat, Paper Piercer, Designer Builder Brads, Itty Bitty Shapes Punch Pack, Distressing Tool, Ruler, Sahara Sand Marker, Stampin Sponge, Pop Up Posies Designer Kit, Large Scallop Edgelit, Early Espresso Marker, Vanilla Shimmer Smooch Spritz


Here's your Mashup Challenge:

  1. Create a project using "Lined paper (Notebook, Graph, Spreadsheet etc.)".
  2. Create a project that has a "Distressed appearance".
  3. Or Mash it Up and create a project with "Lined paper that's Distressed looking".

I had a tough time with this challenge. I don’t have any stamps that have lines like paper, and I didn’t want to use regular notebook paper. So I here is what I did.

I started off with a 5-1/2” 8-1/2” piece of Midnight Muse card stock and scored it at 4-1/4”. Next I cut a piece of Comfort Café DSP 4” x 5-1/4”. I sponged around the edges of the DSP with Early Espresso ink and adhered the DSP onto the card front.

Next I took a scrap of Very Vanilla card stock that was about 3” x 4”. I took a ruler and the fine point end of my Sahara Sand marker and drew lines across the card stock. I just eyeballed how far apart to have the lines. Then took the stamps from the My Paper Pumpkin welcome kit and used Early Espresso ink to stamp the greeting so that it was almost on the line. I stamped the spots image several times onto the card stock in Sahara Sand ink. I distressed the edges of the card stock and sponged around the edges with Early Espresso ink. Then I took Paper Snips and cut the bottom at an angle so it wouldn’t stick out past the scalloped edge. I adhered the lined paper onto the card front with a few Stampin’ Dimensionals at the top and glue stick at the bottom.


For the scallops I cut a piece of Early Espresso card stock 2” x 5-1/2” and ran it through the Big Shot with the Large Scallop Edgelit. I used my Paper Piercer, Stampin’ Pierce Mat, and Essentials Paper Piercing pack to pierce holes along the scalloped edge and the top edge. I sponged around the edges of the card stock with Early Espresso ink, and then I used the fine point end of my Early Espresso marker to draw lines between every other pierced hole to make it look like stitching. I adhered the scalloped edge onto the card front with glue stick. I wrapped a piece of Linen Thread around the card front and tied it into a bow.


For the flower I took four flowers from the Pop Up Posies Designer Kit and curled the petals a little by running them across my bone folder. I stacked up the flowers and used my Paper Piercer and Stampin’ Pierce mat to pierce a hole through all the layers and added a Designer Builder Brad in the hole. I used the circle punch from the Itty Bitty Shapes Punch pack on a scrap of Midnight Muse DSP and adhered it onto the brad before adding the clear dome. I adhered the flower onto the card with a Stampin’ Dimensional. I wanted to add some shimmer and a little more splatter so I sprayed my card front with my Vanilla Shimmer Smooch Spritz.


Although I struggled a bit coming up with this card, I really love how it turned out!

If you have a chance head on over to the Friday Mashup and see what the rest of the design team has come up with! 


Thursday, March 28, 2013

Take Care

Are you ready for a cute Owl punch card? Good! I have one to share with you today. This is a card that can work for a variety of occasions. It’s also a cure and fast card to put together. Take a look!


  • Stamps: Take Care
  • DSP: Sycamore Street
  • Card Stock: Gumball Green, Whisper White, Crumb Cake, Sahara Sand, Pool Party, Whisper White, Basic Black
  • Ink: Gumball Green
  • Markers: Early Espresso, Gumball Green
  • Accessories: Owl Builder Punch, Silver Glimmer Paper, 1-1/4” Scalloped Circle Punch, Paper Snips, 2-Way Glue Pen, Stampin’ Dimensionals, Top Note Die, Woodgrain embossing folder.


I started off by cutting a piece of Gumball Green card stock 5-1/2” x 8-1/2” and scored it at 4-1/4”. I ran the card base through the Big Shot in the Woodgrain embossing folder. Next I cut a piece of Whisper White card stock 4” x 5” and ran it through the Big Shot on the Top Note die.


I inked up the branch from Take Care with Early Espresso and Gumball Green markers, breathed on the stamp to re-moisten the ink, and then stamped it on the top note card stock. I stamped the greeting onto the top note in the upper right hand corner in Gumball Green ink. I adhered this piece onto the card front and used Paper Snips to cut the label even with the edge of the card front.


Now for the owl. I punched the shapes from scraps as follows: Crumb Cake for the body, Whisper White for the large circles, Pool Party for the medium circles, Basic Black for the smallest circles, Sycamore Street DSP for the belly, and Silver Glimmer paper for the heart. I adhered all the pieces together using 2-Way Glue Pen. For the wings I used the 1-1/4” Scalloped Circle punch on a scrap of Sahara Sand card stock and used Paper Snips to cut the scalloped circle in half. Just adhere each half of the circle behind the owl with 2-Way Glue Pen and you have wings!  I adhered the owl onto the card front with a Stampin’ Dimensional. 

I just love this little owl! 


Monday, March 25, 2013

Follow Via Bloglovin'

Just in case you haven't heard, Google Follower will be shut down July 1. So if you are following me now, or  would like to start following me you can use Bloglovin' to do so! 

Follow on Bloglovin


Patterned Posies Gift Set

Are you ready for Spring flowers but there are none in sight?  Make your own bright patterned flowers to cheer up your space and decorate for Spring!  This bunch of flowers, vase, and card wold also make a lovely gift set for someone special!  This project is also a fun class project!


This project was designed by me! 

If you would like to subscribe to the March edition of Craft Project Central and get 10 wonderful tutorials for only $10 then click HERE


Sunday, March 24, 2013

Blue and Butterflies Friday Mashup 102

Hello everyone! I have another Friday Mashup challenge to share with you! Take a look at the card I made. 


  • Stamps: Loving Thoughts, Flowering Flourishes
  • Card Stock: Night of Navy, Whisper White, Vellum
  • Ink: Pool Party, Tempting Turquoise, Midnight Muse, Night of Navy, Versamark
  • Accessories: Beautiful Wings Embosslit, Rhinestones, Paper Snips, Iridescent Ice embossing powder, Embossing Buddy, Heat Tool, Brayer, Stampin' Dimensionals, Glue Dots, Crystal Effects


So here is the "Mashup" Challenge:

1. Make a project using the "Sketch".
2Or Make a project using "Butterflies & Your Brayer".
3. Or "Mash it Up" and create a project with "your Brayer using the Sketch and add some Butterflies".


I started off with a piece of Night of Navy card stock cut at 5-1/2" x 8-1/2' and scored it at 4-1/4". Next I cut a piece of Whisper White card stock 3-3/4" x 5".  I used my brayer to add Pool Party ink in two opposite corners.


Then I brayered on Tempting Turquoise ink not covering the Pool Party entirely. 


Then I brayered on Midnight Muse ink not covering the Tempting Turquoise ink entirely. 


Finally I brayered on Night of Navy ink not covering the Midnight Muse ink entirely. 


I wanted to add a pretty swirl into the background so I stamped the large swirl from Flowering Flourishes onto the left side of the card stock in Versamark ink. I covered the stamped image with Iridescent Ice embossing powder, tapped of the excess, and heated it with the Heat Tool. Then I adhered this brayered panel onto a 3-7/8" x 5-1/8" piece of Whisper White card stock, then adhered the layer onto the card front. 


Next I cut a piece of Whisper White card stock 1/2" x 4" and stamped the greeting from Loving Thoughts onto the strip in Night of Navy ink. I used Paper Snips to cut one end into a dove-tail shape. I ran the strip across my bone folder to give it a little bit of wave. Then I used a combination of Glue Dots and Stampin' Dimensionals to adhere the banner onto the card front. 


I cut a piece of Vellum card stock 2" x 8-1/2' and ran it through the Big Shot two times in the Beautiful Wings Embosslit to cut out all the vellum butterflies. I added a little line of Crystal Effects in each location that I wanted a butterfly then pressed the butterfly into the glue. I allowed the Crystal Effects to cry completely then added Rhinestones into the center of each butterfly. 


The largest butterfly was strategically placed to cover up the end of the greeting strip. It's hard to see, but there is also one teeny tiny little butterfly at the end of the greeting banner. 


This was a really fun challenge. I hope you get a chance to play along. Head on over to the Friday Mashup to see what the rest of the design team has come up with! 


Saturday, March 16, 2013

Craft Project Central!

Oh Hello Box and Note Cards: 

This fun notepad holder is a perfect gift for anyone!  The little drawers can hold postage stamps, paper clips or a secret stash of candy!  This is a perfect box that can be re-used over and over again and can be showcased on your desk all year round.  Great for a stamp camp or class project too!


This wonderful project was designed by Monika! If you have a chance please head on over to Monika's blog or Craft Project Central and let her know how fabulous her project is! 

If you would like to subscribe to the March edition of Craft Project Central and get 10 wonderful tutorials for only $10 then click HERE


Friday, March 15, 2013

You're in My Thoughts Friday Mashup 101

Good morning! It’s Friday again! That means it’s time for another Friday Mashup challenge. This time we are using the chalkboard technique. Take a look at the card I made.


  • Stamps: Papaya Collage, Word Play, Make a Cake
  • DSP: Sycamore Street
  • Card Stock: Pool Party, Island Indigo, Basic Black
  • Ink: Whisper White Craft
  • Accessories: Paper Snips, Beautiful Wings Sizzlit, Vanilla Smooch Spritz, Rhinestones, Glue Dots, Sycamore Street Ribbon in Pool Party, Stampin’ Dimensionals, Stampin’ Sponge


Photo Source 
So here is the "Mashup" Challenge:

1. Make a project using the "Chalkboard Technique".
2Or Make a project using " 2 or more Stamp Sets".
3. Or "Mash it Up" and create a project using "2 or more Stamp Sets with the Chalkboard Technique". 


I started off by cutting a piece of Pool Party card stock 5-1/2” x 8-1/2” and scored it at 4-1/4”. Next I cut a piece of Island Indigo card stock 3-7/8” x 5-1/8” and a piece of Sycamore Street DSP 3-3/4” x 5”. I adhered the DSP onto the Island Indigo card stock, then adhered this onto the card front.

I seriously LOVE this Sycamore Street DSP! The patterns are just so bright, fun, and cheerful! I don’t what I’m going to do when it’s gone. Make sure you get plenty before Sale-A-Bration ends next Friday the 22nd!


Next I stamped the frame image from Papaya Collage onto a scrap of Basic Black card stock in Whisper White craft ink. I also stamped the greeting from Word Play and the tiny butterflies from Make a Cake in Whisper White craft ink. Then I simply sponged a little bit more craft ink randomly on the card stock to make it look more like a dirty chalkboard. I cut out the image with Paper Snips then added just a little shimmer with some Vanilla Shimmer Smooch Sptriz.


Then I wrapped a piece of Pool Party ribbon from the Sycamore Street ribbon and button pack around the frame and tied it into a bow. I adhered the frame onto the card front with a few Stampin’ Dimensionals. Just to add one more little detail I cut a scrap of Island Indigo card stock with my Beautiful Wings Embosslit in the Big Shot and adhered one of the little butterflies onto the corner of the frame with a Glue Dot then added a couple rhinestones for the butterfly’s body.


This technique is really fun and easy to do! If you have a chance head on over to the Friday Mashup and see what the rest of the design team has created. I hope you get a chance to play along with the challenge! 


Wednesday, March 13, 2013

Craft Project Central!

Vintage Spring Centerpiece: 

It’s time to get ready for Spring, and this centerpiece will definitely make any table look like Spring!  the centerpiece is made with Tea for Two fabric, and the candle jar is lit with a flameless candle.  There is absolutely no sewing involved in making this centerpiece.  This beautiful candle centerpiece would make a great gift for Mother’s Day, and would also be a fun class project!


This stunning project was created by Christy! If you have a chance please head over to Christy's blog or Craft Project Central and let her know how gorgeous her project is! 

If you would like to subscribe to the March edition of Craft Project Central and get 10 wonderful tutorials for only $10 then click HERE


Christmas Tag

I have several projects that I made before Christmas that I am sharing now. Here is a pretty tag that I made for a swap.


  • Stamps: Chock Full of Cheer, Bells and Boughs
  • Card Stock: Cherry Cobbler, Very Vanilla
  • Ink: Cherry Cobbler, Crumb Cake, Black Stazon
  • Markers: Lucky Limeade, Old Olive, Cherry Cobbler
  • Accessories: Decorative Label Punch, Gold Embossing Powder, Embossing Buddy, Heat Tool, Stampin’ Dimensionals, Cherry Cobbler Seam Binding ribbon, Crop-A-Dile, Corner Rounder Punch, Stampin’ Sponge, SNAIL Adhesive


For this cheerful Christmas tag I started off by cutting a piece of Cherry Cobbler card stock at 2-1/2” x 3-1/2” and a piece of Very Vanilla card stock at 2-1/4” x 3-1/4”. I used the Corner Rounder Punch on both pieces to make the pretty rounded corners.

I stamped the holly image from Bells and Boughs all over the Very Vanilla card stock in Crumb Cake ink then sponged around the edges of the card stock with Crumb Cake ink. I adhered this onto the Cherry Cobbler card stock and wrapped a piece of Cherry Cobbler Seam Binding ribbon around one end. I used a little bit of SNAIL Adhesive to adhere the ribbon ends in the middle of the tag.

Next I stamped the holly image onto a scrap of Very Vanilla card stock in Black Stazon ink and colored in the holly and the berries. I stamped the greeting from Bells and Boughs on top of the holly in Versamark ink. I covered the stamped image with Gold embossing powder, tapped off the excess, and heated it with my Heat Tool. After the embossing cooled I punched out the greeting with the Decorative label punch. I sponged around the edges of the label with Crumb Cake ink before adhering the label on top of the ribbon ends with a couple Stampin’ Dimensionals.


Now for the candy canes… I stamped the candy canes from Chock Full of Cheer onto a scrap of Very Vanilla card stock in Cherry Cobbler ink and cut them out with Paper Snips. I adhered the candy canes onto the tag with a few Stampin’ Dimensionals.  Now you could just use the Sensational Season stamp set and framelits from the Holiday Catalog to save on your cutting time, but I didn’t have that set at the time I made these.

You gotta have something to attach the tag with so I used the large side of my Crop-A-Dile to punch a hole in the top of the tag and added some more Cherry Cobbler Seam Binding ribbon.


I really like how this turned out. I’ve already got a matching card design in my head. Too bad I didn’t save one of these tags to use on a Christmas present. Maybe I’ll just have to make one more….


Tuesday, March 12, 2013

Scallop Envelope Box

This cute little box with its scalloped flaps is just the right size to hold a few little note cards or some candy. At the Make and Take the gals made these with a Reece’s candy inside. It fit just perfectly! Wouldn’t these make the cutest favors at a party?


  • Stamps: Four Frames, Bring on the Cake
  • DSP: Comfort Cafe
  • Card Stock: Summer Starfruit, Very Vanilla
  • Ink: Midnight Muse, Summer Starfruit
  • Accessories: Scallop Envelope Die, Decorative Label Punch, Paper Trimmer, Stampin’ Dimensionals, Sticky Strip

I started off by cutting two pieces of Summer Starfruit card stock 4-1/4” x 4-3/4”. I ran them both through the Big Shot, one at a time, on top of the Scallop Envelope Die.

Line up the score line for the bottom flap with the 1/2” mark on the Paper Trimmer and trim off the excess.

Place Sticky Strip onto the outside of the side flaps and bottom flap on one envelope. 

Cut a piece of Comfort Café DSP 2-1/8” x 3-1/8”. Adhere the DSP onto the envelope that will be on the front of your box.

Remove the Sticky Strip liner from the bottom flap of the envelope and adhere it onto the inside of the bottom flap on other envelope.

One at a time, remove the Sticky Strip liner from the side flap of the envelope and adhere it onto the inside of the side flap on the second envelope.  Repeat to adhere the other side.

On the side that has the DSP, add a Stampin’ Dimensional into the center of the scalloped flap. Remove the Stampin’ Dimensional liner and fold the flap down to adhere it in place over the DSP.

Stamp the frame from Four Frames onto a scrap of Very Vanilla card stock in Midnight Muse ink. Stamp the greeting from Bring on the Cake into the center of the frame in Summer Starfruit ink.

Punch out the frame with the Decorative Label punch and adhere it onto the box front with a couple Stampin’ Dimensionals.


That’s it! Now you have a sweet little candy box that is ready to give!