Monday, January 31, 2011

Elegant Breeze

Here is the card I created for the SCCSC sketch challenge on Stampin’ Connection. This week the sketch was created by Susie Nelson. Here is the sketch:
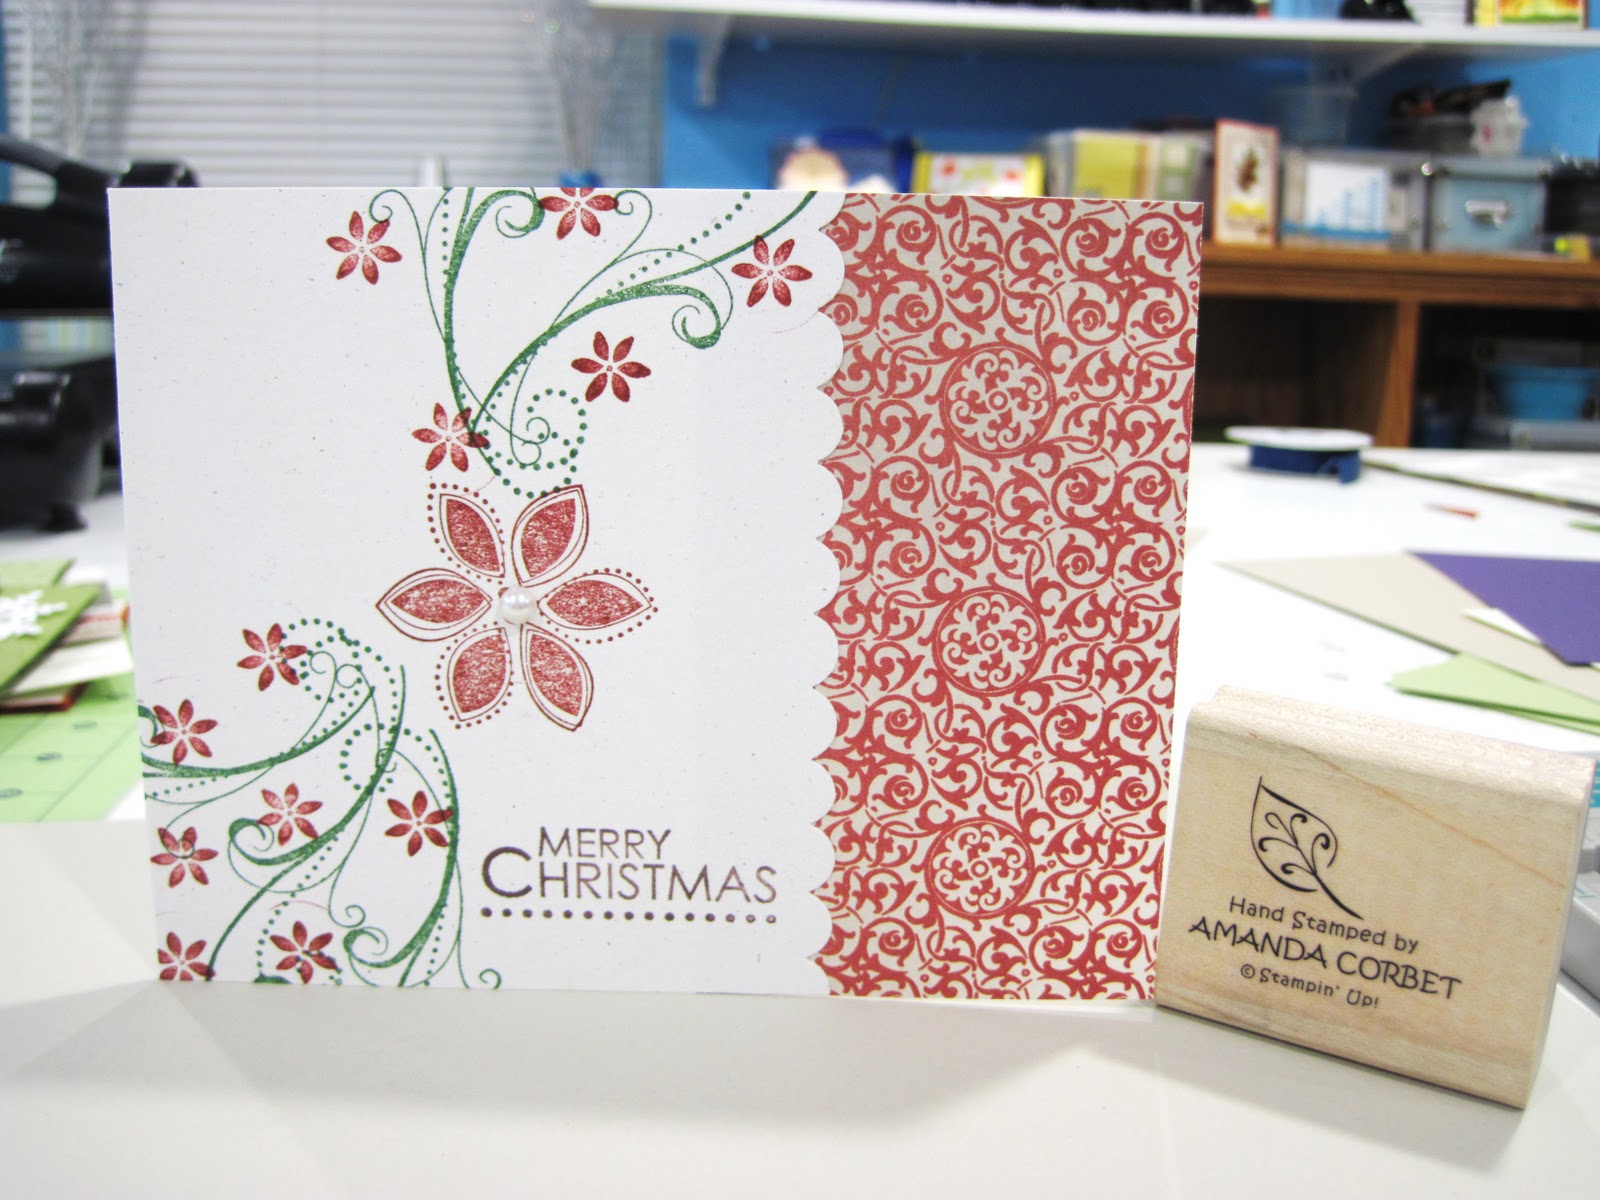

Here is my card:

Stamps: En Francais, Perfect Punches

Cardstock: Very Vanilla, Crumb Cake, Whisper White, Baja Breeze
DSP: Elegant Soiree
Ink: Crumb Cake, Baja Breeze
Accessories: Scalloped Oval Punch, 1 3/8” x 5/8” Oval Punch, Scallop Edge Border Punch, Bronze Brads, Stampin’ Dimensionals, Basic Pearls Jewel Accents, Two Way Glue Pen, Stampin’ Dimensionals, Needle Tool, Mat Pack.

The card base is Very Vanilla cardstock cut at 5 ½” x 8” and scored at 4 ¼”. The shorter side will be the card front. The card front was stamped with En Fraincais in Crumb Cake ink to create a background. A piece of Baja Breeze and Whisper White cardstock were cut at 1” x 5 ½” and punched with the Scallop Edge Border punch. Both of these were adhered together and then adhered behind the side of the card front.

A piece of Elegant Soiree DSP was cut at 3 ¾” x 5 ½” and then cut from one corner to the other corner to get the diagonal cut. This was adhered to the card front. A 3/16” x 7 ¾” piece of Crumb Cake cardstock was adhered just at the edge of the diagonal line of the DSP with a Two-Way Glue Pen. The ends were trimmed to meet the edge of the card.

The greeting from Perfect Punches was stamped on a scrap of Whisper White cardstock in both Baja Breeze ink and then Crumb Cake ink. The Crumb Cake one was punched out with the Scalloped Oval punch. The Baja Breeze image was punched out with the 1 3/8” x 5/8” Oval Punch and adhered on top of the Crumb Cake punched image. The Needle Tool and Mat Pack were used to pierce two holes in the ends of the scalloped oval and a bronze brad was added in each hole. The punched out greeting was adhered to the card front with a couple Stampin’ Dimensionals. Five Basic Pearls were added in the upper right hand corner of the card just to add a little bling.

If you are a Stampin’ Up Demonstrator you can find the sketch challenge thread here. If you are not a Stampin’ Up Demonstrator I would still love to see your creations. Please post a link to your card in the comments section of this post. This sketch was fun and simple to play along with. Thanks Susie! I hope others will get a chance to play along! Have fun stamping!

Sunday, January 30, 2011

Tree Trimmings Christmas Card – December Make and Take 1

I’m FINALLY getting around to posting the December Make and Take cards. I know that Christmas is long gone but these are too cute not to share. I hope you like them. Here is the first one. This cards was inspired by Julie Lablanc’s card that you can see here.


Stamps: Tree Trimmings, Heard From the Heart
Cardstock: Sahara Sand, Early Espresso, Very Vanilla, Cherry Cobbler
Ink: Early Espresso, Cherry Cobbler, Sahara Sand, Old Olive, Basic Black
Accessories: Tasteful Trim Die, White Gel Pen


The card base is Sahara Sand cardstock cut at 5 ½” x 8 ½” and scored at 4 ¼”. A piece of Very Vanilla cardstock was cut at 1 7/8” x 5 ½”. On the Very Vanilla cardstock strips the ornaments from Tree Trimmings were stamped in Cherry Cobbler, Old Olive, and Sahara Sand ink. The ornament strings were stamped in Early Espresso ink. This was adhered to a piece of Early Espresso cardstock cut at 2” x 5 ½”.

A strip of Cherry Cobbler cardstock was cut at 1” x 5 ½” and ran through the Big Shot on the Tasteful Trim die to get those wonderful large scallops.

The greeting from Heard From The Heart was stamped in Cherry Cobbler ink at the top of the card. Then the ornament panel was adhered to the card front just under the greeting. The scalloped Cherry Cobbler cardstock was adhered just below the ornament panels. The White Gel Pen was used to add little white dots between the scallops.

This is a pretty quick and simple card to make but looks like it took a lot more time. One of the things I love most is making Christmas cards which is why the ladies at the make and take got to make so many this last year. Come back tomorrow to see the second card from the December Make and Take. Have fun stamping!

Friday, January 28, 2011

Season of Joy Christmas Card Class

Back in November I hosted a Christmas Card Class where the guests each got a Season of Joy stamp set and made 10 christmas cards with envelopes. The ladies all loved it! Here are the projects that we made and the supplies that were used. The only stamp set used was Season of Joy. Take a look:

Cardstock: Naturals White, Pear Pizzaz, Cherry Cobbler
Ink: Pear Pizzaz, Early Espresso
Accessories: Scallop Trim Border Punch, Tombow Multi-Purpose Adhesive, Gold Glass Glitter


Cardstock: Whisper White, Always Artichoke, Cherry Cobbler
Ink: Basic Black, Riding Hood Red
Accessories: Scallop Edge Border Punch


Cardstock: Very Vanilla, Real Red
Ink: Real Red, Early Espresso
DSP: Jolly Holiday


Cardstock: Sahara Sand, Whisper White, Old Olive
Ink: Old Olive, Chocolate Chip
Accessories: Petals A Plenty Textured Impressions Die, Brayer, 1 3/4" Circle Punch, 1/8" Real Red Taffeta Ribbon, Chocolate Chip Marker, Stampin' Sponge, Stampin' Dimensional


Cardstock: Naturals White
DSP: Deck The Halls
Ink: Garden Green, Cherry Cobbler, Chocolate Chip
Accessories: Scallop Edge Border Punch, Basic Pearls Jewel Accents


Cardstock: Basic Grey, Whisper White, Real Red, Basic Black
Ink: Basic Black
Accessories: Petals A Plenty Textured Impressions Die, Snowflake Punch, Ticket Corner Punch, Silver Brad, Stampin' Dimensionals


Cardstock: Night of Navy, Bashful Blue, Whisper White, Marina Mist
Ink: Night of Navy
Accessories: Square Lattice Textured Impressions Die, Northern Flurries Textured Impressions Die, Decorative Label Punch, Silver Glass Glitter, Brayer, Stampin' Dimensionals, Night of Navy and Marina Mist Markers


Cardstock: Pink Pirouette, Melon Mambo, Early Espresso
Ink: Pink Pirouette, Whisper White Craft, Early Espresso
Accessories: Scallop Trim Border Punch


Cardstock: Very Vanilla, Old Olive, Cherry Cobbler
DSP: Jolly Holiday
Ink: none
Accesories: 2 3/8" Scallop Circle Punch, 1 3/4" Circle Punch, Crimper, Needle Tool, Mat Pack, Stampin' Dimensionals, Crumb Cake and Old Olive Markers.


Cardstock: Elegant Eggplant, Basic Black, Whisper White
Ink: Elegant Eggplant, Concord Crush, Basic Black
Accessories: Northern Flurries Strip Die


The ladies had a blast making all of these cards with their very own stamp set! It just goes to show you that not only can one stamp set be very versatile, but that you can make simple christmas cards that look great! I intend on doing somthing similar this year when Christmas time gets closer. I may even offer a kit online for those who want to play but aren't close to the Leavenworth Kansas area. Have fun stamping!

Monday, January 24, 2011

Beautiful Blossom

It's Monday again! That means its time for another wonderful sketch challenge. This week's sketch was created by Liz Goldhawk and is a lot of fun! Take a look:


At first I thought that this would be a tough one to do, but once I got started it really came together rather quickly. Here is my card:


Stamps: Build-A-Blossom, Elements of Style, Apple Blossoms
Cardstock: Naturals White, Whisper White, Marina Mist, Pear Pizzaz, Crumb Cake, Baja Breeze, Daffodil Delight, Bashful Blue
DSP: Greenhouse Gala DSP
Ink: Pear Pizzaz, Old Olive, Crumb Cake, Marina Mist, Early Espresso
Accessories: Blossom Petals XL Punch, Scallop Edge Border Punch, ½” Circle Punch, 1 ¾” Circle Punch, Two-Way Glue Pen, Stampin’ Dimensionals, 5/8” Marina Mist Grosgrain ribbon, Glimmer Brad, Word Window Punch, Needle Tool, Mat Pack, Silver Brads

The card base is 5 ½” x 8 ½” Naturals White cardstock scored at 4 ¼”. The edges of the card were sponged all the way around with Early Espresso ink. A piece of Greenhouse Gala DSP was cut at 1” x 4 ¼”, sponged with Early Espresso ink, and adhered to the left side of the card front. Another piece of Greenhouse Gala DSP was cut at 2” x 4 ¼”, sponged with Early Espresso ink, and adhered to the left side of the card front. Two 1 ¾” circles were punched from Baja Breeze cardstock. The Edges were sponged with Early Espresso ink and adhered to the card front.

A piece of Crumb Cake cardstock was cut at 3 ¼” x 4 ¼”. This piece was stamped with the flourish from Elements of Style in Crumb Cake ink to create a soft background. The edges were sponged with Early Espresso ink and this piece was set aside.
A piece of Whisper White cardstock was cut at 2” x 3 ½”. The top and bottom edges were punched with the Scallop Edge Border punch. The leaves from Apple Blossoms were stamped first in Pear Pizzaz ink, stamped three times without re-inking, and then in Old Olive ink two times without re-inking. The edges were sponged with Early Espresso ink. This piece was adhered to the Crumb Cake panel with a piece of 5/8” Marina Mist Grosgrain ribbon adhered just under the edge of stamped Whisper White cardstock. The Needle Tool and Mat Pack were used to punch three holes in the bottom right hand corner of the panel and three silver brads were added. This layer was then adhered to the card front. The Marina Mist ribbon end was trimmed and adhered to the card front.
The sentiment from Apple Blossoms was stamped in Marina Mist ink on a scrap of Whisper White cardstock and punched out with the Word Window punch. The edges were sponged with Early Espresso ink and adhered to the card front with Stampin’ Dimensionals to pop it up off the card.

Six flower petals from Build-A-Blossom were stamped in Marina Mist ink on a scrap of Bashful Blue cardstock. Two leaves were stamped in Old Olive ink on scraps of Pear Pizzaz cardstock. Both the petals and leaves were punched out with the Blossom Petals XL Punch. The flower center was stamped in Daffodil Delight ink on a scrap of Daffodil Delight cardstock and punched out with the 1/2” circle punch.

The flower petals, leaves, and center were adhered together using a Two-Way Glue Pen. The Needle Tool and Mat Pack were used to pierce a hole through the flower center. This takes quite a bit of effort to get through all those layers of cardstock. Then a green Glimmer Brad from the Brights collection was added to the center of the flower. The flower was adhered to the card front with Stampin’ Dimensionals.

That’s it! Thanks Liz for the fabulous sketch it really was a lot of fun to play with! I hope you get a chance to play along with this sketch. If you are a Stampin’ Up Demonstrator you can find the sketch challenge thread here. If you are not a Stampin’ Up Demonstrator I would still LOVE to see your creations. Please post a link to your card in the comments section of this post. I hope everyone has a wonderful week! Have fun stamping!

Monday, January 17, 2011

Photo To Share

Okay... I just HAD to share this photo. As I've mentioned before my husband is taking lessons to earn his Private Pilots License and is almost done. Well late last month I was able to ride with him and his instructor and got this great photo. It was too good not to share. I'm by no means a professional photographer but this one turned out pretty good for just a point and shoot camera. That's all... I just wanted to share because I'm so excited about how well this turned out. I'm thinking of getting it printed on a large canvas and framed to put in my hubby's office. You can click on the photo to view it larger.

Love You Much Owl

I finally had a chance to complete my card for the sketch challenge. If you didn't see the post for the sketch challenge you can find it here. Here is my card:


Stamps: Well Scripted (retired), Punch Potpourri
Cardstock: Pink Pirouette, Basic Grey, Whisper White, Cherry Cobbler, Sahara Sand, Basic Black
DSP: Love Impressions Specialty Designer Paper
Ink: Melon Mambo, Pink Pirouette, Whisper White Craft
Accessories: Vintage Wallpaper Textured Impressions Die, Heart Punch, 2 3/8" Scalloped Circle Punch, 1 3/4" Circle Punch, Two-Step Owl Punch, Dotted Scalloped Ribbon Border Punch, Curly Label Punch, Candy Cane Big Designer Buttons (retired), 1/8" Real Red Taffeta Ribbon, Stampin' Dimensional, Mini Glue Dots, Two-Way Glue Pen

The card base is Pink Pirouette cardstock cut at 4 1/4" x 11" and scored at 5 1/2". The front of the card was run through the Big Shot in the Vintage Wallpaper Textured Impressions Die. I used the Whisper White Craft ink pad directly onto the paper to ink the raised portions of the texture and let the ink dry. A piece of Love Impressions DSP was cut at 2" x 4 1/4" and adhered to a piece of Basic Grey cardstock cut at 2 1/4" x 4 1/4". This was adhered to the card front. The Dotted Scalloped Ribbon Border punch was used with Whisper White cardstock. I used the Pink Pirouette ink pad directly onto the punched ribbon to give it a little color and adhered this piece to the DSP with a Two-Way Glue Pen.

The sentiment from Well Scripted (retired) was stamped in Melon Mambo ink on a scrap of Whisper White cardstock and punched out with the Curly Label punch. This was adhered to the left side of the card with the bottom just behind the Basic Grey cardstock. I used the Two-Step Owl punch with Basic Grey, Love Impressions DSP, Sahara Sand, Whisper White, Basic Black, and Pink Pirouette cardstock to punch out the elements of the owl. The owl was glued together with the Two-Way Glue Pen and adhered to the card front just above the curly label with the sentiment.

The 2 3/8" Scalloped Circle punch was used with Cherry Cobbler cardstock to get the large scalloped circle. The 1 3/4" Circle punch was used with another pattern of the Love Impressions DSP. The DSP circle was adhered to the center of the scalloped circle and then adhered to the card front. Some 1/8" Real Red Taffeta ribbon was threaded through a red Candy Cane Big Designer Button and tied into a knot. The button was added on top of the DSP circle with a few Mini Glue Dots.

The heart from Punch Potpourri was stamped in Melon Mambo ink on a scrap of Pink Pirouette cardstock and punched out with the Heart punch. This was adhered to the card front with a few Stampin' Dimensionals. That completes this card.

I didn't realize until I was working on the card that I used a lot of punches in this sketch. But I really do like the combination and spacing of the elements and texture on the card. I hope you get a chance to play along with the sketch! Have fun stamping!

Monday Sketch Challenge!

Here is the sketch challenge for this week! There is no time limit so feel free to play along whenever you get a chance. You don't have to create a card identical to the sketch, the sketch is just to inspire your creativity. Take a look!


If you are a Stampin' Up Demonstrator you can find the sketch challenge thread here. If you are not a Stampin' Up Demonstrator I would still love to see your creations! Please post a link to your card in the comments section of this post. I will post my card later today. Have fun stamping! 

Wednesday, January 12, 2011

9 Square Valentine

I finally have had a chance to play with the sketch challenge from Monday that was created by Susie Nelson. Here is the sketch:
And here is my card:


Stamps: I (heart) Hearts, Perfect Punches, Bella Toille
Cardstock: Sahara Sand, Whisper White, Pink Pirouette, Pretty in Pink, Melon Mambo
Ink: Early Espresso, Pink Pirouette, Melon Mambo, Cherry Cobbler
Accessories: Curly Label Punch, Decorative Label Punch, Vintage Wallpaper Textured Impressions Die, Square Lattice Textured Impressions Die, Glimmer Brads, Crochet Flower (retired), Pretty in Pink Epoxy Brads (retired), Stampin' Dimensionals, Mini Glue Dots, Sponge Daubers, Needle Tool

The card base is Sahara Sand cardstock cut at 5 1/2" x 11" and scored at 5 1/2". The card front was stamped with the Bella Toille background stamp in Early Espresso ink. I stamped the hearts from I (Heart) Hearts in both Pink Pirouette and Melon Mambo on scraps of Whisper White cardstock. I punched 6 of these out with the Curly Label punch. I took two scraps of paper and ran them through the Big Shot. One was used with the Square Lattice Textured Impressions Die and then inked direct to paper with Pink Pirouette. The other was ran through the Vintage Wallpaper Textured Impressions die and inked direct to paper with Melon Mambo.

After the ink dried two labels were punched using the Curly Label punch. The edges of all the stamped Whisper White curly labels were sponged with Cherry Cobbler ink on a Sponge Dauber. Four labels were punched with the Curly Label punch from Melon Mambo cardstock and four labels were punched with the Curly Label punch in Pink Pirouette cardstock. The edges of all eight of the curly labels were sponged with Early Espresso ink with a Sponge Dauber. The colored labels were adhered behind the stamped labels and then adhered to the card front starting with the center label.

The Decorative Label punch was used with Pretty in Pink cardstock to punch one label. The edges were sponged with Early Espresso ink. The sentiment was stamped from Perfect Punches in Early Espresso ink on a scrap of Whisper White cardstock. A heart from I (Heart) Hearts was stamped in Pink Pirouette ink over the greeting. The greeting was punched out with the Curly Label punch and the label was adhered to the Pretty in Pink decorative label. The Needle Tool was used to pierce one hole at the top and bottom of the decorative label punch. Two black Glimmer Brads were added in the holes. Stampin' Dimensionals were adhered to the back of the decorative label and the label was adhered to the card front.

As a finishing touch a Pretty in Pink Epoxy Brad (retired) was added to the center of a Crochet Flower (retired) and then adhered to the top left hand square with Mini Glue Dots. This sketch layout was a lot more difficult to work with than I had anticipated. I hope you get a chance to play along with this challenging sketch!

If you are a Stampin' Up Demonstrator you can find the sketch challenge thread here. If you are not a Stampin' Up Demonstrator I would still LOVE to see your creations! Please post a link to your card in the comments section of this post! Have fun stamping!


Thursday, January 6, 2011

Blueberry Crisp Flowers

I finally had the chance to play with the sketch challenge SCCSC48 created by Liz Goldhawk. Here is her sketch:


And here is my card:


Stamps: Silhouette Sentiments (Level 1 hostess)
Cardstock: Night of Navy, Whisper White, Marina Mist
DSP: Blueberry Crisp
Ink: Marina Mist, Pacific Point, Night of Navy
Accessories: Pretties Kit (retired), White Gel Pen, 5/8" x 1 3/8" Oval Punch, Decorative Label Punch, Circle Scissors, Dazzling Diamonds glitter, Tombow Multi-Purpose Adhesive, Aquapainter, Reinkers: Night of Navy, Pacific Point, Bashful Blue, Heat Gun 

The card base is Night of Navy cardstock cut at 5 1/2" x 11" and scored at 5 1/2". The next layer is Whisper White cardstock cut at 5 1/4" x 5 1/4". The DSP squares were cut at 2" x 2". The DSP squares were adhered to the Whisper White cardstock alternating patterns. I then used the Circle Scissors to cut two 4 1/4" circles from the Blueberry Crisp DSP. I then cut each circle into four pieces. The DSP "pie pieces" were adhered on top of the squares alternating the patterns. Only three squares recieved a "pie piece". The last square remains blank.

I then took four flowers from the Pretties Kit (retired) and first sponged the entire flower with Night of Navy, Marina Mist, and Pacific Point ink. I only used one color on each petal, but alternated the petals for a varied look. After sponging them I placed the flower petals in a plastic container and spritzed them with water until they were fairly saturated. I then used a few drops of re-inker color in Night of Navy, Pacific Point, or Bashful Blue (after I realized that I didn't have a Marina Mist reinker) depending on which flower I was working on.

I just put the drops of reinker on a plastic container lid and picked up a little at a time on the tip of the Aquapainter. You just have to touch the end of the petal with the inked Aquapainter tip and the color travels up the petal in the most beautiful way. The heat gun was used to dry the flowers quickly. On the four petal flower I added some Tombow Muti-Purpose Adhesive around the edges of the petals and sprinkled on some Dazzling Diamonds glitter to give this flower a little sparkle.


A Needle Tool was used to pierce a hole in the center of the DSP where the points meet. A rhinestone brad from the Pretties Kit (retired) was used to fasten the flower petals to the card front. The panel with the flower and DSP was adhered to the card front. I stamped the greeting from Silhouette Sentiments in Pacific Point ink on a scrap of Whisper White cardstock. The flower was stamped next to the greeting in Pacific Point ink by stamping off before stamping onto the cardstock.

The greeting was punched out with the 5/8" x 1 3/8" Oval Punch. I also punched a decorative label from Marina Mist cardstock with the Decorative Label Punch. The decorative label was cut in half. Then the edges of the decorative label and greeting oval were sponged with Pacific Point ink. The oval was adhered to the decorative label. The White Gel Pen was used to add white dots around the outside edge of the decorative label. The label was then adhered to the card front.

This card took a while to make, but it was well worth the effort. It was so much fun playing with this sketch challenge. If you are a Stampin' Up Demonstrator you can find the Sketch Challenge thread here. If you are not a Stampin' Up Demonstrator I would still love to see your cards. Please post a link to your creation in the comments section of this post. Have fun stamping!!!!

Tuesday, January 4, 2011

The Occasions Mini is HERE!!!!!!!

Today the Occasions Mini Catalog is released. I just know you love many of the things inside! I do!


Take a look at the Occasions Mini Catalog in PDF format by clicking here. Or you can shop the items available in the Occasions Mini Catalog online 24/7 by clicking here!

Fall Gift Card Holder Card - November Make and Take 4

Today I have for you the fourth November Make and Take project. I didn't get a chance to play with the sketch from yesterday. I hope to do that tonight so you can see the sketch and my card tomorrow. This card is the more masculine card. Take a look:


Stamps: Autumn Splendor, Teeny Tiny Wishes
Cardstock: Cajun Craze, Whisper White, Watercolor Paper
Ink: Daffodil Delight, Cajun Craze, Pumpkin Pie, Black Stazon
Accessories: Swirls Texturez Plate, Aqua Painter, Stampin' Sponge, 1/8" Pumpkin Pie Taffeta Ribbon, Chocolate Chip Marker

The card base is Cajun Craze cardstock cut at 4 1/4" x 8 1/2" and scored at 4 1/4". The next layer is Whisper White cardstock cut at 4 1/8" x 4 1/8" that was run through the Big Shot on the swirls Texturez plate. The greeting from Teeny Tiny Wishes was stamped in Cajun Craze ink in the bottom right hand corner of the Whisper White cardstock and it was adhered to the card front.

The next layer is Cajun Craze cardstock cut at 3 3/4" x 5 1/2" and scored at 2 3/4". The cardstock was folded on the score line and the back was adhered to the card front close to the top of the card. Since I already had them I added a 2 5/8" x 3 5/8" envelope on the inside of the flap. You could also add a small strip at the bottom of the inside with 1/4" red tape and it would still work to hold the gift card.

The Watercolor Paper was cut at 2 1/2" x 3 1/2". The leaf from Autumn Splendor was stamped in Black Stazon. The leaf was colored in by using the ink pad and Aqua Painters with Daffodil Delight, Pumpkin Pie, and Cajun Craze. The edges were sponged with Pumpkin Pie and Cajun Craze ink and the panel was adhered to the card front. A piece of 1/8" Pumpkin Pie Taffeta ribbon was tied around the entire card front. The ribbon was left loose so that while its over the leaf flap it holds the flap closed hiding the gift card inside. You just slide the ribbon down the card and you can open the flap. Here you can see the inside of the flap:


This is so much fun having a regular card and a gift card holder all in one. Come back tomorrow to see what I have to share with you! Have fun stamping!