Friday, June 28, 2013

At the Beach!

Not really…I wish I were though. But seeing as I’m in Kansas I would have to travel a really long distance to go to a beach. It doesn’t happen very often. This week’s Friday Mashup is all about the beach! 
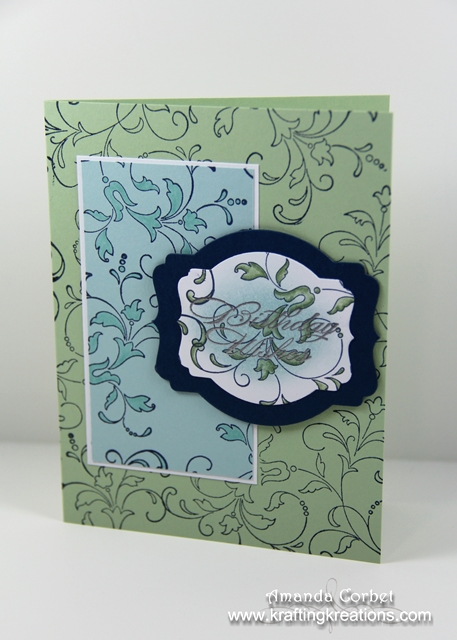
Take a look at the card I made!


  • Stamps: Rain or Shine, Teeny Tiny Wishes, Oh Whale!
  • DSP: Summer Starfruit DSP (retired), Silver Glimmer Paper
  • Card Stock: Island Indigo, Whisper White
  • Ink: Pool Party, Tempting Turquoise, Pacific Point, Early Espresso, Sahara Sand, Baked Brown Sugar, Strawberry Slush, Island Indigo, Illuminate Versamark
  • Markers: Early Espresso, Strawberry Slush, Raspberry Ripple
  • Accessories: Paper Snips, Rhinestones, Stampin’ Dimensionals, 2-Way Glue Pen, Cloudy Day embossing folder (retired), Festive Piercing Pack, Paper-Piercing Tool, Stampin’ Pierce Mat, Aqua Painter, Soft Sky re-inker, Stampin’ Sponge, Color Spritzer Tool, Deco Labels Framelits, Post-It Notes


Here's your Mashup Challenge:
  1. Create a project using the "Masking Technique".
  2. Create a project with some "Beach elements".
  3. Or Mash it Up and create a "Beach'y project using Masking".

I had such.. a… hard… time with this card! I though over the challenge and didn’t get started on it until the day before I needed to have it up on the Friday Mashup site. I was in such a hurry that I didn’t take any step-by-step photos. Sometimes I’m just stumped what to do for a challenge. I seriously stood at my craft table for a good 20 minutes just trying to figure out where to start. I kinda freaked out a little bit… “I don’t have any beach themed stamps!!!” Eeek!

I started out with a piece of Island Indigo card stock cut at 4-1/4” x 11” and scored it at 5-1/2”. I took my Festive Piercing Pack, Paper-Piercing Tool, and Stampin’ Pierce Mat and pierced the largest label shape that would mostly fit on the card front. Next I cut a piece of Summer Starfruit DSP 2” x 5-1/2”. I adhered the DSP onto a 2-1/8” x 5-1/2” piece of Whisper White card stock then adhered this onto the card front.

I knew I wanted to use the new Deco Labels framelits so I used the third from smallest framelit and ran it through the Big Shot with a scrap of Whisper White card stock. I took a long Post-It Note and tore the sticky edge to create the edge of my sand and placed this on the bottom of my card stock. I placed another Post-It Note covering the top half starting right where I wanted my horizon line to be.

I brayered on Pool Party; then brayered on Tempting Turquoise ink not covering the Pool Party entirely; then brayered on Pacific Point ink not covering the Tempting Turquoise entirely to make my ocean. With the Post-It Notes still in place I stamped the waves from Oh Whale! Onto the ocean in Island Indigo, Pool Party, and Illuminate Versamark to give some different colored layers to the ocean.


Next I removed all the Post-It Notes. For the sand I sponged on some Sahara Sand ink. I used my torn Post-It Note as a mask to add some sandy hills with more Sahara Sand ink and a little bit of Baked Brown Sugar ink. I just placed the Post-It Note over the ocean portion and used my Early Espresso Marker with my Color Spritzer Tool to add the speckles to the sand. Now the Post-It Notes can go in the trash.

I ran the image panel through the Big Shot with just the sky portion inside the Cloudy Day embossing folder. Then I used my Aqua Painter filled with rubbing alcohol to lightly apply some Soft Sky ink around the cloud shapes. Finally I stamped the greeting from Teeny Tiny Wishes into the sand in Early Espresso ink.


At this point the image panel looked great, or as good as it was gonna get, but I wanted to add some more depth to the card. So I sponged some Early Espresso ink around the image panel and around the card front. That did the trick!

I had a small piece of Silver Glimmer Paper sitting around that was a little less than 1/8” wide. I cut a short piece of off it and adhered it onto the image panel with some 2-Way Glue Pen to make my amazing beach umbrella handle.

This is the part where I was really stumped. I wanted to use some punches to make a totally cute beach umbrella, but after wasting about an hour I just grabbed my Rain or Shine stamp set and stamped the umbrella in Strawberry Slush ink. I added some shadows with my Strawberry Slush and Raspberry Ripple markers, cut out the umbrella with Paper Snips, and adhered it on top of the glimmer umbrella handle with a Stampin’ Dimensional. I added a small Rhinestone onto the top of the umbrella just for a tiny bit more sparkle.


I like how this one turned out, but boy was it a process to get to the finished product. 


Thursday, June 27, 2013

Rain or Shine

This card was from a previous Make and Take. I think it was during April. I’m so behind on posting the Make and Take cards. So several of the ones you’ll see soon use product that is now retired.


  • Stamps: Rain or Shine, Oh Hello
  • DSP: Tempting Turquoise
  • Card Stock: Tempting Turquoise, Real Red Whisper White
  • Ink: Daffodil Delight, Tempting Turquoise, Real Red, Soft Suede
  • Accessories: Ovals Framelits, Stampin’ Dimensionals, Dazzling Details, Paper Snips


I started off with a piece of Tempting Turquoise card stock cut at 5-1/2” x 8-1/2” and scored at 4-1/4”. Next I cut a piece of Temping Turquoise striped DSP 2” x 5-1/2” and adhered it onto a 2-1/8” x 5-1/2” piece of Whisper White card stock before adhering it onto the card front.

Next I cut a piece of Whisper White card stock 2-3/4” x 4”. I stamped the chevron oval from Oh Hello onto the card stock in Daffodil Delight ink. Then I stamped the umbrella on top of the chevrons in Real Red ink and the umbrella handle in Soft Suede ink. I cut out the oval with the 3rd from smallest Oval Framelit. I cut a piece of Real Red card stock 3” x 4” and ran it through the Big Shot with the 4th from smallest Oval framelit. I adhered the layers together then adhered the oval layer onto the card front with a few Stampin’ dimensionals.


For the greeting I cut a piece of Whisper White card stock 3/4” x 3” and stamped the greeting in Tempting Turquoise ink. I used Paper Snips to trim both ends of the greeting strip into a dove-tail shape then curled the banner around my fingers to give it a little bit of shape. I adhered the banner onto the chevron oval with a couple Stampin’ Dimensionals.


Finally, because every card just HAS to have a little bit of sparkle, I added some Dazzling Details onto the dots of the umbrella. That’s it! Bright, fun, and simple! 


Wednesday, June 26, 2013

Craft Project Central!

Spring Garden Ensemble: 

It’s time to dig in the dirt and enjoy the growth and abundance of Spring!!!!  What better way to express your appreciation than to share this Spring Gardening Ensemble with someone! This ensemble features a decoupage clay pot, a burlap seed packet holder, a small gift card and some adorable heat-embossed ladybug rocks to ornament your garden.  Any one of these projects, individually, would make for a wonderful small class or stamp camp!


This fun and beautiful project was designed by Michelle! If you have a chance head on over to Michelle's blog and let her know how wonderful her project is! 

If you would like to subscribe to the June edition of Craft Project Central and get 10 wonderful tutorials for only $10 then click HERE!


Monday, June 24, 2013

Craft Project Central!

Patriotic Wreath and Card: 

This blossom patriotic wreath is perfect decor for the summer!  Put it on your door or add it to the wall! A great gift for that 4th of July BBQ!  Change up the colors and theme and you have a beautiful wreath and matching card for any occasion any time of the year!  Makes for a fun class project too!


This beautiful and fun wreath was designed by Heidi! If you have a chance head on over to Heidi's blog and leave her a comment on her project. 

If you would like to subscribe to the June edition of Craft Project Central and get 10 wonderful tutorials for only $10 then click HERE!


Friday, June 21, 2013

It's Triple Time!

We’re having fun with the Triple Time Stamping technique over at the Friday Mashup today! Click HERE to see the tutorial that I posted yesterday on this technique. So here is what I made for this fun challenge!


  • Stamps: Everything Eleanor, Sassy Salutations
  • Card Stock: Crumb Cake, Summer Starfruit, Pacific Point, Whisper White, Daffodil Delight
  • Ink: Crumb Cake, Pacific Point
  • Accessories: Silver Glimmer Paper, Brights Buttons (retired), Early Espresso Baker’s Twine, Labels Framelits, Ovals Framelits, Stampin’ Dimensionals, Paper-Piercing Tool, Stampin’ Pierce Mat, Festive Paper-Piercing Pack, Glue Dots, 2-Way Glue Pen


Photo Source
Here's your Mashup Challenge:
  1. Create a project using 3 of the following colors "Crumb Cake, Summer Starfruit, Pacific Point or Daffodil Delight".
  2. Create a project with the "Triple Time Stamping Technique".
  3. Or Mash it Up and create a "Triple Time Stamped Project with 3 of the above colors".

I started off by cutting a piece of Crumb Cake card stock 5-1/2” x 8-1/2” and scored it at 4-1/4”. Next I used the second from smallest Labels framelit and the third from smallest Ovals framelit and ran both through the Big Shot with a scrap of Whisper White card stock. I applied 2-Way Glue Pen onto the back of the die cut shapes, allowed the glue to dry until it was clear, then adhered them on the card front. I stamped the swirls from Everything Eleanor all over the card front in Crumb Cake ink.

I peeled back up the Whisper White pieces.  I cut a piece of Daffodil Delight card stock 1/2” x 5-1/2” and adhered it onto the bottom of the card front. I cut a piece of Silver Glimmer Paper (because it’s gotta be sparkly!) 1/4” x 5-1/2” and adhered it on top of the Daffodil Delight strip.

For the oval mat I used the fourth from smallest oval framelit and ran it through the Big Shot with a scrap of Summer Starfruit card stock. I adhered the stamped oval onto the Summer Starfruit oval.  I adhered the oval onto the left side of the card front with Stampin’ Dimensionals. Make sure to line up your stamped images!


For the label mat I used the third from smallest Labels framelit and ran it through my trusty Big Shot with a scrap of Pacific Point card stock. I adhered the stamped label onto the Pacific Point label. Then I used my Paper-Piercing Tool, Stampin’ Pierce Mat, and Festive Paper-Piercing Pack to pierce holes around both label shapes. I adhered the label onto the card front with Stampin’ Dimensionals, making sure that the right side of the label overlapped the oval. Make sure to line up your stamped images!


Finally I cut a small piece of Early Espresso baker’s twine and treaded it through the holes of a Daffodil Delight Brights button (one of the old ones) and tied it into a bow. I adhered the button onto the bottom of the oval with a Glue Dot.


That’s it! If you have a chance head on over to the Friday Mashup to see the wonderful creations that the rest of the design team came up with and to add your project! 


Wednesday, June 19, 2013

A Different Triple Time Stamping Technique

I’m sure many of you have seen the Triple Time Stamping cards that have flooded the card galleries online. They have three panels in graduating sizes each centered on top of the other with a colorful mat. They are beautiful! But I want to share with you how you can use the same concept to stamp on two, three, or more layers and not have them centered. The concept is simple really.


  • Stamps: Creative Elements, Bring on the Cake
  • Card Stock: Pistachio Pudding, Whisper White, Soft Sky, Night of Navy
  • Ink: Night of Navy, Soft Sky, Versamark
  • Accessories: Deco Labels Framelits, 2-Way Glue Pen, Pistachio Pudding Marker, Stampin’ Dimensionals, Sponge Dauber, Silver embossing powder, Embossing Buddy, Heat Tool, Rhinestones


I started off by cutting a piece of Pistachio Pudding card stock 5-1/2” x 8-1/2” and scored it at 4-1/4”. Next I cut a piece of Soft Sky card stock 2” x 3-3/4”. Then I cut a piece of Whisper White card stock 2-1/4” x 2-1/2” and ran it through the Big Shot with the smallest Deco Labels framelits. Now I have all the pieces that I want to be stamped ready to go. Apply 2-Way Glue Pen onto the backside of the pieces and allow the glue to dry until it is clear. Position your pieces on your card front right where you want them.


Now take your stamp, ink it up, and stamp it all over your card front. In this case I used Creative Elements in Night of Navy ink. Now you can pull your pieces off the card front.


Next cut a mat for each of your layers (other than your card front). So I cut a piece of Whisper White card stock 2-1/8” x 3-7/8” and adhered it behind the Soft Sky card stock. I adhered this panel back onto the card front making sure to line up the stamped images on the card base with the images on the Soft Sky card stock. I cut a piece of Night of Navy card stock 2-3/4” x 3” and ran it through the Big Shot with the second from smallest Deco Labels framelit.


You can decorate each piece however you choose. I wanted to add some more detail to the stamped images so I colored in portions of the images with Pool Party on the Soft Sky card stock and Pistachio Pudding on the Whisper White label. Next I stamped the greeting from Bring on the Cake onto the label in Versamark ink, covered the stamped image with Silver embossing powder, tapped off the excess, and heated it with my Heat Tool. The greeting still wasn’t standing out very much so I used a Sponge Dauber to sponge some Soft Sky ink around the greeting giving it a halo effect. I adhered the label onto the card front with Stampin’ Dimensionals.


No matter how many layers you have you can still use this wonderful technique. Just make sure that you have a mat for each layer on the card. I hope you give this fun technique a try! 


Monday, June 17, 2013

Faux Tile Trees Tutorial

Hello everyone! I hope you all had a wonderful Father’s Day! Today I’m going to share with you the card that I gave my Dad for Father’s Day. It’s also the second card that I made for the Friday Mashup challenge last week.


  • Stamps: Lovely as a Tree, Something to Celebrate, Woodgrain
  • Card Stock: Baked Brown Sugar, Early Espresso, Very Vanilla, Early Espresso Core’Dinations
  • Ink: Sahara Sand, Black Stazon, Baked Brown Sugar
  • Re-Inker: Soft Suede, Gumball Green
  • Accessories: Aqua Painter, Early Espresso Marker, Champagne Glimmer Paper, Stampin’ Dimensionals, Sanding Block, 2-Way Glue Pen, Gold Embossing Powder, Heat Tool, Embossing Buddy, Woodgrain embossing folder


I started off by cutting a piece of Baked Brown Sugar card stock 5-1/2” x 8-1/2” and scored it at 4-1/4”. I stamped one half of the card front with the Woodgrain Background stamp in Baked Brown Sugar ink. Next I cut a piece of Early Espresso Core’dinations card stock 4” x 3". I ran this through the Big Shot in the Woodgrain embossing folder then used the sanding block to sand off the top of the texture revealing the Crumb Cake inside of the card stock. I adhered this onto the left side of the card front.


Next up I cut a piece of Very Vanilla card stock 2-1/2" x 4-1/4". This is the fun part! I placed my card stock on a piece of grid paper and used a ruler and the fine point end of my Early Espresso markers to draw on the horizontal lines, then the vertical lines to look like bricks. 


I filled up my large Aqua Painter with rubbing alcohol the dropped a single drop of Soft Suede and Gumball Green re-inker in two separate places on a piece of plastic (or whatever you want to use for your paint pallet). Then I squeezed my Aqua Painter over each spot until a drop of rubbing alcohol drips over the ink. Ta Daaa!!!! You now have alcohol ink!

I picked up a little bit of the diluted Soft Suede ink and brushed it over each of the marker lines. It looks kind of messy, but that’s okay. Don’t freak out. It will be alright. 


I stamped the long line of trees in the background with Sahara Sand ink. Then I stamped the tree in the front with Black Stazon ink. I colored in the trunk of the tree with more Soft Suede alcohol ink and added some green to the leafy part of the tree with the Gumball Green alcohol ink. I heated this with my heat tool on the 1st setting just to completely dry my artwork.


Hint: Heat from both the front and the back alternating sides so your paper doesn’t curl up a whole bunch. It will still be a little wavy, but won’t be one round curl.

Next I used my Embossing Buddy on the card stock and stamped the greeting from Something to Celebrate in Versamark ink. I covered the stamped image with Gold embossing powder, tapped off the excess, and heated it with my heat tool. Ohhh…shiny!


I cut a piece of Early Espresso card stock 2-5/8" x 4-1/2" and adhered my beautiful stamped panel onto the card stock. Now you may notice that one end of the mat is a little bit wider than the other three sides. This is intentional… I happened to have a scrap of Champagne Glimmer Paper that was about 1/16” wide sitting on my table, so I snipped off a section of that and adhered it onto the mat to the left of the tree panel. Then I just slapped this onto the card front with a few Stampin’ Dimensionals. Well….really I was nicer than that. I carefully placed it onto the card front trying to make sure it was centered without getting out my ruler and doing more math.


Anyway… that is it! A fun “faux” tiled scene for Father’s Day! If you haven’t yet, head on over to the Friday Mashup to see what the rest of the design team has created and to load up your project! 
  

Sunday, June 16, 2013

Craft Project Central!

Get Well Ensemble: 

Nobody likes getting a cold in the summer so here is a Get Well Ensemble with some Pool Party and Daffodil Delight colors for you to fancy things up a bit for your friends in need.  This project also makes for a fun class, club, or camp project.


This beautiful gift set was designed by Julie! If you have a chance head on over to Julie's blog and  leave her a comment on her project! 

If you would like to subscribe to the June edition of Craft Project Central and get 10 wonderful tutorials for only $10 then click HERE!


Friday, June 14, 2013

Washi Wishes!

It’s Friday again! I have another fun and interesting Friday Mashup challenge for you! This one combines a sketch with the brick wall technique. I had such a hard time with this challenge. I ended up making two cards, then realized I hadn’t used the sketch! Back to the drawing board I went. Or actually my craft island. After some more time I came up with the card I’m going to show you now. Once that one was finished I still had another idea for this challenge that I wanted to put to the test. That one I’ll show you Monday.  Anyway…enough rambling…on to today’s card! Take a look!


  • Stamps: Make a Wish
  • Card Stock: Strawberry Slush, Raspberry Ripple, Whisper White
  • Ink: Strawberry Slush, Coastal Cabana, Pacific Point, Night of Navy
  • Accessories: Gingham Garden Washi Tape, Sponge Dauber, Deco Labels Framelits, Argyle embossing folder, Rhinestone Basic Jewels, Stampin’ Dimensionals


Here's your Mashup Challenge:
  1. Create a project using the "Sketch".
  2. Create a project using the "Brick Wall Technique".
  3. Or Mash it Up and create a project using the "Sketch with the Brick Wall Technique".

I started out with a piece of Strawberry Slush card stock cut 5-1/2” x 8-1/2” and scored it at 4-1/4”. Next I cut a piece of Whisper White card stock 3” x 4”. I started layering on my Gingham Garden Washi Tape tearing it into different length “bricks” and placing it on the Whisper White card stock. My first two rows were nice and straight, but then it went crazy after that. Oh well… I decided to embrace the imperfection. Even though it still drives me crazy that it’s crooked.

I decided I wanted to add a fun ombre look to this so I took my sponge daubers and sponged on Coastal Cabana ink, Pacific Point ink, and Night of Navy ink to make the panel gradually darker as it goes down. The fun part… Washi Tape resists the ink! I just spritzed a paper towel with some water from my Stampin’ Mister and wiped off the Washi Tape. So cool!


I adhered this panel onto the bottom of the card front. Then I put just the top portion of the card front inside the Argyle embossing folder and ran it through the big shot to add the fabulous texture. I stamped the greeting from Make a Wish onto a scrap of Whisper White card stock in Strawberry Slush ink and cut it out with the smallest Deco Labels framelit. I cut out a scrap of Raspberry Ripple with the second from smallest Deco Labels framelit and adhered it behind the greeting label. I added a medium Rhinestone onto either side of the greeting and adhered the label onto the card front with a couple Stampin’ Dimensionals.


Now this very loosely follows the sketch, but I think it still counts.

If you have a chance head on over to the Friday Mashup to see what the rest of the design team has created and to link up your project! 


Thursday, June 13, 2013

Craft Project Central!

Mosaic Flip Flop Album: 

This is such a fun album to make!  There are eight 6” x 6” pages in this album, along with eight half page flaps.  Everyone will love how the pages “flip flop” when looking through it.  The album features the new Mosaic Madness stamp set and the new Quatrefancy Specialty designer series paper.  This project would make a very fun scrapbooking class, too.


This bright and fun project was designed by Christy! If you have a chance head on over to Christy's blog and  leave her a comment on her project! 

If you would like to subscribe to the June edition of Craft Project Central and get 10 wonderful tutorials for only $10 then click HERE!


Tuesday, June 11, 2013

Pinwheel Grad Card

This is a fun and relatively simple graduation card. For the May Make and Take I wanted to use lots of Spring Catalog products that were retiring. Since I haven’t gotten around to posting them until now you will see lots of retired goodies.


  • Stamps: Wishes Your Way (retired)
  • DSP: Tea for Two (retired), Silver Glimmer Paper
  • Card Stock: Sahara Sand, Whisper White, Lucky Limeade (retired)
  • Ink: Black Stazon
  • Accessories: Scallop Edge Border Punch, Cloudy Day embossing folder (retired), Paper Piercing Tool, Stampin’ Pierce Mat, Paper Snips, 2-Way glue Pen, Glue Dots, Mini Brads, Pinwheel Sizzlit Die (retired)


I started off by cutting a piece of Sahara Sand card stock 5-1/2” x 8-1/2” and scored it at 4-1/4”. Next I cut a piece of Whisper White card stock 3-3/4” x 5”. I cut a piece of Tea for Two DSP 1-1/2” x 5” and adhered it onto the bottom of the Whisper White card stock. Then I ran this through the Big Shot with just the top half of the Whisper White card stock inside the fabulous Cloudy Day embossing folder.

Next I cut a piece of Lucky Limeade (that wasn’t very “Lucky” after all since it was one of the retiring colors) card stock 3/4” x 5” and punched one of the long edges with the Scallop Edge Border Punch. Then I stamped the greeting from Wishes Your Way onto the right side of the card stock strip in Black Stazon ink. Then I adhered the scalloped card stock onto the card front covering where the DSP and Whisper White card stock met. Then I adhered this layer onto the card front.


I cut a piece of Silver Glimmer Paper 1/8” x 1” and used my Paper Snips to cut an angle at one end and adhered it onto the card front with 2-Way Glue Pen so the angled end met up with the cut edge of the Lucky Limeade scalloped strip. Then I used my Paper Piercing Tool and Stampin’ Pierce Mat to pierce a hole in the card front right at the very top of the Silver Glimmer Paper strip.


Next up I cut a piece of Summer Starfruit DSP 2-1/4 x 2-1/4” and ran it through the Big Shot on the Pinwheel Sizzlit die. Now this pinwheel is absolutely adorable! Really cute! But a ROYAL pain in the butt to put together!!! I ended up having to help most of the ladies at the make and take with this part. Once the pinwheel was FINALLY together with the brad through all four points I quickly inserted the brad into the hole in the card front before it fell apart again.


So, other that the fact that it is a nightmare to try to get that teeny tiny but totally adorable pinwheel together, this was a really fun and simple card! 


Monday, June 10, 2013

Craft Project Central!

Cupcake Box Gift Set: 

Do you need a really bright and fun gift to celebrate someone’s birthday? Well this set has it all for you! There are instructions to create this fun pink card, gift bag, and cupcake box set that is sure to make anyone’s day!


This fun Birthday project was designed by me! 

If you would like to subscribe to the June edition of Craft Project Central and get 10 wonderful tutorials for only $10 then click HERE!


Sunday, June 9, 2013

Craft Project Central!

CREATE Wall Hanging and Card: 

Make this beautiful wall hanging for your crafty friends or family, or just to decorate your own craft room or office.  If making for a gift, be sure to make the matching card for an impressive gift ensemble!  This project makes for a fun class, club or camp project as well!!


This beautiful and inspiring project was designed by Monika! If you have a chance head on over to Monika's blog and  leave her a comment on her project! 

If you would like to subscribe to the June edition of Craft Project Central and get 10 wonderful tutorials for only $10 then click HERE!