Showing posts with label Manly Cards. Show all posts

Wednesday, April 9, 2014

A Simple Happy Birthday

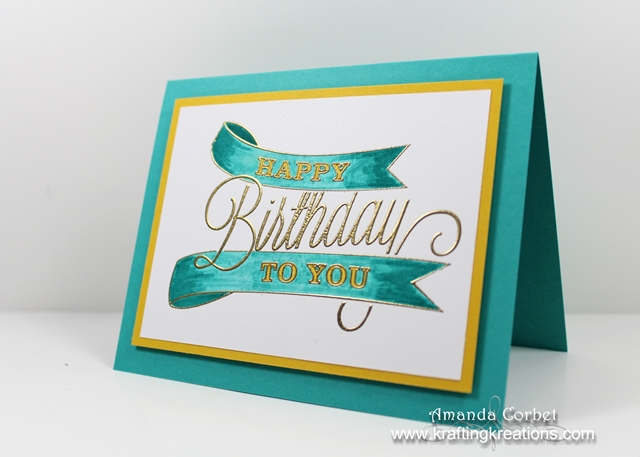
Today I want to share the birthday card I made for my Dad. I was procrastinating as usual so I needed to make him a quick birthday card just a couple hours before actually going to the party. Nothing like planning ahead right??? So this big bold image from Another Great Year came to my rescue for this simple yet beautiful/manly birthday card! 


  • Bermuda Bay card stock 5-1/2" x 8-1/2", scored at 4-1/4"
  • Crushed Curry card stock 3-1/2" x 4-3/4"
  • Whisper White card stock 3-1/4" x 4-1/2"
  • Stamps: Another Great Year
  • Ink: Versamark
  • Markers: Bermuda Bay, Crushed Curry, Blender Pen
  • Accessories: Gold embossing powder, Embossing Buddy, Heat Tool, Stampin' Dimensionals


Start off as always by folding the Bermuda Bay card stock on the score line. Now take the Whisper White card stock and rub your Embossing Buddy over the entire piece. Now stamp the big image from Another Great Year onto the card stock in Versamark ink. Cover the stamped image with gold embossing powder, tap off the excess, and heat with your Heat Tool until it's nice and shiny.

Then take your Bermuda Bay marker to color in the banners. Color in the letters on the banners with the Crushed Curry marker. Then add some shadow to the banners by going over the ends again with the Bermuda Bay marker a couple times to make the ends darker.


Now simply glue the greeting piece onto the Crushed Curry card stock then stick the panel onto the card front with a few Stampin' Dimensionals.

On the inside I stamped another greeting from Another Great Year in Versamark ink and heat embossed it with more gold embossing powder.


So simple, yet so much fun! I love how heat embossing adds a nice pop and shine to card! 

So what have you been procrastinating on lately?

Thursday, March 20, 2014

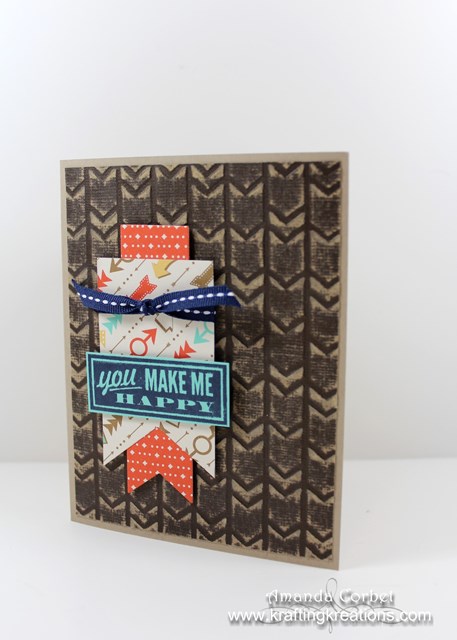
You Make Me Happy

Here is the final card from the February Make and Take. It's got lots and lots of arrows!


  • Crumb Cake card stock 5-1/2” x 8-1/2”, scored at 4-1/4"
  • Early Espresso Coredinations 4” x 5-1/4”
  • Retro Fresh DSP (arrows) 1-3/4” x 4”
  • Retro Fresh DSP (diamonds) 1-1/2” x 2-1/2”
  • Coastal Cabana card stock 1-1/4” x 2-1/2”
  • 10” Night of Navy Stitched Grosgrain Ribbon
  • Stamps: Hello Lovely
  • Ink: Night of Navy
  • Accessories: Paper Snips, Dimensionals, Arrows embossing folder, Sanding Block, Banners Framelits
As always I started off by folding the Crumb Cake card base on the score line. Next I ran the Early Espresso Core'dinations card stock through the Big Shot in the Arrows embossing folder. Use the sanding block to rough  up the raised arrows. Stick this layer onto the card front with Glue Stick.


Take the 4th from smallest Banners framelit. Use a ruler to measure up 3" from the points and mark the die with a fine point permanent marker on both sides. Now take the DSP piece with the arrows on it and position it on the Big Shot with the end of the DSP lined up with your marks. Run it through the Big Shot. 


Now take the diamonds piece of Retro Fresh DSP and run it through the Big Shot with the 2nd from smallest Banners framelit. Take Paper Snips and cut the Diamonds banner in half and glue it onto the backside of the arrows banner as shown below.


This is what it looks like from the front side. Oooh pretty!


Wrap the piece of Night of Navy ribbon around the top of the banner and tie it into a knot. Sick this lovely layered banner onto the card front with a few Stampin' Dimensionals. Next stamp the greeting from Hello Lovely onto the Coastal Cabana card stock in Night of Navy ink. Trim around the image with Paper Snips and stick it onto the banner layer with a couple Stampin' Dimensionals.


You're card front is done! Now for the inside stamp the arrow from Hello Lovely (because we totally don't have enough arrows yet) in Night of Navy ink. Now take the other piece of diamond patterned DSP and run it through the Big Show with the 2nd from smallest Banners framelit. Glue the banner inside the card with some glue stick. Then take the scrap from cutting your larger banner earlier and glue that down on top of the smaller banner.


That's it! Another fun and somewhat funky card complete! What do you think? Too many arrows?


Friday, March 14, 2014

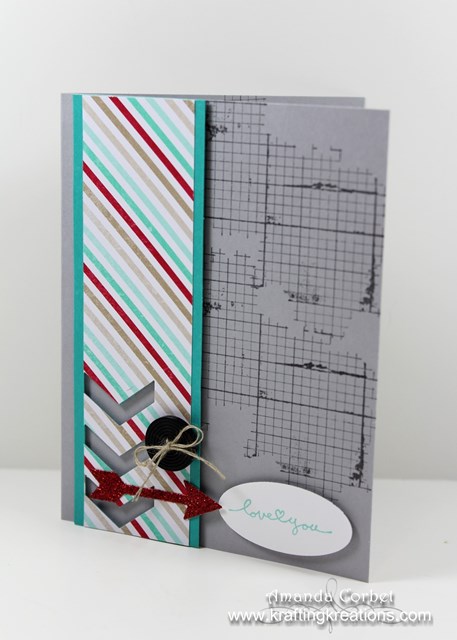
Love You Manly Valentine

Today I want to share with you one of the Valentine's cards that my guests made at the February Make and Take. I usually try to have both a girly valentine and a manly valentine. The girly ones are easy to come up with, but a manly valentine??? Those are quite a bit harder to design. 

When you're creating things for Valentine's Day you just want to reach for those pinks and reds. Especially with all the fun things you see on Pinterest around that time. So it's much harder to stay away from those girly colors and not come up with something that isn't five different shades of pink with lace and pearls and bling and over the top girly. 

So this is what I came up with and I'm pretty darn pleased with it! Although I think it took me an hour to design just this card! I kept hemming and hawing about how to place that stripey DSP and what stamp to use to fill up all that gray space on the right and where to add what greeting all while trying to keep the red to a reasonable amount.


  • Smoky Slate card stock 5-1/2" x 8-1/2", scored at 4-1/4". 
  • Coastal Cabana card stock 1-3/4" x 5-1/2"
  • Fresh Prints DSP 1-1/2" x 5-1/2"
  • Stamps: Best of Love, Off the Grid
  • Ink: Coastal Cabana, Basic Gray
  • Accessories: Chevron Border Punch, Large Oval Punch, Red Glimmer Paper, Label Card Thinlits, Neutrals Buttons, Linen Thread, Stampin' Dimensionals, 2-Way Glue Pen

First off fold the Smoky Slate card stock on the score line and stamp the Off the Grid image onto the card front twice in Basic Gray ink. Next up glue the strip of Fresh Prints DSP onto the strip of Coastal Cabana card stock. Use the Chevron Border Punch just on one end to punch those three lovely chevrons at the bottom of the strip. It takes a little more oomph to punch through the DSP and the card stock, but it's totally doable. Then stick this layer onto the left side of the card front with a few Stampin' Dimensionals. 


Next up stamp the greeting from Best of Love onto a scrap of Whisper White card stock in your Coastal Cabana ink then punch out the greeting with the Large Oval Punch. Stick the greeting onto the card front with a couple more Stampin' Dimensionals.


To get the glimmery red arrow use the arrow die from the Label Card Thinlits pack with a scrap of Red Glimmer Paper in the Big Shot. Glue this onto the DSP with a little 2-Way Glue Pen. To finish it off take some linen thread and run it through a nice big Basic Black button from the Neutrals button pack and tie the twine into a bow (easier said than done). Then stick the button onto the card front with another Stampin' Dimensional. This card really has a lot of dimension with all those dimensionals!


Now open up the card and stamp the Off the Grid image again in Basic Gray ink. Then take the chevrons that you punched out earlier and glue them inside the card with some more 2-Way Glue Pen. No wasting chevrons on this card! 

That's it! A cute and fun, yet still manly, Valentine's card! Or anniversary... or anytime you want to say "I love you".  


Monday, January 6, 2014

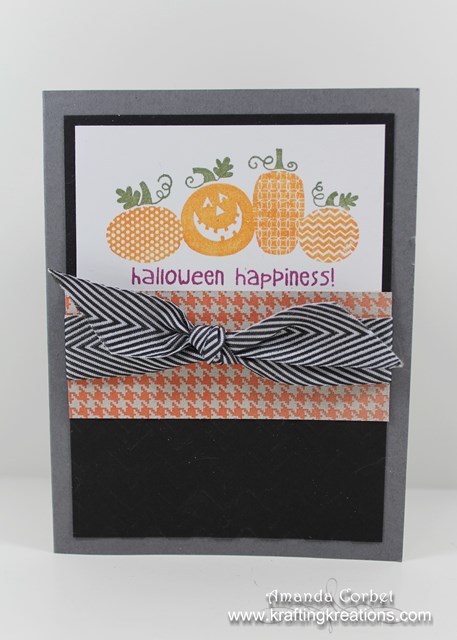
Happy Birthday or Halloween

There are a lot of people that don't really send Halloween cards including me. But I wanted to have a Halloween option at the October Make and Take last year. So I created a card that could either be a Halloween card or a masculine birthday card depending on which stamp sets were used. That way my guests could decide for themselves which they would like to make. 


  • Basic Gray card stock 5-1/2" x 8-1/2"
  • Basic Black card stock
  • Whisper White card stock
  • Sweater Weather DSP
  • Basic Black Chevron ribbon
  • Whisper White
  • Basic Black
  • Stamps: Best of Halloween, Halloween Happiness, Perfectly Penned, Best of Birthdays
  • Markers: Marina Mist, Pumpkin Pie, Rich Razzleberry, Old Olive
  • Ink: Midnight Muse, Black Stazon, Pumpkin Pie
  • Accessories: Basic Black chevron ribbon, Paper Snips, Chevron embossing folder

Both cards had the exact same cut dimensions and just used different stamp sets. You have to be a bit creative the with the card design to make sure that it will work for both options, but it's an easy way to let my guests chose what they would like to make. 

For the Birthday option the greeting from Perfectly Penned was stamped onto the small piece of Whisper White card stock in Night of Navy ink. I glued this layer down onto the top of the big piece of Basic Black card stock. Then I ran this piece through the Big Show with just the bottom of the Basic Black card stock inside the Chevron embossing folder. Then just glue on the DSP, wrap the ribbon around the card stock, tie it into a knot, and stick this layer onto the card front with a few Stampin' Dimensionals.

On the inside I simply stamped the present and "celebrate" from Best of Birthdays onto the top of the large piece of Whisper White card stock in Black Stazon ink and colored in the images with Marina Mist and Pumpkin Pie markers. I stuck this down into the card with Glue Stick. The strip of Basic Black card stock was glued down with 2-Way Glue Pen just under the stamped images to add a little more interest to the inside of the card.

For the Halloween card I just colored in the Halloween Happiness stamp with Old Olive, Pumpkin Pie, and Rich Razzleberry markers, breathed on the stamp to re-moisten the ink, and stamped it onto the card stock. Then for the inside piece I stamped the haunted house and "Trick or Treat" from Best of Halloween in Black Stazon and Pumpkin Pie ink. 

A fun and simple card with two very different occasions! 


Friday, November 22, 2013

Gettin' Grungy

I absolutely LOVE the Gorgeous Grunge stamp set! It is just so much fun to play with! So to show my guests just how much fun it is we made this card at the August Make and Take.


  • Stamps: Gorgeous Grunge, Happy Day
  • Card Stock: Soft Sky, Crushed Curry, Whisper White
  • Ink: Soft Sky, Basic Gray, Smoky Slate
  • Accessories: Basic Gray Stitched Grosgrain Ribbon

For this card you need to start off with a piece of Soft Sky card stock cut at 4-1/4” x 5-1/2”. Next cut a piece of Whisper White card stock 4” x 10-1/2” and score it at 5-1/4”. Stamp the tiny dots splatter image across the bottom right hand corner twice in Soft Sky ink. Then stamp the larger splatter in Smoky Slate ink twice.


Next stamp the three splotches twice in Soft Sky ink. Stamp the diagonal lines twice in Basic Gray ink but only ink up the stamp once.


Next cut a piece of Whisper White card stock 1” x 4”. Stamp the greeting from Happy Day onto the card stock in Smoky Slate ink. Adhere this onto a 1-1/4" x 4" piece of Crushed Curry card stock. Wrap a piece of Basic Gray Stitched Grosgrain ribbon around the panel and tie it into a knot. Adhere this strip across the bottom of the card front and you’re done!

This is such a fun and simple card to make! 


Sunday, January 8, 2012

Masculine Birthday


I needed a birthday card for my brother-in-law back in December and I was getting way behind on my sketch challenges so I used the SCCSC97 Sketch Challenge from Stampin’ Connection to start on this card. I also used some things on this card that may be unexpected.


Stamps: Happiest Birthday Wishes (Hostess)
Card Stock: Basic Grey, Whisper White, Basic Black, Poppy Parade
DSP: Letters to Santa
Ink: None
Markers: Marina Mist, Poppy Parade
Accessories: Snow Burst embossing folder, 5/8” Basic Black satin ribbon, Curly Label punch, Stampin’ Dimensionals, SNAIL Adhesive.

Here is the sketch that was created by Susie Nelson:


The card base is Basic Grey card stock cut at 5-1/2” x 8-1/2” and scored at 4-1/4”. Next a piece of Basic Grey card stock was cut at 4” x 5-1/4” and was run through the Big Shot in the Snow Burst embossing folder. I just love this texture folder. It looks great on all cards, not just Christmas or holiday cards! This panel was adhered onto the card front.

Next a piece of Letters to Santa DSP was cut at 2-5/8” x 3-7/8” and was adhered onto a 2-3/4” x 4” piece of Basic Black card stock. The Curly Label punch was used on a scrap of Poppy Parade card stock and the label was adhered behind the bottom right hand corner of the DSP panel. This panel was adhered onto the card front. A piece of 5/8” Basic Black satin ribbon was wrapped around the card front and adhered in place with SNAIL Adhesive. The cut edges of the ribbon are actually in the center of the card front hidden behind the panel with the greeting.

Then a piece of Whisper White card stock was cut at 1-5/8” x 2-7/8”. The greeting from Happiest Birthday Wishes was colored in with Marina Mist and Poppy Parade markers. Then I breathed on the stamp to re-moisten the ink and stamped the image onto the Whisper White card stock. This panel was then adhered onto a 1-3/4” x 3” piece of Poppy Parade card stock before being adhered onto the card front with Stampin’ Dimensionals.

Thanks for stopping by!

Tuesday, November 1, 2011

Fall Tree

Here is the second card from the October Make and Take. I just couldn’t resist doing a card with a fall tree. Fall is my favorite season after all. Take a look at the card we made:


Stamps: Lovely as a Tree
Cardstock: More Mustard, So Saffron, Cajun Craze, Chocoalte Chip
DSP: Frostwood Lodge Designer Series Paper
Markers: Chocolate Chip, More Mustard, Cajun Craze, Old Olive, Cherry Cobbler
Accessories: Scallop Edge Border Punch, Paper Piercer, Mat Pack, Neutrals Brads (Pewter), Stampin’ Dimensionals, Perfect Polka Dots Textured Impressions Folder

The card base is More Mustard cardstock cut at 4 ¼” x 11”, and scored at 5 ½”. A piece of So Saffron cardstock was cut at 4” x 5 ¼” and was run through the Big Shot in the Perfect Polka Dots Textured Impressions Embossing Folder. This was adhered to the card front. A piece of Cajun Craze cardstock was cut at 2 ¼” x 4” and one lone side was punched with the Scallop Edge Border Punch. A piece of Frostwood Lodge DSP was cut at 1 5/8” x 4”. You could somewhat see the white edges of the DSP so I sponged the edges of the DSP with Early Espresso ink. The DSP was adhered to the Cajun Craze cardstock. This panel was adhered to the bottom of the card front. The Paper Piercer and Mat Pack were used to pierce two holes in the upper right and corner of the DSP and two pewter brads from the Neutral Brad Pack were added.

A piece of Very Vanilla cardstock was cut at 2” x 4”. The pine tree from Lovely as a Tree was colored in completely with the More Mustard marker. The trunk of the tree was colored with the Chocolate Chip marker. Then the colors Cajun Craze, Old Olive, and Cherry Cobbler were randomly tapped on the tree image. I breathed on the stamp to re-moisten the ink and stamped the image onto the cardstock. This method of coloring gives a very realistic looking fall tree. This panel was adhered to a 2 ¼” x 4 ¼” piece of More Mustard. The panel was then adhered to a 2 3/8” x 4 3/8” piece of Chocolate Chip cardstock before being adhered to the card front with Stampin’ Dimensionals.


That’s it! A pretty quick and simple card once you can get everyone convinced to tap the marker colors without paying attention to where you’re tapping. I kept hearing people oooh and ahhhh after they stamped the image. I hope you will give this technique a try sometime!

Thanks for stopping by!


Wednesday, October 12, 2011

Uncharted Territory

Here is the second card that I made as a good luck card! This one uses Uncharted Territory,which is a perfect stamp set for a masculine card!

Stamps: Uncharted Territory, Sailing Away, Sanded (retired)
Cardstock: Sahara Sand, Night of Navy, Poppy Parade, Baja Breeze, Watercolor Paper
DSP: Elegant Soiree (retired)
Ink: Bashful Blue, Night of Navy, Peach Parfait, Black Stazon, Sahara Sand
Accessories: White Gel Pen, Stampin' Dimensionals, Aquapainter, Soft Suede Re-Inker

The card base is Sahara Sand cardstock cut at 4 1/4" x 11" and scored at 5 1/2". The card front was stamped with the Sanded background stamp (retired) in Night of Navy ink. The a piece of Elegant Soiree DSP (retired) was cut at 2 1/2" x 4 1/4". This was adhered to a 2 5/8" x 4 1/4" piece of Night of Navy cardstock and was adhered to the card front.

A piece of Watercolor paper was cut at 2 1/2" x 3 3/4". The image from Uncharted Territory was stamped in Black Stazon ink. The sky was colored by sqeezing the center of the closed Bashful Blue ink pad, opening the pad up half-way and picking up the ink with the Aquapainter. This gives the sky a very subtle watercolored look. The lighthouse was colored using the same method as the sky, but with Peach Parfait ink, you only need to pick up a tiny bit of the ink to get this color. Apply it starting on the left side brushing up and down while moving to the right. Repeat the process until the lighthouse it the color that you like it. The rocks were colored in using Soft Suede Re-Inker. I used Re-Inker on the rocks to get a much darker color.

For the ocean I swiped the Night of Navy ink pad directly across the cardstock several times. Then I use the Aquapainter to pick up some ink from the lid of the ink pad like before, to fill in the shallow portions of the texture. For the foam I just used the White Gel Pen and dabbed it along the base of the rocks to look like foam or waves crashing on the rocks. This panel was adhered to a 2 3/4" x 4" piece of Baja Breeze cardstock. This panel was adhered to a 2 7/8" x 4 1/8" piece of Poppy Parade and then the whole thing was adhered to the card front with Stampin' Dimensionals.


On the inside I stamped the greeting from Uncharted Territory in Night of Navy ink, then I added the sail boat image in Sahara Sand ink just to add a pretty detail to the inside of the card.

Good Luck!

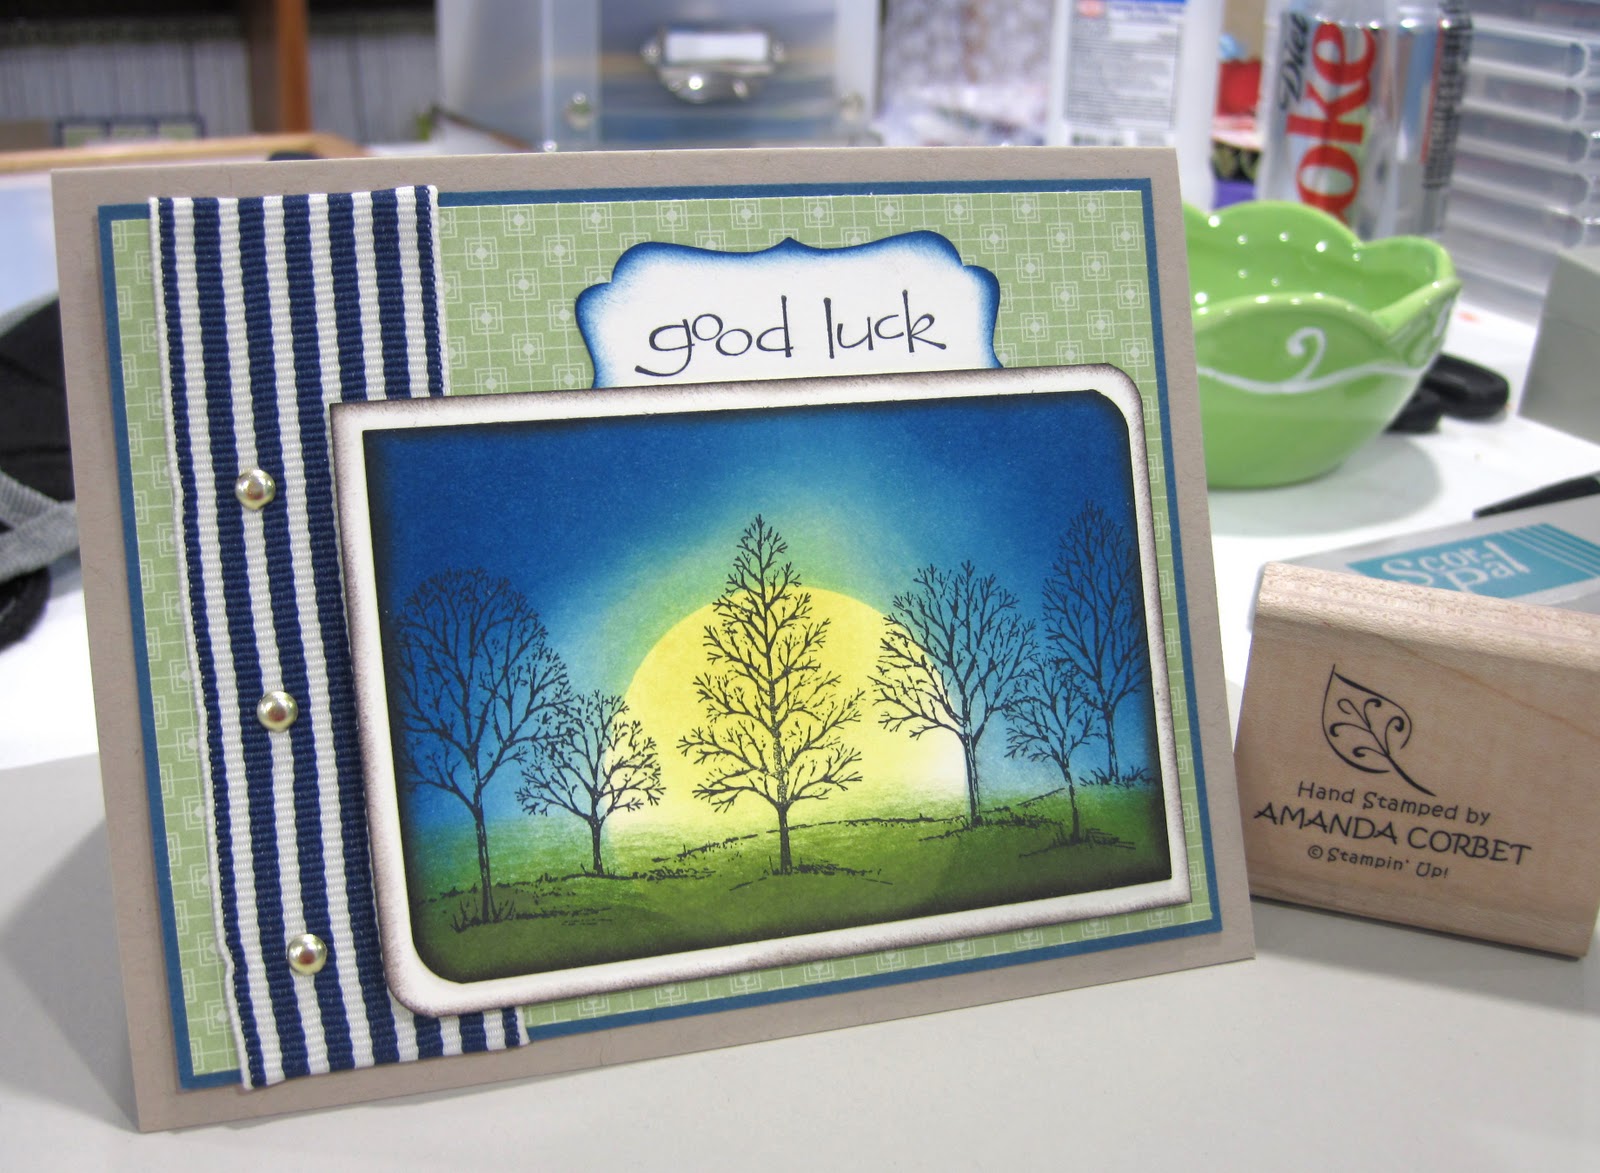
Someone well appreciated where I work was forced to find another job. So before he left I made two cards (so that everyone in the building could have enough room to sign). Here is the first one. I will show you the second one later today.


Stamps: Lovely as a Tree, So Happy For You (retired)
Cardstock: Crumb Cake, Night of Navy, Very Vanilla
DSP: Pear Pizzaz Designer Series Paper
Ink: Daffodil Delight, Baja Breeze, Not Quite Navy, Old Olive, Always Artichoke, Basic Black, Early Espresso
Accessories: Decorative Label Punch, Corner Rounder Punch, 1 1/4" Striped Night of Navy ribbon, Gold Brads, Paper Piercer, Mat Pack, Stampin' Dimensionals, Stampin' Sponge, Post-It Notes, Snail Adhesive, 1 3/4" Circle Punch

The card base is Crumb Cake cardstock cut at 5 1/2" x 8 1/2" and scored at 4 1/4". A piece of Pear Pizzaz DSP was cut at 3 3/4" x 5". This was adhered to a 3 7/8" x 5 1/8" piece of Night of Navy cardstock. I cut a piece of 1 1/4" striped Night of Navy ribbon and adhered it to the panel and around to the back of the panel with Snail Adhesive. The Paper Piercer and Mat Pack were used to pierce three holes in the ribbon through the cardstock where three Gold Brads were added. This panel was adhered to the card front.

Next I cut a piece of Very Vanilla cardstock 2 1/2" x 3 3/4". I punched two of the corners with the Corner Rounder punch. I placed a Post-It Note onto a piece of copy paper and punched it out with the 1 3/4" Circle Punch making sure that some of the sticky part of the Post-It Note was inside the cirlce. I placed the Posti-It Note circle onto the cardstock where I wanted my sun to go. The sky was sponged first with Baja Breeze then with Night of Navy making sure not to cover the Baja Breeze ink entirely. The Post-It Note sun  mask was removed and Daffodil Delight ink was sponged inside the sun. The grassy area was sponged with Old Olive and then with Always Artichoke making sure not to cover the Old Olive ink entirely.

The image from Lovely as a Tree was stamped in Basic Black ink and the edges of the panel were sponged with Basic Black ink. For the mat a piece of Very Vanilla cardstock was cut at 2 3/4" x 4" and the same two corners were punched with the corner rounder punch. The edges were sponged with Early Espresso ink and the sponged panel was adhered on top of this panel. This panel was adhered to the card front with Stampin' Dimensionals.

The greeting from So Happy for You (retired) was stamped in Basic Black ink onto a scrap of Very Vanilla cardstock. The greeting was punched out with the Decorative Label Punch making sure that the greeting was in the top half of the label. The edges of the label were sponged with Night of Navy ink and the label was adhered to the card front so that the bottom portion of the label was behind the sponged panel. 

 That's all for now! Thanks for stopping by!


Friday, September 9, 2011

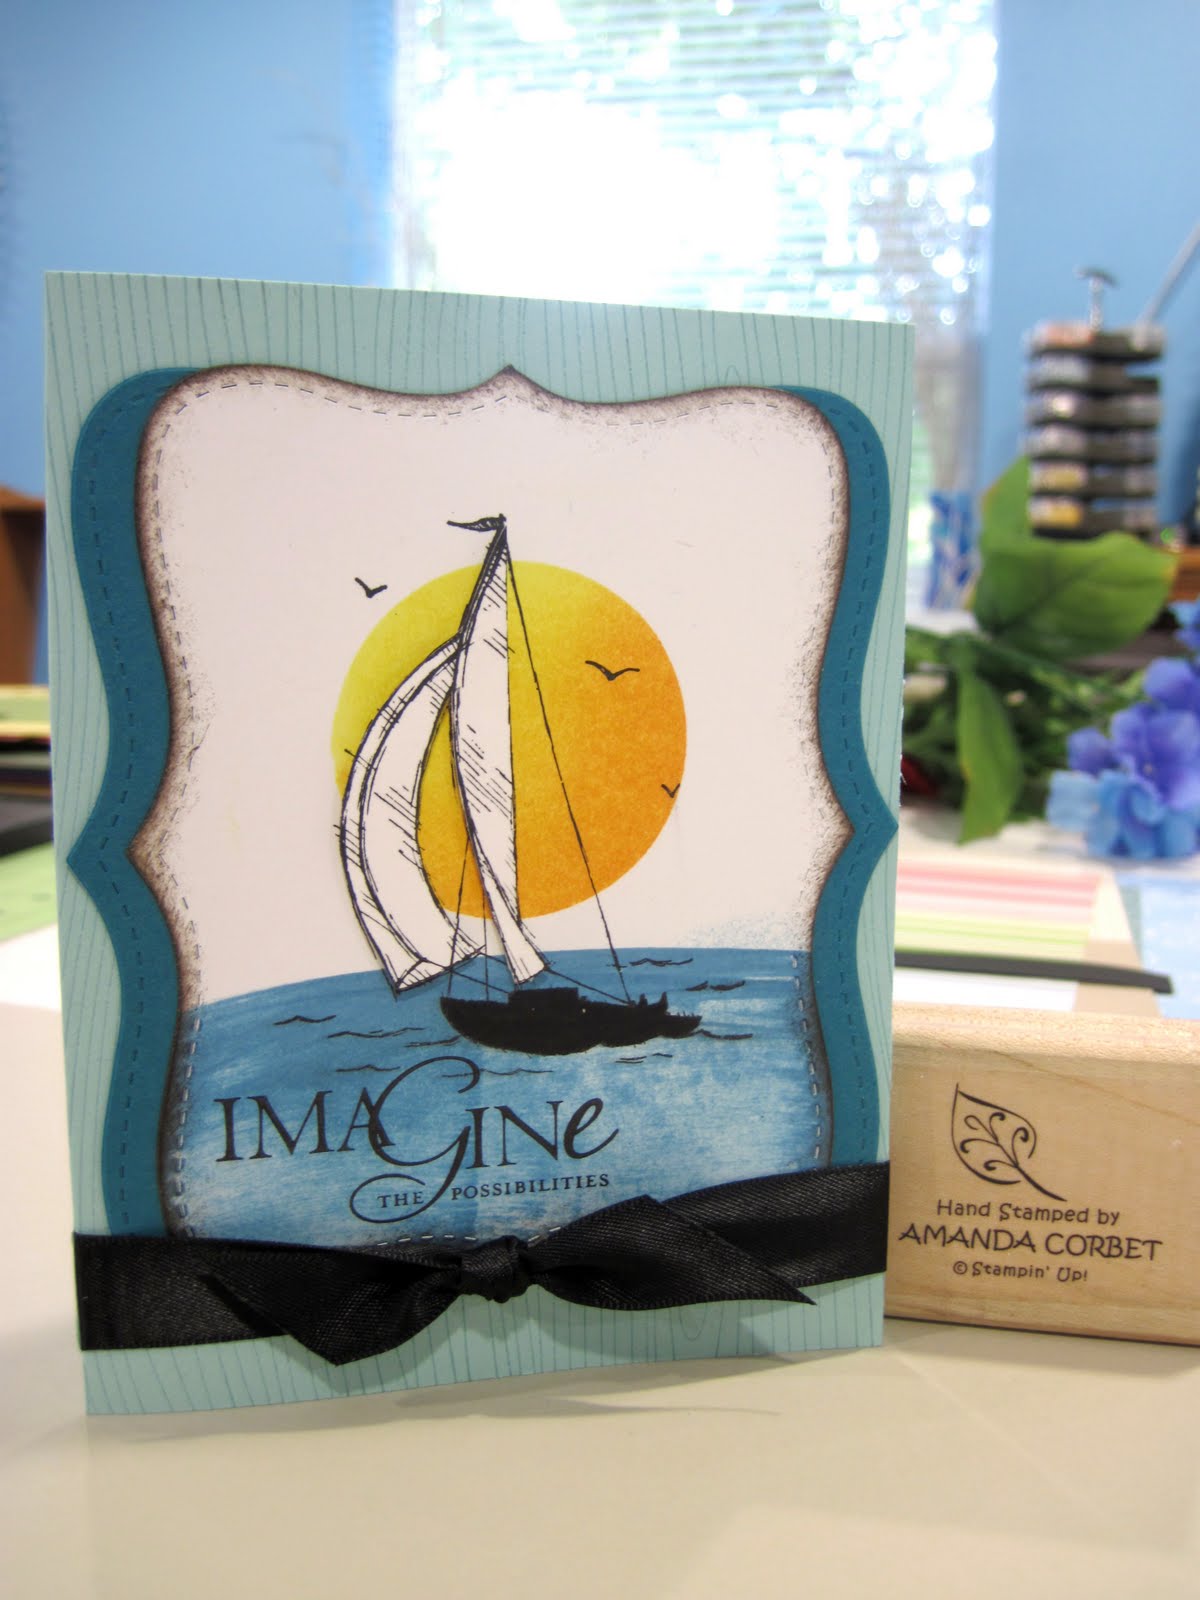
Imagine Sailing Away

Good morning everyone!!! Here is the first card from the July Make and Take. Although the fabulous stamp Sail Away has sailed away with the Summer Mini catalog my guests got the chance to make this wonderful card before it went away. Even though everyone was intimidated by this card it really is easy. Take a look:


Stamps: Sail Away (retired), Woodgrain, Word Play
Cardstock: Pool Party, Island Indigo, Whisper White
Ink: Daffodil Delight, Peach Parfait, Basic Black, Marina Mist, Early Espresso
Accessories: 5/8" Basic Black Satin ribbon, Basic Black Marker, 1 3/4" Circle punch, Paper Snips, Stampin' Sponge, Top Note Die, Post-It Notes, Stampin' Dimensionals, Hobby Blade

The card base is Pool Party cardstock cut at 5 1/2" x 8 1/2" and scored at 4 1/4". The card front was stamped with the Woodgrain background stamp with Pool Party ink. Next a piece of Whisper White and a piece of Island Indigo cardstock were cut at 4" x 5" and were both run through the Big Shot with the Top Note Die.

Right now we are going to use the Whisper White top note, so everything else can be set aside. Place a Post-It Note on a piece of copy paper and use the 1 3/4" Circle punch to punch a circle through the middle of the Post-It Note. Remove the Post-It Note from the copy paper. You do not want the circle, that can be put in the trash. You want the Post-It Note with the circle cut in the middle. Place the Post-It on top of your Whisper White cardstock with the circle where you want your sun to be. Use a Stampin' Sponge to sponge Daffodil Delight ink inside the entire circle. Now sponge Peach Parfait ink just on the bottom and right side of the circle. Now remove the Post-It note. Voila! You have a nice clean and perfectly shaded sun!

Ink up the Sail Away image with Black Stazon ink and stamp the sail boat where you want it on the card. Let the ink dry completely or use a heat tool to set the ink before continuing. Sponge the bottom portion of the Whisper White top note with Marina Mist ink to fill in the ocean area. Then take the ink pad directly to the paper and swipe the ink pad across the cardstock to create the horizon line. Next sponge the edges of the Whisper White top note with Early Espresso ink then stamp the greeting from Word Play in Basic Black ink. Color in the base of the boat with the Basic Black marker and set aside your beautiful top note.

Cut the Island Indigo top note in half length-wise and trim off the points that were in the middle of the short sides. Adhere each top note half behind the stamped top note to create a mat on each side. Adhere this layer to the card front.

Now stamp another sail boat in Black Stazon ink onto a scrap of Whisper White cardstock. Cut out the sails with Paper Snips and adhere the sails on top of the stamped top note image with Stampin' Dimensionals. Now open up your card and use a Hobby Blade to cut the fold of the card where you want your ribbon to go. Insert your Basic Black Satin ribbon through the slit in the card fold, wrap it around the card front, and tie it into a knot. Now you're done!


It really isn't that hard, you just have to be brave and trust my instructions. Anything you aren't sure about doing, like swiping the ink pad across the cardstock, try it out on a piece of copy paper first to get the hang of it. Also remember, if it was perfect it would be Hallmark not handmade! I hope you give this wonderful card a try if you have this stamp set!

Thanks for stopping by!

Friday, July 29, 2011

Baja Gift Card Holder


The final project from the May Make and Take is this wonderful gift card holder that could easily be given to a guy or a girl.


Stamps: Autumn Splendor, Afterthoughts (retired)
Cardstock: Baja Breeze, Early Espresso, More Mustard, Whisper White
Ink: Marina Mist, Cajun Craze
Accessories: Decorative Label Punch, Tasteful Trim Die, 1 ¼” Early Espresso Striped Grosgrain Ribbon, Paper Snips, stapler, Two-Way Glue Pen, Sticky Strip, 1 ¾” Circle Punch

Start off by cutting a piece of Baja Breeze cardstock 4” x 7 ½”. Score along the long side at 3 ½”, 7”, and 7 ½”. Stamp the leaf image from Autumn Splendor in Marina Mist ink to create your own patterned paper. Fold on all the score lines.

Place Sticky Strip on the ½” flap on the stamped side. Place sticky strip at the very bottom of the center section on the non-stamped side. Remove the liner from the sticky strip on the center section. Fold the ½” tab over and adhere it to the center sticky strip. Remove the liner from the ½” side. Fold the remaining section over and adhere it to both the center sticky strip and the sticky strip on the ½” section. This creates your little card envelope.

Now that your envelope is adhered together use the 1 ¾” Circle Punch on the open end. Only insert the envelope about ½” into the punch. You just want to punch out a partial circle so it is easier to grab the gift card out of the envelope.

To decorate the envelope run a ½” wide piece of Early Espresso cardstock through the Big Shot on the Tasteful Trim die to cut out your ric-rac. Adhere the ric-rac to the envelope front using the Two-Way Glue Pen, using Paper Snips trim the ends flush with the edge of the envelope.

Stamp the greeting from Afterthoughts (retired) in Cajun Craze ink on a scrap of Whisper White cardstock. Punch out the greeting with the Decorative label punch. Punch another decorative label from More Mustard cardstock. With Paper Snips cut the More Mustard decorative label in half length-wise and cut off the points that were in the middle of the sides. Adhere each half of the label behind the Whisper White stamped label to create a mat. Adhere the greeting label to the envelope front.

For the envelope insert cut a piece of Baja Breeze cardstock 3 ¼” x 4 ½”. Score along the long side at 1”. Stamp both sides of this cardstock with the leaf image in Marina Mist ink. Place Sticky Strip along the 1” length of both sides of the cardstock. You want the Sticky Strip right up against the edge of the cardstock. Remove the Sticky Strip liner and fold up. This creates a pocket for the gift card to set in.

Cut a piece of 1 ¼” Early Espresso Striped Grosgrain ribbon 6” long. Fold in half and use a stapler to staple the ribbon to the center of the top of the insert. Trim the ends of the ribbon into a dove-tail. Insert the gift card into the insert and put the insert into the envelope. So simple!

I hope you get a chance to give it a try!

Don’t forget to enter to win the Blog Candy that I have posted HERE!

Thanks for stopping by!


Thursday, July 28, 2011

Father's Day Owl

Today I have to share with you the fourth and final card for the May Make and Take. This one is a Father’s Day card using the adorable Owl Punch. You can’t tell that the owl is one of my favorites right???? Anyway… here is the card:


Stamps: All Holidays (retired)
Cardstock: Basic Grey, Very Vanilla, Cherry Cobbler
DSP: Elegant Soiree
Ink: Cherry Cobbler
Accessories: Stampin’ Dimensionals, Owl Punch, Bird Punch, Two-Way Glue Pen

The card base is Basic Grey cardstock cut at 5 ½” x 8 ½” and scored at 4 ¼”. Next a piece of Elegant Soiree DSP was cut at 3 ¾” x 4 ¼”. One of the 4 ¼” long edges was torn. Tip: when tearing DSP turn the pattern that you want away from you and tear by pulling the cardstock towards you. The DSP is not colored all the way through like the cardstock is. If you use this method for tearing the large white edge that the tear leaves will be on the back side and will be adhered to your project.

This torn DSP was adhered to a 4” x 4 ¼” piece of Cherry Cobbler cardstock, then the cardstock edge was torn. You want to have your DSP adhered to the cardstock before tearing the cardstock so you have a guideline for your tear. Then a piece of Very Vanilla cardstock was cut at 1” x 4 ¼” and was adhered behind the straight end of the Cherry Cobbler cardstock. This panel was adhered to the card front.

A piece of Very Vanilla cardstock was cut at 2” x 2 ¼” and the greeting from All Holidays (retired) was stamped in Cherry Cobbler ink. This was adhered to a 2 ¼” x 2 ½” piece of Early Espresso cardstock. Then it was adhered to the card front using Stampin’ Dimensionals.

Now for the fun part. Two branches were punched from Old Olive cardstock using the Bird Punch and were adhered to the card front using a Two-Way Glue Pen. The owl pieces were punched from Sahara Sand, Early Espresso, Very Vanilla, Basic Black, Cherry Cobbler, and Pear Pizzaz DSP. The pieces were adhered together with the Two-Way Glue Pen and the owl was adhered to the card front with a Stampin’ Dimensional. That’s it! Pretty simple and really fun!

Come back tomorrow to see the 3D project from the May Make and Take!

Don’t forget to enter to win the Blog Candy that I have posted HERE!

Thanks for stopping by!

Wednesday, July 27, 2011

Pine Forest

Here is the next card from the May Make and Take. I created a small forest on the front of the card. Take a look:


Stamps: Lovely as a Tree, Teeny Tiny Wishes, Woodgrain
Cardstock: Crumb Cake, More Mustard, Chocolate Chip, Bravo Burgundy, Very Vanila
Ink: Early Espresso, Old Olive, Always Artichoke, Basic Black
Accessories: Tasteful Trim Die, Perfect Polka Dots Textured Impressions Folder, Needle Tool, Mat Pack, Gold Brads, Stampin’ Dimensionals

The card base is Crumb Cake cardstock cut at 4 ¼” x 11” and scored at 5 ½”. The front of the card was stamped with the Woodgrain background stamp in Chocolate Chip ink. Next a piece of More Mustard cardstock was cut at 2” x 5 ½” and was run through the big shot in the Perfect Polka Dots Textured Impressions Folder. A piece of Chocolate Chip cardstock was cut 1” x 5 ½” and was run through the Big Shot on the Tasteful Trim Die to get the large scallops cut.

Both the Chocolate Chip scallops and the More Mustard cardstock were adhered to the card front. The Needle Tool and Mat Pack were used to pierce three holes in the upper right hand corner of the More Mustard panel and through the card front. Three Gold Brad were added in the holes.

A piece of Very Vanilla cardstock was cut at 2 ¼” x 3 ¼”. The pine tree from Lovely as a Tree was stamped three times in Always Artichoke ink, and then four times in Old Olive ink. For the Old Olive trees I stamped the image twice before inking up the stamp again. The second stamping gives a lighter tree in the background in the same color.

The greeting from Teeny Tiny Wishes was stamped in Basic Black ink in the upper right hand corner of the Very Vanilla forest panel. The forest panel was adhered to a 2 ½” x 3 ½” piece of Bravo Burgundy cardstock. This layer was adhered to the card front with Stampin’ Dimensionals.

Don’t forget to enter to win the Blog Candy that I have posted HERE!
That’s all for this quick and simple Father’s Day card! Thanks for stopping by!

Tuesday, July 26, 2011

Sailing Away

For the May Make and Take, other than the wedding/graduation card, I focused on masculine cards that could be used for Father’s Day, birthday, or any other occasion when you need a guy card. So here is the second card for the May Make and Take. I knew I wanted to use the Sail Away stamp from the Summer Mini, so here is what I came up with.


Stamps: Sail Away, Upsy Daisy, Sanded
Cardstock: Sahara Sand, Not Quite Navy, Whisper White, Poppy Parade, Baja Breeze
DSP: Elegant Soiree
Ink: Basic Black, Baja Breeze, Not Quite Navy
Accessories: Needle Tool, Mat Pack, Gold Brads, Stampin’ Sponge, Stampin’ Dimensionals, Clear Block

The card base is Sahara Sand cardstock cut at 4 ¼” x 11” and scored at 5 ½”. The Sanded background stamp was used with Not Quite Navy ink to add some pattern to the card base. A piece of Elegant Soiree Designer Series Paper was cut at 2 ½” x 4 ¼” and was adhered to a 2 5/8” x 4 ¼” piece of Not Quite Navy cardstock. The greeting from Upsy Daisy was stamped in Basic Black ink in the lower right hand corner of the panel. The Needle Tool and Mat Pack were used to pierce three holes to the left of the greeting where three Gold Brads were added. This panel was then adhered to the card front.

A piece of Whisper White cardstock was cut at 3” x 3”. Next I used a size D clear block as a stamp. Inked it up with Baja Breeze ink, and stamped it onto the Whisper White cardstock. Cool effect huh? Next I stamped the Sail Away image in Basic Black ink. The edges were sponged with Not Quite Navy ink and then this was adhered to a 3 ¼” x 3 ¼” piece of Baja Breeze cardstock. Next the panel was adhered to a 3 3/8” x 3 3/8” piece of Poppy Parade cardstock. Then it was adhered to the card front with Stampin’ Dimensionals.

I really love how this one turned out with the stripes and the pop of Poppy Parade! The ladies all loved it too! Come back tomorrow to see the next card from the May Make and Take. Also, don’t forget to enter to win the Blog Candy that I have posted HERE!

Thanks for stopping by!


Saturday, May 28, 2011

Birthday Wishes for Grandpa

This is another birthday card that I made recently. This one was for my husband’s grandfather.


Stamps: Lovely As A Tree, Occasional Quotes
Cardstock: Not Quite Navy, Cajun Craze, Whisper White
Ink: Tempting Turquoise, Pacific Point, Old Olive Always Artichoke, Early Espresso, Basic Black
Accessories: Twill Tape (?), Word Window Punch, Modern Label Punch, Black Brads, Needle Tool, Mat Pack.

The card base is Not Quite Navy cardstock cut at 5 ½” x 8 ½” and scored at 4 ¼”. A piece of Whisper White cardstock was cut at 3 7/8” x 5 1/8”. The top of the cardstock was brayered first with Tempting Turquoise ink and then with Pacific Point ink, not covering the Tempting Turquoise ink entirely. The tree tops were stamped with Pacific Point ink taking care not to ink up the grassy hills under the trees. These Pacific Point trees were stamped across the card right where I wanted the horizon line to be.

The next row of trees was stamped in Basic Black ink. This time I included the hills when inking up my stamp. Next I used the direct to paper technique to color in the grassy area first with Old Olive ink and then with Always Artichoke ink to add some shadows. The edges of the panel were sponged with Early Espresso ink all the way around.

The image panel was adhered to a piece of Cajun Craze cardstock cut at 4” x 5 ¼”. A piece of what I believe is Twill Tape, came from the grab bag, was added around the panel and tied into a knot. The panel was then adhered to the card front.

The greeting from Occasional Quotes was stamped on a scrap of Whisper White cardstock in Basic Black ink and punched out with the Word Window punch. The Modern Label punch was used with a scrap of Old Olive cardstock to get a second label. The Whisper White greeting was adhered to the Old Olive modern label then the Mat Pack and Needle tool were used to pierce a hole through the labels and the card front. Two black brads were added to the holes to finish off the card.

That’s it for this lovely scenic birthday card. Have fun stamping!

Wednesday, May 25, 2011

Trendy Birthday Card

This is a card that I made for my brother’s birthday a while ago. Take a look:


Stamps: Trendy Trees, Wood Grain, Teeny Tiny Wishes
Cardstock: Basic Grey, Whisper White, Old Olive, River Rock
Ink: Bashful Blue, Pear Pizzaz, Always Artichoke, Early Espresso, Basic Black
Accessories: 5/8” Chocolate Chip Grosgrain ribbon, Silver Brads, Needle Tool, Mat Pack, Word Window punch, Stampin’ Dimensionals

The card base is Basic Grey cardstock cut at 5 ½” x 8 ½” and scored at 4 ¼”. The Wood Grain background stamp was stamped onto the card front with Basic Black ink.

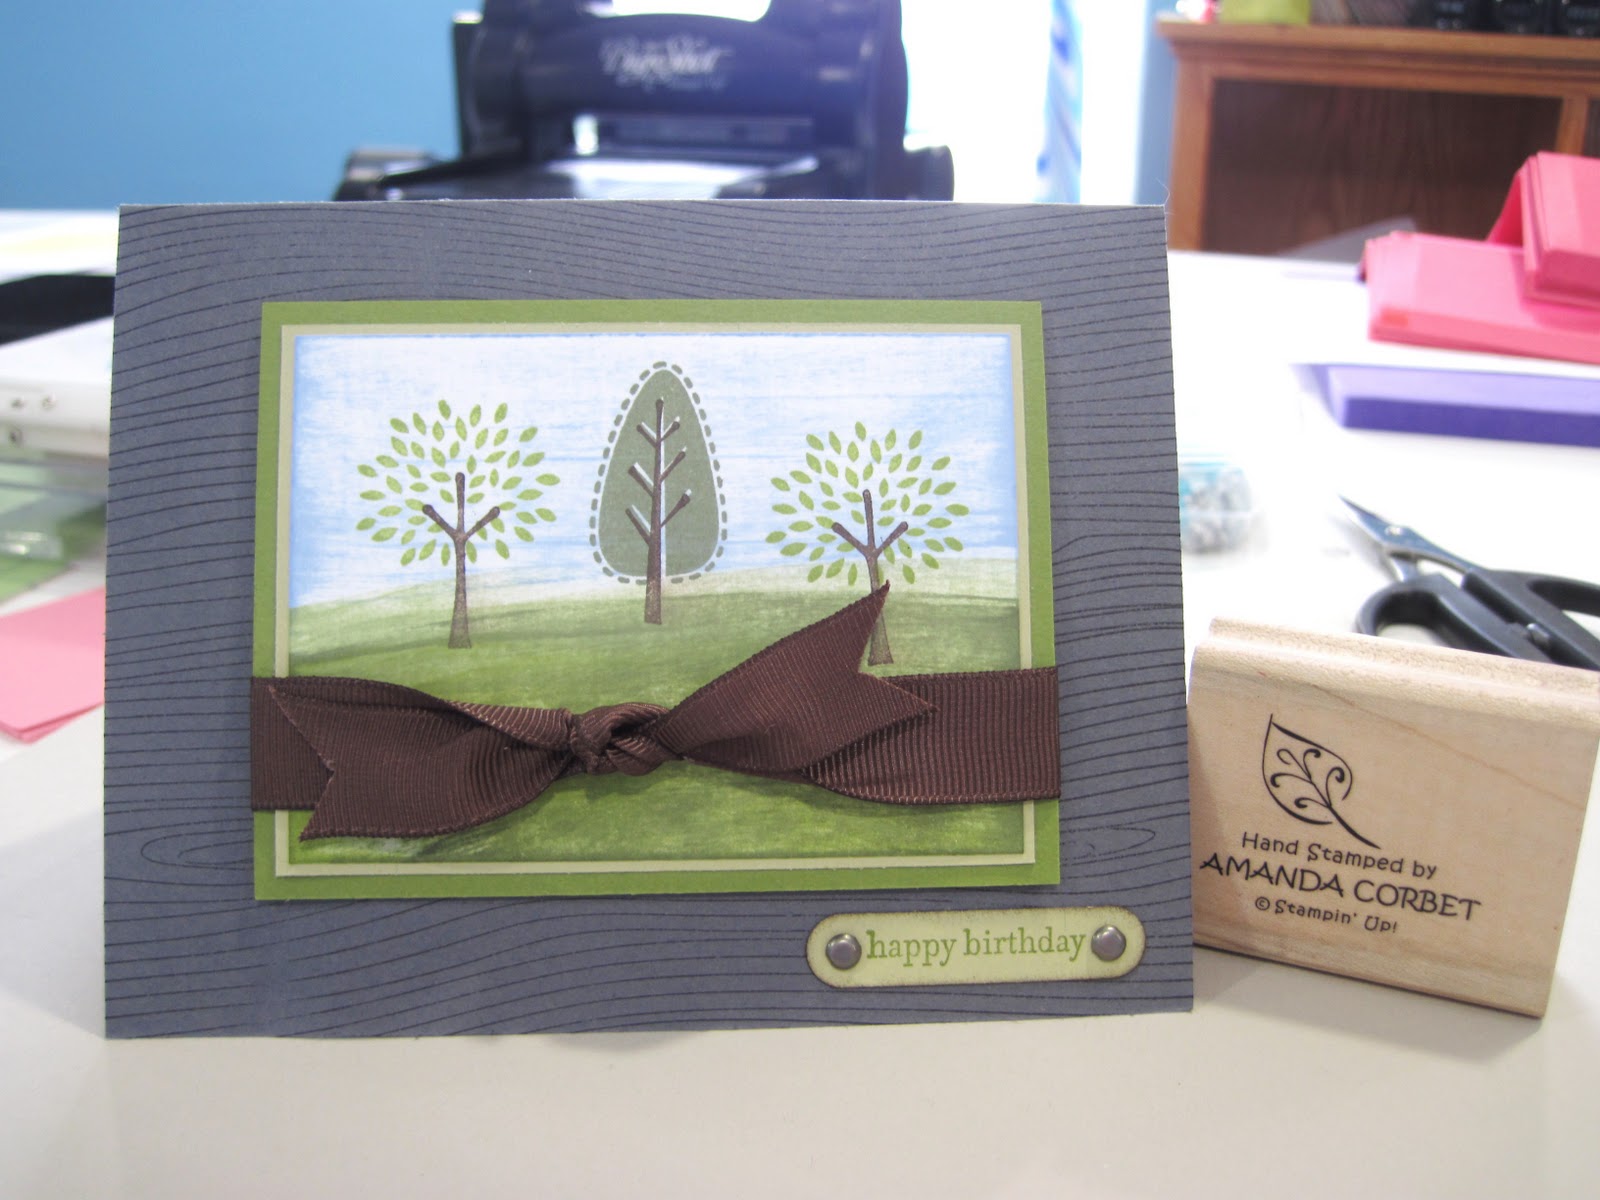
Next a piece of Whisper White cardstock was cut at 2 5/8” x 3 5/8”. The top half of the cardstock was smeared with Bashful Blue ink using the direct to paper technique. The bottom half was smeared with Old Olive and Always Artichoke ink to look like hills. The trees from Trendy Trees were stamped in Early Espresso, Old Olive, and Always Artichoke. This image panel was adhered to a piece of River Rock cardstock cut at 2 ¾” x 3 ¾”, which was then adhered to a piece of Old Olive cardstock cut at 3” x 4”.

A piece of 5/8” Chocolate Chip Grosgrain ribbon (retired) was tied around the panel into a knot. The panel was adhered to the card front with Stampin’ Dimensionals. The greeting from Teeny Tiny Wishes was stamped on a scrap of River Rock cardstock in Old Olive ink. The greeting was punched out with the Word Window punch and the edges were sponged with Early Espresso ink. The Needle Tool and Mat Pack were used to pierce a hole through each side of the greeting all the way through the card front. Silver brads were added into the holes.

That’s it for this quick and simple masculine card! I hope you’ve enjoyed it as well and will try the direct to paper technique sometime. Have fun stamping!