Showing posts with label Christmas Cards. Show all posts

Tuesday, February 18, 2014

Christmas Star

Here is another quick and pretty card from the December Make and Take. These stamps were some of the ones that you could buy individually. I just love the neutral colors of this one. It's just so simple and elegant. 


  • Early Espresso card stock 4-1/4" x 11", scored at 5-1/2"
  • Crumb Cake card stock 4" x 5-1/4"
  • Very Vanilla card stock 3-7/8" x 5-1/8"
  • Very Vanilla card stock 3-7/8" x 5-1/8" (inside)
  • 18" Crumb Cake Taffeta Ribbon
  • Stamps: Christmas Star, Magical Season
  • Ink: Soft Suede, Versamark
  • Accessories: Gold embossing powder, Embossing Buddy, Heat Tool, Large Pearl Basic Jewel, Crumb Cake Taffeta Ribbon
Start off by folding the Early Espresso card stock on the score line. Next stamp the lovely Christmas Star image onto the bottom of both of the Very Vanilla card stock pieces in Soft Suede ink. Glue one of these down on the inside of the card so you have a space to write a message you can actually see. 


Rub your Embossing Buddy all over the bottom of the other Very Vanilla card stock and stamp the greeting from Magical Season onto the card stock in Versamark ink. Cover the stamped image with Gold embossing powder, tap off the excess, and heat it with the Heat Tool. Glue this layer onto the Crumb Cake card stock and then onto the card front.


Finally add a large pearl into the center of the star for a little bling and wrap the ribbon around the top of the card front and tie it into a bow. Super duper easy yet super pretty! 


Monday, February 17, 2014

Skating Merry Christmas Card

Are you ready for another adorable, yet very late, Christmas card idea? I totally LOVE the big beautiful polka dots in this DSP! 


  • Sahara Sand Card Stock 5-1/2" x 8-1/2", scored at 4-1/4"
  • Whisper White Card Stock 3-1/2" x 4-3/4"
  • Polka dot Season of Style DSP 3-1/4" x 4-1/2"
  • Season of Style DSP 1-1/4" x 4"
  • 15" Real Red Taffeta Ribbon
  • Stamps: For The Birtds
  • Ink: Stazon
  • Markers: Cherry Cobbler, Pear Pizzaz, Soft Sky
  • Accessories: XL Oval Punch, Dazzling Details, Stampin' Dimensionals
This one goes together pretty quickly once you have all the pieces cut. Glue the polka dot Season  of Style DSP onto the Whisper White card stock. Glue the red Season of Style DSP onto the bottom of this layer. Then wrap the Real Red Taffeta ribbon around the card stock and tie it into a knot and stick this layer onto the card front with Stampin' Dimensionals. 


For the adorable little birdie stamp the image from For the Birds onto a scrap of Whisper White card stock in Black Stazon ink. Color in the bird with the markers and punch out the image with the XL Oval Punch. Stick this onto the card front with a couple Stampin' Dimensionals and scribble on some Dazzling Details around the bird to make the "ice" sparkle.


So cute! I cased this card from somewhere, but I have absolutely no idea where. If you happen to know the original creator let me know so I can give them credit. 


Candy Stripe Snowflakes

I have another cute card from the November Make and Take to share with you today. Hopefully you still have some of this paper and the stamp set if you would like to re-create this fun yet simple card. 


  • Crumb Cake card stock 5-1/2" x 8-1/2", scored at 4-1/4"
  • Whisper White card stock 3-1/4" x 5-1/2"
  • Season of Style DSP 1-1/2" x 5-1/2"
  • Cherry Cobbler card stock 1/2" x 5-1/2"
  • 20" Silver 1/8" Ribbon
  • Stamps: Endless Wishes
  • Ink: Soft Suede, Gumball Green, Cherry Cobbler 
  • Accessories: Scallop Trim Border Punch, Rhinestones

For this sweet and simple Christmas card start out by folding the Crumb Cake card stock on the score line. Then stamp the snowflake image from Endless Wishes all over the top and bottom of the card front in Soft Suede ink. Now take the Whisper White card stock and stamp the "merry" in the upper left hand corner in Gumball Green ink. Stamp the "christmas" just below the merry in Cherry Cobbler ink.

Use the Scallop Trim border punch along the bottom edge of the Whisper White card stock then glue this piece onto the card front. Glue the DSP onto the Whisper White card stock just above the scalloped edge. Then glue the strip of Cherry Cobbler card stock over the edge of the DSP.


Wrap the Silver 1/8" Ribbon around the card front and tie it into a knot. Then, just to add a little more sparkle and shine, add a Rhinestone onto each end of the "merry". 


Ta daa! Fast and easy Christmas card done! 


Sunday, February 16, 2014

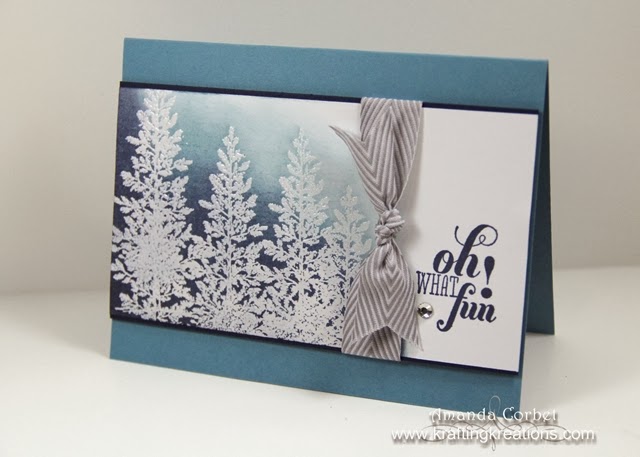
Oh What Fun!

This is one of the cards from the November Make and Take. I'm trying to get caught up on some of these cards from last year that I hadn't posted yet. This card was cased from Renee at the Colour Q blog. 


  • Stamps: Lovely as a Tree, Christmas Messages
  • Card Stock: Marina Mist, Night of Navy, Whisper White
  • Ink: Marina Mist, Night of Navy, Versamark
  • Accessories: Clear Embossing Powder, Embossing Buddy, Heat Tool, Stampin' Sponge, Smoky Slate Chevron Ribbon, Rhinestones, Stampin' Dimensionals

For this card I started off with a piece of Marina Mist card stock cut at 5-1/2" x 8-1/2" and scored at 4-1/4". Next I cut a piece of Whisper White card stock 3" x 5-1/2". I stamped the pin tree from Lovely as a Tree several times on the left side of the card stock in Versamark ink, covered the stamped image with clear embossing powder and heated it with my Heat Tool. 

Next I sponged on some Marina Mist ink making sure not to go past the right side of the trees and not covering the card stock completely. Then I sponged on some Night of Navy ink in the lower left hand corner making sure not to cover the Marina Mist ink completely. 


The greeting from Christmas Messages was stamped onto the right side of the card stock in Night of Navy ink. Then this panel was adhered onto a 3-1/8" x 5-1/2" piece of Night of Navy card stock.


I wrapped a piece of Smoky Slate Chevron ribbon around the panel and tied it into a knot. I adhered this panel onto the card front with Stampin' Dimensionals and added a large Rhinestone next to the greeting. 

This card was so much fun, with a great affect, but was really pretty easy. 


Saturday, February 15, 2014

Oh Christmas Tree

Here is another card from the December Make and Take. You'll notice that the last few months a lot of the cards for the Make and Take have been pretty easy. I thought that since the time of year when we made these is already pretty busy (so busy that I couldn't get these cards posted when the supplies were current) it would be nice just to keep things somewhat simple. I cased this card almost exactly from another one, but it's been so long that I have no idea where the original idea came from. 

  • Stamps: Special Season, Christmas Messages
  • Card Stock: Crumb Cake, Whisper White
  • DSP: Season of Style DSP
  • Ink: Gumball Green, Early Espresso
  • Accessories: Cherry Cobbler Ribbon 1" Ribbon, Champagne Glimmer Paper, 3/16" Corner Punch, Stampin' Dimensionals, Glue Dots
If you want to make this card start off by grabbing a piece of Crumb Cake card stock and cut it at 5-1/2" x 8-1/2" and score it at 4-1/4". Now cut a piece of the red plaid Season of Style DSP (if you still have some left) 3-1/2" x 4-1/2". Use the 3/16" Corner punch to round the bottom two corners of the DSP. Cut a piece of Cherry Cobbler ribbon 6" long, trim one end into a dove-tail shape, and adhere the ribbon onto the DSP with Glue Dots. Fold the end of the ribbon around to the backside of the DSP and glue it in place with a Glue Dot. Now adhere this onto the card front.

I really don't like seeing rough edges of ribbon on my cards so I always try to figure out some way to tuck them behind another panel or otherwise hide them. Mostly because I can't cut straight and want to hide the crooked end.


Next cut a piece of Whisper White card stock 2-3/4" x 3-1/2". Stamp the tree from Special Season onto the card stock in Gumball Green ink. Now stamp the greeting from Christmas Messages onto the card stock in Early Espresso ink. Cut a piece of Champagne Glimmer Paper 1/8" x 2-3/4" and adhere it onto the bottom of the card stock with 2-Way Glue Pen. Then adhere this panel onto the card front with Stampin' Dimensionals.


On the inside stamp the tree again in Gumball Green ink and stamp the message that accompanies the greeting from Christmas Messages in Early Espresso ink.

Now you've finished a simply yet fun Christmas card! It's not too early to get started working on next year's cards right???


Saturday, February 1, 2014

Present Gift Card Holder

I'm working through getting caught up on some cards that I made last year but never got around to posting. This gift card holder my guests made at the December Make and Take. 

Ever since I saw this style of card presented at Convention by Shelli I wanted to make one! I also thought it would be fun to make it a Christmas present and adjust it so that it can hold a gift card. Gift cards are great gifts for those hard to buy for people, but I hate just presenting them with a card in an envelope. It makes it more fun to give if the gift card is in something fun and pretty. So here comes the present card! 

It would probably be easier to just to a tutorial on this project instead of trying to describe that so I will work one up pronto and link it to this post when it's finished. Hopefully you already have the fabulous Gift Bow Bigz Die. But if you don't I will also show you how you can create a different bow. 


  • Stamps: Christmas Tagables
  • Card Stock: Cherry Cobbler, Gumball Green, Whisper White
  • DSP: Season of Style
  • Ink: Gumball green
  • Accessories: Champagne Glimmer Paper, Scallop Edge Border Punch, Gift Bow Die, Sticky Strip, Simply Scored


Thursday, January 30, 2014

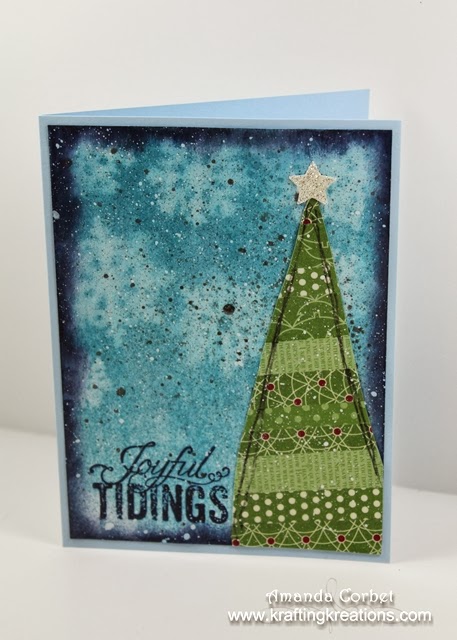
Mixed Media Christmas Cards

Last November I joined in on the Mixed Media Christmas Card swap that Tracy hosts. I totally had fun with this! I just started and kept adding and adding and adding until I felt it was done. There were only ten cards to make so it wasn't too bad to reproduce. I just worked through it one step at a time. 


For the card base I cut a piece of retired Bashful Blue card stock 6-1/4" x 9". With the 9" side against the top of my Simply Scored I scored at 4-1/2". For the main image part I started off by cutting a piece of Mixed Media paper 4-1/4" x 6". I watered down some Whispering Turquoise DecoArt paint and just quickly brushed it over the entire piece of paper and let it dry. 

I die cut some snowflakes from the retired Northern Flurries Strip die from Stampin' Up, placed those on the paper, then misted the card stock with Island Indigo ink mixed with rubbing alcohol. Since the snowflakes were just a mask I picked them up and reused them on the other pieces.  


Next I took a Stampin' Sponge and some Night of Navy ink and sponged around the edges of the paper. I also stamped the greeting from Christmas Messages in the lower left hand corner in Night of Navy ink. Then I coated the whole thing with DecoArt Decou-page. I had to be quick when brushing over the greeting so I didn't smear the ink to much, but I love how the ink smeared around the edges of the paper. Next I spritzed the panel with some retired Silver Foil Smooch Spritz.

For the tree I cut hacked out some triangle shapes from Mixed Media paper. I really do mean hacked. I was't even attempting anything perfect or straight or the same length. I had taken a variety of retired Christmas DSP and cut random width strips of multiple patterns. I added decou-page onto the paper, and layered the strips, allowed it to dry, then trimmed the strips even with the Mixed Media paper edge. I added some black lines with a charcoal pencil and adhered the tree onto the panel and cut the bottom edge of the tree even with the edge of the panel.


I used the retired small star punch from Stampin' Up on some Silver Glimmer Paper to punch the star and glued it onto the top of the tree. Finally. I took some thinned down Titanium White DecoArt paint and used an old stencil brush to splatter the paint all over the paper. After allowing the splatters to dry I deemed these as done and adhered them onto the card front with some Multipurpose Liquid Adhesive.


As I mentioned before, this was so. much. FUN!!! I really am enjoying exploring mixed media. Plus it helps me use up some of my stash hoard of retired Stampin' Up supplies. 


Thursday, October 31, 2013

Merry Christmas!

I have had the idea for this card bouncing around in my head for the last two weeks! But I couldn't manage to get into my craft room long enough to make it until last night. Yes, it's been two weeks since I've made a card. Gasp! I know.... it's just terrible! I have had a moment here or there to work some on Christmas gifts, but you can't see those until after Christmas. 


  • Stamps: Very Merry, Endless Wishes photopolymer
  • Card Stock: Coastal Cabana, Whisper White, Pool Party Coredinations
  • Ink: Pool Party, Coastal Cabana, Midnight Muse
  • Accessories: Mosaic Punch, Large Oval Punch, Silver Glimmer Paper, Rhinestones, Stampin' Dimensionals, Pretty Print embossing folder, Silver 1/8" Ribbon, Glue Dot, Sanding Block


I created this card for the Craft Project Central Creating Pretty Cards challenge #28. Today is the deadline for it so I'm just barely squeaking by on this one! Take a look at the other wonderful cards that were entered! 

This card was pretty simple to put together. I wasn't entirely feeling the mojo last night so I just stuck with the first card front piece that I found on my desk and stuck with a monochromatic look. So if you want to recreate this start off by cutting a piece of Coastal Cabana card stock 4-1/4" x 11" and score it at 5-1/2". Next cut a piece of Pool Party coredinations card stock 3-3/4" x 5" and run it through the Big Shot in the Pretty Print embossing folder. Use the Sanding Block to sand off some of the raised texture then adhere this onto a 4" x 5-1/4" piece of Whisper White. Then adhere this onto the card front. 

Next cut three strips of Silver Glimmer paper 1/8" x 3-3/4" and use 2-Way Glue Pen to adhere the strips evenly across the card front. Next stamp the image from Very Merry onto a scrap of Whisper White card stock in Coastal Cabana ink three times. Punch out each ornament with the Mosaic punch and adhere them onto the card front with a Stampin' Dimensional. Add a small Rhinestone into the center of each ornament. Next tie a small bow in the 1/8" Silver ribbon and use a Glue Dot to adhere it just above the middle ornament. 

For the greeting I stamped the "Merry" in Coastal Cabana ink, the "Christmas" in Midnight Muse ink, and the snowflakes in Pool Party ink. I just love these Photopolymer stamps! It is so easy to get the stamp in exactly the right spot! Love it! Anyway, after I got all my stamping for my greeting done I punched it out with the Large Oval punch. I also used the Large Oval punch on a scrap of Coastal Cabana card stock. I used some Paper Snips to cut the oval in half and adhered the two halves behind the greeting oval. This was finally adhered onto the card front with a Stampin' Dimensional. 

Done! A fun and simple Christmas card all ready to go! 


Thursday, October 24, 2013

Christmas Snowflake

Here is the Christmas card from the September Make and Take! Beginning in July or August I always include one Christmas card in the Make and Take projects all the way through December. That way my guests have plenty of ideas for their Christmas cards! This one was inspired by Jen's lovely creation that you can find HERE. 


  • Stamps: Festive Flurry
  • DSP: Winter Frost
  • Card Stock: Smoky Slate, Whisper White, Midnight Muse
  • Ink: Versamark, Midnight Muse
  • Accessories: Festive Flurry Framelits, Vintage Faceted Designer Buttons, Silver 1/8" ribbon, glue Dots, Stampin' Dimensionals


There are a few steps to this card, but overall it wasn't that difficult. To make this start off with a piece of Smoky Slate card stock cut at 5-1/2" x 8-1/2" and scored at 4-1/4". Next use the largest Festive Flurry Framelit to cut the snowflake from the top of the card front. Cut a piece of Winter Frost DSP 4" x 5-1/4" and adhere it onto the inside of the card so you see the pattern through the snowflake. Not only is this a cool effect for the front, but you are decorating the inside too! 


Next you will want to stamp the 2nd from smallest image from Festive Flurry onto a scrap of Midnight Muse card stock in Versamark ink. Cover the stamped image with Silver embossing powder, tap off the excess, and heat it with your Heat Tool. Now cut out your snowflake in the Big Shot with the 2nd from smallest Festive Flurry framelit. Adhere the snowflake onto the card front inside the big snowflake with a Stampin' Dimensional. Next thread some 1/8" Silver Ribbon through a Vintage Faceted Designer Button, tie the ribbon into a bow, and adhere the button into the center of the snowflake with a Glue Dot. 


I wanted to do something a little different for the greeting then what Jen did. So I cut a piece of Whisper White card stock 1" x 4". Stamp the greeting from Greetings of the Season onto the strip in Midnight Muse ink and used Paper Snips to cut the right end of the card stock into a dove-tail shape. Next cut a piece of Midnight Muse card stock 1-1/4" x 4-1/4". Adhere the Whisper White banner onto the Midnight Muse card stock then use Paper Snips to cut a matching dove-tail shape onto the one end. Adhere this onto the card front with a couple Stampin' Dimensionals. 

I didn't get a picture of it, but on the inside I just stamped a few snowflakes in Midnight Muse ink to make it a little prettier. I haven't decided for sure yet, but I just might have to do something like this for my Christmas cards this year. I just LOVE snowflakes! 


Sunday, January 8, 2012

Vintage Stocking Christmas

This is the third card from the December Make and Take.


Stamps: Stitched Stockings, Teeny Tiny Wishes
Card Stock: Crumb Cake, Always Artichoke, Very Vanilla, Real Red, Early Espresso
DSP: Frostwood Lodge
Ink: Real Red, Early Espresso
Accessories: Decorative Label Punch, 2-3/8” Scalloped Circle punch, 1-3/4” Circle punch, Stocking punch, Early Espresso baker’s twine, Mini Jingle Bells, Stampin’ Dimensionals, Paper Piercer, Mat Pack, Silver Brads, Stampin’ Sponge, Stampin’ Dimensionals, Snow Burst embossing folder.

The card base was cut at 5-1/2” x 8-1/2” and scored at 4-1/4”. A piece of Frostwood Lodge DSP was cut at 2” x 5-1/2”, a piece of Very Vanilla card stock was cut at 2-1/4” x 5-1/2”, and a piece of Always Artichoke card stock was cut at 3” x 5-1/2”. All of the pieces, including the card front, were sponged with Early Espresso ink. The DSP was adhered onto the Very Vanilla, this was then adhered onto the Early Espresso, and finally the panel was adhered onto the card front. The greeting from Teeny Tiny wishes was stamped in Early Espresso ink in the bottom right hand corner of the card front.

The 1-3/4” Circle punch was used on a scrap of Very Vanilla card stock. This circle was run through the Big Shot in the Snow Burst folder. The 2-3/8” Scalloped Circle punch was used on a scrap of Early Espresso card stock. The edges of both circles were sponged with Early Espresso ink and the Very Vanilla circle. The Decorative Label punch was used on a scrap of Real Red card stock. The label was cut in half width-wise and the label halves were adhered behind the scalloped circle. The Paper Piercer and Mat Pack were used to pierce a hole in each of the decorative label halves and a Silver Brad was added. This was adhered onto the card front.

The image from Stitched Stockings was stamped in Real Red ink on a scrap of Very Vanilla card stock and was punched out with the Stocking Builder punch. The edges were sponged with Early Espresso ink. Then the Paper Piercer and Mat Pack were used to pierce a hole in the top of the stocking. A piece of Early Espresso baker’s twine was threaded through the hole and through a Mini Jingle Bell (I used a needle threader for this). The baker’s twine was tied into a little bow and the stocking was adhered onto the card front with Stampin’ Dimensionals.

Lots of sponging and lots of punches, but the result is a very vintage and masculine looking Christmas card.

Thanks for stopping by!

Saturday, January 7, 2012

Sparkly Snowflake

Here is the second card from the December Make and Take. I just love snowflakes and I wanted to share a really special sparkly one in this card. Take a look:


Stamps: Four the Holidays
Card Stock: Whisper White, Pool Party
DSP: Silver Glimmer Paper
Ink: Island Indigo
Accessories: Pool Party Ruffled ribbon, Snow Burst embossing folder, Ticket corner punch, Snowflake punch, Stampin’ Dimensionals

The card base is Whisper White card stock cut at 5-1/2” x 8-1/2” and scored at 4-1/4”. A piece of Whisper White card stock was cut at 3-7/8” x 5-1/8”. All but approximately 1” of the cardstock was inserted into the Snow Burst embossing folder and was run through the Big Shot. The greeting from Four the Holidays was stamped on the bottom smooth portion in Island Indigo ink. This was adhered onto a 4” x 5-1/4” piece of Pool Party card stock. A piece of Pool Party Ruffled ribbon was wrapped around the panel and tied into a knot. This panel was adhered onto the card front.

A piece of Pool Party card stock was cut at 2-3/4” x 2-3/4”. The corners were punched with the Ticket corner punch. A piece of Silver Glimmer paper was cut at 2-1/4” x 2-1/4” and was adhered in the center of the Pool Party card stock. Next a piece of Whisper White card stock was cut at 2-1/2” x 2-1/2”. The corners were punched with the Ticket Corner punch. Then the Snowflake punch was used to punch a snowflake from the center of the Whisper White card stock. This Whisper White card stock was adhered on top of the Silver Glimmer paper with Stampin’ Dimensionals. This panel was adhered onto the card front with more Stampin’ Dimensionals.


The negative of the snowflake reveals the shimmery paper without the hassle of trying to punch the snowflake out of glimmer paper and it adds dimension.

Thanks for stopping by!

Friday, January 6, 2012

Frostwood Christmas

This is the first card from the December Make and Take. I wanted something super simple and pretty so show that Christmas cards don’t have to be terribly time consuming to be gorgeous. Take a look:


Stamps: Baroque Motifs, Bright Hopes
Cardstock: Whisper White, Cherry Cobbler
DSP: Frostwood Lodge
Ink: Cherry Cobbler, Versamark
Accessories: Iridescent Ice embossing powder, Heat Tool, Scallop Trim border punch, Cherry Cobbler Dotted Scallop ribbon

The card base is Whisper White card stock cut at 4-1/4” x 11” and scored at 5-1/2”. The swirls from Baroque Motifs were stamped onto the card front in Versamark ink. Iridescent Ice embossing powder was poured over the stamped image, the excess tapped off, and heated with the Heat Tool.

A piece of Cherry Cobbler card stock was cut at 1” x 4-1/4” and one long edge was punched with the Scallop Trim border punch. This was adhered behind the top of a 2” x 4-1/4” piece of Frostwood Lodge DSP. This was adhered onto the card front. A piece of Cherry Cobbler Dotted Scallop ribbon was wrapped around the card front and tied into a knot. The greeting from Bright Hopes was stamped in Cherry Cobbler ink in the upper left hand corner of the card front.


This card was super quick and super easy. The swirls look so sparkly and wonderful in real life. The picture just does not show it well enough.

Thanks for stopping by!

Thursday, December 22, 2011

Stocking Punch and Card Class

Unfortunately the Stocking Builder Punch will NOT be carried over into the Idea Book and Catalog next year. Once the current stock is depleted you will not be able to order it! So if you don't already have it then make sure you order it soon before it's too later and there are no more!

I also wanted to share with you the project from the Stocking Punch Class that I never posted. So here they are:

*********************************************************************************

Merry and Bright


Stamps: Stitched Stockings
Card Stock: Old Olive, Whisper White
DSP: Letters to Santa
Ink: Old Olive
Accessories: Snow Burst embossing folder, Stocking Builder Punch, 5/8" Chocolate Chip Satin ribbon, Stampin' Dimensionals, Simply Score, craft knife


*********************************************************************************

Hobby Horse 


Stamps: Stitched Stockings
Card Stock: Very Vanilla, Early Espresso, Crumb Cake
DSP: Letters to Santa
Ink: Pretty in Pink, Early Espresso
Accessories: Perfect Polka Dots embossing folder, Stocking Builder Punch, 1/8" Rich Razzleberry Taffeta ribbon, Basic Black Marker, Two-Way Glue Pen, Stampin' Dimensionals


*********************************************************************************

Stockings All in a Row


Stamps: Curly Cute
Card Stock: Early Espresso, Cherry Cobbler, Very Vanilla, Old Olive
DSP: Letters to Santa
Ink: Early Espresso
Accessories: Stocking Builder Punch, Scallop Edge Border Punch, Paper Piercer, Mat Pack, Mini Jingle Bells, Cherry Cobbler Baker's Twine, Stampin' Dimensionals, Two-Way Glue Pen, Corner Rounder Punch


*********************************************************************************


Ice Skates 


Stamps: Simple Snowflake, Stitched Stockings, Teeny Tiny Wishes
Card Stock: Night of Navy, Bashful Blue, Whisper White, Brushed Silver
DSP: Letters to Santa
Ink: Bashful Blue, Night of Navy
Accessories: Basic Black Marker, Scallop Trim Border Punch, Stocking Builder Punch, Bird Punch, Modern Label Punch, Word Window Punch, 5/8" Bashful Blue Satin ribbon, Silver Mini Brads, Stampin' Dimensionals, Two-Way Glue Pen, Paper Snips, Paper Piercer, Mat Pack


*********************************************************************************


Baby Booties 


Stamps: Stitched Stockings, Teeny Tiny Wishes
Card Stock: Marina Mist, Whisper White, Early Espresso, Bashful Blue
DSP: Letters to Santa
Ink: Marina Mist
Accessories: Stocking Builder Punch, Dotted Scallop Ribbon Punch, 5/8" Bashful Blue Satin Ribbon, Curly Label Punch, Perfect Polka Dots embossing folder, Basic Rhinestones, Scallop Square Duo die, Stampin' Dimensionals, Paper Snips, Two-Way Glue Pen


*********************************************************************************


Noel 


Stamps: None
Card Stock: Always Artichoke, Old Olive
DSP: Letters to Santa, Red Glimmer Paper
Ink: None
Accessories: Lucky Limeade Marker, Dazzling Details, Stocking Builder Punch, Two-Way Glue Pen, Tombow Multi-Purpose Adhesive, Lucky Limeade ribbon, Stampin' Dimensionals


*********************************************************************************


 Vintage Christmas Stocking


Stamps: Stitched Stockings, Season of Joy
Card Stock: Crumb Cake, Very Vanilla, Early Espresso
DSP: Letters to Santa
Ink: Cherry Cobbler
Accessories: Decorative Label Punch, Stocking Builder Punch, Snow Burst Folder, 5/8" Very Vanilla Satin Ribbon, Stampin' Dimensionals, Stampin' Sponge, Two-Way Glue Pen


*********************************************************************************

There are so many wonderful things you can create with the Stocking Punch so make sure to get yours on order soon if you don't already have it!

Thanks for stopping by!