Thursday, June 30, 2011

Butterfly Birthday

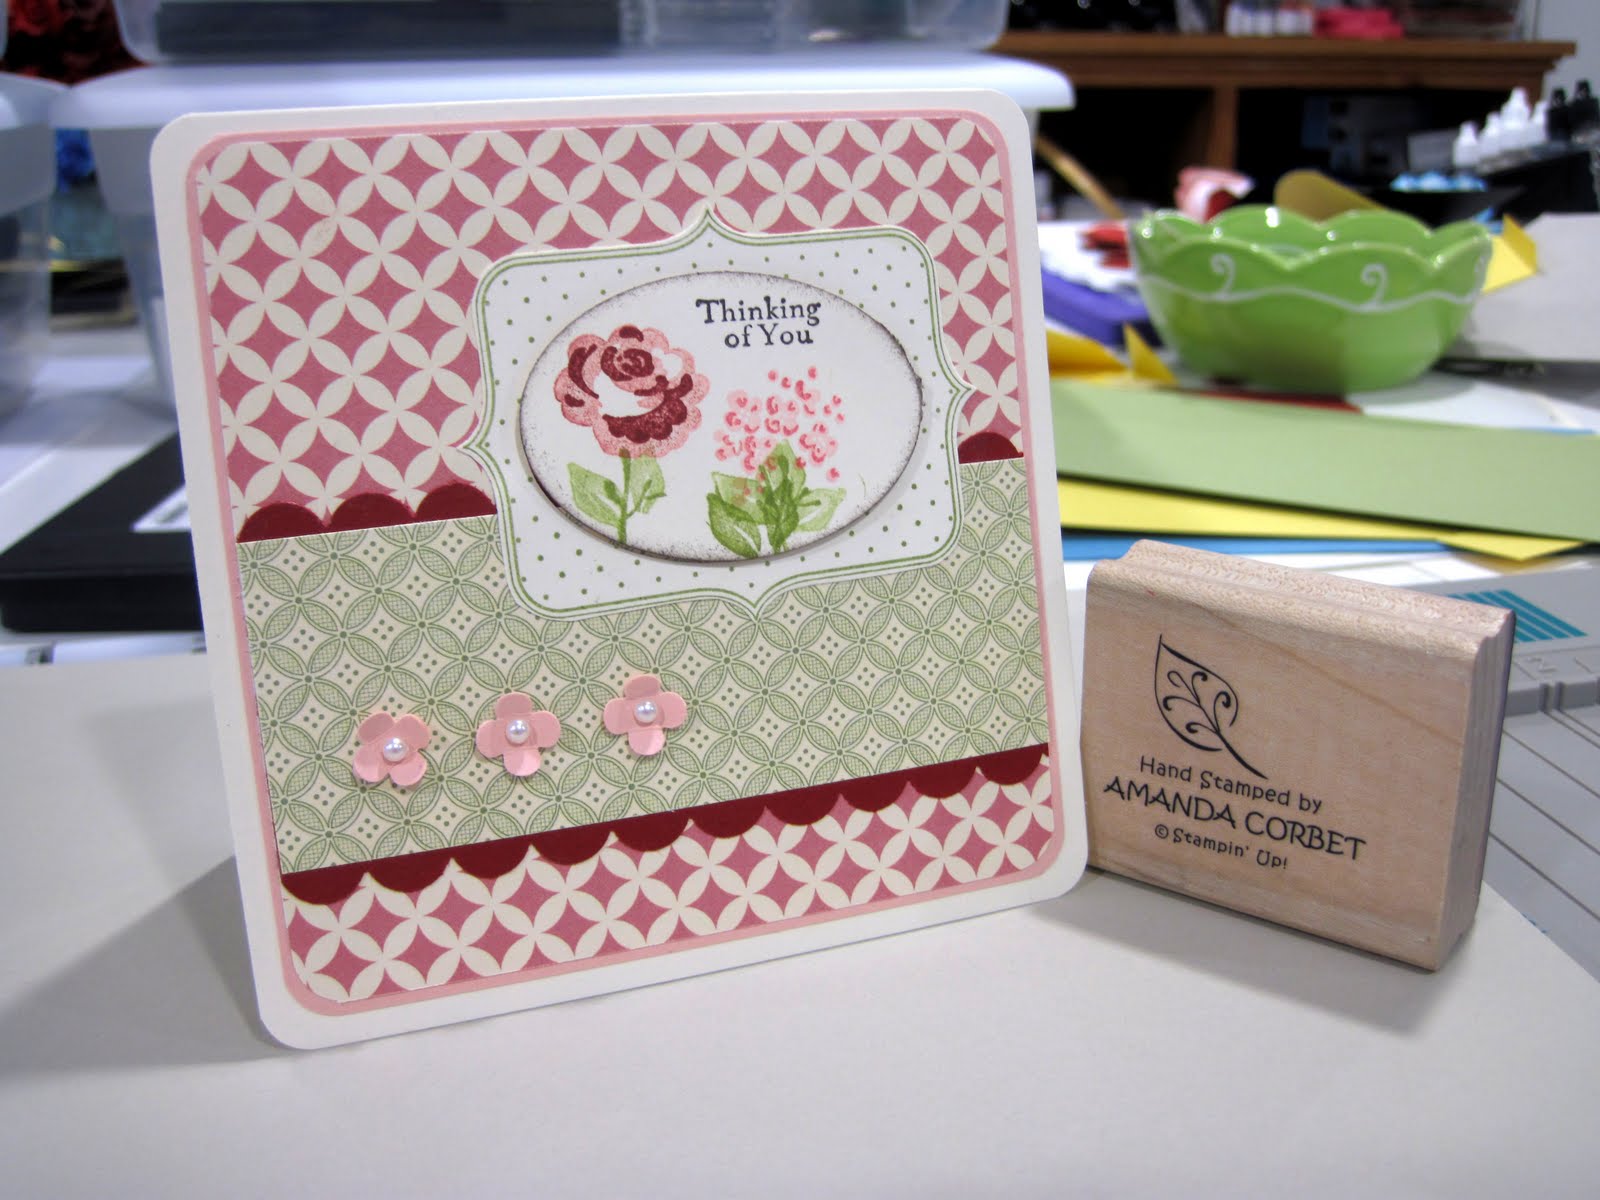
Good afternoon! Here is the fourth card from the April Make and Take. This one was cased from Carrie Gaskin the Artistic Avenger You can find her card HERE.


Stamps: Something to Celebrate, Vintage Vogue
Cardstock: Concord Crush, Pear Pizzaz, Whisper White, Bashful Blue, Marina Mist
Ink: Concord Crush, Old Olive
Accessories: Beautiful Wings Embosslit, Basic Grey marker, Basic Rhinestones Jewel Accents, Marina Mist 5/8” Grosgrain ribbon, Stampin’ Dimensionals, Needle Tool, Mat Pack, Corner Rounder Punch, Mini Glue Dots, Stampin Dimensionals.

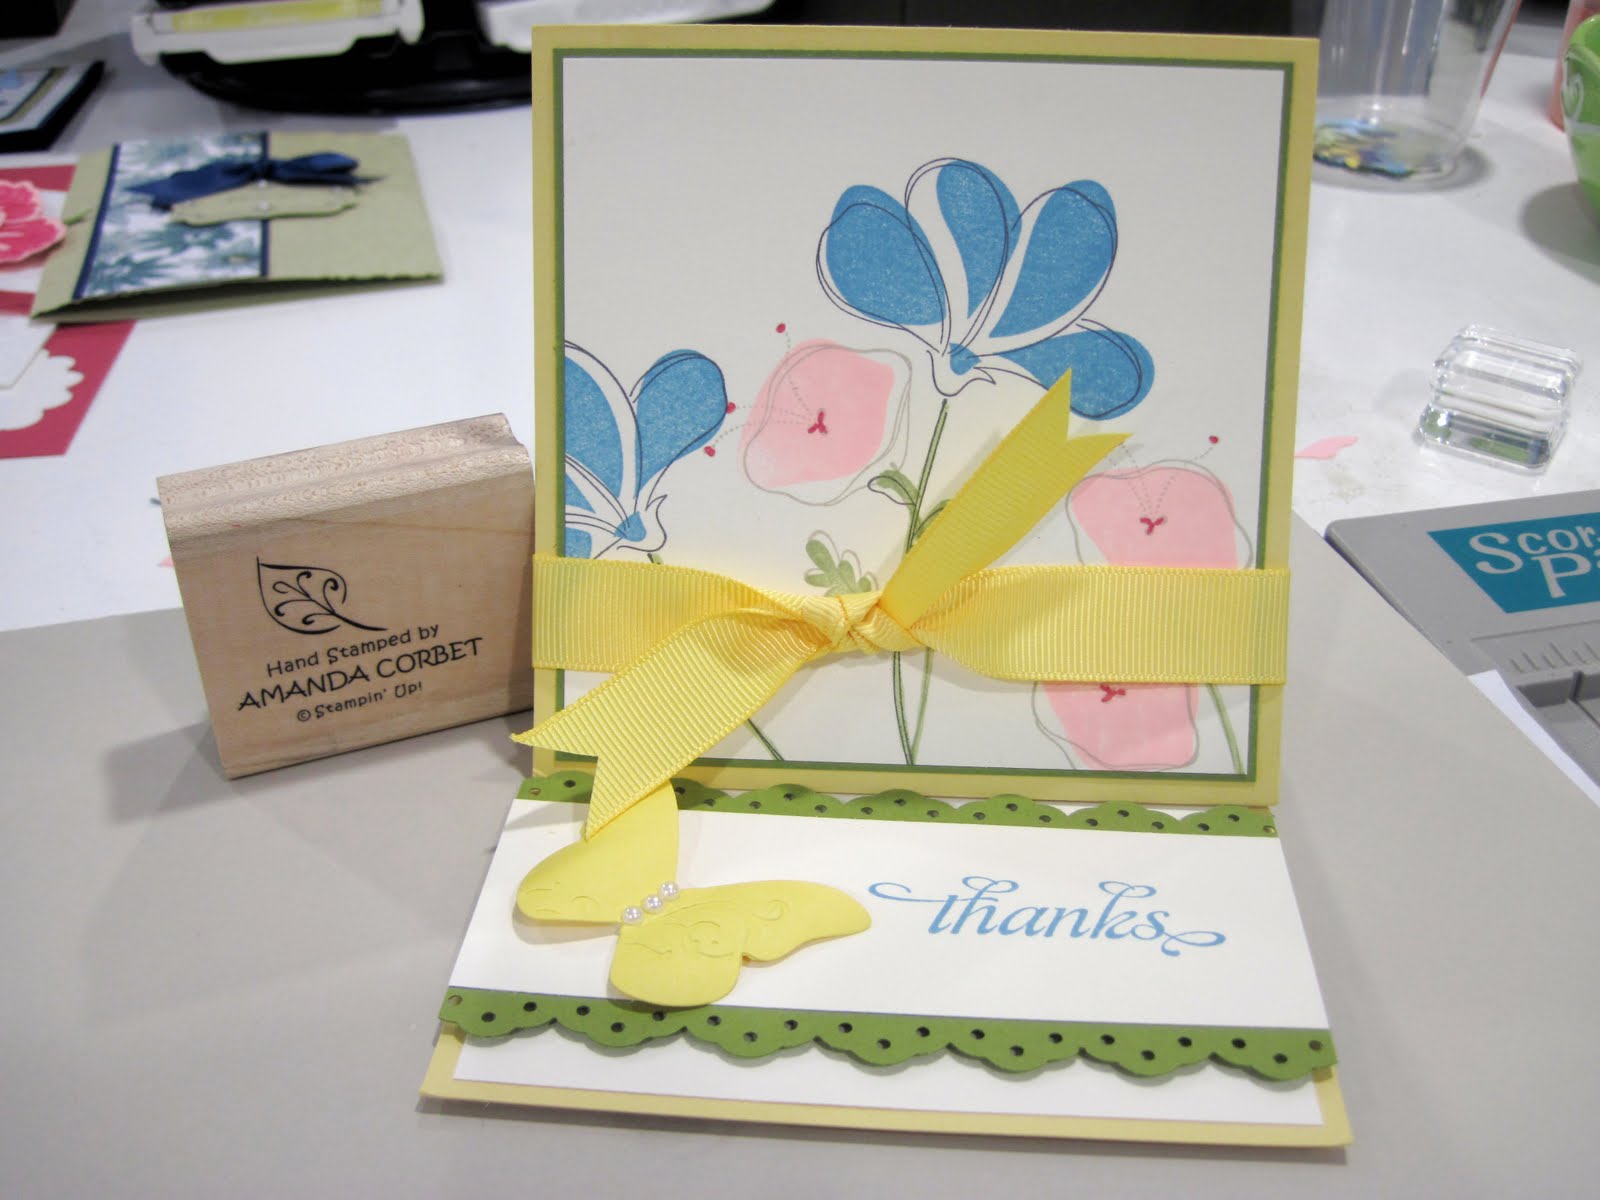
The card base is Concord Crush cardstock cut at 5 ½” x 8 ½” and scored at 4 ¼”. A piece of Whisper White cardstock was cut at 4” x 5 ¼” and was adhered to the card front. A piece of Pear Pizzaz cardstock was cut at 3 3/8” x 4 5/8”. The flourish stamp from Elements of Style was stamped all over the Pear Pizzaz cardstock in Old Olive ink. A piece of Concord Crush cardstock was cut at 3” x 4 ¼”. A piece of Whisper White cardstock was cut at 2 7/8” x 4 1/8”. Two of the corners on the stamped Pear Pizzaz cardstock, Concord Crush cardstock, and the small piece of Whisper White cardstock were punched with the Corner Rounder punch. Just make sure that you punch the same corners on both pieces. Next the stamped Pear Pizzaz cardstock was adhered to the card front.

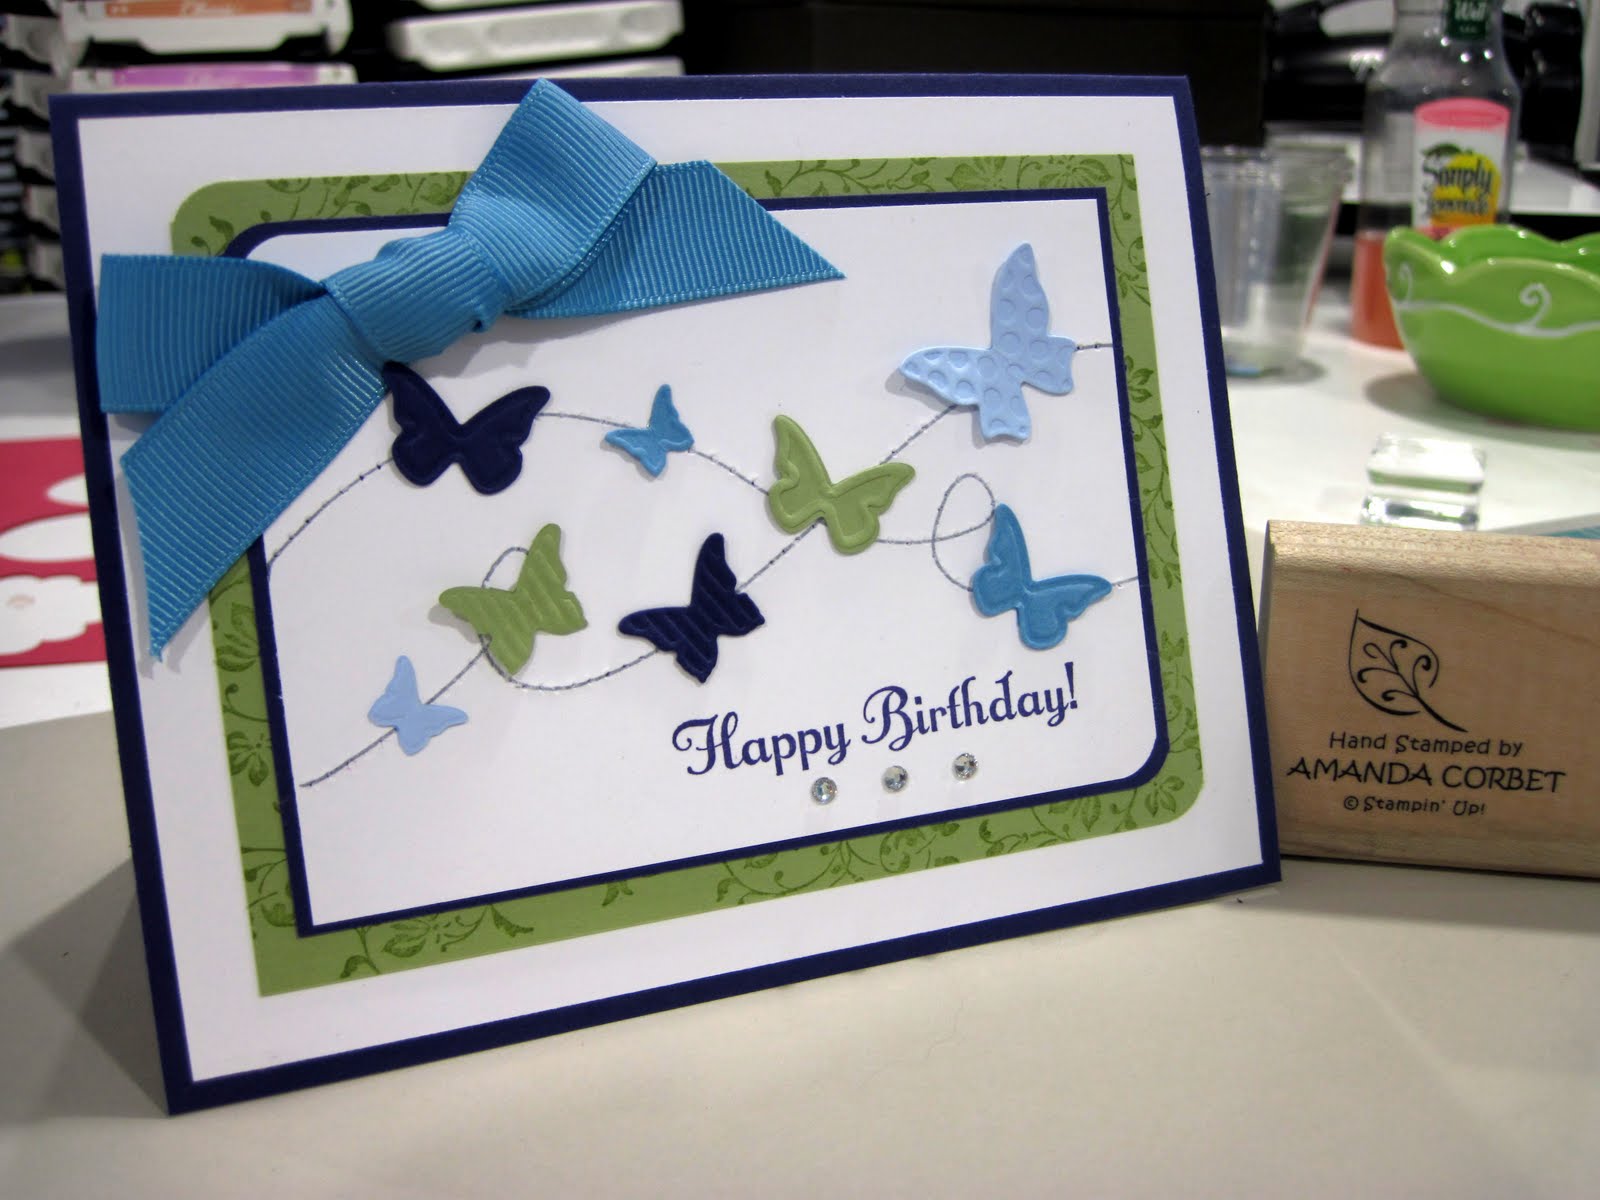
The lines were drawn free hand with the Basic Grey marker. Come on…. I know you can do it! They are just swirly lines, they don’t have to be perfect. The small piece of Whisper White was adhered to the Concord Crush cardstock. Next the Needle Tool and Mat Pack were used to pierce holes all along the swirly lines that you created.

Note: Make sure that you do the piercing AFTER the Whisper White cardstock is adhered to the Concord Crush cardstock. It will be tougher to pierce the holes through, but if you pierce first and then adhere the cardstock down you won’t be able to see your pierced holes very well.

The greeting from Something to Celebrate was stamped in Concord Crush ink in the bottom right hand corner of the Whisper White cardstock. Several butterflies were cut using the Big Shot and the Beautiful Wings Embosslit in various colors. The butterflies were adhered along the swirly line. Three Basic Rhinestone Jewel Accents were added just below the greeting. This panel was adhered to the card front using Stampin’ Dimensionals. A piece of Marina Mist 5/8” Grosgrain Ribbon was tied into a bow and adhered to the card front using several Mini Glue Dots.

Now you have a beautiful butterfly filled card! I hope you give it a try!

Awash With Flowers Thanks

Here is the third card from the April Make and Take. This one is an easel card. An easel card is a card that when closed lays flat, but when opened allows the card front to stay standing and view a portion of the inside of the card. I will have a tutorial on making an easel card for you Friday. But anyway….here is the card that we made:


Stamps: Awash With Flowers, Thank You Kindly
Cardstock: So Saffron, Old Olive, Very Vanilla
Ink: Sahara Sand, Basic Grey, Pretty in Pink, Melon Mambo, Pear Pizzaz
Accessories: Beautiful Wings Embosslit, Eyelet Border Punch, Pear Pizzaz Marker, Melon Mambo Marker, Daffodil Delight 5/8” Grosgrain ribbon, Basic Pearls Jewel Accents

The easel card base is made from So Saffron cardstock, again a tutorial will be posted Friday to show you how to make the easel card base for this size card. A piece of Very Vanilla cardstock was cut at 3 7/8” x 3 7/8”. The flower outlines from Awash With Flowers were stamped in a combination of Basic Grey and Sahara Sand ink. The solid flower images were stamped in Pretty in Pink and Marina Mist. The leaves were stamped in Pear Pizzaz ink. The stems were colored in with the Pear Pizzaz markers, and the pink flower centers and stamens were colored in with the Melon Mambo marker.

The stamped flower panel was adhered to a 4” x 4” piece of Old Olive cardstock and was then adhered to the card front. A piece of Very Vanilla cardstock was cut at 4” x 4” and was adhered inside the card. A piece of Old Olive cardstock was cut at 2 ¼” x 4 ½”. Both long sides of the cardstock were punched with the Eyelet Border Punch. The greeting from Thank You Kindly was stamped in Marina Mist ink on a 1 ½” x 4 ¼” piece of Very Vanilla cardstock. This was adhered to the punched Old Olive cardstock. Then this panel was adhered to the inside of the card using Stampin’ Dimensionals.

A butterfly was cut using the Big Shot and the Beautiful Wings Embosslit. The butterfly was adhered to the inside Very Vanilla panel using Mini Glue Dots. Three Basic Pearls Jewel Accents were added for the butterfly’s body. A piece of Daffodil Delight 5/8” Grosgrain ribbon was wrapped around the card front and tied into a knot.

The longest part of putting together this card was the stamping on the front Very Vanilla panel. But even though the stamping on this one was a bit tedious everyone liked the result and how to card stood open. This is such a fun technique to try.

Thanks for stopping by! Come back later to see the next card from the April Make and Take. I’ll give you a hint, it’s all about butterflies!

Wednesday, June 29, 2011

Vintage Paisley

Today I have for you the second card from the April Make and Take. This one showcases some products that will be in the new 2011 -2012 Idea Book & Catalog. This card was cased from a card created by Julie B. You can find here card HERE (http://justjulieb30.blogspot.com/2011/03/not-lost-but-glad-i-found-it.html) Here is the card we made:


Stamps: Four Frames (In the new catalog!), Teeny Tiny Wishes
Cardstock: River Rock, Night of Navy
DSP: Paisley Petals (In the new catalog!)
Ink: Night of Navy
Accessories: Decorative label Punch, Basic Pearls Jewel Accents, 5/8” Night of Navy Satin Ribbon, Stampin’ Dimensionals, Mini Glue Dots

The card base is River Rock cardstock cut at 5 ½” x 8 ½” and scored at 4 ¼”. The card front was run through the Big Shot in the Vintage Wallpaper Textured Impressions Folder. A piece of Paisley Petals DSP was cut at 1 ¾” x 5 ½” and was adhered to a 2” x 5 ½” piece of Night of Navy cardstock. This panel was adhered to the card front.

The frame from Four Frames was stamped onto a scrap of River Rock cardstock in Night of Navy ink. The greeting from Teeny Tiny Wishes was stamped in Night of Navy ink in the center of the frame. The frame was punched out with the Decorative Label Punch and was adhered to the card front with Stampin’ Dimensionals. Four pearls were added to each of the points on the sides of the label.

A piece of 5/8” Night of Navy Satin ribbon was tied into a bow, the ends trimmed, and adhered to the card front with Mini Glue Dots.

This card was super fast and easy to make and everyone really liked it!

Tuesday, June 28, 2011

Pink Mother's Day Flower

Since April is the month before Mother’s Day I, of course, had a Mother’s Day card for my guests to make. This card was cased from a card created by Rita. You can find her card HERE. Here is the card that we made:


Stamps: Build A Blossom, All Holidays
Cardstock: Whisper White, Pretty in Pink, Old Olive
Ink: Melon Mambo
Accessories: Stampin’ Dimensionals, Needle Tool, Mat Pack, Glimmer Brads, Hobby Blade, Rose Red Seam Binding Ribbon, Boho Blossoms Punch, Build A Blossom Punch, Framed Tulips Textured Impressions Folder

The card base is Whisper White cardstock cut at 5 ½” x 8 ½” and scored at 4 ¼”. The card front was run through the Big Shot in the Framed Tulips Textured Impressions Folder. The greeting from All Holidays was stamped at the very bottom of the card front inside the texture in Melon Mambo ink. The Hobby Blade was used to cut a slit in the fold of the card for the ribbon to go through. A piece of Rose Red Seam Binding Ribbon threaded through the slit in the fold of the card, wrapped around the card front, and tied into a knot just above the greeting.

Five large petals from Build A Blossom were stamped on Pretty in Pink cardstock in Melon Mambo ink. They were then punched out with the Bold Blossom Punch. Five small petals were stamped on a scrap of Pretty in Pink cardstock in Melon mambo ink and punched out. Three leaves were punched from a scrap of Old Olive cardstock. The Boho Blossoms Punch was used to punch the largest flower from Rose Red cardstock and a smaller one from Pretty in Pink cardstock.

The large petals were adhered together, leaves adhered to the back, and then the small petals were adhered on top of the large petals. Then the two smaller flowers were adhered to the flower center. The Needle Tool and Mat Pack were used to pierce a hole through all of the layers of cardstock in the center of the flower. A Glimmer Brad was added in the hole. The flower was adhered to the front of the card with Stampin’ Dimensionals.

Come back tomorrow to see the next card from the April Make and Take!

Monday, June 27, 2011

Fabuous Pool Party Floret

This card was created for the Stampin Connection SCCSC73 sketch challenge. I just had to play with some of the new colors and designer series paper! So here goes:


Stamps: Fabulous Florets, Teeny Tiny Wishes
Cardstock: Whisper White, Pool Party, Island Indigo
DSP: Pocket Full of Posies
Ink: Pool Party, Lucky Limeade, Island Indigo
Accessories: Buttons (retired), Vanilla Hodgepodge Hardware (retiring), Glimmer Brad, Needle Tool, Mat Pack, Stampin’ Dimensionals, Pool Party Marker, Paper Snips, Mini Glue Dots

The card base is 4 ¼” x 11” Whisper White cardstock scored at 5 ½”. A piece of Pool Party cardstock was cut at 3 ½” x 4 ½”. One of the long sides was torn and then this cardstock was adhered to the card front. Three different patterns from the Pocket Full of Posies DSP were cut at 1” x 5 ½” and adhered together so that different amounts of the DSP show. This DSP layer was then adhered to the card front.

The greeting from Teeny Tiny wishes was stamped in the lower right hand corner of the torn cardstock in Island Indigo ink. A piece of Whisper White cardstock was cut at 1 5/8” x 2 ½”. The leaves from Fabulous Florets were stamped in Lucky Limeade ink. This panel was then adhered to a 1 ¾” x 2 5/8” piece of Island Indigo cardstock. This panel was adhered to the card front with Stampin’ Dimensionals.

The flower from Fabulous Florets was stamped on a scrap of Whisper White cardstock in Pool Party ink. Then I carefully added shadows to the petals by going over them with the Pool Party marker two times. The first time I only colored about half of each petal from the center out. The second time I only colored one quarter the way out from the center. This is what gives the flower the shadows and depth of color. The flower was then cut out with Paper Snips and adhered to the stamped Whisper White panel with more Stampin’ Dimensionals.


As if this card didn’t have enough dimension I stayed true to the sketch and dug out some buttons and brads. I usually don’t embellish my cards quite this heavy. And is is a HEAVY card. I will not be hand delivering this card for sure! The blue button was from the springtime buttons package from the Occasions Mini. The green button was from the button pack in last winter’s Holiday Mini. The vanilla brad is from the Hodgepodge Hardware kit (which will be retiring this year!), and then a green Glimmer Brad.

The Needle Tool and Mat Pack were used to pierce the holes for the brads. The buttons were added to the card with a combination of Mini Glue Dots and Stampin’ Dimensionals.

I had tons of fun making this card and I love how it turned out! I hope you get a chance to play along with the sketch challenge. Here is the sketch that was created by Liz Goldhawk:


If you are a Stampin’ Up Demonstrator you can find the Sketch Challenge thread HERE. If you are not a Stampin’ Up Demonstrator I would still love to see your creations. Please post a link to your card in the comments section of this post!

Thanks so much for stopping by!


Blue Flower Basket

Here is the finished and decorated petal cone basket from my tutorial. If you missed the tutorial you can find it HERE.


Stamps: Delicate Doilies
Cardstock: Pool Party, Island Indigo
DSP: Pocket Full of Posies DSP
Ink: Pool Party, Island Indigo
Accessories: Fun Flowers Die, Needle Tool, Mat Pack, Dotted Scallop Ribbon Punch, Whisper White Organza Ribbon, Silver Brads, Sticky Strip, Stampin Dimensionals, Paper Snips, Petal Cone Die, Glimmer Brad, Perfect Polka Dots Textured Impressions Folder


After finishing the basket base I used the Fun Flowers die and cut a large flower and large flower center from Island Indigo cardstock. The middle flower from Pocket Full of Posies DSP (from the new catalog), and the smallest flower from Pool Party cardstock. The Island Indigo and Pool Party flowers were run through the Big Shot again but this time in the Perfect Polka Dots Textured Impressions Folder. The large flower I used the debossed side and swiped my Island Indigo ink pad across the top to make the debossed polka dots stand out. The small Pool Party flower I used the embossed (raised) side and swiped my Pool Party ink pad across the top to make the texture stand out.

The flower layers were glued together with glue stick, then I used the Needle Tool and Mat Pack to pierce a hole in the center of the flower and added a turquoise Glimmer Brad. The flower was adhered to the side of the basket with Sticky Strip. A piece of Whisper White organza ribbon was tied around the handle and into a bow.

That's it! Once you get the basket assembled it is super easy to decorate! I hope you get a chance to make one, they are so much fun!


Friday, June 24, 2011

Petal Cone Basket Tutorial

What you will need: Cardstock, Stamps and ink of choice, Petal Cone Die, Big Shot, Sticky Strip, Paper Snips, Paper Cutter, Scoring Tool, Stampin Dimensionals, Needle Tool, Brads, Dotted Scallop Ribbon Punch.

1. Cut two pieces of cardstock 5” x 6” in the color that you want to use for your basket base. Stamp the cardstock however you like if you want to create a pattern.

2. Run the cardstock one piece at a time through the Big Shot on the Petal Cone Die.

3. Fold the scallops down on the score line and fold the cardstock in half on the score line.


4. Place your folded cone onto your paper cutter and line up the top edge with the 3.5 in. line, cut off the bottom.

5. Place the folded cone half onto your scor-pal or whatever tool you use for scoring and score 1” from the end of the cut edge.

6. Trim the fold lines as shown here. 

7. Place Sticky Strip in the locations shown.
8. Repeat steps 2 through 7 on the other die cut cone half.

 8. Remove the liner from the sticky strip on one of the petal cone sides and adhere the flap to the second petal cone half.

9. Remove the liner from the sticky strip on the remaining side flap and adhere the flap to the first petal cone side.

10. Fold in the first flap with the sticky strip, remove the liner and fold over the opposite flap.

11. Fold in the next flap with the sticky strip, remove the liner and adhere the final flap to the bottom.

12. Your bottom should look like this.

13. Cut four pieces of Whisper White cardstock 2” x 3 ½”.
14. Run the pieces through the Big Shot on the Petal Cone die with the cardstock placed over the scalloped half circle

. 15. Trim two scallops off of each side of the scalloped circle halves

14. Adhere each Whisper White scalloped circle half behind each of the petals on the basket.

15. Place a Stampin’ Dimensional in the center and close to the rounded edge of each petal on the basket.

16. Remove the liner from the dimensionals and adhere the petals to the side of the basket. 


17. On two petals that are opposite one another use the needle tool to pierce a hole approximately ¾” down from the fold and centered in the width. These holes will be used to attach the handle.

18. Using a scrap of cardstock that is 8 ½” wide and the Dotted Scallop Ribbon punch, punch a ribbon 8 ½” long in the color of your choice for the handle.

19. Use the needle tool to punch a hole on the handle ends. Make sure you punch the hole about ¾” from the handle end.
20. Use Paper Snips to cut a dove-tail in the handle ends.

21. Place a brad through the hole in the handle and through the hole in the basket side. Open the prongs of the brad.


22. Finish decorating the basket as desired.


Thursday, June 23, 2011

Daffodil Easter Basket

Good morning! Today I’m sharing with you the three dimensional project that we made at the March Make and Take. Since Easter was coming up soon I decided to make an Easter basket from the Petal Cone Die. I will have a tutorial posted for you later today for constructing the basket so for now I will just share how I decorated this one.


Stamps: Easter Blossoms, Elements of Style
Cardstock: Daffodil Delight, Whisper White, Marina Mist
Ink: Daffodil Delight, Marina Mist
Accessories: Dotted Scallop Ribbon Punch, Baja Breeze Seam Binding Ribbon, Punch Pack, Melon Mambo Marker, Scallop Oval Punch, Circle Punch, Petal Cone Die, Gold Brads, Paper Snips, 1/8” Hole Punch

The Daffodil Delight cardstock was stamped with the flourish from Elements of Style in Daffodil Delight ink on both the front and back to give a subtle background pattern to the basket. The cardstock was run through the Big Shot with the Petal Cone die and assembled to create the basked as shown in the Petal Cone Basket Tutorial. You can find this tutorial on the Tutorials page later today.

On a scrap of Whisper White cardstock I stamped the flourish from Elements of Style in Daffodil Delight ink by stamping off first and then stamping onto the cardstock to give a lighter shade of yellow. Next I stamped the greeting from Easter Blossoms in Marina Mist ink. The greeting was then punched out with the 1 ¾” Circle Punch. The 2 3/8” Scalloped Circle Punch was used on a scrap of Marina Mist cardstock. The greeting circle was adhered to the center of the Marina Mist scalloped circle. Then the scalloped circle was adhered to one of the sides of the basket.

Marina Mist cardstock was used for the handle and Baja Breeze Seam Binding Ribbon was tied around the handle in a bow. Three flowers were punched from a scrap of Blush Blossom cardstock with the flower punch from Punch Pack. Paper Snips were used to cut just a little bit between each scallop to make it look more like petals. The Melon Mambo marker was used to add bright pink centers to the flowers and the flowers were then adhered onto the scalloped circle with the greeting.

Come back tomorrow to see the step-by-step tutorial on how to assemble this cute little basket!

Wednesday, June 22, 2011

Wonderful Posy

Here is a little sneak peak of what you will see in the new catalog! This card was created for the SCCSC72 Sketch Challenge on Stampin Connection. Here is my card:


And here is the sketch created by yours truly:


Stamps: Posy Punch, Just believe
Cardstock: Wisteria Wonder, Concord Crush, Whisper White
DSP: Cheerful Treat
Ink: Concord Crush, Elegant Eggplant
Accessories: Dazzling Diamonds Glitter, Tombow Multi-Purpose Adhesive, Pear Pizzaz Seam Binding Ribbon, Top Note Die, Modern Label Punch, Word Window Punch, Fancy Flower Punch, Basic Rhinestones Jewel Accents, Paper Snips, Perfect Polka Dots Textured Impressions Folder.

The card base is Wisteria Wonder (one of the new In Colors for this year) cut at 5 ½” x 8 ½” and scored at 4 ¼”. The card front was run through the Big Shot in the Perfect Polka Dots Textured Impressions Folder.

Next I cut a piece of Cheerful Treat DSP and Concord Crush cardstock 4” x 5” and ran these through the Big Shot on the Top Note die. I trimmed the edges of the top note down to the stitching marks with my Paper Snips and adhered it to the Concord Crush top note. The top note layers were adhered to the card front and then the excess was trimmed off. A piece of Pear Pizzaz Seam Binding ribbon was wrapped around the card front and tied into a knot.

The flower from Posy Punch was stamped in Elegant Eggplant on Wisteria Wonder cardstock and punched out with the Fancy Flower Punch. Tombow Multi-Purpose adhesive was added in the dots in the flower’s center and around the petals and Dazzling Diamonds Glitter was added to give the flower some sparkle. Then I added some Basic Rhinestones Jewel Accents to the flower because just the glitter wasn’t enough sparkle. The flower was adhered to the card front with Stampin’ Dimensionals.


The greeting from Just Believe was stamped in Wisteria Wonder ink on a scrap of Whisper White cardstock and was punched out with the Word Window Punch. The Modern Label Punch was used on a scrap of Concord Crush cardstock. The greeting was adhered to the Concord Crush label, two rhinestones were added, and the greeting label was adhered to the card front with Stampin’ Dimensionals.

There are so many fun new products in the new catalog that I just can’t wait to play with! I just know you’ll love it! Contact me if you would like to order a catalog!

If you are a Stampin' Up Demonstrator you can find the sketch challenge thread HERE. If you are not a demonstrator I would still love to see your creations. Please post a link to your card in the comments section of this post. Have a wonderful day!

Baby Blossoms

Good morning all! I hope you have a wonderful Wednesday! Today I’m going to share with you the fourth and final card from the March Make and Take. I just knew I HAD to use Baby Blossoms so this is what I came up with.


Stamps: Baby Blossoms, Silhouette Sentiments
Cardstock: Very Vanilla, Blush Blossom, Cherry Cobbler
DSP: Springtime DSP
Ink: Early Espresso, Blush Blossom, Cherry Cobbler, Old Olive
Accessories: Scallop Edge Border Punch, Basic Pearls Jewel Accents, blossom from Punch Pack, 2” x 1 3/8” Oval Punch, Corner Rounder Punch, Paper Snips.

The card base is Very Vanilla cardstock cut at 4 ¼” x 8 ½” and scored at 4 ¼”. A piece of Blush Blossom cardstock was cut at 4” x 4” and a piece of Springtime DSP was cut at 3 7/8” x 3 7/8”. All of the corners on the card front, Blush Blossom cardstock, and DSP were punched with the corner rounder punch. Then the DSP was adhered to the Blush Blossom cardstock, and this layer was then adhered to the card front.

Next a piece of Cherry Cobbler cardstock was cut at 2 ¼” x 3 7/8” and both long sides were punched with the Scallop Edge Border Punch. A piece of Springtime DSP was cut at 1 ½” x 3 7/8” and was adhered to the center of the punched Cherry Cobbler cardstock. This was then adhered to the card front.

Three flowers were punched from a scrap of Blush Blossom cardstock using the small blossom punch from the Punch Pack. The petals were folded up and the blossoms were adhered to the card front in the bottom left hand corner of the DSP. A pearl was added to the center of each of the blossoms.

The frame from Baby Blossoms was stamped in Old Olive ink on a scrap of Very Vanilla cardstock and was cut out with Paper Snips. The frame was adhered to the card front. The greeting from Silhouette Sentiments was stamped on a scrap of Very Vanilla cardstock in Early Espresso ink and was then punched out with the 2” x 1 3/8” Oval Punch with the greeting in the upper right hand section of the oval.

The blossoms from Baby Blossoms were stamped in Blush Blossom, Cherry Cobbler, and Old Olive ink to fill some space in the oval. The rose was stamped in Cherry Cobbler by first stamping off with the background image and then regular stamping for the second image. The same was done with Blush Blossom ink for the other flowers. The edge of the oval was sponged with Early Espresso ink and the oval was adhered to the card front with Stampin’ Dimensionals.

Come back tomorrow to see the adorable Easter basket that we made for the 3D item at the March Make and Take!