Thursday, October 31, 2013

Merry Christmas!

I have had the idea for this card bouncing around in my head for the last two weeks! But I couldn't manage to get into my craft room long enough to make it until last night. Yes, it's been two weeks since I've made a card. Gasp! I know.... it's just terrible! I have had a moment here or there to work some on Christmas gifts, but you can't see those until after Christmas. 


  • Stamps: Very Merry, Endless Wishes photopolymer
  • Card Stock: Coastal Cabana, Whisper White, Pool Party Coredinations
  • Ink: Pool Party, Coastal Cabana, Midnight Muse
  • Accessories: Mosaic Punch, Large Oval Punch, Silver Glimmer Paper, Rhinestones, Stampin' Dimensionals, Pretty Print embossing folder, Silver 1/8" Ribbon, Glue Dot, Sanding Block


I created this card for the Craft Project Central Creating Pretty Cards challenge #28. Today is the deadline for it so I'm just barely squeaking by on this one! Take a look at the other wonderful cards that were entered! 

This card was pretty simple to put together. I wasn't entirely feeling the mojo last night so I just stuck with the first card front piece that I found on my desk and stuck with a monochromatic look. So if you want to recreate this start off by cutting a piece of Coastal Cabana card stock 4-1/4" x 11" and score it at 5-1/2". Next cut a piece of Pool Party coredinations card stock 3-3/4" x 5" and run it through the Big Shot in the Pretty Print embossing folder. Use the Sanding Block to sand off some of the raised texture then adhere this onto a 4" x 5-1/4" piece of Whisper White. Then adhere this onto the card front. 

Next cut three strips of Silver Glimmer paper 1/8" x 3-3/4" and use 2-Way Glue Pen to adhere the strips evenly across the card front. Next stamp the image from Very Merry onto a scrap of Whisper White card stock in Coastal Cabana ink three times. Punch out each ornament with the Mosaic punch and adhere them onto the card front with a Stampin' Dimensional. Add a small Rhinestone into the center of each ornament. Next tie a small bow in the 1/8" Silver ribbon and use a Glue Dot to adhere it just above the middle ornament. 

For the greeting I stamped the "Merry" in Coastal Cabana ink, the "Christmas" in Midnight Muse ink, and the snowflakes in Pool Party ink. I just love these Photopolymer stamps! It is so easy to get the stamp in exactly the right spot! Love it! Anyway, after I got all my stamping for my greeting done I punched it out with the Large Oval punch. I also used the Large Oval punch on a scrap of Coastal Cabana card stock. I used some Paper Snips to cut the oval in half and adhered the two halves behind the greeting oval. This was finally adhered onto the card front with a Stampin' Dimensional. 

Done! A fun and simple Christmas card all ready to go! 


Tuesday, October 29, 2013

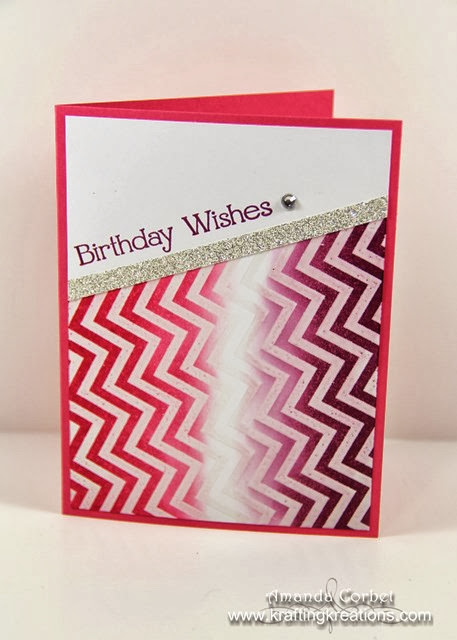
Birthday Chevrons

Today I have the final card from the September Make and Take to share with you! For this one I cased myself! HERE is the original card I made. There are just a few differences on this one to make it easier for my Make and Take guests to make. 


  • Stamps: Positively Chevron, Cycle Celebration
  • Card Stock: Strawberry Slush, Whisper White
  • Ink: Rich Razzleberry, Strawberry Slush, Versamark
  • Accessories: Silver Glimmer Paper, Rhinestones, Clear embossing powder, Heat Tool, Stampin' Sponge, Post-It Notes, 2-Way Glue Pen


This card is so much easier than it looks! Just follow along with me and you'll have a beautiful birthday card! Start off by cutting a piece of Strawberry Slush card stock 5-1/2" x 8-1/2" and scoring it at 4-1/4". Next cut a piece of Whisper White card stock 4" x 5-1/4". Stamp the Positively Chevron background stamp onto the Whisper White card stock at an angle in Versamark ink. Pour Clear embossing powder over the stamped image, tap off the excess, and heat it with your Heat Tool. 

Now take a couple Post-It Notes and place the sticky edge right along the top of your embossed chevrons. Then starting from the sides and working your way towards the center in a circular motion sponge on Strawberry Slush ink onto the left side. Then do the same to sponge Rich Razzleberry ink on the right side making sure to leave a portion in the center white. 

Now remove your Post-It Notes. Voila! You have some beautifully sponged chevrons! Now cut a piece of Silver Glimmer Paper 1/4" x 4-3/4" and use 2-Way Glue Pen to adhere it over the top edge of the chevrons. Use Paper Snips to trim the Glimmer paper even with the edge of your Whisper White card stock. Stamp the greeting from Cycle Celebration just above the Silver Glimmer Paper in Rich Razzleberry ink. Adhere this layer onto the card front and add a Rhinestone to the right of the greeting for some added sparkle! 

I didn't get a picture of it, but on the inside I just stamped the candle from Cycle Celebration several times in the bottom right hand corner in Strawberry Slush ink. Now that wasn't that bad at all was it? 


Monday, October 28, 2013

Gently Falling

Are you ready for a fun fall card? Because that is exactly what I have to share with you today. This is from the September Make and Take. 


  • Stamps: Gently Falling, Happy Day
  • DSP: Sweater Weather
  • Card Stock: Very Vanilla, Chocolate Chip, Crushed Curry
  • Ink: Chocolate Chip, Crushed Curry, Old Olive
  • Accessories: Paper Snips, Stampin' Dimensionals, Crumb Cake Taffeta Ribbon


For this lovely start off with a 5-1/2" x 8-1/2" piece of Very Vanilla card stock and score it at 4-1/4". Next cut a piece of Sweater Weather plaid DSP 3-3/4" x 5" and adhere it onto a 3-7/8" x 5-1/8" piece of Chocolate Chip card stock then adhere it onto the card front. 

Next cut a piece of Sweater Weather DSP 2-7/8" x 2-7/8" and stamp the greeting from Happy Day onto the bottom right corner of the DSP in Chocolate Chip ink. Then adhere this onto a 3" x 3" piece of Chocolate Chip card stock. Wrap a piece of Crumb Cake Taffeta ribbon around the panel and tie it into a knot. Adhere this panel onto the card front with a few Stampin' Dimensionals. 


Stamp the solid leaf image from Gently Falling onto a scrap of Very Vanilla card stock by using the Rock-N-Roll technique with Crushed Curry and Old Olive ink. Then stamp the line image of the leaf in Chocolate Chip ink. Use Paper Snips to cut out the leaf and adhere it onto the card front with a couple Stampin' Dimensionals. 


To dress up the inside cut a piece of Crushed Curry card stock 4" x 5-1/4". Stamp the line image of the leaf a few times in Chocolate chip ink then adhere this onto the inside of the card.


This one was so fast and simple for my guests to make! Except for the fussy cutting of course. But overall pretty easy. Sometimes I surprise myself with how few accessories I use on some cards and how others have almost everything including the kitchen sink! Funny huh?


Saturday, October 26, 2013

Drip Art Fun

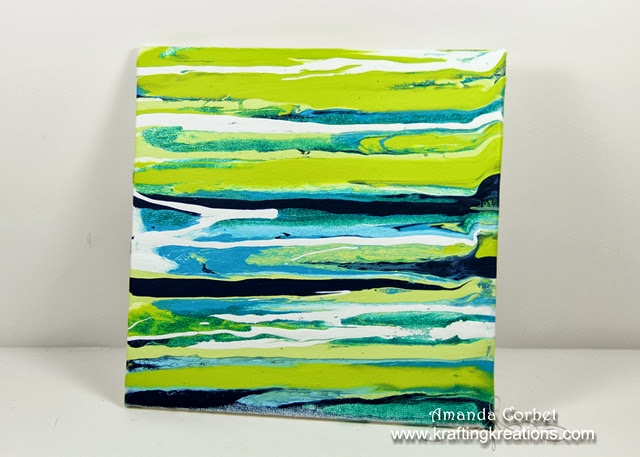
Do you want to make some fun and funky art? Check out my video that is featured on DecoArt's YouTube channel! You can find the video HERE. Then grab some paint and a canvas and have some fun! 


Friday, October 25, 2013

Happy Birthday Cake!

It's Friday Mashup time! This is the last week that I will be a part of the Friday Mashup Design Team. They are introducing some lovely new designers that will be taking over next week. It has been a lot of fun playing along with the challenges every week.The ladies over at the mashup really know how to get you thinking outside the box! Anyway... here is my card for this week's cake challenge!  


  • Stamps: Cycle Celebration, Make a Wish
  • DSP: Eastern Elegance
  • Card Stock: Whisper White, Smoky Slate, Coastal Cabana
  • Ink: Coastal Cabana, Basic Gray
  • Markers: Smoky Slate, Crushed Curry
  • Accessories: 3/16" Corner Punch, Scallop Trim border punch, Silver Glimmer Paper, 2-Way Glue Pen, Stampin' Dimensionals, Dazzling Details, Basic Gray Stitched Grosgrain ribbon


Here's your Mashup Challenge:
  1. Create a project with the colors "Coastal Cabana, Crushed Curry, Smoky Slate & Basic Grey."
  2. Create a project with a "Cake."
  3. Or Mash it Up and create a project "with a Cake using the colors above."

This was actually a pretty easy cake to put together and decorate! I started off with a 5-1/2" x 8-1/2" piece of Coastal Cabana card stock and scored it at 4-1/4". Next I cut a piece of Whisper White card stock 3-7/8" x 5-1/8" and adhered it onto a 4" x 5-1/4" Smoky Slate card stock.

Next I cut three pieces of Eastern elegance DSP. One was cut at 1-1/2" x 1-3/4", one at 2-1/4" x 2-1/2", and one at 1-1/2" x 3". I used the 3/16" Corner punch on the top two corners of all the DSP squares. I cut a piece of Silver Glimmer Paper 3/8" x 8-1/2" and used the Scallop Trim border punch to add a lovely scalloped edge to that sparkly paper.

I used 2-Way Glue Pen to adhere the glimmery strip at the top of one of the cake layers and used Paper Snips to cut the glimmer paper even with the edge of the DSP. I just kept doing that, gluing down and trimming, until I had each layer with some sparkly icing. Then I used 2-Way Glue pen to adhere the "tiers" of the cake one on top of the other until the cake was all stacked up. I stamped the greeting onto the bottom cake layer in Basic Gray ink.


I placed the cake onto the Whisper White layer and used a pencil to very lightly mark the top corners of the cake. Then I stamped the candle three times inside those two pencil marks in Coastal Cabana ink. The candles were colored in with a Smoky Slate and Crushed Curry markers. I erased my pencil marks then adhered the cake layers onto the Whisper White layer with Stampin' Dimensionals. Then that panel was adhered onto the card front with more Stampin' Dimensionals.


To dress it up a bit I wrapped a piece of Basic Gray Stitched Grosgrain ribbon around the card front and tied it into a bow. Just because it wasn't quite sparkly enough I added some Dazzling Details onto the candle flames.


For the inside I simply stamped the candle from Cycle Celebration all across the bottom in Coastal Cabana ink. Then I stamped the greeting from Make a Wish in Basic Gray ink.


This was such a fun cake to make! And calorie free too! 


Thursday, October 24, 2013

Christmas Snowflake

Here is the Christmas card from the September Make and Take! Beginning in July or August I always include one Christmas card in the Make and Take projects all the way through December. That way my guests have plenty of ideas for their Christmas cards! This one was inspired by Jen's lovely creation that you can find HERE


  • Stamps: Festive Flurry
  • DSP: Winter Frost
  • Card Stock: Smoky Slate, Whisper White, Midnight Muse
  • Ink: Versamark, Midnight Muse
  • Accessories: Festive Flurry Framelits, Vintage Faceted Designer Buttons, Silver 1/8" ribbon, glue Dots, Stampin' Dimensionals


There are a few steps to this card, but overall it wasn't that difficult. To make this start off with a piece of Smoky Slate card stock cut at 5-1/2" x 8-1/2" and scored at 4-1/4". Next use the largest Festive Flurry Framelit to cut the snowflake from the top of the card front. Cut a piece of Winter Frost DSP 4" x 5-1/4" and adhere it onto the inside of the card so you see the pattern through the snowflake. Not only is this a cool effect for the front, but you are decorating the inside too! 


Next you will want to stamp the 2nd from smallest image from Festive Flurry onto a scrap of Midnight Muse card stock in Versamark ink. Cover the stamped image with Silver embossing powder, tap off the excess, and heat it with your Heat Tool. Now cut out your snowflake in the Big Shot with the 2nd from smallest Festive Flurry framelit. Adhere the snowflake onto the card front inside the big snowflake with a Stampin' Dimensional. Next thread some 1/8" Silver Ribbon through a Vintage Faceted Designer Button, tie the ribbon into a bow, and adhere the button into the center of the snowflake with a Glue Dot. 


I wanted to do something a little different for the greeting then what Jen did. So I cut a piece of Whisper White card stock 1" x 4". Stamp the greeting from Greetings of the Season onto the strip in Midnight Muse ink and used Paper Snips to cut the right end of the card stock into a dove-tail shape. Next cut a piece of Midnight Muse card stock 1-1/4" x 4-1/4". Adhere the Whisper White banner onto the Midnight Muse card stock then use Paper Snips to cut a matching dove-tail shape onto the one end. Adhere this onto the card front with a couple Stampin' Dimensionals. 

I didn't get a picture of it, but on the inside I just stamped a few snowflakes in Midnight Muse ink to make it a little prettier. I haven't decided for sure yet, but I just might have to do something like this for my Christmas cards this year. I just LOVE snowflakes! 


Wednesday, October 23, 2013

Slice of Cake

I've got another project from the September Make and Take to share with you today! This one is a fun Birthday card! This fun card was inspired by Chiaki's card that you can find HERE


  • Stamps: Sketched Birthday
  • DSP: Birthday Basics
  • Card Stock: Summer Starfuit, Bermuda Bay, Very Vanilla
  • Ink: Stazon, Bermuda Bay, Crisp Cantaloupe
  • Markers: Pool Party, Summer Starfruit, Smoky Slate, Bermuda Bay, Blender Pen
  • Accessories: Circles Framelits, Perfect Polka Dots embossing folder, Bitty Banners Framelits, Stampin' Dimensionals, Rhinestones, Dotted Scallop Trim punch, 2-Way Glue Pen


To make this fun birthday card start off with a piece of Summer Starfruit card stock cut at 5-1/2" x 8-1/2" and score it at 4-1/4". Cut a piece of Birthday Basics DSP 4" x 5-1/4" and adhere it onto the card front. Cut a piece of Very Vanilla card stock 2-3/4" x 2-3/4". Stamp the cake slice from Sketch Birthday onto the card stock in Stazon ink and color in the cake slice with your markers. For the inside of the cake use your Blender Pen to pick up a little bit of ink from your Crisp Cantaloupe ink pad lid to add a slight pink color to the cake. 

Cut a piece of Bermuda Bay card stock 3" x 5-1/4". Use the 4th from smallest Circle Framelit and the Big Shot to cut a hole in the top of the card stock. Then run your card stock through the Big Shot again in the Perfect Polka Dots embossing folder. Next cut a piece of Very Vanilla card stock 5-1/4" wide and punch two strips with the Dotted Scallop Trim punch. Adhere the strips half way behind the edge of the Bermuda Bay card stock with 2-Way Glue Pen.

Adhere the stamped and colored card stock with the cake slice onto the backside of the Bermuda Bay card stock with Stampin' Dimensionals. Make sure that your cake slice is centered in the little window. Now adhere this layer onto the card front with Stampin' Dimensionals. Stamp the Happy Birthday greeting from Sketched Birthday onto a scrap of Very Vanilla card stock in Bermuda Bay ink. Cut it out in the Big Shot with the Bitty Banners Framelits. Add a small Rhinestone onto each end of the banner and adhere the banner onto the card front with a couple Stampin' Dimensionals.


Finally stamp the cake slice and party hat on the inside of the card. Color in the images with your markers. Stamp the eat cake image at the top in Bermuda Bay ink and color in the banner with the Pool Party marker. Now you have a fun and cheerful birthday card! 


Tuesday, October 22, 2013

Lovely Trees

Wow! I have gotten so far behind in posting the Make and Take projects! Here is one of my favorites from September! 


  • Stamps: Lovely as a Tree, A Dozen Thoughts, Woodgrain
  • Card Stock: Crumb Cake, Cajun Craze, Soft Sky, Whisper White
  • Ink: Early Espresso, Crumb Cake
  • Stampin' Spots: Pool Party, Bermuda Bay, Old Olive, Garden Green
  • Accessories: Argyle embossing folder, 3/16" Corner Punch, Stampin' Dimensionals, Paper Snips, Scallop Edge Border Punch, Early Espresso Stitched Grosgrain Ribbon


This card is a lot easier to make than it looks! Start out with a piece of Crumb Cake card stock cut 5-1/2" x 8-1/2" and scored at 4-1/4". Stamp the Woodgrain background stamp onto the card front in Crumb Cake ink. Next cut a piece of Soft Sky card stock 4" x 4-1/4" and run it through your Big Shot in the Argyle embossing folder. 

Cut a piece of Cajun Craze card stock 1-1/4" x 4-1/4". Use the Scallop Edge Border punch on one long edge of the Cajun Craze card stock then adhere it behind one of the longer sides of the Soft Sky card stock. Adhere this layer onto the card front. 


Next up cut a piece of Whisper White card stock 3-1/2" x 4". Stamp the Lovely as a Tree image onto the card stock in Early Espresso ink. Stamp the trees again a little further into the background in Crumb Cake ink. Now take your Pool Party and Bermuda Bay Stampin' Spots and rub them directly across the card stock to color the sky. Repeat with your Old Olive and Garden Green spots to add color to the ground. Use the 3/16" Corner Punch on the corners on the right side and tear the edge on the left side. Adhere this layer onto the card stock with Stampin' Dimensionals. 


For the greeting banner cut a piece of Whisper White card stock 1/2" x 3". Stamp the greeting from A Dozen Thoughts onto the strip in Early Espresso ink. Use Paper Snips to trim the ends of the paper into a dove-tail shape and adhere this onto your card front with Stampin' Dimensionals. Finally wrap a piece of Early Espresso Stitched Grosgrain ribbon around your card front and tie it into a knot. 

That's it! If you're scared to rub your ink spot on your pretty stamped paper try it out on some scrap copy paper first to get the feel for it. You can totally do it! 


Saturday, October 19, 2013

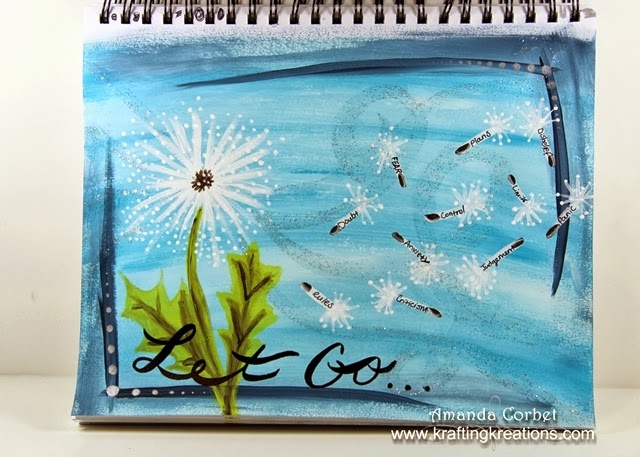
Let Go...

A couple months ago I stumbled upon Tracy's blog. Every week she has the most wonderful videos showing how to make a large variety of mixed media art sharing techniques and product information. The video sessions are actually streamed live every Monday night on U stream where you can chat and interact with her as she paints. I usually don't get the chance to watch the live show, but I love watching the recap recordings. She always says to just let go and create. So after watching for several weeks this month's Creative Dare is to share what we need to let go of so we can create. This is what I created. 


There is nothing quite as scary as a blank page when you start off huh? But once I started adding on the paint  on the background (sticking with my favorite color) it came pretty easily. The hardest part was putting on that first brush stroke. The thoughts "what if I mess up", "there is no way this is going to turn out good", "I can't do this" were running through my head. But after I dove in and just started adding color those questions faded away. Once I had my background I knew I wanted to do a dandelion with the seeds and my worries floating away on the breeze. 

But when I went to start on my dandelion the haunting questions returned. But I just kept on going. "I am so going to finish this no matter what it looks like" was my thought. As it progressed I kept thinking..."this really does NOT look like a dandelion", "this looks terrible". But I kept on going...


I added the words with a ultra fine point Sharpie. After I got the words added in (which took quite a while to think up) I realized that I meant to add "perfection" as one of those words. Because trying to make everything perfect puts on way too much stress  and pressure. I actually thought about going back and painting over one of the words to add perfection in, but that in and of itself would be striving for perfection huh? And that's one of the things I'm trying to let go of. So I just left it as is.


The end result??? I am so incredibly proud of what I created with a little paint and a couple markers! I am totally going to frame this and hang it in my craft room as a reminder! To let go of all those nagging thoughts and concerns and just create something beautifully you!


Thank you Tracy for giving me the push I needed to try out something like this. And for giving me a perspective that I can use no matter what I'm working on! 

~ Supplies ~
  • DecoArt Americana: Deep Midnight Blue, Turquoise Blue, Whisper Turquoise, Blue Chiffon, Charcoal Gray, Cool White, Snow (Titanium) White, Citron Green, Craft Twinkles
  • Markers: Fine Point Sharpie, Ultra Fine Point Sharpie, Stampin' Up Silver Marker, 
  • Paint Brushes: 3/4 flat, 5/8 chisel, #4 round, 10/0 round


Friday, October 18, 2013

Autumn Leaves

It's Friday! That means it's time for a Friday Mashup card! This one I'm actually posting on time! 


  • Stamps: Gently Falling, Chalk Talk
  • Card Stock: Bermuda Bay, Crushed Curry, Very Vanilla
  • Ink: Bermuda Bay, Crushed Curry, Pumpkin Pie, Cajun Craze, Baked Brown Sugar
  • Accessories: XL Oval Punch, Burlap Ribbon, Paper Snips, Stampin' Dimensinoals, Rhinestones, Early Espresso 1/4" Stitched Grosgrain ribbon, Stamp-A-Ma-Jig


Here's your Mashup Challenge:
  1. Create a project with a  "Tree or Leaves."
  2. Create a project using the "Color Orange."
  3. Or Mash it Up and create a "Project with Leaves/ Tree & the Color Orange."
For this lovely I started off with a piece of Bermuda Bay card stock cut 5-1/2" x 8-1/2" and scored at 4-1/4". Next I cut a piece of Very Vanilla card stock 3-5/8" x 4-7/8". I stamped the leaves from Gently falling all over the top end of the card stock using the Rock-N-Roll technique with Crushed Curry, Pumpkin Pie, and Cajun Craze inks. I used my Stamp-A-Ma-Jig to stamp the leaf outlines in Baked Brown Sugar ink. This was adhered onto a 3-3/4" x 5" piece of Crushed Curry card stock.


Next I cut a piece of Burlap Ribbon 5-1/2" long, used Paper Snips to trim one end into a dove-tail shape, and used some Multipurpose Liquid Adhesive to adhere it onto the panel and around to the backside. I wrapped a piece of Early Espresso Stitched Grosgrain ribbon around the panel and tied it into a bow. This panel was adhered onto the card front with Stampin' Dimensionals. 


For the greeting from Chalk Talk I simply stamped it onto a scrap of Bermuda Bay card stock in Bermuda Bay ink, punched it out with the XL Oval punch, added a couple Rhinestones, and adhered it onto the card front with a few Stampin' Dimensionals. 


On the inside I just stamped a few of the leaf outlines onto the card stock in Bermuda Bay ink. So much fun! 

If you have a chance head on over to the Friday Mashup to see what the rest of the design team has created! 


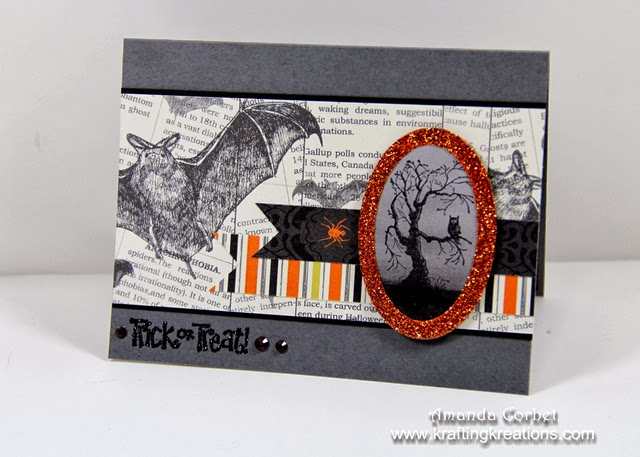
Trick or Treat!

So I'm finally getting around to posting my project for last week's Friday Mashup. I've been busy cleaning and creating and haven't spent as much time scheduling blog posts. Oops!  With so many things on my "to do list" my posts are going to be rather sporadic for a while. 


  • Stamps: Best of Halloween
  • DSP: Witches' Brew DSP
  • Card Stock: Basic Gray, Basic Black, Pumpkin Pie, Smoky Slate
  • Ink: Black Stazon, Basic Black, Versamark
  • Accessories: Ovals Framelits, Heat & Stick Powder, Stampin' Dimensionals, Black and Orange Glitter, Rhinestones, black permanent marker, Stampin' Sponge, Paper Snips, 2-Way Glue Pen


Here's your Mashup Challenge:
  1. Create a project using "the Sketch."
  2. Create a "Spooky" project.
  3. Or Mash it Up and create a "Spooky project using the above sketch. "

I really don't use Halloween cards or projects that much, but for some reason they are just so much fun to create! I guess it's a great excuse to go over the top with details and embellishments. This card is no different, although it was pretty easy to create. 

I started off with a 5-1/2" x 8-1/2" piece of Basic Gray card stock and scored it at 4-1/4". Next I cut a piece of the Witch's Brew DSP with the bats 2-3/4" x 5-1/2" and adhered it onto a 2-7/8" x 5-1/2" piece of Basic Black card stock before adhering it down onto the card front. Next I took two scraps of DSP that were 1" and 3/4" wide. The striped piece was about 4-1/4" long and the spider piece was about 3-5/8" long. I used Paper Snips to add the dove-tail shape to one end and adhered this onto the card front with Glue Stick. 


I stamped the tree and owl image from Best of Halloween onto a scrap of Smoky Slate card stock in Jet Black Stazon ink. Then I took my Basic Black ink pad and swiped it directly across the card stock to create the ground. I used a Stampin' Sponge to sponge on a little more black near the ground to make it look like there was fog covering the ground. I cut this image out with the 2nd from smallest from smallest Oval framelit. 

Next I took a scrap of Pumpkin Pie card stock and used the smallest and 2nd from smallest Oval framelits to make an oval frame. I covered the frame with Versamark ink, poured on some Heat and Stick powder, tapped off the excess, heated it with my heat tool, poured on some Orange glitter, tapped off the excess, and heated it quickly with my heat tool again to set the glitter. After all that was done I adhered the frame onto the tree oval with 2-Way Glue Pen. I adhered this onto the card front with a couple Stampin' Dimensionals. 


I added the Trick or Treat onto the bottom left corner of the card front by stamping in Versamark and using Heat and Stick powder just like I did for the oval frame, except this time I used the Black glitter. For the Rhinestones I just colored them with a black permanent marker then added them onto either side of the greeting. 


Now that the front of the card was finished I needed to pretty up the inside! I cut a piece of Smoky Slate card stock 4" x 5-1/4". I rubbed my Basic Black ink pad across the edges intentionally trying to make it messy. Then I took two more scraps of DSP, cut them into banners and adhered all the layers together and to the inside of the card with glue stick. These banners are about 2" x 3-5/8" for the large one, and 1-3/8" x 3" for the smaller one. 

Now that I've finished this spooky Halloween card I just need to figure out who I am going to send it to!


Thursday, October 10, 2013

Celebrate!

This sweet little gift bag was part of my Make and Takes from Convention that I finally put together. I filled it up with some chocolates to give to my best friend for her birthday. I just think that little lizard (chameleon?) is so adorable! 


The chevron bags are so pretty and fun to work with. 


And the mini clothespins are just adorable! 


Overall this was a super cute and super quick project to put together!