Monday, October 31, 2011

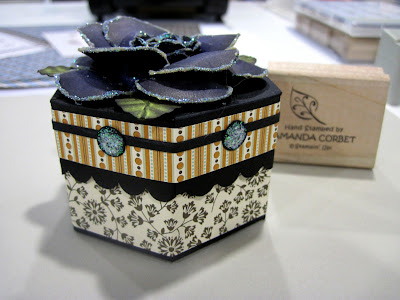
Black Rose Box

I was playing around with a fabulous Milk Carton Box tutorial that was created by Sunghee at Creativity In Progress. I will have the links to both of the tutorials that I used on this project at the end of the post.


Cardstock: Basic Black, Concord Crush, Lucky Limeade
DSP: Spice Cake
Ink: Basic Black, Early Espresso
Accessories: Mini Milk Carton Die, Owl Punch, 1 ¾” x 7/8” Oval Punch, Crimper, Tombow Multi-Purpose Adhesive, Dazzling Diamonds, Dazzling Details, Mini Glue Dots, Stampin’ Sponge, Scallop Edge Border Punch, 2 3/8” Scalloped Circle Punch, Paper Snips, Sticky Strip

Anyway… I made this little black milk carton box out of Basic Black cardstock just to try out the tutorial and it was sitting there on my work table. I just had to decorate it, so I decided to make a Halloween themed gift box. I wrapped the box bottom with a strip of Spice Cake DSP. Then I wrapped the top of the box with another pattern from the Spice Cake DSP.

I had another one of those 1/8” strips of cardstock on my table so I adhered that to the box top. The width was a little uneven where the strip ends met, so that meant I had to use something to cover the seam, which also means adding one to the center of all six sides. So I punched out six circles from Basic Black cardstock using the largest circle in the Owl Punch. I glued the circles on the sides of the lid and applied Dazzling Details to the circles to give them some sparkle.

For the rose I used Valita’s Owl Punch Rose tutorial. I used Concord Crush cardstock sponged with Basic Black ink for the flower petals. After the rose was completely formed I edged each petal and the center with Tombow Multi-Purpose Adhesive and then sprinkled Dazzling Diamonds glitter over the glue and tapped off the excess. The rose was set aside to dry while I created the leaves.

The leaves were made by punching Lucky Limeade cardstock three times with the 1 ¾” x 7/8” Oval Punch. The leaves were then folded in half and run through the crimper at an angle. Once you un-fold the cardstock you now have a leaf with veins! The leaves were sponged with Early Espresso ink and adhered underneath the rose. The rose was adhered to the box top with LOTS of Sticky Strip.


I LOVE, LOVE, LOVE how this black rose looks! Such a deep pretty purple with sparkles! Okay…so I’m really excited about this project. Anyway… here are the tutorials I used:

Mini Milk Carton Boxes by Sungee

Owl Punch Rose by Valita

Thanks for stopping by and I hope you’ve enjoyed all of my Halloween projects!

Peeking Halloween Ghosts

Here is another fun Halloween card for you! This one features a sparkly spider web and ghosts following a cute owl trick-or-treater. Take a look:


Stamps: Warmest of Wishes, Teeny Tiny Wishes
Cardstock: Basic Grey, Basic Black, Pumpkin Pie, Whisper White
DSP: Spice Cake
Ink: Basic Black
Accessories: Word Window Punch, Modern Label Punch, Neutrals Brads, Needle Tool, Mat Pack, Owl Punch, Spider Web Textured Impressions Embossing Folder, Dazzling Details, Stampin' Dimensionals, Pumpkin Pie Marker, Two-Way Glue Pen

The card base is Basic Grey cardstock cut at 5 ½” x 8 ½” and scored at 4 ¼”. A piece of Pumpkin Pie cardstock was cut at 3 ¾” x 5” and was run through the Big Shot in the Spider Web Textured Impressions Embossing Folder. Then Dazzling Details was added to the raised lines that the embossing folder created. This piece was set aside to dry.

A piece of Basic Black cardstock was cut at 2” x 3 ¾”. A piece of Spice Cake DSP was cut at 1 7/8” x 3 ¾”. The DSP was adhered on top of the Basic Black cardstock. On another project I had changed my mind on how large I wanted a mat to be, so I had these 1/8” wide strips of cardstock lying next to my paper cutter. I adhered these two strips on top of the DSP with Two-Way Glue Pen, then trimmed the strips to the width of the DSP with Paper Snips.

The owl from Warmest of Wishes was stamped in Basic Black ink onto a scrap of Whisper White cardstock. The mask, nose, and bag were colored in with the Pumpkin Pie marker. The owl was punched out with the Owl punch. I also used the owl punch to punch out two owls from Whisper White cardstock and four of the smallest circles in Basic Black. The feet of the Whisper White owls were cut off and the eyes were added. This created the ghosts.

Now that your spider web is dry this panel is adhered to a 4” x 5 ¼” piece of Basic Black cardstock and this panel was adhered to the card front. The ghosts were adhered to the back of the DSP/Basic Black panel then this panel was adhered to the card front. The owl was adhered to the card front with Stampin’ Dimensionals.


The greeting from Teeny Tiny Wishes was stamped in Pumpkin Pie ink onto a scrap of Whisper White cardstock then was punched out with the Word Window punch. The Modern Label punch was used on a scrap of Basic Grey cardstock. The greeting was adhered to the Basic Grey modern label. Then the Paper Piercer and Mat Pack were used to pierce a hole in each side of the label and two black brads from the Neutrals Brads were added. The greeting was adhered to the card front with Stampin’ Dimensionals.


I just love how the sparkly spider web in the background came out! Such a fun Halloween card! Come back later to see the last project for today!

Candy Corn Treat!


So here is the second of my Halloween projects today. This one is a cute little Candy Corn treat holder. This is also the 3D project from the October Make and Take. I just Love the cute little Trick or Treating owl in the set Warmest of Wishes which is the Hostess set in the Holiday Mini Catalog.


Stamps: Warmest of Wishes
Cardstock: Basic Grey, Lucky Limeade, Pumpkin Pie
Ink: Versamark, Basic Black
Accessories: 2 3/8” Scalloped Circle Punch, 1 ¾” Circle Punch, Owl Punch, Black Embossing Powder, Heat Tool, Dazzling Details, Sticky Strip, Stampin’ Dimensionals, Perfect Polka Dots Textured Impressions Embossing Folder, Stampin’ Sponge

Two scalloped circles were punched from Basic Grey cardstock with the 2 3/8” Scalloped Circle punch. The edges of both of them were sponged with Basic Black ink. Next two circles were punched from Lucky Limeade cardstock with the 1 ¾” Circle Punch. The Lucky Limeade circles were run through the Big Shot in the Perfect Polka Dots embossing folder and were then adhered onto the Basic Grey scalloped circles. Next the owl image from Warmest of Wishes was stamped in Versamark ink onto Pumpkin Pie cardstock. Black Embossing Powder was poured over the images, the excess tapped off, then heated with the heat tool. The owls were punched out with the Owl Punch.

One of the Cellophane Bags was filled with Candy Corn, not exactly the easiest task either, then the bag was sealed with plenty of room at the top to be adhered to the cardstock. Several strips of Sticky Strip were placed on the back of both of the Basic Grey scalloped circles. I wanted to make sure that there was sticky strip on both sides of the cellophane bag so the bag was well adhered to both circles. The sticky strip liner was removed from one of the scalloped circles and the cellophane bag was adhered. The sticky strip liner on the other scalloped circle was removed and it was adhered on top of the first scalloped circle sandwiching the end of the cellophane bag between the cardstock.


One owl was adhered to each side of the bag topper with Stampin’ Dimensionals. Then the trick or treat bag and the mask on the owl were covered with Dazzling Details on one side to give the bag topper some sparkle.

This was simple to do, loads of fun, and a totally cute treat! Check back later to see what I have to share with you next!


Happy Halloween Witch


Today is Halloween. So Happy Halloween to all of you goblins, witches, and ghouls! Since today is Halloween I want to share with you ALL of the Halloween projects that I have made and have yet to post. So here is the first one. I have four projects to share with you today so pop back in every once and a while to see the latest post! Here we go!
Here is the first card from the October Make and Take. Of course we HAD to do a Halloween Card! So I used the adorable set Out on a Limb to put together this cutie. Take a look:


Stamps: Out on a Limb, Teeny Tiny Wishes
Cardstock: Basic Grey, Basic Black, Rich Razzleberry, Lucky Limeade, So Saffron, Whisper White
Ink: Black Stazon, Basic Black, So Saffron, Peach Parfait, Blush Blossom
Markers: Rich Razzleberry, Lucky Limeade, Daffodil Delight, Sahara Sand, River Rock
Accessories: Blender Pen, Aqua Painter, Spider Web Textured Impressions Embossing Folder, 2 ½” Circle Punch, 1” Circle Punch, XL Lace Border Punch, Stampin’ Dimensionals, Basic Rhinestones Jewel Accents.

The card base is Basic Grey cardstock cut at 5 ½” x 8 ½” and scored at 4 ¼”. The edges of the card were heavily sponged with Basic Black ink. Next a scrap of Lucky Limeade cardstock was punched with the XL Lace Border Punch. Five 1” Circles were punched from So Saffron cardstock and were adhered behind the Lucky Limeade lace. The lace was adhered to the right side of the card front and four rhinestones were added to the lace just to add a little sparkle.

Next a piece of Rich Razzleberry cardstock was cut at 2 ¾” x 4” and was run through the Big Shot in the Spider Web embossing folder. The edges of the cardstock were distressed and the texture was sponged with Basic Black ink before it was adhered to a piece of Basic Black cardstock cut at 3” x 4 ¼” that also had the edges distressed.

The witch from Out on a Limb was stamped in Black Stazon onto a scrap of Whisper White cardstock. The broom was stamped under the witch. Tip: It is much easier to stamp the witch first, then the broom… trust me. The witch was punched out with the 2 ½” Circle punch. The witch was colored in with markers. The skin was colored by squeezing the closed Blushing Bride ink pad, opening it half-way, and picking up just a little bit of the ink with an Aqua Painter. If you go over the line with the Aqua Painter, which is really easy to do, just color over it with the Blender Pen. After the witch and the broom are colored in I sponged the edges of the circle with Daffodil Delight ink all the way around, then I sponged just half-way around with Peach Parfait ink. The stamped circle was then adhered to the card front with Stampin’ Dimensionals.


Just to finish it off the greeting from Teeny Tiny Wishes was stamped in Basic Black ink on the bottom of the card front.

That’s all it took to create this adorable little witch! Check back later for more Halloween fun!

Friday, October 28, 2011

Yellow Tulips

Here is the third card from the Owl Class. This one has lots of yellow tulips!


Stamps: Happy Greetings
Cardstock: Island Indigo, Night of Navy, Whisper White, Old Olive, Pool Party, So Saffron, Very Vanilla
Ink: Daffodil Delight, Island Indigo
Accessories: Scallop Trim Border Punch, Owl Punch, Decorative Label Punch, Basic Rhinestones Jewel Accents, Stampin’ Dimensionals, Perfect Polka Dots Textured Impressions Embossing Folder, Vintage Wallpaper Textured Impressions Embossing Folder, Paper Snips, Two-Way Glue Pen.

The card base is Island Indigo cardstock cut at 5 ½” x 8 ½” and scored at 4 ¼”. The card front was run through the Big Shot in the Vintage Wallpaper Textured Impressions Embossing Folder. A piece of Whisper White cardstock was cut at 2 ¾” x 3 ¾”. This was run through the Big Shot in the Perfect Polka Dots Textured Impressions Embossing Folder. The Whisper White cardstock was adhered to a 3” x 4” piece of Night of Navy cardstock.

Three owls were punched from So Saffron cardstock and three owls were punched from Very Vanilla cardstock and all of the feet were trimmed off with Paper Snips. The Vanilla owls were cut from the inside of the ear down to the middle of bottom of the owl. Repeat with the other half. You are basically cutting out a small triangle from the center of the owl and you end up with two pieces. All of the owls get sponged with Daffodil Delight ink around the edges.

The sponged Vanilla owl pieces are adhered on top of the So Saffron owls so that the Very Vanilla halves overlapped and were in the center of the So Saffron owls. Three strips of Certainly Celery cardstock were cut at ¼” x 3”. The strips were adhered behind the tulips to create the stem. The tulips were adhered to the Whisper White cardstock with Stampin’ Dimensionals. The bottom of the stems were adhered to the Whisper White cardstock with the Two-Way Glue Pen. The stems sticking out past the edge of the cardstock were trimmed off with Paper Snips.


A piece of Old Olive cardstock was cut at 1” x 4”. One of the long sides was punched with the Scallop Trim Border Punch. This cardstock was adhered over the bottom of the stems and to the Whisper White cardstock. This panel was adhered to the card front with Stampin’ Dimensionals.

The greeting from Happy Greetings was stamped in Island Indigo ink onto a scrap of Pool Party cardstock. The greeting was punched out with the Decorative Label punch. A rhinestone was added to each side of the label and the label was adhered to the card front with Stampin’ Dimensionals.

That’s all it takes to make some wonderful spring tulips from the owl punch! Thanks for stopping by!

Wednesday, October 26, 2011

Haunting Halloween Card

This ghostly card is the second project from the Owl Class. Take a look:


Stamps: Distressed Dots, Happy Greetings
Cardstock: Elegant Eggplant, Peach Parfait, Basic Black, Old Olive, Whisper White
Ink: Old Olive, Pumpkin Pie, Basic Black, Versamark
Accessories: 1 ¾” x 7/8” Oval Punch, Bird Punch, 1” Circle Punch, Owl Punch, White Gel Pen, Stampin’ Sponge, White Embossing Powder, Heat Tool, Stampin’ Dimensionals, Paper Snips, Two-Way Glue Pen, 5/8” Basic Black Satin Ribbon, Mini Glue Dots.

The card base is Elegant Eggplant cardstock cut at 5 ½” x 8 ½”, and scored at 4 ¼”. The background stamp Distressed Dots was inked up in Basic Black ink and stamped onto the card front. A piece of Basic Black cardstock was cut at 3 ¾” x 3 ¼”. The greeting from Happy Greetings was stamped in Versamark ink in the upper left hand corner of the cardstock. White embossing powder was poured over the greeting, the excess was tapped off, and the greeting was heated with the Heat Tool to melt the powder. The White Gel Pen was used to add dots all over the Basic Black cardstock to look like stars.

The Old Olive cardstock was torn along one of the long sides. The remaining sides were sponged with Old Olive ink. This was adhered to the bottom of the Basic Black cardstock to create the ground. For the ghosts I punched two owls from scraps of Whisper White cardstock and sniped off the feet of the owl with Paper Snips. With the owl body upside-down I added two little Basic Black circles for the eyes. The Ghosts were adhered to the Basic Black cardstock background.

For the pumpkins I punched out three 1” Circles from Peach Parfait cardstock, sponged the edges with Pumpkin Pie ink and adhered them together. The large pumpkin was made the same way except it was punched with the 1 ¾” x 7/8” Oval Punch. Old Olive cardstock scraps were used to punch several branches from the Bird Punch. These were trimmed and adhered to the tops of the pumpkins to look like vines. The pumpkins were adhered on top of the ghosts with Stampin’ Dimensionals so it looks like the ghosts are peeking out from behind the pumpkins.


The image panel was adhered to the card front with Stampin’ Dimensionals. A bow was tied in 5/8” Basic Black Satin Ribbon and the bow was adhered to the card front with Mini Glue Dots.

This card was cased from one created by Michelle Scileppi that she posted on a Demonstrator only gallery. Unfortunately I can't find a blog to share her sample with you. Thanks for the inspiration Michelle!
Thanks for stopping by!

Tuesday, October 25, 2011

Rudolph the Red Nosed Reindeer

A while back I had a class featuring the Owl punch. I wanted to show the ladies that attended that you can do much more than just make owls with the owl punch. So here is the first one. It is an adorable Christmas card featuring Rudolph! Take a look:


Stamps: Happy Greetings, Simple Snowflake
Cardstock: Cherry Cobbler, Very Vanilla, Crumb Cake, Early Espresso, Red Glimmer Paper, Basic Black, Whisper White
DSP: Holly Berry Bouquet DSP
Ink: Crumb Cake, Cherry Cobbler, Soft Suede
Accessories: Early Espresso Marker, Snowflake Punch, Owl Punch, Dotted Scallop Ribbon Punch, Stampin’ Sponge, Stampin’ Dimensionals, Paper Snips, Two-Way Glue Pen.

The card base is Cherry Cobbler cardstock cut at 5 ½” x 8 ½” and scored at 4 ¼”. A piece of Very Vanilla cardstock was cut at 4” x 2 ¾”. The snowflake from Simple Snowflake was stamped in Crumb Cake ink all over the Very Vanilla cardstock to create a background. The greeting from Happy Greetings was stamped at the top of the cardstock in Cherry Cobbler ink. This stamped Very Vanilla cardstock was adhered to the top of the card front.

A scrap of Early Espresso cardstock was punched with the Dotted Scallop Ribbon punch and was adhered behind a 2 ½” x 4” piece of Holly Berry Bouquet DSP. This was adhered to the bottom of the card front. You can’t tell in the photo, but those red stripes are glittery. Next a piece of Very Vanilla cardstock cut at 2 ½” x 1 ½” was adhered to a 2 3/8” x 1 5/8” piece of Cherry Cobbler cardstock.

An owl was punched from scraps of Crumb Cake cardstock. The feet were trimmed off with Paper Snips and the edges were sponged with Soft Suede ink. The eyes were punched from Whisper White and Basic Black cardstock scraps. The nose is the largest circle from the owl punch and it was punched from Red Glimmer Paper. The mouth was drawn on with an Early Espresso marker. For the antlers I punched a snowflake from Early Espresso cardstock using the Snowflake punch. I used paper snips to cut off just two of the “branches” of the snowflake and then cut off the third “v” shape from each “branch”. This was glued to the back of the owl to create the antlers. This adorable Rudolph head was adhered to the small Very Vanilla panel with a Stampin’ Dimensional. The panel was adhered to the card front with more Stampin’ Dimensionals.


This cute reindeer card was a piece of cake to put together. I hope you give it a try sometime! My reindeer was inspired by Chera's card that you can find HERE.

Thanks for stopping by!


Monday, October 24, 2011

Short Vacation to the Windy City!

Sorry I've been MIA for the last week. I took the week off from work and have at least partially unplugged. I really haven't been on the computer a lot in the last week which has been so nice! Not that I don't like sharing with all of you, but it has been wondeful to appreciate just spending some time at home with only a few chores on the to-do list and thats it.

However, Hubby and I went to Chicago Tuesday and Wednesday just to see something different and go somewhere different together. It was a relatively inexpensive vacation. The hotel was fabulous as was the view from the window. You have to understand that the biggest city that I've actually ever been around is Kansas City. Which, although big for our area, is rather small compared to other big cities in the country. So going to Chicago was truly an experience! I can't say that I like the maze of the public transportation system. Not to mention that you truly do A LOT of walking!


Here is the view from our hotel room window. It's really hard to get a clear picture of the city lights at night!


Here are some other pictures from our trip!


 This was taken as we were about two blocks away from the John Hancock building (the one with the two antennae).

This is the same building as we were about to enter it. We were heading to the Observatory to see the city from the top of the John Hancock building.


City along the lake, a very BIG lake!


It's a long way down. The cars and people look so small from this view. On the left you can see the water pump house and the tower on the right is the water tower.


View of the city from the lake. We went on an Architectural tour of the city from the Chicago river. What a wonderful view-point. It was a bit overcast both days that we were there, however, it only rained a little Tuesday evening and then off and on Wednesday morning. It was a chilly rain too!

More pictures of our short vacation to the windy city will come later in the week!

Thursday, October 13, 2011

Pink Flowers and Polka Dots

Today I'm going to share with you another project from earlier this year. This is Neila's birthday present. Neila is the exchange student from Germany that my parents hosted last school year. It was a ton of fun getting to know her and showing her the American way of life in the midwest. Her birthday was in June, just a couple weeks before she was heading home. So her gift had to be small so it would fit in her already full suit-cases. I made her these two necklaces and purchased a pretty britght pink scarf. Here are the necklaces:


I found this gift bag a Wal-Mart. Neila LOVES pink so I knew it was perfect, but the card had to match! So I spent some time digging through my stamp collection to find just the right one, and this is what I came up with!


Stamps: Friendly Flowers, Bring on the Cake
Cardstock: Melon Mambo, Pretty in Pink, Whisper White
Ink: Pink Pirouette, Basic Black
Markers: Basic Black, Lucky Limeade, Peach Parfait, Melon Mambo, Pretty in Pink, Regal Rose
Accessories: Paper Piercer, Mat Pack, Glimmer Brads, 5/8" Basic Black Satin ribbon, non-SU ribbon

The card base is Melon Mambo cardstock cut at 5 1/2" x 8 1/2" and scored at 4 1/4". A piece of Whisper White cardstock was cut at 3 3/4" x 5". The images from Friendly Flowers (retired) were inked up with markers to get the variety of colors in the flowers. After completely coloring the stamp I breathed on the stamp to re-moisten the ink and stamped it onto the cardstock. The smaller flower was stamped several times in the background with Pink Pirouette ink just to fill in some white space. The greeting from Bring on the Cake was stamped in Basic Black ink in the lower right hand corner of the cardstock. This panel was adhered to a 3 7/8" x 5 1/8" piece of Pretty in Pink cardstock.


The Paper Piercer and Mat Pack were used to pierce a hole in the two colorful flower centers and two green Glimmer brads were added. Some 5/8" Basic Black ribbon was wrapped around the panel and adhered to the back using Snail Adhesive. Then I dug out the black organza polka dot ribbon from my non-SU stash (SU didn't sell the polka dot ribbon at the time I made this card or I just would have used that instead). I managed to find two pieces of this ribbon that were just long enough. So the first was wrapped around and adhered to the back with Snail Adhesive. The second was into a bow. The Paper Piercer and Mat Pack were used again to pierce a hole for another brad. The brad was pushed through the knot in the bow and through the hole in the cardstock and the tabs were flattened on the back. This panel was adhered to the card front.

Thanks for stopping by !


Wednesday, October 12, 2011

Uncharted Territory

Here is the second card that I made as a good luck card! This one uses Uncharted Territory,which is a perfect stamp set for a masculine card!

Stamps: Uncharted Territory, Sailing Away, Sanded (retired)
Cardstock: Sahara Sand, Night of Navy, Poppy Parade, Baja Breeze, Watercolor Paper
DSP: Elegant Soiree (retired)
Ink: Bashful Blue, Night of Navy, Peach Parfait, Black Stazon, Sahara Sand
Accessories: White Gel Pen, Stampin' Dimensionals, Aquapainter, Soft Suede Re-Inker

The card base is Sahara Sand cardstock cut at 4 1/4" x 11" and scored at 5 1/2". The card front was stamped with the Sanded background stamp (retired) in Night of Navy ink. The a piece of Elegant Soiree DSP (retired) was cut at 2 1/2" x 4 1/4". This was adhered to a 2 5/8" x 4 1/4" piece of Night of Navy cardstock and was adhered to the card front.

A piece of Watercolor paper was cut at 2 1/2" x 3 3/4". The image from Uncharted Territory was stamped in Black Stazon ink. The sky was colored by sqeezing the center of the closed Bashful Blue ink pad, opening the pad up half-way and picking up the ink with the Aquapainter. This gives the sky a very subtle watercolored look. The lighthouse was colored using the same method as the sky, but with Peach Parfait ink, you only need to pick up a tiny bit of the ink to get this color. Apply it starting on the left side brushing up and down while moving to the right. Repeat the process until the lighthouse it the color that you like it. The rocks were colored in using Soft Suede Re-Inker. I used Re-Inker on the rocks to get a much darker color.

For the ocean I swiped the Night of Navy ink pad directly across the cardstock several times. Then I use the Aquapainter to pick up some ink from the lid of the ink pad like before, to fill in the shallow portions of the texture. For the foam I just used the White Gel Pen and dabbed it along the base of the rocks to look like foam or waves crashing on the rocks. This panel was adhered to a 2 3/4" x 4" piece of Baja Breeze cardstock. This panel was adhered to a 2 7/8" x 4 1/8" piece of Poppy Parade and then the whole thing was adhered to the card front with Stampin' Dimensionals.


On the inside I stamped the greeting from Uncharted Territory in Night of Navy ink, then I added the sail boat image in Sahara Sand ink just to add a pretty detail to the inside of the card.

Good Luck!

Someone well appreciated where I work was forced to find another job. So before he left I made two cards (so that everyone in the building could have enough room to sign). Here is the first one. I will show you the second one later today.


Stamps: Lovely as a Tree, So Happy For You (retired)
Cardstock: Crumb Cake, Night of Navy, Very Vanilla
DSP: Pear Pizzaz Designer Series Paper
Ink: Daffodil Delight, Baja Breeze, Not Quite Navy, Old Olive, Always Artichoke, Basic Black, Early Espresso
Accessories: Decorative Label Punch, Corner Rounder Punch, 1 1/4" Striped Night of Navy ribbon, Gold Brads, Paper Piercer, Mat Pack, Stampin' Dimensionals, Stampin' Sponge, Post-It Notes, Snail Adhesive, 1 3/4" Circle Punch

The card base is Crumb Cake cardstock cut at 5 1/2" x 8 1/2" and scored at 4 1/4". A piece of Pear Pizzaz DSP was cut at 3 3/4" x 5". This was adhered to a 3 7/8" x 5 1/8" piece of Night of Navy cardstock. I cut a piece of 1 1/4" striped Night of Navy ribbon and adhered it to the panel and around to the back of the panel with Snail Adhesive. The Paper Piercer and Mat Pack were used to pierce three holes in the ribbon through the cardstock where three Gold Brads were added. This panel was adhered to the card front.

Next I cut a piece of Very Vanilla cardstock 2 1/2" x 3 3/4". I punched two of the corners with the Corner Rounder punch. I placed a Post-It Note onto a piece of copy paper and punched it out with the 1 3/4" Circle Punch making sure that some of the sticky part of the Post-It Note was inside the cirlce. I placed the Posti-It Note circle onto the cardstock where I wanted my sun to go. The sky was sponged first with Baja Breeze then with Night of Navy making sure not to cover the Baja Breeze ink entirely. The Post-It Note sun  mask was removed and Daffodil Delight ink was sponged inside the sun. The grassy area was sponged with Old Olive and then with Always Artichoke making sure not to cover the Old Olive ink entirely.

The image from Lovely as a Tree was stamped in Basic Black ink and the edges of the panel were sponged with Basic Black ink. For the mat a piece of Very Vanilla cardstock was cut at 2 3/4" x 4" and the same two corners were punched with the corner rounder punch. The edges were sponged with Early Espresso ink and the sponged panel was adhered on top of this panel. This panel was adhered to the card front with Stampin' Dimensionals.

The greeting from So Happy for You (retired) was stamped in Basic Black ink onto a scrap of Very Vanilla cardstock. The greeting was punched out with the Decorative Label Punch making sure that the greeting was in the top half of the label. The edges of the label were sponged with Night of Navy ink and the label was adhered to the card front so that the bottom portion of the label was behind the sponged panel. 

 That's all for now! Thanks for stopping by!


Tuesday, October 11, 2011

Inspired Wistera Birthday Wishes

Good morning! I've been going through my photos that need to be posted and have found several from some time ago. So here is one of them. You may have noticed that I make A LOT of birthday cards. It's usually my go to for greetings because I really do use a lot of birthday cards. I need to stock up on my others though so you may see more than just birthday sentiments in the near future. Anyway...here is the card I created for the SCCSC80 sketch challenge on Stampin' Connection back in August.


Stamps: Inspired By Nature, Bring on the Cake
Cardstock: Wisteria Wonder, Elegant Eggplant, Whisper White
DSP: Flirtatious
Ink: Wisteria Wonder, Basic Black
Accessories: Blossom Bouquet Triple Layer Punch, Tasteful Trim Die, Punch Pack (small flower punch), Basic Rhinestones Jewel Accents, Glimmer Brad, Dazzling Details, Stampin' Dimensionals, Paper Piercer, Mat Pack, Two-Way Glue Pen

Here is the sketch that was created by Susie Nelson:


The card base is Wisteria Wonder cardstock cut at 5 1/2" x 8 1/2" and scored at 4 1/4". The image from Inspired By Nature was stamped twice across the card front in Wisteria Wonder ink to give the card a bold background. The greeting was stamped in Basic Black ink in the lower right hand corner of the card.

A piece of Flirtatious DSP was cut at 2 1/4" x 2 1/4". This was adhered to a 2 3/8 x 2 3/8" piece of Whisper White cardstock. The panel was adhered to the card front with Stampin' Dimensionals. A scrap of Elegant Eggplant cardstock was run through the Big Shot on the ric-rac portion of the Tasteful Trim Die. I cut the ric-rac into two pieces approximately the same length as the sides of the square. These were adhered to the card front using Two-Way Glue Pen. For where the ric-rac meets on the right side of the DSP square I punched one small flower from Elegant Eggplant cardstock and one small flower from Wisteria Wonder cardstock. The flowers were adhered together and to the card front. Then a small rhinestone was added to the center of the flower.

Next I used the Blossom Bouquet Triple Layer punch. I punched the largest flower from Elegant Eggplant cardstock, the middle flower from Wisteria Wonder cardstock, and the most detailed flower from Whisper White cardstock. The flower layers were adhered together using the Two-Way Glue Penl. Then the Paper Piercer and Mat Pack were used to pierce a hole in the center of the flower where a Glimmer Brad was added. The flower was adhered to the card front.


At this point I thought the card needed a little more bling so I added a strip of rhinestones underneath the greeting and added Dazzling Details glitter glue in the center of the flower petals. This made for a sparkly, yet simple, card.

If you are a Stampin' Up Demonstrator you can find the sketch challenge thread HERE. If you are not a Stampin' Up Demonstrator I would still love to see your creations! Please post a link to your card in the comments section of this post!

Thanks for stopping by!


Monday, October 10, 2011

Blue and Red Christmas

Good morning! Today I apparently missed posting one of the cards from the August Make and Take. In my Make and Take classes starting from August I have one Christmas card at least. That way people can get ideas for their Christmas cards, or if they don’t have many to send, then they have all the Christmas cards they need. Anyway, here is the Christmas card from August:


Stamps: Snow Swirled, Delightful Decorations, Teeny Tiny Wishes
Cardstock: Bashful Blue, Real Red, Whisper White
Ink: Bashful Blue, Real Red
Accessories: Top Note Die, Northern Flurries Textured Impressions Embossing Folder, Ornament Punch, Modern Label Punch, Word Window Punch, 5/8” Real Red Satin Ribbon, Baker’s Twine, Stampin’ Dimensionals, Vanilla Smooch Spritz, Corner Rounder Punch, Snail Adhesive

The card base is Bashful Blue cardstock cut at 5 ½” x 8 ½” and scored at 4 ¼”. The corners were punched with the Corner Rounder Punch. The snowflake from Snow Swirled was stamped on the cardstock in Bashful Blue ink to create a background. Next a piece of Whisper White and Real Red cardstock were cut 4” x 5” and were run through the Big Shot on the Top Note Die. The Whisper White top not was run through the Big Shot again in the Northern Flurries Textured Impressions Embossing Folder then it was sprayed with Vanilla Smooch Spritz to give the panel some sparkle. The Real Red top note was cut in half length-wise and the points that were in the middle of the sides were snipped off with Paper Snips. The Real Red top note halves were adhered behind the Whisper White top note.


A piece of 5/8” Real Red Satin Ribbon was adhered to the panel using Snail Adhesive. At the top of the panel the ribbon was folded around and adhered to the backside of the panel. The other end was cut into a dove-tail with paper snips. This panel was adhered to the card front. The ornament from Definitely Decorative was stamped in Bashful Blue ink onto a scrap of Whisper White cardstock. The ornament was punched out with the Ornament Punch. A piece of Baker’s Twine was wrapped around the ornament top and tied into a bow. The ornament was adhered to the card front with Stampin’ Dimensionals.
Next the Modern Label punch was used on a scrap of Bashful Blue cardstock. Then the greeting from Teeny Tiny Wishes was stamped in Real Red ink onto a scrap of Whisper White cardstock. The greeting was punched out with the Word Window punch and was adhered to the Bashful Blue modern label. The greeting label was adhered to the card front with Stampin’ Dimensionals.

Come back tomorrow to see the first card from the September Make and Take. This time I won’t try to forget one of them!

Thanks for stopping by!

Thursday, October 6, 2011

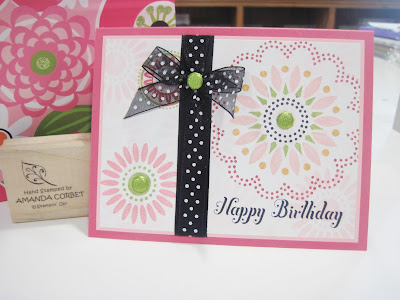
Stocking Punch Class!!!!

When: November 4th at 7:00 PM

Where: My home
What is included: Stocking Punch, Stitched Stockings stamp set and 1/2 a package of Letters to Santa DSP.


As part of this class you will get your very own Stocking Punch and Stitched Stockings stamps set. You can choose either clear mount or wood mount for the stamp set and I will have it assembled and ready for your use when you arrive on November 4th. With this class you will get to make 7 cards with envelopes provided using YOUR stamp and punch! The DSP that is remaining after the supplies for your cards are cut is yours to take home and use on other projects! Believe it or not this little stocking set can be used to create cards for a number of occasions and I will show you how!
The fees are:

Clear Mount Class $55.00
Wood Mount Class $65.00

Already have just the punch, or just the stamp set, or both?

Punch Only Class $34.00
Stamp Set Only Class (Clear Mount) $37.00
Stamp Set Only Class (Wood Mount) $46.00
Just the Projects Class $15.00

Cards-By-Mail Version:

Not close enough to Leavenworth to come to my home? Join in on the Cards-By-Mail version of this class! This would include the cost of the class plush shipping to your address. I will include printed instructions with color photos of each project! All you need is the ink and adhesive! Please make sure to select the Cards-By-Mail class prices which include shipping! (This shipping cost is for continental US only. If international or Hawaii or Alaska please contact me for pricing!)

The class must be PRE-PAID by October 28th to be able to participate in the class! Please contact me if you would like more info!

Payment methods accepted: PayPal, Money Order, Personal Check (local only), Cash

Please make sure to PRE-PAY by the October 28th deadline to be able to participate in the class!

Click here to pay via PayPal!


Stampin' Up Demonstrator
amanda.c09@hotmail.com