Thursday, September 30, 2010

Christmas Ornament - September Make and Take 4

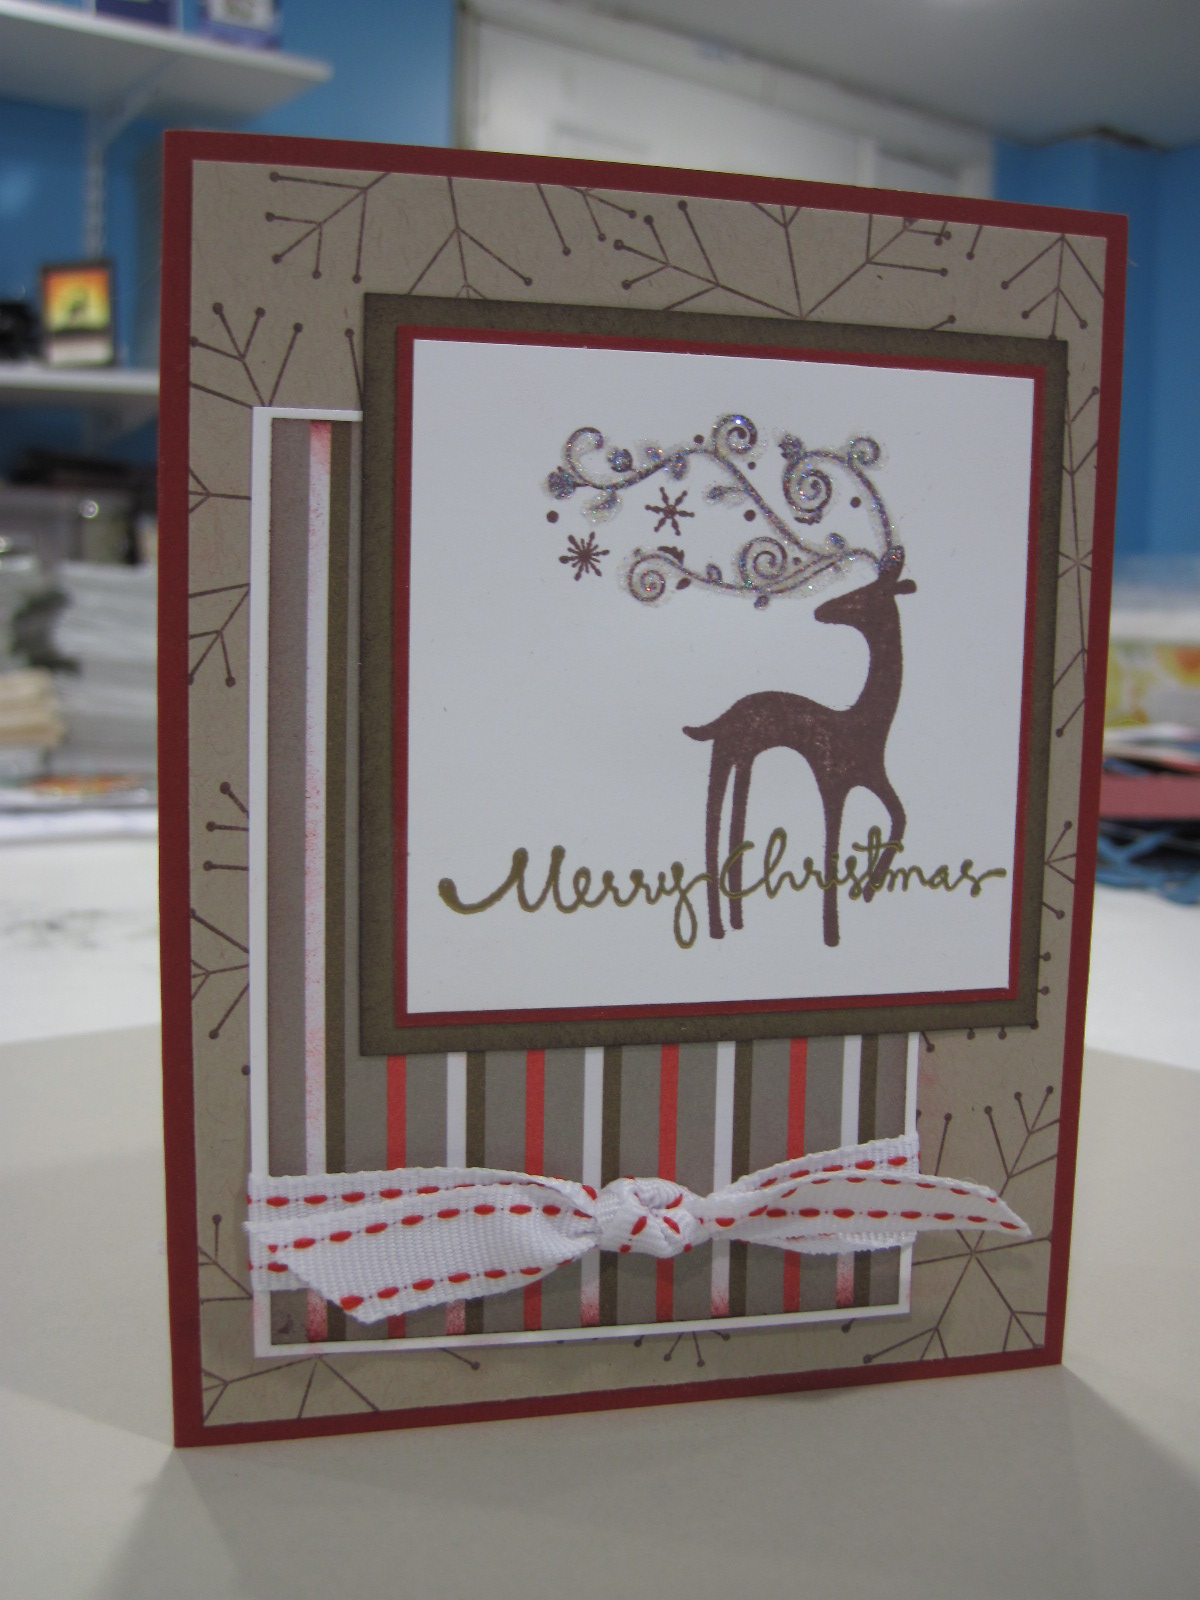
This is the last card that my guests made at the September Make and Take. Since August I have had one Christmas card at each Make and Take. That way people who want to make their own Christmas cards can start getting ideas now. Well here is the one for September. This card was inspired by Marie Shaughnessy. You can view her card and her blog here. Take a look at the one that we made:


Stamps: Christmas Punch, Lovely As A Tree, Christmas Greeting
Cardstock: Cherry Cobbler, Old Olive, Bravo Burgundy, Whisper White
Ink: Always Artichoke, Old Olive, Cherry Cobbler
Accessories: Ornament Punch, Gimmer Brads, Stampin' Dimensionals, Basic Black Marker, Needle Tool

The card base is 5 1/2" x 8 1/2" Cherry Cobbler cardstock scored at 4 1/4". A piece of Whisper White cardstock was cut at 2 7/8" x 4 1/8". The pine tree from Lovely As A Tree was stamped several times from the top left corner in both Always Artichoke and Old Olive ink. The greeting from Christmas Greetings was stamped in Always Artichoke ink at the bottom of the Whisper White cardstock.
The Basic Black marker was used to draw a hook from one of the Christmas tree branches down to where the ornament will be. The stamped Whisper White cardstock was adhered to a 3" x 4 1/4" piece of Bravo Burgundy cardstock. This was then adhered to a piece of Old Olive cardstock cut to 3 1/4" x 4 1/2", then adhered to the card front.
The ornament from Christmas Punch was stamped in Cherry Cobbler ink on a scrap piece of Whisper White cardstock. The stamped ornament was then punched out with the Ornament Punch. The Basic Black marker was used to draw a string around the top of the ornament.

The needle tool was used to punch a hole in the center of the ornament and a Glimmer Brad was added. In this case I used gold, but my guests got to choose the color they wanted to use. A Stampin' Dimensional was used on the back of the ornament and then the ornament was adhered to the card making sure that the drawn string goes behind the ornament a little bit.

This Christmas card is so easy to make and really does look very nice and elegant. You could easily whip out a bunch of these in no time to send to all of your family and friends during the holidays. Come back tomorrow to see the 3D project that we made, it's totally adorable! Have fun stamping!

Wednesday, September 29, 2010

Cute Owls - September Make and Take 3

This is the third card that my guests made at the September Make and Take. This card was inspired by a card created by Darlene DeVries. You can view her card and her blog here. I know it was a lot of steps to put together, but this card is soooo cute! Take a look:


Stamps: Wood Grain, For All You Do
Cardstock: Sahara Sand, Peach Parfait, Cherry Cobbler, Pear Pizzaz, various scraps for owls.
DSP: Autumn Spice
Ink: Early Espresso
Accessories: Two-Step Owl Punch, 2 3/4" Scalloped Circle punch, 1 3/4" circle punch, Two-Way Glue Pen, 1/4" Real Red Grosgrain ribbon, Stampin' Sponge, Stampin' Dimensional, Scallop Edge Border Punch

Isn't this just absolutely adorable???? The card base is 4 1/4" x 11" Sahara Sand cardstock scored at 5 1/2". The Wood Grain background stamp was stamped onto the card front with Early Espresso ink. The sides of the card front were sponged with Early Espresso. I used the 1 3/4" circle punch on the card front in the upper left hand corner. You want to leave plenty of room around your hole for the "frame", so don't get the hole too close to the side or top of your card front. Punch the 1 3/4" circle in a scrap of Pear Pizzaz cardstock. Then use your 2 3/4" circle punch upside down to center your 1 3/4" circle inside your scalloped circle and punch. Now you have your window "frame". This was adhered to the card front with Two-Way Glue Pen.

The edge of a 1 1/2" x 4 1/4" piece of Cherry Cobbler cardstock was punched with the Scallop Edge Border punch then adhered under a piece of Peach Parfait cardstock cut 1 1/2" x 4 1/4". The greeting from For All You Do was stamped in Early Espresso ink in the bottom right hand corner of the Peach Parfait cardstock. These layers were adhered to the card front an a piece of 1/4" Real Red Grosgrain ribbon was tied into a knot around the card.

Now for the owls. The Two-Step Owl punch was used to punch out all of the owl pieces. Since we were doing two owls on this card I pre-punched all of the pieces to save some time during the make and take. For the girl owl I used Chocolate Chip, Sahara Sand, Naturals White, Basic Black, Daffodil Delight, and Greenhouse Gala cardstock and DSP. For the boy owl I used Early Espresso, Sahara Sand, Naturals White, Basic Black, Cherry Cobbler, and Autumn Spice cardstock and DSP. The owls were assembled with the Two-Way Glue Pen. A Stampin' Dimensional was placed on the back of the owl that will be peeking through the "window". Close the card and adhere the owl in place so that you can see most of him/her through the "window". Then adhere the other owl underneat the first owl's feet on the inside of the card.

A 1 1/4" x 4 1/4" piece of Autumn Spice DSP was placed at the bottom of the inside of the card to create a floor. The sentiment from For All You Do was stamped on the inside of the card in Early Espresso ink. That's it!

This card is so cute and funny and everyone at the Make and Take really loved it. Thanks so much Darlene for the great inspiration!

Tuesday, September 28, 2010

Fall Gratitude - September Make and Take 2

Here is the next card that we made at the Make and Take. This one is a fall/thanksgiving card.
This card was inspired by a card created by Dawn Olchefske. You can view her card and her blog here. Here is the card we made:


Stamps: Day of Gratitude
Ink: Old Olive, Peach Parfait, Cajun Craze
DSP: Autumn Spice
Cardstock: Cherry Cobbler, Very Vanilla
Accessories: Decorative Label Punch, 1/8" Early Espresso Taffeta ribbon, Paper Snips

The card base is Cherry Cobbler cardstock cut at 5 1/2" x 8 1/2" and scored at 4 1/4". A piece of Very Vanilla cardstock was cut to 4" x 5 1/4". In the center and to the left side the leaves from Day of Gratitude were stamped in Old Olive and Peach Parfait ink. A 1 1/4" x 3 3/4" piece of Cherry Cobbler cardstock was adhered at the bottom of the Very Vanilla cardstock. A 1 1/2" x 4" piece of Autumn Spice Designer Series Paper was adhered to the Very Vanilla cardstock just barely on top of the small piece of Cherry Cobbler cardstock. A piece of 1/8" Early Espresso Taffeta ribbon was added around the bottom edge of the Autumn Spice DSP and adhered to the back of the Very Vanilla cardstock.

These layers were adhered to the card front. The greeting from Day of Gratitude was stamped in Cajun Craze ink on a scrap piece of Very Vanilla cardstock. The greeting was thne punched out with the Decorative Label Punch (brand new from the Holiday Mini Catalog). Another decorative label was punched from a scrap of Cherry Cobbler cardstock. This label was cut down the middle length wise and the points that were in the middle of the short sides were snipped off. This allows you to adhere the halves of the decorative label to the back of the Very Vanilla label creating a kind of mat for your greeting. This was adhered to the card front.

This card was super simple, but really great looking. Everyone else loved it too! Thanks Dawn for the wonderful card to case. I hope everyone has a wonderful fall day today! Here it is cool and beatutiful and the leaves are just starting to change colors. I'm going to enjoy this nice weather while it lasts! Have fun stamping!

Monday, September 27, 2010

Masculine Trees - September Make and Take 1


This card was one of the ones I had on display and I was requested to have it as one of the projects at the September Make & Take. This was the most difficult card to do that evening, but I think everyone really liked it.


Stamps: Trendy Trees, Solid Stripes, Perfect Punches
Cardstock: Basic Grey, More Mustard, Pumpkin Pie, Whisper White
Ink: Sahara Sand, Pear Pizzaz, Chocolate Chip, Tangerine Tango, Basic Black
Accessories: Square Lattice Textured Impressions Die, Brayer, 5/8" Basic Black Satin ribbon, Stamp-A-Ma-Jig, Stampin' Dimensionals

The card base is 5 1/2" x 8 1/2" Basic Grey cardstock scored at 4 1/4". A piece of 4" x 5 1/4" More Mustard cardstock was run through the Big Shot in the Square Lattice Textured Impressions Die. The brayer was then used to add ink to the raised texture on the More Mustard cardstock. A piece of 5/8" Basic Black Satin ribbon was wrapped around the middle of the cardstock and the ends were adhered to the back. This panel was adhered to the card front.

A piece of Whisper White cardstock was cut to 2 7/8" x 4 1/8". The Stamp-A-Ma-Jig was used to stamp the stripes across the bottom first in Sahara Sand and then again in Pear Pizzaz. I used the Stamp-A-Ma-Jig to get all of the stripes lined up, and to have the Pear Pizzaz stripes slightly offset from the Sahara Sand stripes. This way it looks like each stripe has two colors one next to the other. You'll have to look closely at the picture because this is hard to describe.

Next the direct to paper technique was used with the Sahara Sand and Pear Pizzaz ink to create the ground above the stripes. Everyone was afraid to do this part, but with a little bit of practice it really is very easy. Then the Stamp-A-Ma-Jig was used to stamp the tree trunks in Chocolate Chip and the tree tops in Tangerine Tango. The sentiment from Perfect Punches was stamped in Basic Black ink on top of the stripes. This panel was adhered to a piece of Pumpkin Pie cardstock cut at 3" x 4 1/4". These panels were then adhered to the card front with Stampin' Dimensionals.

Come back tomorrow to see the next project from the September Make & Take! Have fun stamping!

Tuesday, September 21, 2010

Craft Room Update

I've had a few requests to share my craft room photos recently. I was going to wait until it was cleaned up to do this, but then my craft room is never totally clean. I would like to have everything completely organized with a place for everything and everything in it's place. Its not finished yet so it will get there someday. Anyway here goes:
I applied the Dandelion Decor Elements (retired) to the sliding glass door that seperates my craft room and the family room. The section of the house with my craft room and sunroom was an addition to the house and the owners at the time just left the sliding glass door there. I'm glad they did because I really like it.


The hanging fruit basket holds all of my various adhesives. Its a great way to keep them all in one place and within reach of where I normally work.


This is the corner to the left of the door. It is really a pile of various crafting supplies. The plastic drawers hold my scraps right now. Eventually I will have a counter in this cubby to hold my electronic cutter and paper cutters. I will have shelves above to hold my textbooks, magazines, and maybe my dolls.

This is the wonderful craft island that my hubby built for me. It has drawers on one side and shelves on the other side.


This is the ribbon rack that my hubby made for me to house all of my various ribbons. The bottom shelf is for my current SU ribbon. I need to stock up, I don't have that much right now.


There was a table here and most of this stuff was underneath it, but I needed the table for the First City Festival booth. But hubby promised to put in my countertop here this weekend or next weekend. We already have the roll of laminate sitting in the garage.


I'm currently preparing for the make and take this week, which is why the island top is covered in plastic bins with stampin' supplies. The purple mat is a stamping mat that I purchased online. I always work on one of these! They are wonderful.
The outside window and the cable modem on the floor.


This is another piece of furniture that hubby built for me. I liked the "cube" style of the shelves I've seen on Ikea, but since we don't have one near by I asked him to build it for me. The white shelves were already there before the book case was, and now they look incredibly cheap. So I will be taking them down and replacing them with some other kind of shelf.


This room is long and skinny, about 12' x 24'. See how bright it is? This photo was taken at 10:00 PM. I love all of the lights. It makes it really easy to see what you are doing and it makes it easy to take a great looking photograph. The little outdoor bistro table is just a catch-all that I periodically clean off.


So here's to being creative, and messy. I do hope to have some time soon to go through things and clean up a bit. I'll make sure to update you when it is all finished and somewhat organized. I hope you've enjoyed touring my craft room! Have fun stamping!  


Monday, September 20, 2010

Masking Tutorial

As promised I have a tutorial for you today! This tutorial is on the Masking technique. Lets get started.

For this tutorial you will need a stamp set, classic black ink (I accidentally grabbed the craft before taking this photo, you really want to use classic ink), post it notes, paper snips.


Stamp your images that you want masked onto the post it notes. I've chosen to use Fifth Avenue Floral for my images.


Trim out around your image. Make sure you trim right up to the line.


Stamp your first image on the cardstock. Here I am using Whisper White cardstock. I plan on coloring these in later so I am stamping with Black Stazon onto the cardstock.


Place your mask over the top of the flower you already stamped. I like to use post it notes because if you stamp and cut on the sticky portion then your mask will stick to the cardstock without damaging it.


Stamp your next image. The mask prevents the lines from this image from being inside the first flower that you stamped.


Continue stamping and placing the mask until you get the finished result you are happy with. Artistically speaking you want to work from front to back when masking. You'll be able to see what I mean when I reveal the panel at the end.


I want a few more flowers on my cardstock so I just keep going using the same steps as before. Stamp and place the mask.


Once you've stamped all you want to remove all of your masks.


Voila! Now you have your images so that it looks like the lilies are in front and the roses are in the back instead of overlapping flower outlines.


Stamps: Fifth Avenue Floral
Cardstock: Rich Razzleberry, Whisper White
Ink: Riding Hood Red, Melon Mambo, Rich Razzleberry, Blush Blossom, Bashful Blue, Not Quite Navy, Black Stazon, Basic Black ink.
Accessories: Whisper White Organza Ribbon, Aquapainter, White Gel Pen

The card base is Rich Razzleberry cardstock cut at 5 1/2" x 8 1/2" and scored at 4 1/4". The image panel is Whisper White cardstock cut at 4" x 5 1/4". The panel was stamped as shown above and watercolored with re-inkers and an Aquapainter. The White Gel Pen was used to color in the stamens on the lilies.  The sentiment was stamped in Black Stazon (because it was already out, classic ink would also work well for this.) Some Whisper White Organza ribbon was tied around the panel and into a bow. This panel was adhered to the card front. That's it!

Come back tomorrow to see some pictures of my very messy craft room. I've received some inquiries about my craft room lately and tomorrow I will show you, and tell you, all about it. It's not totally finished yet, but you'll see.

Friday, September 17, 2010

Autumn Scalloped Square Card

Hello crafters! Today I have for you a card made with the SCCSC32 Sketch Challenge on Stampin Connection. Take a look!


  • Stamps: Day of Gratitiude
  • Cardstock: Peach Parfait, Cherry Cobbler, Daffodil Delight, Early Espresso, Very Vanilla, Cajun Craze
  • DSP: Autumn Spice
  • Ink: Old Olive, Early Espresso, Cherry Cobbler
  • Accessories: Scallop Edge Border Punch, Scallop Square Clear Bigz Die, Scallop Circle Punch, Extra Large Flower Punch, Circle Scissor, Silver Glass Glitter, Tombow Multipurpose Adhesive


The card base is a piece of Peach Parfait cardstock cut at 5" x 10" and scored at 5". The fold of the cardstock was positioned just under the blade for the scallops on the top. This makes a scalloped square for your card base. A piece of Cajun Craze cardstock was cut at 3 7/8" x 3 7/8" and adhered to the card front. A piece of Daffodil Delight cardstock was cut at 3 1/4" x 3 1/4" and adhered to the card front. A scrap strip of Cherry Cobbler cardstock (approximately 3/4" wide) was adhered to the card front.

A 3" circle was cut from a piece of beautiful Autumn Spice DSP with the Circle Scissor. This DSP, now available in the Holiday Mini Catalog, is absolutely gorgeous!!! I just love all the great DSP patterns Stampin' Up offers this year! The 3" circle was adhered to the card front. A scrap piece of Early Espresso cardstock was punched with the Scallop Edge Border punch and adhered to the card front (approximately 3/4" wide). Both strips of cardstock were longer than the card front and trimmed around the scallops with paper snips after the pieces were glued on.

The Extra Large Fancy Flower punch was used with Peach Parfait cardstock to punch a flower. The edges of the flower were sponged with Early Espresso ink. The 1 3/4" Scalloped Circle punch was used to punch a circle from Very Vanilla cardstock. The leaf from Days Of Gratitude was stamped in Old Olive ink by stamping off before stamping onto the Very Vanilla cardstock. The greeting was stamped in Early Espresso ink.

At first I had sponged the edges of the scalloped circle with Cherry Cobbler ink, but I didn't like how it looked. It was okay, but looked a little flat. So I got out my new Silver Glass Glitter and my Tombow Multipurpose Adhesive and added a glittered edge around the scalloped circle. This, now sparkly, circle was adhered to the Peach Parfait flower and then adhered to the card front with a Stampin' Dimensional.

I hope you like my interpretation of the sketch! Monday I will definitely have a tutorial for you, come back to check it out!

Thursday, September 16, 2010

Just Believe!

This card actually combines two challenges; the color challenge and a featured stamper challenge. The color challenge requires you to use Cherry Cobbler, Daffodil Delight, Early Espresso, and Certainly Celery. The featured stamper challenges honors Kathy Baffone this week! Take a look at her beautiful card:


Now here is my version combined with the color challenge:


Stamps: Just Believe
Cardstock: Whisper White
Ink: Cherry Cobbler, Daffodil Delight, Early Espresso, Certainly Celery
Accessories: Post-it note, Decorative Label Punch, Stampin' Sponges, 1/4" Real Red Grosgrain ribbon.

The card base is 4 1/4" x 11" Whisper White cardstock scored at 5 1/2". I put a large post-it note onto a piece of copy paper and punched it out with the Decorative Label Punch making sure to punch so that part of the label would have the "sticky" on it. Instead of using the punch, I used the remainder of the post it note for a reverse mask.

I placed the post it note so the label opening was in the center and to the left side of the card front and then sponged with Daffodil Delight ink. I moved the mask down to the bottom of the card and sponged Certainly Celery ink. Then I moved the same mask up to the top and sponged the Cherry Cobbler ink. When doing this you want to work from lightest color to darkest color. This will keep a darker color from bleeding into a lighter color ink when you're sponging.

The flowers from Just Believe were stamped in Early Espresso ink on top of the sponged colors. The greeting was stamped in Cherry Cobbler cardstock. Some 1/4" Real Red Grosgrain Ribbon was added around the bottom of the card and tied into a knot.

This would be considered a Clean And Simple card because it is only one layer and only takes about 10  minutes to make. Thank you Kathy for the wonderful sample to CASE! Also, thank you Barbara Welch for the great color challenge!

Come back tomorrow to see a card made with the sketch challenge SCCSC32 from Stampin Connection.

Tuesday, September 14, 2010

Dasher Featured Stamper Challenge

For the Featured Stamper Challenge on Stamping Connection SCFC26 Julie Pitta was honored for her wonderful creations. I could not find a blog post on this card but  you can view her wonderful blog and other fabulous projects by clicking here. Here is her card:


And here is my version:
Stamps: Simple Snowflake, Christmas Greetings, Dasher
Cardstock: Cherry Cobbler, Crumb Cake, Whisper White, Soft Suede
DSP: Cocoa Specialty DSP (retired)
Ink: Chocolate Chip, Cherry Cobbler, Versamark
Accessories: Gold Embossing Powder, Heat Gun, Embossing Buddy, Crystal Effects, Dazzling Diamonds Glitter, Mistletoe Ribbon Originals (retired), Stampin' Sponge

The card base is 5 1/2" x 8 1/2" Cherry Cobbler cardstock scored at 4 1/4". A piece of Crumb Cake cardstock was cut at 4" x 5 1/4" and stamped with the Simple Snowflake in Chocolate Chip ink to create a background. Then the panel was adhered to the card front. A piece of Cocoa Specialty DSP (retired) was cut at 2 7/8" x 3 7/8". The top and bottom edge were sponged with Cherry Cobbler ink and then the DSP was adhered to a 3" x 4" piece of Whisper White cardstock. A piece of Mistletoe Ribbon Originals was added around the panel and tied into a knot. The panel was adhered to the card front.  

A piece of Whisper White cardstock was cut at 2 3/4" x 2 3/4". Dasher was stamped in Chocoalte Chip ink. The embossing buddy was used before stamping the greeting from Christmas Greetings in Versamark and heat embossing with Gold Embossing powder. Some Crystal Effects and Dazzling Diamonds glitter were added to Dasher's antlers to add some sparkle. This was adhered to a 2 7/8" x 2 7/8" piece of Cherry Cobbler cardstock. This was then adhered to a piece of Soft Suede cardstock cut at 3 1/8" x 3 1/8" that had the edges sponged with Chocolate Chip ink. This was adhered to the card front to complete the card.

I just love making Christmas cards and this Dasher is such an easy stamp to use. I promise to have some fall inspired cards soon. I won't skip over fall and Halloween. I just really like making Christmas cards. Come back tomorrow to see a My Digital Studio scrapbook page!

Monday, September 13, 2010

First City Festival!

Sorry I've been neglecting the blogging world the last couple of weeks as I scrambled to prepare things for my booth at the First City Festival in Leavenworth, KS. Instead of a tutorial today I have some photos of my booth from the festival. I will definitely have a tutorial for you next week!

I wouldn't say that it was a total and complete success, but I atleast got more people interested in my Make and Take classes and maybe a few leads for workshops. It was definitely a learning experience!

My mother in law, who sells Avon, and I split one booth. It was nice to have her there to talk to all day.


This board really helped get people's attention and get them excited about the Make and Take classes. Thanks for stopping by! Come back tomorrow to se a Christmas card from a Featured Stamper Challenge!

Tuesday, September 7, 2010

Update!

Did everyone have a great Labor Day Weekend? I had a great time with my family at the Kansas City Rennaissance Festival and then spent more time working on items for the First City Festival. This will be the first year that I have a booth, actually I will be sharing a booth with my mother-in-law who sells Avon. I am really excited, but also really busy preparing handmade papercraft items to sell. There will probably be very few posts this week as I work work work on all the wonderful items I will have to offer.

I think next year I will start making things in July instead of waiting until two weeks before the event. Yikes! Anyway, come down to Leavenworth's annual First City Festival in downtown Leavenworth Friday Sept. 10th and Saturday Sept. 11th!

So for today I have a couple of new product training videos from Stampin' Up! The Holiday Mini Catalog offers some wonderful new products to the Stampin' Up collection including fabric, yes I said fabric, and Letterpress Plates!

To shop the 2010 Holiday Mini Catalog online now click here.

To view the video for the Letterpress Plates click here.

To view the video for the new Stampin' Up fabric click here.

The two fabric packages available are:

121715  Candy Cane Christmas  $9.95

121716  Deck The Halls  $9.95