Thursday, December 30, 2010

Christmas Cardinal - November Make and Take 3

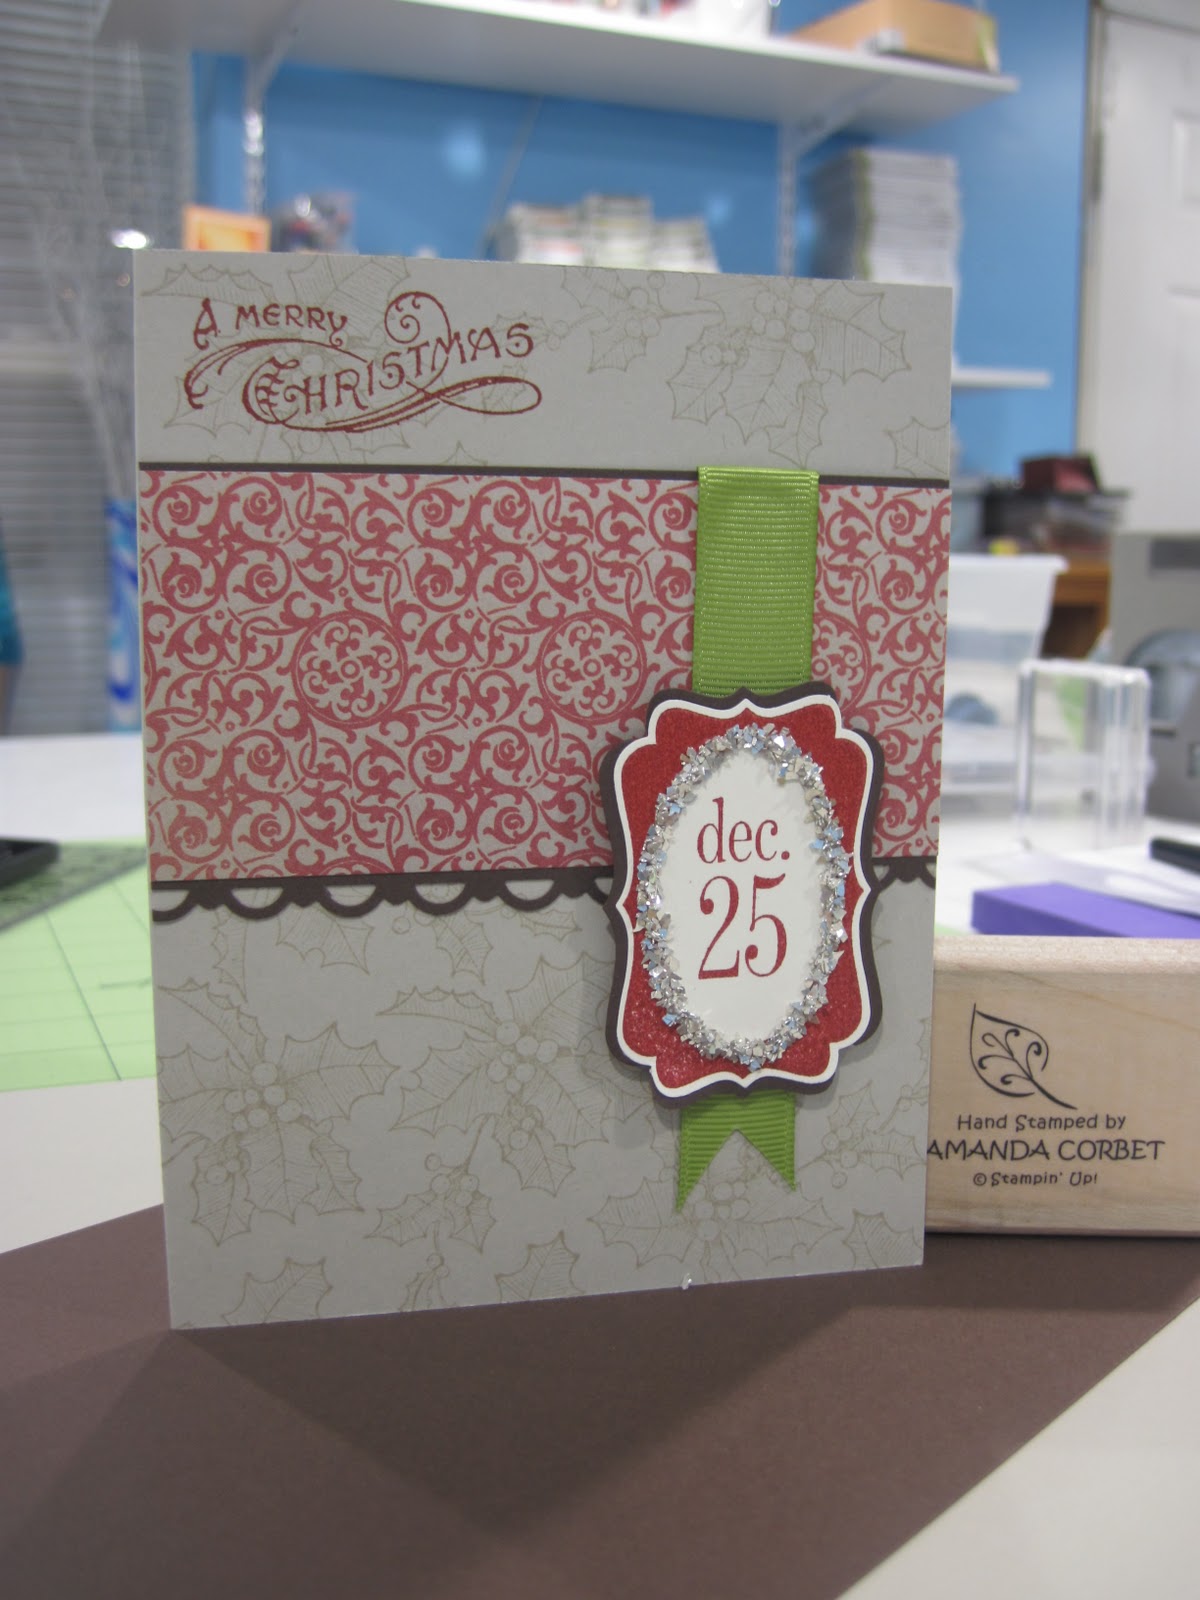
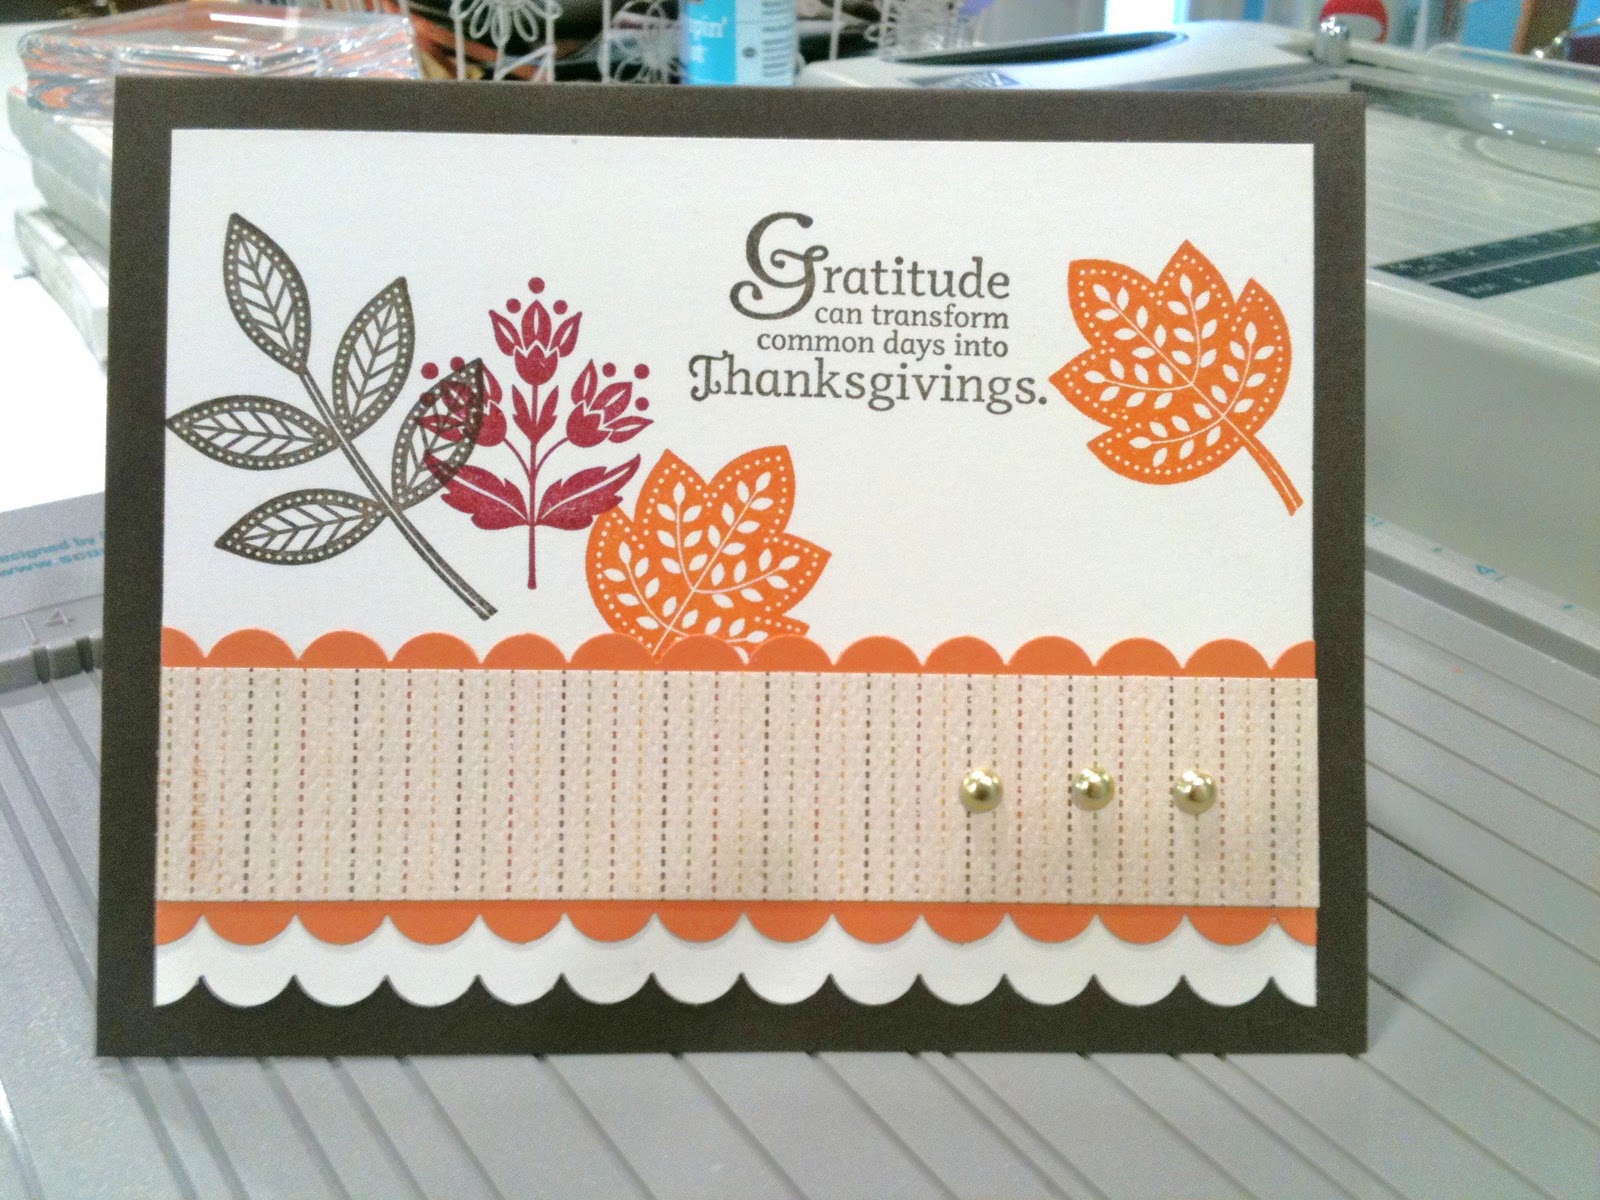
Here is the third card that we made at the November Make and Take. This one was cased from Rebekah Jensen's card.


Stamps: Tags Till Christmas, A Cardinal Christmas
Cardstock: Very Vanilla, Crumb Cake, Cherry Cobbler
DSP: Deck the Halls DSP
Ink: Always Artichoke, Chocolate Chip
Accessories: Decorative Label Punch, Two Step Bird Punch, 1/8" Real Red Taffeta ribbon, Crochet Trim ribbon, Paper Snips, Two-Way Glue Pen, Stampin' Dimensionals, White Gel Pen, Markers: Basic Black, Always Artichoke, Chocolate Chip

The card base is Very Vanilla cardstock cut at 5" x 8 1/2" and scored at 4 1/4". A piece of Crumb Cake cardstock is cut at 2 3/4" x 5 1/2". A piece of Deck the Halls DSP is cut at 1 1/2" x 5 1/2" and the DSP was adhered to the top of the Crumb Cake cardstock. A piece of Crochet Trim ribbon was added around the cardstock covering the DSP edge. A piece of 1/8" Real Red Taffeta ribbon was added around the Crochet Trim and tied into a knot.

The crumb cake, DSP, and ribbon panels were adhered to the card front and the greeting from A Cardinal Christmas was stamped in Always Artichoke ink on the bottom right hand corner of the card.


On a scrap of Crumb Cake cardstock the tag with the pinecone and branches were colored in with Always Artichoke and Chocolate Chip markers. The To and From was omitted by carefully not coloring on those portions of the stamp. I then breathed on the stamp to re-moisten the ink and stamped on the Crumb Cake cardstock. This label was cut out with the Decorative Label punch.

The Decorative Label punch was also used to punch out two labels from scraps of Cherry Cobbler cardstock. One label was cut in half width-wise with the points that were in the middle of the side trimmed off. The two halves were adhered behind the label with the Two-Way Glue Pen to create a mat. The other label was trimmed in half length-wise with the points trimmed off and adhered behind the stamped label. This creates a complete mat around the label.

Next the Two Step Bird Punch was used to punch out one bird and two wings from Cherry Cobbler cardstock. The Basic Black marker and White Gel Pen were used to create the black portion of the head and the white eye. One wing is adhered behind the bird’s head with the Two-Way Glue pen to create the pointed head. The portion of the wing that sticks out around the birds face and beak was trimmed off with paper snips. The bird and the other wing were sponged with Chocolate Chip ink to give the bird more dimension. The wing was adhered to the side of the bird and the bird was adhered to the bottom right hand corner of the label. The label was adhered to the card front with Stampin’ Dimensionals.

That’s it! Have fun stampin!

My Very First Quilt!

My sister and her husband are also hosting a foreign exchange student this year. Her name is Sira and I decided to make a simple quilt for her back in September. She likes Navy Blue and Cream so that is the colors I went with. I ordered the fabric from a craft store online. I spent hours reading online to determine the best way to go about this monumental feat, for me anyway. Not to mention a pattern.


I saw a simple quilt on a beginners book that had squares with the patterns in diamonds growing outward. So that is what I did. I cut many, many, many 6" squares and spent hours at the sewing maching putting them into rows and the sewing the rows together. The thing I had the most trouble with was getting the layers of the top fabric with the squares, batting, and back fabric together neatly. The back doesn't look great but I am so proud of how the front looks. The finished blanket is Twin sized.


So those quilting experts out there please take it easy on this quilting rookie. I'm still pleased with it and Sira LOVED it!

Wednesday, December 29, 2010

Crochet Christmas Gift

Here is the most time consuming of all the Christmas gifts that I made. My parents hosted a foreign exchange student this year. Her name is Neila and she is very much a Girly Girl! I made mom a crochet bed doll a few years ago that she has sitting in her bedroom. Neila saw it and fell in love with it. So back in September I decided to make her a doll for Christmas in her favorite color...bright pink.


The ruffles and the underskirt took forever! I was working on it until the very early hours of Christmas morning. I shouldn't procrastinate so much and try to get things done sooner. But then I just came up with more ideas for handmade Christmas gifts.


Here is Neila opening the box. She was so very suprised and happy!


Come back soon to see what else I have to share with you!

Tuesday, December 28, 2010

Mosaic Vase

The first Christmas present I made was a mosaic vase for my sister Kelly who loves pink. I found this wonderful clear glass vase at an antique store and used some glass that I already had on hand. One of my other of many hobbies is stained glass and glass fusing. These pieces were just waiting to be used. I cut the glass into 1/2" strips then cleaned them with alcohol. Then I used on glass tile nippers from the home store to cut the strips into 1/2" squares. Well...approximately squares. They weren't perfect, but I didin't want it to be perfect either.


Then I used E600 glue to adhere all the glass pieces to the vase. This project used five different kinds of glass. A champagne colored opaque, a solid pink opaque, glue chip (which looks like frost on glass), a pink and yellow streaky glass, and a peachy colored mottled (textured) glass.


I'm really happy with how it turned out and Kelly loved it!

Come back later to see what else I have to share with you!

Pear Just Believe - November Make and Take 2

Today I have the second card from the November Make and Take to show you. Better late than never right? This card was inspired by Debbie Currier's card. Take a look:


Stamps: Just Believe
Cardstock: Pear Pizzaz, Whisper White, Basic Black, Elegant Eggplant
Ink: Early Espresso, Basic Black, Elegant Eggplant
Accessories: Vintage Wallpaper Textured Impressions Die, Curly Label Punch, Paper Snips, Stampin' Dimensionals, Basic Pearl Jewel Accents, Old Olive marker, Elegant Eggplant marker.


The card base is 4 1/4" x 11" Pear Pizzaz cardstock scored at 5 1/2". The card front was run through the Big Shot with the Vintage Wallpaper Textured Imressions die. The flowers from Just Believe were inked up with the Old Olive and Elegant Eggplant markers. I then breathed on the stamp and stamped it on a piece of Whisper White cardstock. After adding some additional shadow lines to the leaves and the flowers with the fine points on the marker the stamped panel was adhered to a piece of Basic Black cardstock and then this was adhered to the card front.

The greeting was stamped in Elegant Eggplant ink on a scrap of Whisper White cardstock then punched out with the Curly Label punch. The edges were sponged with Basic Black ink. Another curly label was punched from a scrap of Elegant Eggplant cardstock. The label was cut in half length-wise with paper snips and the points that were in the middle of the sides were cut off. The two piece were adhered behind the stamped curly label to give it a mat. This was adhered to the card front with Stampin' Dimensionals.

Some Basic Pearl Jewel Accents were added to two of the flower centers to finish the card off. This was a simple yet pretty card that all the ladies loved! Come back tomorrow to see more Christmas Kreations and another card from the November Make and Take!

Monday, December 27, 2010

Valentine Sketch Card

Sorry for the long gap between posts during the holiday season. I've been soooo busy trying to finish up Christmas presents and Christmas cards and baking for various pot-lucks that I didn't even have time to create a card to show you. Or post the cards from the November make and take. I hope everyone had a wonderful Christmas! Now that Christmas is over not only can I get caught up on my posts from previous Make and Takes, but I can show you the things I was working so hard on that I couldn't post.

First though it is Monday and this week was my turn to create the sketch. So here is the sketch:


And here is my card:


Stamps: With All My Heart, I Heart Hearts
Cardstock: Pretty in Pink, Cherry Cobbler, Very Vanilla
DSP: Sending Love Specialy DSP (retired)
Ink: Pretty in Pink, Cherry Cobbler
Accessories: Crochet Flourettes (retired), Paper Snips, Tombow Multi-Purpose Adhesive, Dazzling Diamonds glitter, Glimmer Brad, Stampin' Dimensionals, Tasteful Trim die, Needle Tool, Mat Pack

I have been making soooooo many Christmas cards for the last several months with the Christmas card class and Make and Takes that I'm ready for something different. So today I decided to go with a Valentines card. The card base is Pretty in Pink cardstock that was cut at 5 1/2" x 8 1/2" and scored at 4 1/4". The Sending Love DSP (retired) was cut at 4" x 5 1/4" and adhered to the card front. Then I cut a 1 1/2" x approx. 7" strip of Very Vanilla cardstock and ran it through the Big Shot with the Tasteful Trim die to get the large scallops. The scallop trim was cut down to 5 1/2" and adhered on top of a 1 1/2" x 5" piece of Cherry Cobbler cardstock. This was then adhered to the card front.

The reason for cutting the strip of Very Vanilla cardstock longer than what you need is so that you can cut out your scallops on the die, then trim it down so that the scallops on each end of the card match and so you are guaranteed to have straight edges on the ends.

The greeting from With All My Heart was stamped in Pretty in Pink ink on a scrap of Very Vanilla cardstock and then trimmed with paper snips into a strip with dove-tailed ends to look kind of like ribbon. This was adhered to the card front. I used the Needle Tool and Mat Pack to pierce a hole in the straight end of the greeting strip and added a red Glimmer Brad with a Crochet Flourette (retired) on it.

On a scrap of Pretty in Pink cardstock I stamped the dotted heart from I Heart Hearts in Cherry Cobbler ink. Then I stamped the other heart (not sure how to describe it) in Pretty in Pink ink. The heart was then cut out with Paper Snips. Tombow Multi-Purpose Adhesive was used to adhere the Dazzling Diamonds glitter around the edge of the heart. Then the heart was adhered to the card front with Stampin' Dimensionals.


This one was so quick and easy to make I think I whipped it out in 15 minutes. I will certainly have more to share with you but it will be a little while before I get back to the regular schedule. Make sure to stop by tomorrow to see what I have to share with you! It may be a card or it may be a Christmas present...who knows!

If you are a Stampin' Up Demonstrator you can find the sketch challenge here. If you are not a demonstrator I would still love to see your cards created with the sketch. Please post a link to your creation in the comments section of this post.

Tuesday, December 7, 2010

Bells and Boughs - Monday Sketch Challenge

It's Tuesday again! That means it was time for the weekly sketch challenge yesterday! Yes, I am still way behind in posting. Here is the sketch created by me! Take a look:


And here is my card:


Stamps: Bells and Boughs
Cardstock: Crumb Cake, Cherry Cobbler, Early Espresso, Very Vanilla, Old Olive
DSP: Jolly Holiday
Ink: Early Espresso, Black Stazon, Crumb Cake
Accessories: Dazzling Diamonds glitter, Northern Flurries Strip Die, 12"x12" Adhesive Sheet, Brights Glimmer Brad, Scallop Trim Border Punch, Dotted Scallop Ribbon punch, Gold Elastic Cord (retired)
Stampin' Dimensionals, Needle Tool, Mat Pack, Markers: Old Olive, Pear Pizzaz, Always Artichoke, Early Espresso, and Cherry Cobbler.

The card base is Crumb Cake cardstock cut at 5 1/2" x 8 1/2" and scored at 4 1/4". I stamped the background with the image from Bells and Boughs in Crumb Cake ink. Just to give the background a subtle pattern. Then I cut a piece of Cherry Cobbler cardstock at 2 3/8" x 4 1/4" and punched one edge with the Scallop Trim Border punch. A piece of Jolly Holiday DSP was cut at 2" x 4 1/4" and adhered onto the scalloped Cherry Cobbler cardstock. A scrap of Old Olive cardstock was used in the Dotted Scallop Ribbon punch and trimmed to 4 1/4" long. This was adhered on top of the DSP with the Two-Way Glue Pen and some Gold Elastic Cord (retired). The greeting was stamped onto the DSP in Early Espresso ink and then this panel was adhered to the card front.

A piece of Very Vanilla cardstock was cut at 2" x 3" and the image from Bells and Boughs was stamped in Black Stazon onto the cardstock. The image was colored in with Pear Pizzaz, Old Olive, Always Artichoke, Early Espresso, and Cherry Cobbler markers. The edges of the cardstock were sponged with Early Espresso ink and then was adhered to a 2 1/8" x 3 1/8" Early Espresso panel.

Next I cut out a small piece of Very Vanilla cardstock (just large enough to fit over the Northern Flurries Strip Die to get the snowflake I want) and a equal-sized piece of 12" x 12" Adhesive sheets. I removed the liner from one side and adhered this to the cardstock. Then I ran the cardstock through the Big Shot with the Northern Flurries Strip Die with the liner side of the Adhesive Sheet up. The die will cut through the cardstock, but will not cut completely through the liner. I took the snowflake off the liner and sprinkled on Dazzling Diamonds glitter to sparkle up my snowflake.

Since the snowflake I used has a large hole in the center I adhered the snowflake to the Very Vanilla/Early Espresso panels with the Two-Way Glue Pen. The Needle Tool and Mat Pack were used to pierce a hole through the layers of cardstock and a Glimmer Brad from the Brights collection was added. The panel was adhered to the card front. With Stampin' Dimensionals. You can get a close up of my snowflake and Glimmer Brad here:


If you are a Stampin' Up Demonstrator you can find the challenge here. If you are not a Stampin' Up Demonstrator please post a link to your creation in the comments section of this post. I would LOVE to see what you create with this sketch!

Tuesday, November 30, 2010

Merry Wreath - Monday Sketch Challenge!

Monday Sketch Challenge on Tuesday...better late than never I guess. Sorry for the late post, but the sketch challenge wasn't posted until late last night. The sketch this week was provided by Susie Nelson. Take a look:


And here is my card:


Stamps: Northern Hearts, Christmas Greetings

Cardstock: Very Vanilla, Early Espresso, Old Olive
DSP: Jolly Holiday
Ink: Riding Hood Red, Versamark
Accessories: 1 ¾” Circle Punch, 2 3/8” Scalloped Circle Punch, Scallop Trim Border Punch, 1/8” Real Red Taffeta ribbon, Stampin’ Dimensionals, Shimmer Spray (Alcohol and Shimmer Paint), Gold embossing powder, heat gun, Two-Way Glue Pen, Mini Glue Dots, Markers: Cherry Cobbler, Old Olive, Always Artichoke.

This is a different card size than what I normally make. The card base is 6 ¼” x 6” and scored at 3”. This leaves the card size at 3” x 6 ¼”. It is fun to play with different sized cards other than the standard A2 size. The background of my Very Vanilla card base was stamped with a snowflake from Northern Hearts (Level 1 hostess set in the Holiday Mini) in Riding Hood Red Ink. I then cut a strip of Jolly Holiday Designer Series Paper 1 ¼” x 6 ¼”. The greeting from Christmas Greetings was stamped in Versamark and heat embossed with gold embossing powder.

A piece of Early Espresso cardstock was cut at 1 5/8” x 6 ¼” and punched with the Scallop Trim Border Punch on just one long side. The DSP was adhered to the scalloped Early Espresso cardstock and these layers were then adhered to the card front.
I used the wreath from Northern Hearts and used the Old Olive, Always Artichoke, and Cherry Cobbler markers to color in the wreath. I then breathed on the stamp to re-moisten the ink and then stamped it on a scrap of Very Vanilla cardstock. This wreath was then punched out with the 2 3/8” Scalloped Circle punch.
On a scrap of Old Olive cardstock I punched the 1 ¾” Circle punch in the center of the scrap. Then I used the 2 3/8” to punch out the circle to create a scalloped frame. This was adhered around the stamped wreath with the Two-Way Glue Pen. I used a Mini Glue Dot to adhere a bow made with 1/8” Real Red Taffeta Ribbon to the top of the Old Olive frame. Then I used some shimmer spray (made by mixing rubbing alcohol with a little bit of Shimmer Paint) and sprayed the wreath/frame to add a subtle shimmer to it. This was adhered to the card front with Stampin’ Dimensionals.


I hope you’ve enjoyed my take on the sketch. If you are a Stampin’ Up Demonstrator you can find the link to the Sketch Challenge on Stampin’ Connection here. If you are not please post a link to your card in the comments section of this post. I would love to see what you create! Thanks Susie for such an interesting and fun sketch! Have fun stamping!

Monday, November 29, 2010

Happy Days - Nov. Make and Take 1

Good morning all!!! I hope everyone had a wonderful Thanksgiving weekend! I always enjoy the holiday season with all the food, friends, and family. This week I will FINALLY get to posting the Make and Take cards from November. I've been soooo busy trying to get some Christmas presents done that I haven't had a chance to post. Sorry for neglecting you! Later today I will post the Monday Sketch Challenge and my card. But for now I have for you November Make and Take 1. This card was inspired by Julie DiMatteo's card. Take a look:


Stamps: Apple Blossoms
Cardstock: Crumb Cake, Marina Mist
Ink: Whisper White Craft, Marina Mist
Accessories: Perfect Polka Dots Textured Impressions Die, 1/8" Marina Mist Taffeta Ribbon, Stampin' Dimensionals.

This card was super quick and easy and everyone loved it! The card base is 5 1/2" x 8 1/2" Crumb Cake cardstock that was scored at 4 1/4". The card front was textured in the Big Shot with the Perfect Polka Dots Textured Impressions Die. The image leaves from Apple Blossoms were stamped in Whisper White Craft Ink on a 2 5/8" x 2 5/8" piece of Crumb Cake cardstock. After the ink on the leaves dried the greeting was stamped in Marina Mist ink. This panel was adhered to a piece of Marina Mist cardstock that was cut at 3" x 4". Some Stampin' Dimensionals were added to the back of the panel and the panel was adhered to the card front. That's it! Can't get much simpler than that!

Come back later to see the Monday Sketch Challenge!!! Have fun stamping!!!!

Monday, November 22, 2010

Let it snow!

Good morning everyone! Sorry I've been missing in action this last week. It's been crazy busy getting ready for my Christmas Card Class. I'll post the cards that we made later this week and next week. Well... today is Monday. Hopefully everyone had a good weekend! Monday is Sketch Challenge day so here is the sketch created by Liz Goldhawk:


And here is my wintry card:

Stamps: Northern Hearts, Cardinal Christmas
Cardstock: Whisper White, Marina Mist, Night of Navy
Ink: Marina Mist, Night of Navy, Versamark
Accessories: Heat and Stick Powder, Dazzling Diamonds, Snowflake Die, Norther Flurries Die, Glimmer Brad, Silver Brads, Decorative Label Punch, Needle Tool, Mat Pack

Anyone who knows me knows that I absolutely LOVE snowflakes and anything sparkly. Well this card definitely shows that!

The card base is Whisper White cardstock cut at 5 1/2" x 8 1/2" and scored at 4 1/4". The background was stamped with the large and middle snowflake from Northern Hearts in Marina Mist ink. A 2" x 4 1/4" piece of Marina Mist cardstock was cut and stamped with snowflakes in Marina Mist ink. The Decorative Label punch was used to punch a label from Night of Navy cardstock. I cut the label in half with Paper Snips and adhered each half to the top and bottom of the Marina Mist strip. The Needle Tool and Mat Pack were used to punch holes near the points of the labels and Silver Brads were added.

I used the Big Shot to and used the Snowflake die to cut a piece of Night of Navy cardstock. I also used the Northern Flurries die to cut a small Whisper White snowflake. The Versamark pad was used to ink both snowflakes entirely then Heat and Stick powder was poured over them. After embossing with the heat gun to make the powder sticky Dazzling Diamonds glitter was added to both flakes. After heating again a few seconds to set the glitter the Needle Tool and Mat Pack was used to punch a hole through the center of both snowflakes and the card front. A glimmer brad was added to the center of the snowflakes to hold them on the card. The greeting from A Cardinal Christmas was stamped in Night of Navy ink in the bottom left corner of the card front.

You can find the discussion for the sketch challenge here. If you don't have access to Stampin' Connection please post a link to your card in the comments section of this post. I would love to see your cards. Have fun stamping everyone!

Monday, November 15, 2010

Christmas Ornaments

It's Monday again and I have another sketch challenge for you. Sorry I didn't have time to post this before heading off to work this morning, but here it is! Here is the sketch that I created for the sketch challenge SCCSC41 on Stampin' Connection:


And here is my card:


Stamps: Tree Trimmings, Christmas Greetings, Simple Snowflake
Cardstock: Old Olive, Early Espresso, Crumb Cake, Whisper White,
Ink: Crumb Cake, Cherry Cobbler, Old Olive, Early Espresso
Accessories: 1/8" Early Espresso Taffeta Ribbon, Northern Flurries Strip Die, Glimmer Brad, Needle Tool, Mat Pack

The card base is 4 1/4" x 11" Old Olive cardstock that has been scored at 5 1/2". The background was stamped with the Simple Snowflake in Old Olive ink. The greeting from Christmas Greetings was stamped in the lower right hand corner of the card in Early Espresso ink.

On a piece of Whisper White cardstock cut at 2 1/2" x 3 1/2" the ornaments were stamped in Cherry Cobbler, Crumb Cake, and Old Olive inks. The strings were stamped in Early Espresso ink. A piece of 1/8" Early Espresso Taffeta ribbon was wrapped around the panel and tied into a knot. This panel was then adhered to a piece of Crumb Cake cardstock cut at 2 5/8" x 3 5/8". Then a piece of Early Espresso cardstock that was also 2 5/8" x 3 5/8" was adhered behind the ornament panel slightly offset to the bottom right. This was adhered to the card front.

I ran a scrap of Whisper White cardstock through the Big Shot in the Northern Flurries Strip Die. I absolutely LOVE this die! You get so many nice looking snowflakes just from one pass through the Big Shot. I picked out one of the die cut snowflakes and used the Needle Tool and Mat Pack to punch a hole in the snowflake and card front. The snowflake was added to the card front with a gold Glimmer Brad in the center.

That's it! This really was a fast card to put together. I hope you have fun with the sketch challenge. If you are a Stampin' Up Demonstrator you can find the link to the sketch challenge on Stampin Connection here. If you are not a Stampin' Up Demonstrator I would still love to see your creations. Please post a link to your card in the comments section of this post. Have fun stamping!

Wednesday, November 10, 2010

Deer Love - Casing Zindorf

I know I haven't kept up with the regular schedule of posts, but I'm rushing like crazy this week trying to get everything ready for the Make and Take and the Christmas Card Class, and various volunteer work to do. Busy busy busy time of year! I will not have a scrapbook page for you today. Hopefully I will get the chance to create one for you later this week.

What I do have for you today is a CASE of a Michelle Zindorf card. If you haven't heard of Michelle she does the most beautiful sponged scenes and true works of art. She instructs several brayer workshops all across the country where you can learn her fabulous techniques. If you're like me and live too far away to go to one of her workshops you can see tutorials that she posts online frequently. You can go to her website by clicking here. If you click on the Tutorials botton on the top of the page this will take you to a list of over 300, that's right 300! tutorials that show you how to make her beautiful creations.

Well here is the card I made:

Stamps: Dasher, Lovely As A Tree
Cardstock: Whisper White, Baja Breeze,
Ink: Baja Breeze, Soft Suede, Basic Black
Accessories: Whisper White Organza ribbon, Folk Art Flowers Decor Elements stencil, Stampin' Sponge, Needle Tool, Glimmer Brads, Northern Flurries Strip Die, Dazzling Diamonds, Crystal Effects, Basic Black Marker, Soft Suede Marker, Brayer, Stampin' Dimensional, Post It Note, acetate, Paper Snips

You can find Michelle's tutorial for Deer Love - Tutorial #369 by clicking here.

I followed Michelle's tutorial completely. The only changes I  made were: I used the Folk Art Flowers Decor Elements Stencil because that is the only one I currently have, I used Glimmer brads instead of Antique Brads and put them in a different location, I used Whisper White Organza ribbon instead of grosgrain ribbon, and I add a snowflake to the wintry scene. Here is a closeup of my snowflake.


I really wanted to make this sparkly and shiny and wanted to find a way to put glitter inside the openings of the snowflake. First I cut the snowflake from the Northern Flurries Strip Die from Whisper White cardstock. Then I sponged on some Frost White Shimmer Paint over the entire flake. After that dried I adhered the snowflake to a scrap of acetate with the Two-Way Glue Pen.

Then I filled the spaces in the snowflake with Crystal Effects and added Dazzling Diamonds glitter. After that dried I covered the entire flake in a coat of Crystal Effects to make the entire thing shiny. After that layer dried overnight I trimmed the acetate around the flake with my paper snips and adhered the shimmery snowflake to the card front with a Stampin' Dimensional.

I hope you take a chance to look through some of Michelle's tutorials because you really can create some beautiful works of art , especially with her telling you exactly how to do it!

Tuesday, November 9, 2010

Glimmery Christmas

Okay today I have for you my card for the SCCSC40 sketch challenge on Stampin' Connection. To see the sketch you can find yesterday's post here.


Stamps: Tags Till Christmas
Cardstock: Crumb Cake, Old Olive, Cherry Cobbler, Very Vanilla
DSP: Jolly Holiday DSP
Ink: Old Olive, Cherry Cobbler, Chocolate Chip
Accessories: Scallop Edge Border Punch, Ornament Punch, Decorative Label Punch, Northern Flurries Strip Die, Gold Glow Smooch Sprits, Glimmer Brads, Gold Brads, Champagne Glass Glitter, Tombow Multi-Purpose Adhesive, Stampin' Dimensionals, Stampin' Sponge, Two-Way Glue Pen

The card base is Crumb Cake cardstock cut at 4 1/4" x 11" and scored at 5 1/2". A piece of Old Olive cardstock and a piece of  Cherry Cobbler cardstock were both cut 2" x 5 1/2". The piece of Old Olive was punched on one side with the Scallop Edge Border Punch. The Cherry Cobbler piece was adhered on top of the punched Old Olive cardstock so that just the scallops are showing. A piece of Jolly Holiday DSP was cut at 1 3/4" x 5 1/2" and adhered on top of the Cherry Cobbler cardstock. This was adhered to the card front.

I used some scrap Whisper White cardstock in the Northern Flurries Strip die to cut some snowflakes. I just love the large variety of snowflakes that you can get out of one cut with this die! I took one of the large snowflakes and spritzed it with some Gold Glow Smooch Spritz to give it some glimmer and glued it in the top left corner of the card with a Two-Way Glue Pen.

I stamped the ornament from Tags Till Christmas in Cherry Cobbler ink on a scrap of Whisper White cardstock and punched the ornament out with the Ornament Punch. The Needle Tool was used to pierce a hole in the middle of the ornament where a gold Glimmer Brad was added. I put two Stampin' Dimensionals on the back of the ornament and adhered it to the card front.

One of the small snowflakes was added to the card front with a Gold Brad by using the Needle Tool to pierce a hole through the card front. Had I thought about it earlier I would have added this before adhereing the Cherry Cobbler cardstock down so the prongs from the brad don't show on the inside, but oh well. I stamped the label from Tags Till Christmas in Old Olive ink on a scrap of Whisper White cardstock and punched it out with the Decorative Label punch. Then I used some Tombow Multi-Purpose Adhesive to add some Champagne Glass Glitter around the center of the label. After the glue dried a couple of Stampin' Dimensionals were added to the back of the label and it was adhered to the card front.

On a scrap of Old Olive cardstock I stamped the greeting in Chocolate Chip ink. This was then punched out with the Decorative Label punch and spritzed with Gold Glow Smooch Spritz before being adhered to the card front. I am really pleased with how this card turned out. I wouldn't normally add so much "bling" to a single card, but I really like how it works here.

I will have something to show you tomorrow, right now I don't know what, so you'll have to stop by to check it out tomorrow! Have fun stamping!

Monday, November 8, 2010

Monday Sketch Challenge!

It's Monday again! Time for another sketch challenge! Here is the sketch created by Liz:


I didn't receive the sketch from Liz until late last night so I don't have a card to show you yet this morning. I will make one tonight and it will be posted tomorrow before the regular Tuesday post.

If you are a Stampin' Up demonstrator you can find the sketch challenge here. If you are not a Stampin' Up demonstrator I would still love to see your creations. Please post a link to your card in the comments section of this post. Have fun stamping!  


Thursday, November 4, 2010

Marina Mist Style

The card I have for you today is a combination of a couple challenges that I missed while on vacation. This combines the SCCSC37 sketch challenge and the SCCOLOR35 color challenge. The color challenge is to used Pacific Point, Marina Mist, So Saffron, Pear Pizzaz, and Whisper White. And here is the sketch from Susie:

Here is my card:


Stamps: Bella Toille, Elements of Style
Cardstock: Marina Mist, Pear Pizzaz, Whisper White
DSP: So Saffron DSP (retired)
Ink: Marina Mist, Pacific Point
Accessories: Curly Label Punch, Build A Brads, 1/2" Circle Punch, Stampin' Dimensionals, Two-Way Glue Pen, Marina Mist Marker, White Gel Pen, Stampin' Sponge, Needle Tool, Mat Pack, Tombow Multipurpose Adhesive

The card base is Marina Mist cardstock cut at 4 1/4" x 11" and scored at 5 1/2". A piece of Whisper White cardstock was cut at 4" x 5 1/4" and stamped with the Bella Toille background stamp in Marina Mist ink. This panel was adhered to the card front. Four strips of Pear Pizzaz cardstock were cut 1/4" wide. Two of them were cut 4" long and the other two were cut 5 1/4" long. The long sides of the four strips were sponged with Pacific Point ink. The strips were then adhered to the card front with the Two-Way Glue Pen.

On a scrap of Marina Mist cardstock the image from Elements of Style was stamped in Pacific Point ink. Three curly labels were cut with the Curly Label Punch. The flowers were colored in with the Marina Mist marker and White Gel pen highlights were added. The edges of the labels were then sponged with Pacific Point ink and these were adhered to the card front with Stampin' Dimensionals.

The greeting from Elements of Style was stamped in the lower right hand portion of the card in Pacific Point ink. The Needle Tool and Mat Pack were used to punch three holes under each curly label for the brads. The Build A Brad bases were put into the cardfront. Three 1/2" circles were punched from a scrap of So Saffron DSP (retired) with the 1/2" Circle Punch. These were adhered into the brad bases with Tombow Multi-Purpose Adhesive. The clear top was added to each brad. That's it!

This card was pretty quick to put together and I enjoyed combining the two challenges. Thank you Susie for the wonderful and challenging sketch, and thank you Barbara for the great color challenge! If you are a Stampin' Up demonstrator and have access to Stampin' Connection you can find the sketch challenge here and the color challenge here. If you are not a demonstrator I would still love to see your creations. Please add a link to your card in the comments section of this post!

Tuesday, November 2, 2010

Simple Vintage Christmas

Today I have for you a very quick and simple vintage looking Christmas card. With the holidays quickly approaching it is getting busier and busier in my world. So many things to do before the holidays actually get here. So here is the card:


Stamps: Tags Till Christams, Bells and Boughs
Cardstock: Crumb Cake, Early Espresso, Very Vanilla
DSP: Deck the Halls
Ink: Cherry Cobbler, Crumb Cake
Accessories: Decorative Label Punch, Scallop Trim Border Punch, Paper Snips, 5/8" Old Olive Grosgrain Ribbon, Silver Glass Glitter, Tombow Multipurpose Adhesive, Stampin' Dimensionals, Two-Way Glue Pen

The card base is Crumb Cake cardstock cut at 5 1/2" x 8 1/2" and scored at 4 1/4". The card front was stamped with the holly image from Bells and Boughs in Crumb Cake ink to create the background.
The Early Espresso cardstock was cut at 4 1/4" x 3 3/8" and the bottom edge was punched with the Scallop Trim Border punch. A piece of Deck The Halls DSP was cut at 2" x 4 1/4" and adhered to the Early Espresso cardstock.

On a scrap of Very Vanilla cardstock the image from Tags Till Christmas was stamped in Cherry Cobbler ink and punched out with the Decorative Label Punch. Two more decorative labels were punched from scraps of Early Espresso cardstock and each were cut in half and adhered to the back of the stamped label with a Two-Way Glue Pen to create the mat behind the stamped label. A piece of 5/8" Old Olive Grosgrain ribbon was cut and the end was adhered to the back of the Early Espresso and DSP cardstock panel. The Early Espresso and DSP layer was then adhered to the card front. I used some snail adhesive to adhere the ribbon flat down the card front.

The greeting from Bells and Boughs was stamped in Cherry Cobbler ink in the upper left hand corner of the card. Tombow Multipurpose Adhesive was added around the inside oval and Silver Glass Glitter was pressed into the adhesive to give the label some sparkle. After the adhesive dried Stampin' Dimensionals were added to the back of the label and the label was adhered on top of the Old Olive ribbon. That's it! I hope you've enjoyed my simple Christmas card.

Come back tomorrow to see a scrapbook page!

Monday, November 1, 2010

Autumn Thank You

Today is Monday and you know what that means...Sketch Challenge time!!! Here is the sketch:


And here is my card:


Stamps: Day of Gratitude
Cardstock: Crumb Cake, Very Vanilla, Cajun Craze
DSP: Autumn Spice
Ink: Crumb Cake, Chocolate Chip
Accessories: 2 3/4" Scalloped Circle punch, 1 3/4" Circle Punch, 5/8" Chocolate Chip Grosgrain ribbon (retired), Needle Tool, Mat Pack, Stampin' Sponge, Stampin' Dimensionals

The card base is Crumb Cake cardstock cut at 5 1/2" x 8 1/2" and scored at 4 1/4". The sides were sponged with Chocolate Chip ink using a Stampin' Sponge. The next layer is a piece of Very Vanilla cardstock cut at 4 1/2" x 4 1/4". The 4 1/4" sides were sponged with Chocolate Chip ink and then this panel was adhered to the card front.

A piece of Autumn Spice DSP was cut at 4 1/8" x 4 1/4". Some 5/8" Chocolate Chip Grosgrain ribbon (retired) was added around the bottom of the DSP and tied into a bow. The DSP panel was adhered to the card front.  The 2 3/4" Scalloped Circle punch was used with some Cajun Craze cardstock to get the large scalloped circle. Then the Needle Tool and Mat Pack were used to add pierced holes in the center of each scallop. The edges of the scalloped circle were sponged with Chocolate Chip ink.

On a scrap of Very Vanilla cardstock the leaf was stamped in Crumb Cake ink and the greeting was stamped in Chocolate Chip ink on top of the leaf. This was then punched out with the 1 3/4" Circle punch. The edges were sponged with Chocolate Chip ink and adhered to the center of the Cajun Craze scalloped circle. The scalloped circle was adhered to the card front with Stampin' Dimensionals to give the card more dimension. Thats it! This is a very simple and a quick card to put together.

If you are a Stampin' Up demonstrator you can find the sketch challenge thread on Stampin' Connection here. If you are not a demonstrator I would still love to see your creations. Please post a link to your card in the comments section of this post!

Come back tomorrow to see another wonderful card!

Sunday, October 31, 2010

Fall Leaves

Today I have for you the card I created for the SCCSC38 sketch challenge. I'm just now getting around to completing some of the challenges I missed while I was on vacation. So here is the sketch provided by Susie:

And here is my card:


Stamps: Day of Gratitude
Cardstock: Very Vanilla, Peach Parfait, Early Espresso
DSP: Autumn Spice
Ink: Peach Parfait, Early Espresso, Cherry Cobbler
Accesories: Scallop Edge Border Punch, Gold Brads, Needle Tool, Mat Pack

The card base is Early Espresso cardstock cut at 5 1/2" x 8 1/2" and scored at 4 1/4". The next layer is a piece of Very Vanilla cardstock that was cut at 5" x 4". The bottom edge was punched with the Scallop Edge Border punch. The leaves from Day of Gratitdue were stamped in Early Espresso, Peach Parfait, and Cherry Cobbler inks. The sentiment was stamped in Early Espresso ink. This panel was then adhered to the card front.

A piece of Peach Parfait cardstock was cut at 1 7/8" x 5". Both long sides were punched with the Scallop Edge Border punch. A piece of Autumn Spice DSP cut at 1" x 5" was adhered to the center of the punch Peach Parfait strip. The Needle Tool and Mat Pack were used to punch three holes on the left side of the cardstock strip and three Gold Brads were added. The cardstock strip was then adhered to the card front. That completes this quick and easy fall card. Thanks for the great sketch Susie! For those of you with access to Stampin' Connection you can find the challenge here. For those of you without access I would love to see your creations. Please add the link to your card in the comments section of this post.

Come back tommorrow to see the sketch that I created and the card that this sketch inspired!

Friday, October 29, 2010

Delightful Flowers

Now I have the card I made with the Two-Step Stamping panel I showed you how to make in the tutorial this morning. I kept this one pretty simple since there is so much going on in the floral panel. Take a look:


Stamps: Awash With Flowers
Cardstock: Daffodil Delight, Peach Parfait, Whisper White
DSP: Autumn Spice
Ink: Daffodil Delight, Cherry Cobbler, Poppy Parade, Old Olive, Basic Black
Accessories: Crystal Effects, Dazzling Diamonds glitter, Whisper White Organza ribbon

The card base is 5 1/2" x 8" and scored at 4". This is a slightly narrower card than A2 because I wanted my Autumn Spice to go all the way from top to bottom, but I was using a scrap that was just a little narrower than the height of the card, so I cut the card to fit the DSP scrap. A piece of Whisper White cardstock was cut at 2 3/4" x 4 1/8". The flower outlines were stamped in Basic Black. The various flower centers and leaves were stamped in Daffodil Delight, Poppy Parade, Cherry Cobbler, and Old Olive. This panel was adhered to a piece of Peach Parfait cardstock that was cut at 2 7/8" x 4 1/4". This was then adhered to the top of a piece of Autumn Spice DSP that is 4" x 4 1/2".

A piece of Whisper White Organza ribbon was tied around the bottom of the Autumn Spice DSP panel. The panel was adhered to the card front. As a finishing touch I added some Crystal Effects to some of the flower edges and added Dazzling Diamonds glitter to the Crystal Effects. The Crystal Effects holds the Dazzling Diamonds glitter better than the Two-Way Glue pen, and I don't like to pick up a card and be covered in glitter. So when I use glitter I use either Crystal Effects or Tombow Multi-Purpose adhesive to adhere glitter. Here you can see a close up of the glitter on the flowers.


That's it! What do you think?

Two-Step Stamping - Tutorial

It's another Friday! That means it's time for the weekly tutorial! Today's is on Two-Step Stamping!

For this tutorial you will need a Two-Step Stamping set, cardstock, and the inks of your choice. For this one I am using Awash With Flowers, Basic Black, Old Olive, Cherry Cobbler, Poppy Parade, and Daffodil Delight ink and Whisper White cardstock.

With a Two-Step Stamping set you can either stamp the bottom image or the top image first. Awash with Flowers is one that I like to stamp the top image or the outline image first in Basic Black so I can layout how I want the flower arrangement, this is just personal preference though.

When using a set like Greenhouse Garden you would want to stamp the solid images in a lighter color and the finer lined images in a darker color.

Now that I have all of my outlines done I can start stamping in my colors.

Now I begin stamping in my solid image stamps to add the various colors to my flower arrangement.

Here I have added all of my colors with the solid image stamps. You can see that by doing the two different steps I can a more whimsical looking panel by not having everything lined up perfectly. Or you could use the Stamp-A-Ma-Jig to get every image perfectly placed on top of the other.

I hope you have enjoyed this tutorial. Let me know if there is another topic that you would like to see a tutorial on. Come back later today to see what I do with this colorful floral panel! Have fun stamping!


Thursday, October 28, 2010

Bermuda Leaves

Todays color challenge features SCCOLOR 15. This is an old color challenge posted back in May. Even though it uses two retired colors I still had fun playing along. The color challenge was to use Bermuda Bay, Dusty Durango, and Very Vanilla. Here is what I created:

Stamps: Apple Blossoms
Cardstock: Bermuda Bay, Dusty Durango, Very Vanilla
Ink: Bermuda Bay, Dusty Durango
Accessories: 5/8" Very Vanilla Satin ribbon, Crystal Effects, Perfect Polka Dots Textured Impressions Die, Stampin' Dimensionals

The card base is 5 1/2" x 8 1/2" Bermuda Bay cardstock that was scored at 4 1/4". The card front was ran through the Big Shot inside the Perfect Polka Dots Textured Impressions Die to add that wonderful polka dotted texture. A piece of Very Vanilla cardstock was cut at 3 1/8" x 4 3/8". I covered the bottom 3/4" of the panel with a post it note as a mask then stamped the image from Apple Blossoms in Bermuda Bay ink at varying heights. The post it note mask was removed and I stamped the greeting in Dusty Durango ink.

The stamped Very Vanilla panel was adhered to a piece of Dusty Durango cardstock that was cut at 3 1/4" x 4 1/2". Some Crystal Effects were added to the middle and outside branches of leaves. You can see a close up shot of the finished card below:


After the Crystal Effects dried some 5/8" Very Vanilla ribbon was tied around the panel and into a knot. After the ribbon ends were trimmed the panel was adhered to the card front with Stampin' Dimensionals.

Although I really had to dig through my stash to find the retired color this was such a fun color combina tion to play with. I imagine you could do something similar with Tempting Turquoise and Cajun Craze with Very Vanilla.

I hope you've enjoyed this look back at some of the older color challenges that have been featured on Stampin' Connection. Make sure to come back tomorrow to see a tutorial! Have fun stamping!

Wednesday, October 27, 2010

Another Magical Vacation!

Hello all! I'm back from vacation! I hope you've enjoyed the pre-scheduled posts I had up while I was gone. Instead of a scrapbook page today, since I haven't had a chance to do one, I will share a few of my vacation photos. I will be posting the sketch challenge that would have been posted on Monday later this week or this weekend.

My Husband, I, my parents, and some of my Dad's extended family enjoyed a seven day Disney cruise on the Disney Magic through the western carribbean. It was absolutely fabulous! Anyway here are some photos!

Key West, Florida

Grand Cayman


Cozumel, Mexico


In Cozumel we went on a snorkeling excursion. This is the ship from the view of the catamaran.


Castaway Cay, Disney's Private Island in the Bahamas


And of course Mickey and Minnie!


If you think Disney cruises are just for kids or young families you are wrong. There are lots of areas and activities that are just for adults such as comedy shows, wine tasting, tequila and margarita tasting, a piano bar, a sports bar, they even show football games on the huge television above the family pool on one of the top decks. Not to mention being spoiled rotten the entire week with all the wonderful service! I just thought I would throw that little note in since I've gotten that question a lot when I mention Disney Cruise Line.

Come back tomorrow to see what I have for you!