Friday, May 30, 2014

A Floral Birthday

Today I have another make and take project to share with you! This one is a simple birthday card that has some bright pops of color with some neutrals.


  • Crumb Cake card stock 5-1/2" x 8-1/2", scored at 4-1/4"
  • Whisper White card stock 3" x 3"
  • Night of Navy card stock 2-1/2" x 3-1/2"
  • Whisper White card stock (3) 7/8" x 2-7/8"
  • Pistachio Pudding card stock 1/2" x 3-1/4"
  • Stamps: Morning Meadow
  • Ink: Crushed Curry, Strawberry Slush, Coastal Cabana, Night of Navy
  • Accessories: Stampin' Dimensionals, Rhinestones, paper Snips

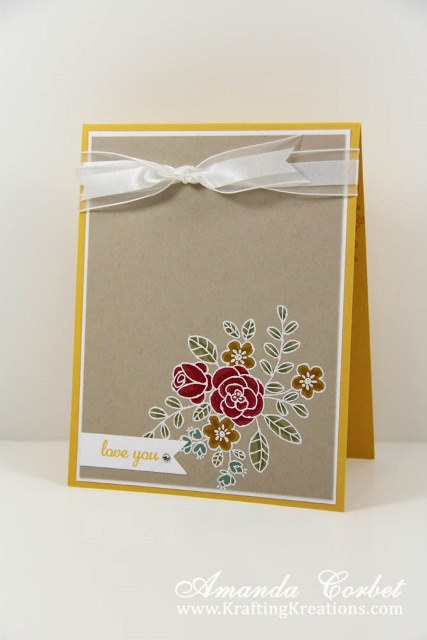
For this lovely start off by folding the Crumb Cake card stock on the score line. Glue the larger piece of Whisper White card stock onto the card front. Next glue the Night of Navy card stock on top of the Whisper White piece.


Now take your three strips of Whisper White and stamp the flower image from Morning Meadow onto the card stock in Strawberry Slush, Coastal Cabana, and Crushed Curry ink. Stick the panels onto the card front with Stampin' Dimensionals. Tip: Start with the two outside pieces and space them evenly from the edges. Then place the center one evenly spaced between the outer two. It's much easier than trying to start from the middle.


Now stamp the greeting onto the strip of Pistachio Pudding card stock in Night of Navy ink and use Paper Snips to trim the ends into a dove-tail shape. Glue the banner on top of the flower panels with 2-Way Glue Pen then add a rhinestone onto either side of the greeting. Stamp some flowers on the inside of the card to add some fun pattern inside.

That's it for this fun and cute card!


Thursday, May 29, 2014

Wonderful Mother

Since Mother's Day is in May we certainly had to make a Mother's Day card at the May make and take. So here is what my guests made!


  • Daffodil Delight card stock 5-1/2" x 8-1/2", scored at 4-1/4"
  • Afternoon Picnic DSP 3" x 5"
  • Whisper White card stock 2-1/4" x 4-1/4"
  • Bermuda Bay card stock 2-3/8" x 4-3/8"
  • 15" Victoria 5/8" Crochet Trim
  • Stamps: Peaceful Petals, Delightful Dozen
  • Ink: Jet Black Stazon, Bermuda Bay
  • Markers: Crisp Cantaloupe, Calypso Coral, Pear Pizzaz, Gumball Green, Daffodil Delight, Crushed Curry
  • Accessories: Stampin' Dimensionals

First off you will need to fold your Daffodil Delight card stock on the score line. Then glue your DSP onto the bottom of the card with some glue stick. Now wrap your ribbon around the top of the card and tie it into a knot.


Take your piece of Whisper White card stock and stamp the flower from Peaceful Petals three times in Jet Black Stazon ink. Color in the flowers with the markers and stamp the greeting from Delightful Dozen into the upper right hand corner in Bermuda Bay ink.


Glue the stamped Whisper White card stock onto the Bermuda Bay card stock then stick this panel onto the card front with some Stampin' Dimensionals. To dress up the inside a little bit stamp one of the other flower images onto the inside of the card in Daffodil Delight ink. 

You're done! You could easily switch up the greeting on this to make it for just about anything else. It would make a lovely birthday card or thank you card. 

Wednesday, May 28, 2014

Wish Upon a Star

I got this fabulous Simply Stars stamp set in a few months ago, then this last month I come to find out it's one of the sets retiring. What! So I figured I had better at least ink it up once before it goes away. So that resulted in this card for the May Make and Take which was a favorite among the ladies.


  • Smoky Slate card stock 4-1/4" x 11", scored at 5-1/2"
  • Whisper White card stock (2) 4" x 5-1/4"
  • Cycle Celebration DSP 2" x 4"
  • 21" Summer Starfruit Stitched Satin Ribbon
  • Cycle Celebration DSP 1" x 4"
  • Stamps: Simply Stars, Make a Wish
  • Ink: Smoky Slate, Summer Starfruit, Midnight Muse
  • Accessories: Rhinestones

To make this fun and simple card start off by stamping both of the pieces of Whisper White card stock with the stars in Smoky Slate and Summer Starfruit ink. To get the different shades of gray I simply stamped the image twice before inking it up again. Use glue stick to glue one of these inside the card and one of these onto the card front.

Now glue the Cycle Celebration DSP onto the left side of the card front right against the edge of the stamped Whisper White card stock. Now take the greeting from Make a Wish and stamp it into the lower right hand corner in Midnight Muse ink. Stamp the small star just above the greeting and to the left in Midnight Muse ink.


Finally, wrap the Summer Starfruit ribbon around the panel covering the edge of the DSP and tie it into a bow. Then add a rhinestone into the center of the star.


That's all there is to it! Fast, simple, and cute! Do you have any stamp sets laying around that you haven't inked up yet? What are you waiting for? Go get them inky!

Tuesday, May 27, 2014

Sweet Baby Prints

Every spring I usually have just one baby card for those that need one. I make the design simple enough that it could easily be changed out to work for both a boy or a girl. I only made the boy version as a sample since I know someone who is having a little boy, but the girl version with Regal Rose ink and Primrose Petals ribbon was equally as cute. The green chevron background and Basic Gray made a great gender neutral background. So here are the instructions so you can make your own version!


  • Pistachio Pudding card stock 5-1/2" x 8-1/2", scored at 4-1/4"
  • Basic Gray card stock 3-1/4" x 3-3/4"
  • Whisper White card stock 3-1/4" x 3-3/4"
  • 22" Midnight Muse Stitched Satin Ribbon
  • Stamps: Baby Prints, Itty Bitty Banners, Positively Chevron
  • Ink: Pistachio Pudding, Marina Mist
  • Accessories" Stamping Sponges, Stampin' Dimensionals, Deco Labels Framelits, Bitty Banners Framelits

Fold the Pistachio Pudding card stock on the score line. Stamp the Positively Chevron background image onto the card front in Pistachio Pudding ink for a nice tone-on-tone effect. Wrap the ribbon of choice around the card front and tie it into a bow.

Next stamp the feet from Baby Prints onto the Whisper White card stock in Marina Mist (or Regal Rose) ink. Cut out the image with the 2nd from smallest Deco Labels Framelit so it looks like the feet are at an angle. Use the 3rd from smallest Deco Labels Framelit on the piece of Basic Gray card stock. Use a Stamping Sponge and sponge Basic Gray ink around the edge of both labels. Use some glue stick to glue the labels together, then stick the labels onto the card front with a couple Stampin' Dimensionals.


Next stamp the greeting from Itty Bitty Banners onto a scrap of Whisper White card stock in Marina Mist (or Regal Rose) ink. Use the coordinating Bitty Banner Framelit to cut out the greeting in the Big Shot then stick it onto the label just under the feet with a dimensional that was cut in half.

To add some pattern to the inside I stamped the feet again in Marina Mist ink in one of the bottom corners.

That's it! A cute baby card ready for giving congratulations!


Monday, May 26, 2014

You Can Never Have Too Much Happy!

Are you ready to see the final card that my guests made at the April Make and Take?  Here it is! 


  • Marina Mist card stock 5-1/2" x 8-1/2", scored at 4-1/4"
  • Pear Pizzaz card stock 3" x 4"
  • Very Vanilla card stock 2-3/4" x 3-3/4"
  • Modern Medley DSP 1-3/4" x 2-3/4"
  • Silver Glimmer Paper 1/4" x 2-3/4"
  • Very Vanilla card stock 4" x 5-1/4"
  • Stamps: Yippee Skippiee, Hardwood, Petite Petals
  • Ink: Pacific Point, Calypso Coral
  • Accessories: Stampin' Dimensionals, Rhinestones, Petitie Petals Punch

Okay, lets get started. Fold the Marina Mist card stock on the score line. Stamp the card front with the oh so fabulous Hardwood background stamp in Pacific Point ink. Now stamp your greeting from Yippee Skipiee onto the top of the Very Vanilla card stock in Pacific Point ink. Glue the Modern Medley DSP onto the bottom of the Very Vanilla card stock, then glue the strip of Silver Glimmer Paper right at the edge of the DSP. 


Glue this layer onto the Pear Pizzaz card stock with some glue stick. Then stick this panel onto the card front with some Dimensionals. Stamp the flower from Petitie Petals onto a scrap of Crisp Cantaloupe card stock in Calypso Coral ink. Punch out the stamped flower plus one more with the Petite Petals Punch.

Curl the flower petals then glue the flowers together with some 2-Way Glue Pen. Glue the flower onto the card front with a Stampin' Dimensional and add a rhinestone into the center of the flower to give the card a little more sparkle.


Finally take the large piece of Very Vanilla card stock and stamp the flower image several times in Calypso Coral ink then glue it inside the card with some glue stick. 

That's it! You're done! I love this fun spring-y color combo!


Friday, May 23, 2014

Happy Birthday To You

Today I've got a bright and fun birthday card to share with you! I just couldn't resist this great big bold greeting! 


  • Basic Gray card stock 5-1/2" x 8-1/2", scored at 4-1/4"
  • Kaleidescope DSP 4" x 5-1/4"
  • Basic Black card stock 3-1/3" x 4-3/8"
  • Whisper White card stock 3" x 4-1/4"
  • Whisper White card stock 4" x 5-1/4"
  • Basic Black card stock 1/4" x 4"
  • Stamps: Another Great Year
  • Ink: Versamark
  • Markers: Smoky Slate, Bermuda Bay, Crushed Curry
  • Accessories: Stampin' Dimensionals, Gold embossing powder, Embossing Buddy, Heat Tool, Large Rhinestones

Fold the Basic Gray card stock on the score line. Use some glue stick to glue the DSP onto the card front. Now take the smaller piece of Whisper White card stock and rub your Embossing Buddy all over it. Then stamp the greeting from Another Great Year onto the card stock in Versamark ink, cover with Gold embossing powder, tap off the excess, and heat it with your heat tool until its nice and shiny.

Use the markers to color in the banners. Then glue this onto the Basic Black card stock and stick this layer onto the card front with a few Stampin' Dimensionals. Then add the large rhinestone to cover up your finger print smudge that you god on the card.


On to the inside. Take the large piece of Whisper White card stock and rub it all over with your embossing buddy. Take the greeting images and stamp onto the card stock in Versamark ink. Cover the stamped images with gold embossing powder, tap off the excess, and heat it with your heat tool.


Color in the candles and banner with your markers. Then glue this inside the card with some Glue Stick. Finally take the thin strip of Basic Black and glue it onto the left side of the card stock.


Now your fun birthday card is ready to send some birthday wishes! 


Thursday, May 22, 2014

So Sorry

This is another card from the April Make and Take and it is a fun one with lots of pattern and layers, but it's not too hard to put together. 


  • Natural White card stock 5-1/2" x 8-1/2", scored at 4-1/4"
  • Early Espresso card stock 3-7/8" x 5-1/8"
  • Pool Party Coredinations 3-3/4" x 5"
  • This & That DSP 2" x 3-3/4"
  • Whisper White 2" x 3-1/2"
  • Pool Party card stock 4" x 5-1/4"
  • This & That DSP 1" x 4"
  • 6" Gumball Green Stitched Satin Ribbon
  • 4" Early Espresso 1/8" Taffeta Ribbon
  • Stamps: So Sorry
  • Ink: Midnight Muse, Gumball Green
  • Accessories: Chevron embossing folder, Angled Tag Topper Punch, Stampin' Dimensionals, Watercolor Wonder Washi Tape, Glue Dots, Sanding Block

Although this card has a lot of pieces it really isn't that hard to put together. So lets get started. Take your Naturals White card stock and fold it on the score line. Now take the Pool Party Coredinations card stock and run it through the Big Shot in the Chevron embossing folder then use the Sanding Block to sand off some of the raised texture. Glue this onto the right side of the Early Espresso card stock. Glue your DSP down onto the right side of the Early Espresso card stock. 

Take the Gumball Green ribbon, wrap it around the middle of the panel where the DSP meets the Coredinations card stock and use a couple Glue Dots to glue the ribbon ends to the back of the card stock. Then glue this layer down onto the card front. 


Use the Angled Tag Topper Punch on one end of your Whisper White card stock. Then stamp the greeting images in Midnight Muse and Gumball Green ink. Add a piece of the polka dot Watercolor Wonder Washi Tape onto the other end of the tag and wrap the ends of the tape around to the back.  Take the piece of Early Espresso ribbon and add it onto the tag. Then stick the tag down onto the card front with a couple Stampin' Dimensionals.

It's not shown, but for the inside glue the 1" wide DSP onto the right side of the Pool Party card stock. Then add a piece of Watercolor Wonder polka dot washi tape right next to the DSP and wrap the ends around to the back. Then glue this piece inside the card.

That's it! Now you have a fun card that is sure to brighten up someone's day.


Wednesday, May 21, 2014

Love You

Today I have the second card from the April Make and Take to share with you. This one was my absolute favorite of the evening. A simple, yet sweet card. 


  • Crushed Curry card stock 4-1/4" x 11", scored at 5-1/2"
  • Whisper White card stock 4" x 5-1/4"
  • Crumb Cake card stock 3-7/8" x 5-1/8"
  • Stamps: Express Yourself, So Very Grateful
  • Ink: Versamark, Crushed Curry
  • Markers: Pear Pizzaz, Coastal Cabana, Strawberry Slush, Crushed Curry
  • Accessories: White embossing powder, Embossing Buddy, Heat Tool, Rhinestones, Bitty Banners Framelits, Whisper White Organza Ribbon


For this beautiful card I started off with folding the Crushed Curry card stock on the score line. Next rub the Embossing Buddy over the Crumb Cake card stock and stamp the flower image from So Very Grateful into the bottom corner in Versamark ink. Then heat the embossing powder with your Heat Tool until its nice and shiny.


Then take your markers and color in the flowers. The embossing really helps you stay in the lines as you color. Another tip... I will use the leaves as an example. Color in the leaf with the Pear Pizzaz marker. Then allow that to dry completely. Now come back with the Pear Pizzaz Marker and color again where you want the shadow to be. This gives you two different values of the same color. I used that technique to color in all the flowers and leaves in this image. 

Next stamp the greeting from Express Yourself onto a scrap of Whisper White card stock in Crushed Curry ink. Cut out the greeting in the Big Shot with the Bitty Banners Framelit. Use some 2-Way Glue Pen to glue the banner onto the Crumb Cake card stock. Then take some Paper Snips to trim the banner even with the edge of the card stock. 


Glue your beautifully colored crumb cake piece onto the Whisper White card stock with some glue stick. Then glue this layer onto the card front with more glue stick. Then add a small rhinestone next to the greeting. Finally wrap a piece of Whisper White Organza Ribbon around the top of the card and tie it into a knot.  

On the inside I stamped the other flower image from So Very Grateful in the upper right and lower left corners with Crushed Curry ink. A simple way to dress up the inside of a card a little bit. 

Tuesday, May 20, 2014

Happy Easter Card

Today I have a simple Easter card to share with you. This is the first of the projects that the ladies made at the April Make and Take. Simple, quick, and oh so cute. Although I've used this as an Easter card you could easily change up the greeting to use it for just about anything. 


  • Soft Sky card stock 5-1/2" x 8-1/2", scored at 4-1/4"
  • Wisteria Wonder card stock 4" x 4"
  • Afternoon Picnic DSP 3-1/4" x 3-1/4"
  • Stamps: Mixed Bunch, Delightful Dozen
  • Ink: Wisteria Wonder, Daffodil Delight
  • Accessories: Window Frames Framelits, Blossom Punch, 3/4" Circle Punch, Large Oval Punch, crimper, Pearls, Lace Doilies


To make this lovely start off by folding the Soft Sky card stock on the score line. Now use some glue stick to glue down the Lace Doily onto the card front near the bottom. I just put glue stick in the center of the doily. Stamp the greeting from Delightful Dozen in the bottom right corner in Wisteria Wonder ink. Then add three of the smallest pearls right under the greeting.


Now take the Wisteria Wonder card stock and use the 3rd from smallest Window Frames Framelit in the Big Shot to cut out the shape. Use the 2nd from smallest Window Frames Framelit to cut out the Afternoon Picnic DSP. Now glue these together with glue stick. Glue the layered labels onto the card front with a few Stampin' Dimensionals.


Next stamp the flower image from Mixed Bunch onto a scrap of Whisper White card stock in Wisteria Wonder ink. Punch out the flower with the Blossom Punch. Stamp the flower center onto a scrap of Whisper White card stock in Daffodil Delight ink. Use the 3/4" Circle Punch to punch that image out. Stick the flower center onto the flower with a Stampin' Dimensional then add one of the large Pearls into the center.


For your leaves use the Large Oval Punch twice on a scrap of Old Olive card stock. Fold the ovals in half length-wise then run them through a paper crimper at an angle. Unfold them and you have your leaves! Just glue the ends of the leaves together with some Glue Stick then glue the leaves onto the backside of the flower with a Stampin' Dimensional. Use another Stampin' Dimensional to stick the flower onto the card front in the center of the labels. 

Monday, May 19, 2014

Hello Wreath

I'm back with a fun a cheerful project! Several weeks ago I actually put together my Burlap and Blooms Simply Created Wreath Kit (Item 133333 $17.95) from Stampin' Up! It had been sitting on my work table for at least a month, maybe more. Why do I procrastinate putting kits together? 

I really liked the wreath kit, but I wanted to add a bit more to it to step it up a bit. So here is the finished wreath hanging on my mantle. Which is a really weird place for a wreath, but it was the best spot for photos at the time. 


I started off making the kit exactly as shown, but saved one flower to put at the top right. Then I took some Crisp Cantaloupe card stock and used my Spiral Flower Die to make five more roses to add to the project. Each of the roses you see is actually two of the spiral flower die cuts to make the rose larger.


Then I cut a piece of Gold Sequin Trim long enough to dangle across the wreath for the banner. The banner pieces are Pool Party card stock cut at 2" x 3-1/2". I cut the ends with Paper Snips then added two strips of Retro Fresh washi tape onto each banner. The letters were cut with the Typeset Alphabet Bigz dies from Champagne glimmer paper and were glued onto each of the banner pieces with Multipurpose Liquid Adhesive. Then the banners were hot glued onto the sequin trim, and the sequin trim was hot glued onto the wreath. 


The flower I saved from earlier was hot glued over the end of the sequin trim.


Another close up view of some of the fabulous flowers.


 And another. Just because.


Here is the whole finished wreath again. I just love it so much! Since it just says "hello" it can stay up with the decor all spring and summer!


And just for fun, what does it take to get the picture above? It takes laying on the floor that really needs to be swept. Here is the zoomed out view. I spy April's project for Craft Project Central, the bunny banner I made for Easter, and Easter decor, but in my defense these photos were taken a couple days before Easter. Although since the Easter decor is still up as I type, I should probably take it down since it's already almost Memorial Day.


So what do you think? Also, what do you think of my bloggy updates?


Long Time No Post

Hello! Long time no post, other than Craft Project Central posts. I didn't mean to fall off the face of the web for the most of May. It's just been busy in my neck of the woods. I get most of my crafting done on the weekends and we've been busy busy on the weekends lately with projects and birthday parties and barbecues and lots of fun! 

A couple weeks ago we totally scored and got an awesome new front door for our house (a post will come on that later (read: we still have to fix the trim on the inside, but need our miter saw back for that since someone is borrowing it. Hi sis!). So of course the very next day we took an afternoon (4 hours) to install the fabulous new door. Then this last weekend I spent about 3 hours putting three coats of white paint on both the inside and outside of the door. 

I've also been working on painting the sewing desk that I picked up at a  yard sale. If you follow me on Instagram (yes I'm finally on Instagram) you may have seen some of the progress. If you want to follow me on Instagram just click on the lovely Instagram button on my right sidebar (a new addition). Shout out to Lucia Barabas for making and selling fabulous bloggy buttons!

I've been making some baby shower invitations for two baby showers. If you need custom cards or invitations just drop me a line! I have some extras that I will be adding into my Etsy store soon. I'm really hoping to get the store actually stocked with some awesome stuff I've been working on. 

I have also been working on some behind the scenes changes on the blog. You might have noticed my lovely new hand drawn/painted header and signature. So excited about those! I really love Stampin' Up! and I still plan on sharing lots of projects and inspiration using their products but I also want to branch out more and post more about general crafting and maybe a little bit of decorating/home DIY/organizing as we get projects finished around the house. So, a more general and more personalized header and signature were required. In case you're wondering they were drawn with Copic Multiliner Black in 0.5mm, Copic BG53 Ice Mint, as well as Grumbacher Opaque watercolor paints all on Canson Mixed Media paper. 

Whew that is quite a list! I will be back in a little bit with an actual project post. 


Long Time No Post

Hello! Long time no post, other than Craft Project Central posts. I didn't mean to fall off the face of the web for the most of May. It's just been busy in my neck of the woods. I get most of my crafting done on the weekends and we've been busy busy on the weekends lately with projects and birthday parties and barbecues and lots of fun! 

A couple weeks ago we totally scored and got an awesome new front door for our house (a post will come on that later (read: we still have to fix the trim on the inside, but need our miter saw back for that since someone is borrowing it. Hi sis!). So of course the very next day we took an afternoon (4 hours) to install the fabulous new door. Then this last weekend I spent about 3 hours putting three coats of white paint on both the inside and outside of the door. 

I've also been working on painting the sewing desk that I picked up at a  yard sale. If you follow me on Instagram (yes I'm finally on Instagram) you may have seen some of the progress. If you want to follow me on Instagram just click on the lovely Instagram button on my right sidebar (a new addition). Shout out to Lucia Barabas for making and selling fabulous bloggy buttons!

I've been making some baby shower invitations for two baby showers. If you need custom cards or invitations just drop me a line! I have some extras that I will be adding into my Etsy store soon. I'm really hoping to get the store actually stocked with some awesome stuff I've been working on. 

I have also been working on some behind the scenes changes on the blog. You might have noticed my lovely new hand drawn/painted header and signature. So excited about those! I really love Stampin' Up! and I still plan on sharing lots of projects and inspiration using their products but I also want to branch out more and post more about general crafting and maybe a little bit of decorating/home DIY/organizing as we get projects finished around the house. So, a more general and more personalized header and signature were required. In case you're wondering they were drawn with Copic Multiliner Black in 0.5mm, Copic BG53 Ice Mint, as well as Grumbacher Opaque watercolor paints all on Canson Mixed Media paper. 

Whew that is quite a list! I will be back in a little bit with an actual project post.