Friday, June 29, 2012

Craft Project Central!

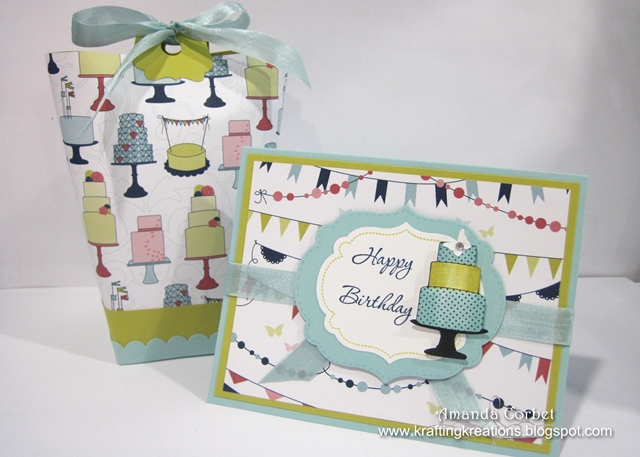
Papaya Collage Birthday Set - June Bonus Project

This sweet gift set makes a pretty birthday presentation!  The uniquely made hinged gift box is perfect for holding a small treasure or candy treat.  The gift card slider is a super simple, but elegantly coordinated way to present a gift card.  The pretty Papaya Collage birthday card brings the set all together! 


This pretty gift set project comes to you designed by Julie! If you have a chance please head on over to Craft Project Central and leave Julie a comment on her project! 


To get the instructions for Julie’s project, head on over to Craft Project Central and subscribe to June and then meet one of the following monthly bonus project requirements:  Subscribe to two or more months in a row, put the Craft Project Central badge on your blog, or refer a friend and when they subscribe, let us know!


Thanks for stopping by! 


Party Owl Friday Mashup 65

Are you ready for another Friday Mashup Challenge? Well ready or not it's here!


  • Stamps: Curly Cute
  • Card Stock: Crumb Cake, Gumball Green, Sahara Sand, Whisper White, Midnight Muse
  • DSP: Summer Starfruit, Midnight Muse, Patio Party
  • Ink: Midnight Muse
  • Accessories: Owl Punch, Two-Way Glue Pen, Stampin' Dimensionals, Paper Snips, Mini glue Dots, Pennant Punch, Itty Bitty Shapes Punch Pack


Here is the challenge info:


So here is the "Mashup" Challenge :
  1. Make a project with " Punch Art ".
  2. Or Make a project featuring your " Favorite Animal ".
  3. Or "Mash it Up" and create a project " with an Animal made from Punches ".

I feel like I kind of cheated on this challenge. It was just too easy to really be called a challenge. I used my Owl Punch to make my animal from punches. But I truly do love my owl punch! It has had a lot of use making adorably cute owls. 


I pulled all of the pieces for this card from my scrap pile. I wasn't sure about the Gumball Green and Summer Starfruit together, but it seems like a really nice and bright combination! I started off with a piece of Crumb Cake card stock 5-1/2" x 8-1/2" and scored at 4-1/4". I ran the card front through the Big Shot in the Chevron embossing folder to give it some nice texture. 


Next I cut a piece of Summer Starfruit DSP 2" x 5-1/2" and adhered it onto a piece of Gumball Green card stock that was 2-1/4" x 5-1/2". Then I adhered this onto the card front with Stampin' Dimensionals. Next I took a strip of Whisper White card stock from my scraps. I think it was 5/8" wide x about 4" long. I stamped the greeting from Curly Cute onto the strip in Midnight Muse ink. Then I used Paper Snips to trim the left end into a dovetail shape. I curled this piece around my bone folder to make it wavy and used two Mini Glue Dots to glue it in place onto the Summer Starfruit DSP. 


Now for the cute owl. For the body I used Crumb Cake, The large part of the eyes were Sahara Sand. Whisper White for the middle part of the eyes, and Midnight Muse for the pupils and the heart. The belly was a scrap of Patio Party DSP. 

For the party hat I used the Pennant Punch on a scrap of Midnight Muse card stock. Then I used Paper Snips to trim a little off the bottom of the triangle to make it shorter. For the pom-pom on the party hat I used the small flower punch from the Itty Bitty Shapes Punch Pack. I used Two-Way Glue Pen to adhere all these little pieces together to create the adorable owl and adhered the owl onto the card front with a couple Stampin' Dimensionals. 

I really love how the textured chevron stripes kind of mimic the strips in the Summer Starfruit DSP, and that owl looks like he's ready to party! 

Stop on by the Friday Mashup blog to see what everyone else on the Design Team created! I hope you get a chance to play along!


Thanks for stopping by! 


Tuesday, June 26, 2012

Craft Project Central!

Pin Cushion Frame Gift Ensemble: 


This little gift set is perfect for the sewers and crafters in your life!  In addition, non-sewers/crafters will love this gift too!  The pin cushion frame can be used as a mini bulletin board and all readers love pretty bookmarks!  Pair these items with the matching card and your recipient is going to love this gift and be very impressed!  Try this one for a fun class or camp project too!


This beautiful project was designed by Heidi! If you have a chance please head over to Craft Project Central and leave Heidi a comment on her project! 

If you would like to subscribe to the June edition of Craft Project Central and get 10 great tutorials for just $10.00 then click HERE!

Thanks for stopping by!


Monday, June 25, 2012

Craft Project Central!

Bounty of Bumblebees: 

Give something sweet to someone special!  This trio of bumblebee inspired boxes will delight young and old.  Fill them with a Bit-o-Honey or caramel candies for that extra special touch!  These cute boxes made great party favors and can be modified for other occasions by changing up the colors!  Makes for fun class or camp projects too!


This adorable project was designed by Kim! If you have a chance please head on over to Craft Project Central and leave Kim a comment on her project! 


If you would like to subscribe to the June edition of Craft Project Central and get 10 fantastic tutorials for just $10.00 then click HERE!


Thanks for stopping by! 


Friday, June 22, 2012

Ready for a Party! Friday MashUp 64

Are you ready for a fun new Friday Mashup Challenge? This week we are getting ready for a party! Take a look: 


So here is the "Mashup" Challenge :
  1. Make a project using the " Party Time " theme.
  2. Or Make a project using the " Box in a Bag " tutorial.
  3. Or "Mash it Up" and create a "Box in a Bag with a Party Time theme."


  • Stamps: Make a Cake, Memorable Moments
  • DSP: Patio Party
  • Card Stock: Pool Party, Summer Starfruit, Whisper White
  • Ink: Summer Starfruit, Midnight Muse, Stazon
  • Accessories: Scallop Edge Border Punch, 3/8" Circle Punch, Decorative Label Punch, Labels Framelits, Paper Snips, Beautiful Wings Embosslit, Rhinestone, Pool Party Seam Binding Ribbon, Stampin' Dimensionals, Sticky Strip, Tombow Multi-Purpose Adhesive, Pool Party Marker, Summer Starfruit Marker, Snail Adhesive, Mini Glue Dots


To start off on this card I started with a piece of Pool Party card stock cut at 5-1/2" x 8-1/2" and scored at 4-1/4". Next I cut a piece of Patio Party DSP 3-3/4" x 5" and adhered it onto a piece of Summer Starfruit card stock that was cut at 4" x 5-1/4". I adhered this panel onto the card front. Next I cut a piece of Pool Party Seam Binding ribbon and wrapped it around the card front. I adhered the ends of the ribbon onto the center of the card front with Snail Adhesive. I cut two shorter pieces of ribbon and adhered them with some more Snail so it looks like the ribbon is tied behind the label, but without the bulk.


Next I stamped the label image from Memorable Moments in Summer Starfruit ink. I stamped the greeting from Memorable Moments in Midnight Muse ink before cutting the label out with the Labels Framelits. I used the next largest label framelit to cut a label from a scrap of Pool Party card stock. I adhered the stamped Whisper White label onto the Pool Party label and then used the fine point end of my Pool Party marker to add stitch lines around the Pool Party Label. I adhered the label onto the card front with Stampin' Dimensionals.

Now for the cake. I stamped the cake and layers from Male a Cake in black Stazon ink onto a scrap of Whisper White card stock. Then I used my Pool Party and Summer Starfruit markers to color in the cake layers. To get the lovely shadow effect on my cake I colored in each layer completely with the desired color. Then I let the marker ink dry and go over it again with the same color marker, this time only coloring the two sides and leaving the middle alone. Let the marker ink dry again and repeat, each time coloring just a little bit less. By layering the same color on top of itself you create shadows. So simple!

If you get hard lines from where you started the second or third layer then just color over the entire thing with a Blender Pen and it will blend away those lines. It's important when coloring on Whisper White card stock that you let the marker ink dry between layers. If you don't the paper will get too wet and you will start to remove the top layer of the paper when you try to color.


I cut out the cake and stand with Paper Snips and adhered it onto the card front with Stampin' Dimensionals. I pulled the little white butterfly out of my scrap dish and adhered it onto the card front with a Mini Glue Dot. Then I added a small Rhinestone into the center of the butterfly just for a tiny bit of sparkle! 


For the box in a bag you can find a tutorial HERE! I used more Pool Party and Summer Starfruit card stock with some Patio Party DSP and Pool Party ribbon to create this sweet little bag! 

Stop on by the Friday Mashup blog to see what everyone else on the Design Team created! I hope you get a chance to play along!

Thanks for stopping by!


Thursday, June 21, 2012

Starting Something New...

I'm starting something new! It's gonna be great! Read more about it HERE!


Thanks for stopping by!


Wednesday, June 20, 2012

Simply Wonderful

Good morning everyone! It has been a busy week and I have a lot left to do! But I thought I would share with you this quick and fun card that I created for the SCCSC118 sketch challenge on Stampin' Connection.  This is one of those cards that looks really simple at the first glance, but really takes some serious thought to make. Take a look: 


  • Stamps: Friendly Phrases
  • Card stock: Midnight Muste, Whisper White
  • DSP: Patio Party, Comfort Cafe, Midnight Muse
  • Ink: Summer Starfruit
  • Accessories: Apothecary Accents Framelits, Lables Framelits, Dimensionals, Gold Brads, Paper Piercer, Stampin' Pierce Mat, Paper Snips


I started off with a piece of Midnight Muse card stock cut at 5-1/2" x 8-1/2" and scored at 4-1/4". Then I cut four pieces of DSP. The hearts pattern is from Patio Party and was cut at 2-3/4" x 3-1/2". The Soft Suede pattern was from Comfort Cafe and was cut at 2" x 1-1/2". The Summer Starfruit pattern was from Patio Party and was cut at 1-1/2" x 3-1/2". Finally the Midnight Muse pattern was from the In Color DSP Stack and was cut at 2" x 2-3/4". I adhered all the DSP pieces onto the card front. 

After the hard work of getting the DSP patterns cut the right size and adhered in place it was time to work on the greeting label! I stamped the greeting from Friendly Phrases onto a scrap of Whisper White card stock in Summer Starfruit ink and cut it out with the die from the Apothecary Accents Framelits. Then I used the label (I think it was the third from smallest one) and cut a label from a scrap of Midnight Muse card stock. I cut the Midnight Muse label in half and adhered the two pieces behind the left side of the Whisper White label. Then I used my Paper Piercer and Stampin' Pierce Mat to poke three holes in the left side of the greeting label. I added three gold brads and then adhered the label layer onto the card front with Stampin' Dimensionals. 


I made sure to adhere the label so the right side of the Whisper White label extended past the card edge. Then I simply used my Paper Snips to trim off the label even with the card edge. Super Simple! Well, after the DSP was cut and adhered it was super simple!

Thanks for stopping by!


Craft Project Central!

Summer Smooches Necklace and Earring Gift Set: 


Here’s a fun necklace and earring set you can make for your BFF using some of the crafting accessories you probably already have in your craft room as well as a few items from your local craft or home improvement store!  Package it up in the matching gift box and you’re set!  This is a fun, quick, and easy project, so you’ll probably want to make several sets!


This wonderful project was designed by Debbie! If you have a chance please head on over to Craft Project Central and leave Debbie a comment on her project! 

If you would like to subscribe to the June edition of Craft Project Central and get 10 fantastic tutorials for just $10.00 then click HERE

Thanks for stopping by!


Monday, June 18, 2012

Craft Project Central!

House Gift Box and Card: 
This house gift box and card are the perfect way to welcome a new neighbor to the neighborhood!  Or give a small gift to a friend or family member who is moving into a new home.  The inside of the box measures 4" x 4" and is ideal for holding a small gift or treat!


This adorable gift box and card was designed by Tara! If you have a chance please head on over to Craft Project Central and leave Tara a comment on her project! 


If you would like to subscribe to the June edition of Craft Project Central and get 10 fabulous tutorials for just $10.00 then click HERE


Thanks for stopping by! 


Friday, June 15, 2012

Wish Big Friday Mashup 63

Are you ready for another Friday Mashup challenge? I'm having a great time on the design team! Here is my bright and colorful card for this week! 


So here is the "Mashup" Challenge :
  1. Make a project using the " Paper Piecing " technique.
  2. Or Make a project using " Rich Razzleberry, Daffodil Delight & Pool Party ".
  3. Or "Mash it Up" and create a " Paper Piecing Project using the above colors."


Here is what I used:

  • Stamps: Quint-Essential Flower, Word Play
  • Card Stock: Daffodil Delight, Pool Party, Rich Razzleberry, Whisper White
  • DSP: Pool Party
  • Ink: Rich Razzleberry, Pool Party, Daffodil Delight
  • Accessories: 2-3/8" Scalloped Circle punch, 1-3/4" Scallop Circle punch, 1" Circle punch, 1/2" Circle punch, Stampin' Dimensionals, Rhinestones, Chevron embossing folder


This card was a lot of fun. First I would like to mention that the layered flower is only ONE stamp! Quint-Essential Flower coordinates with ALL of the following punches: 2-3/8" Scallop Circle punch, 1-3/4" Scallop Circle punch, 1" Circle punch, 3/4" Circle punch, and the 1/2" Circle punch. All in one stamp! Awesome right?

I started off this card by cutting a piece of Daffodil Delight card stock 5-1/2" x 8-1/2" and scored it at 4-1/4". Next I cut a piece of Whisper White card stock 4" x 5-1/4". Then I cut a piece of Pool Party striped DSP 2-1/4" x 4" and adhered it onto the left side of the Whisper White card stock. I stamped the greeting from Word Play on the right side of the Whisper White card stock in Rich Razzleberry ink and then ran the right side of the Whisper White card stock through the Big Shot in the new Chevron embossing folder. Then I adhered the Whisper White card stock layer onto the card front.


Now for that big flower! I stamped the Quint-Essential Flower image onto scraps of Rich Razzleberry, Pool Party, and Daffodil Delight card stock in the matching ink color. Then I punched out the Rich Razzleberry flower with the 2-3/8" Scalloped Circle punch, the Pool Party flower with the 1-3/4" Scallop Circle punch, the Daffodil Delight portion with the 1" Circle punch, and finally another Rich Razzleberry flower with the 1/2" Circle punch. I adhered each layer together with Stampin' Dimensionals and used more Dimensionals to adhere the flower onto the card front.


I just had to add a little bit of sparkle so I added a small Rhinestone in the flower center and in the star of the Wish Big greeting.

I hope you get a chance to head on over to the Friday Mashup to see what the rest of the Design Team has created for you and to play along with the challenge!

Thanks for stopping by!


Thursday, June 14, 2012

Box in a Bag Tutorial

Hello everyone! Today I have a fun tutorial to share with you! I'm frequently needing quick and simple gift bags or boxes for birthdays and such. This pretty Box in a Bag is so fast and easy to put together you'll have your gift wrapped up all pretty and ready to go in a flash! So lets get started! 


For this tutorial you will need: Paper Trimmer, Card Stock, Designer Series Paper (DSP), Scallop Edge Border Punch, Decorative Label Punch, 3/8" Circle Punch (Punch Pack), Paper Snips, Sticky Strip, Simply Scored (or other scoring tool), and ribbon. 

1. Start off by cutting a piece of card stock (Midnight Muse used here) 4-1/2" x 4-1/2".


2. Score your card stock at 1" on all four sides. 


3. Use Paper Snips to trim as shown below. Fold on all of the score lines.


4. Apply Sticky Strip in the locations shown with the red lines in the picture below. 


5. Remove the Sticky Strip liner on one tab, fold it in, and adhere the tab onto the inside of the larger middle tab. You have formed one corner of your box. Repeat on the remaining three tabs to form your box.


6. Cut a piece of DSP (Summer Smooches used here) 5-1/2" x 11". Apply Sticky Strip all along one 11" side and along one 5-1/2" side. Remove the Sticky Strip liner from the 11" side of the DSP and starting with the 5-1/2" side that does NOT have Sticky Strip adhere the DSP onto the sides of the box. Make sure to start the 5-1/2" side of the DSP close to the middle of the box side. You don't want your DSP seam to end up on the corner because it will make it more difficult to adhere the 5-1/2" side down.


7. Wrap the DSP all the way around the box bottom adhering the Sticky Strip in place as you go.


8. Remove the Sticky Strip liner from the 5-1/2" side of the DSP and adhere the end of the DSP in place.


9. Cut a piece of card stock 1" x 11" and punch one of the 11" sides with the Scallop Edge Border Punch.


10. Apply about 1" long pieces of Sticky Strip in 3-4 places along the scalloped card stock. Remove the Sticky Strip liner from the scalloped edge card stock and adhere it around the bag bottom just like you did with the DSP.


11. Now for the tabs at the top to hold the bag closed. Use the Decorative Label Punch on a scrap of card stock. Fold the labels in half. I chose to use Paper Snips to cut off the little points at the top of my folded Decorative Label.


12. Use the 3/8" Circle Punch from the Punch Pack and punch a hole in the folded label.


13. Use more Sticky Strip to adhere the labels onto the front and back side of the bag. I actually ran out of Sticky Strip at this point so I used Tombow Multi-Purpose Adhesive instead. It works great too!


 14. Now simply add some ribbon (Daffodil Delight Stitched Grosgrain Ribbon used here) through the holes in the tabs, tie it into a bow, and decorate  your bag to your heart's content!  I chose to leave mine pretty simple and let the DSP to the decorating for me.


I hope you get a chance to make one of these fun little bags. They would actually hold a decent sized gift. These would make great party favor bags too! 

Thanks for stopping by! 


Craft Project Central!

Floral District Card, Envelopes and Purse Holder:

Need a quick gift for a friend or a teacher gift for the end of the school year?  Look no further!  This sweet little Flora District mini purse will bring a smile to the recipient!  Open it up and you have a set of four 3" x 3" note cards and cute matching envelopes created using Floral District Designer Series Paper!   This project is also a great class project!


This wonderful project was created by Rosemarie! If you have a chance please stop by Craft Project Central and leave Heidi a comment on her project!

If you would like to subscribe to the June edition of Craft Project Central and get 10 fabulous tutorials for just $10.00 then click HERE!

Thanks for stopping by!


Tuesday, June 12, 2012

Simple Primrose Petals

Hello everyone! I've been busy, busy, busy in my craft room playing with lots of new toys! Here is another card that uses some of these fabulous new products. This card was created for the SCCSC119 sketch challenge on Stampin' Connection. Take a look: 


  • Stamps: Flowering Flourishes, Friendly Phrases, Papillion Potpourri
  • Card Stock: Primrose Petals, Raspberry Ripple, Whisper White
  • Ink: Primrose Petals, Raspberry Ripple
  • Accessories: Mini Glue Dots, Elegant Butterfly Punch, Essentials Paper Piercing Pack, Paper Piercing Tool, Curly Label Punch, Stampin' Pierce Mat, Stampin' Dimensionals. 


Here is the sketch that was created by Susie Nelson:


This card was super simple and fast to put together. I started off by cutting a piece of Primrose Petals card stock 5-1/2" x 8-1/2" and scored it at 4-1/4". Then I placed the card front on top of my Stampin' Pierce Mat and used the curly label template from the Essentials Paper Piercing Pack and pierced the large curly label shape.

Then I inked up the image from Flowering Flourishes with Raspberry Ripple ink and stamped the flower four times around the pierced curly label shape. Next I stamped the greeting from Friendly Phrases onto a scrap of Whisper White card stock in Primrose Petals ink. I punched out the greeting with the Curly Label Punch then used the piercing template again to pierce the shape inside the curly label. I adhered the curly label onto the card front with Stampin' Dimensionals.

Just to add some sparkle I applied Dazzling Details onto the blossoms and the leaves of the stamped images.


The card needed just a little something more, so I stamped the butterfly image from Papillion Potpourri in Raspberry Ripple ink onto a scrap of Raspberry Ripple card stock. I punched out the stamped butterfly with the Elegant Butterfly punch and adhered the butterfly onto the card front with a Mini Glue Dot.

I just love how simple yet elegant this card is! What do you think?

Thanks for stopping by!