Showing posts with label Holiday Cards. Show all posts

Wednesday, January 20, 2016

You Send Me Soaring

When I saw this plane stamp set in the Sale-A-Bration catalog I just knew I absolutely HAD to get it! My husband is a private pilot and likes to fly a Cessna whenever he can. So this would be perfect for his Valentine's day card and future birthday cards!


  • Crumb Cake Cardstock 5-1/2" x 8-1/2", scored at 4-1/4"
  • Basic Black Cardstock 4" x 5-1/4"
  • Very Vanilla Cardstock 3-7/8" x 5-1/8"
  • Gold Glimmer Paper 1/4" x 3-7/8"
  • Stamps: Sky is the Limit, Gorgeous Grunge
  • Ink: Early Espresso, Tip Top Taupe, Soft Suede
  • Accessories: 15" Basic Black Stitiched Satin Ribbon, Stampin' Dimensionals, Stampin' Sponge, Crumb Cake Marker, 2-Way Glue Pen


For this lovely start off by stamping the plane and the greeting onto the Very Vanilla cardstock in Early Espresso ink. Stamp the smoke trail onto the cardstock in Tip Top Taupe ink. Stamp the large splatter image from Gorgeous Grunge onto the cardstock several times in Soft Suede ink. Then sponge around the edges of the cardstock with Soft Suede ink. Color in the fuselage of the plane with the Crumb Cake marker to make it stand out more.

Next use the 2-Way Glue Pen to adhere the strip of Gold Glimmer Paper onto the left side of the panel. Use glue stick to adhere this piece down onto the Basic Black cardstock. Wrap the Basic Black Stitched Satin ribbon around the top of the panel and tie it into a knot. Then stick this panel onto the card front with Stampin' Dimensionals.


For the inside of the card I just quickly stamped the plane image in Early Espresso ink and colored in the fuselage of the plane with a Crumb Cake marker.

This is a super fast and easy yet oh so pretty card that is perfect for a guy. 

Tuesday, January 19, 2016

You Are Loved

Anytime I make Valentine's cards for a Make & Take class I always try to have a masculine version and a girly version. Well today I'm sharing the girly version. The masculine Valentine was posted last week but you can see it again by clicking HERE.


  • Basic Black Cardstock 4-1/4" x 11", scored at 5-1/2"
  • Timeless Elegance Designer Series Ppaper 4" x 11"
  • Pink Pirouette Cardstock 2" x 4-1/4"
  • Very Vanilla Cardstock 1-3/4" x 4-1/4"
  • Very Vanilla Cardstock 4" x 5-1/4"
  • Stamps: Grateful Bunch
  • Ink: Jet Black Stazon, Pink Pirouette
  • Accessories: 12" Silver Baker's Twine, Sweetheart Punch, Blushing Bride Glimmer Paper, Stampin' Dimensionals, Banner Triple Punch, Tea Lace Paper Doilies


For this card start off by folding the Basic Black cardstock on the score line and using glue stick to adhere the Timeless Elegance designer series paper onto the card front. Use Paper Snips to cut a Tea Lace Paper Doily in half and glue it onto the left side of the card front about half way up the card.


Use glue stick to adhere the strip of Very Vanilla cardstock onto the Pink Pirouette cardstock. Stamp the greeting from Grateful Bunch onto the center of the banner in Jet Black Stazon ink. Use the Banner Triple punch to punch the right end of the banner.

Wrap the silver twine around the straight end of the banner and tie it into a bow. Tip: when tying bows in twine first tie a double knot, then tie the bow. This will make it easier to keep the twine tight around the cardstock and still have a pretty bow!

Adhere the banner onto the card front with Stampin' Dimensionals. Use the Sweetheart punch on a piece of Blushing Bride Glimmer Paper and adhere the heart onto the banner with a Stampin' Dimensional.

Stamp the lace trim along both short sides of the large piece of Very Vanilla cardstock in Pink Pirouette ink. Use glue stick to adhere the panel inside the card.

Now you have a pretty and girly Valentine's Day card to share with someone special!


Wednesday, August 6, 2014

A Vivid Vases Mother's Day

Today I have the other Mother's Day card I made. This one I made for my mother-in-law who happens to love pink. 


  • Stamps: Vivid Vases, Petite Petals,  Positively Chevron
  • Strawberry Slush card stock 5-1/2" x 8-1/2", scored at 4-1/4"
  • Whisper White card stock 3-1/4" x 3"
  • Basic Black card stock 3-1/2" x 3-1/4"
  • Pink Pirouette Taffeta Ribbon 21"
  • Ink: Stazon, Strawberry Slush
  • Markers: Pool Party, Wisteria Wonder, Daffodil Delight, Blender Pen
  • Accessories: Rhinestone Basic Jewels, Petite Petals Punch, Stampin' Dimensionals, Pink Pirouette Taffeta Ribbon


I started off by folding the Strawberry Slush card stock on the score line and stamping the card front with the Positively Chevron background stamp in Strawberry Slush ink. Then I took the Pink Pirouette ribbon and wrapped it around the card front and tied it into a bow. 


Next I stamped the Vivid Vases image onto the Whisper White card stock in Stazon ink. I used the markers to color in the flowers. For the vases I squeezed the center of the closed Strawberry Slush ink pad, then opened it up  half-way, and used a Blender Pen to pick up some of the color to apply to the vases starting from the bottom and working my way up. That gives the vases the lovely ombre look. This layer was glued onto the Basic Black card stock and then this panel was stuck onto the card front with a few Stampin' Dimensionals. 


I wanted to add just a little more to this card so I stamped a flower from Petite Petals onto a scrap of Pink Pirouette card stock in Strawberry Slush ink. I punched out the stamped flower as well as an additional flower from Strawberry Slush card stock with the Petitie Petals punch. I glued the flowers together with some 2-Way Glue Pen then stuck it onto the card front with a Stampin' Dimensional. Finally, to add a little sparkle, I added a Rhinestone into the center of the flower.

That's it! What do you think? 

Monday, August 4, 2014

A Grateful Mother's Day

I know, Mother's Day was several months ago, but I figured it was still worth sharing the cards I made. This one I made for my mom with the new fabulous Hello Honey card stock.


  • Stamps: So Very Grateful
  • Hello Honey card stock 5-1/2" x 8-1/2", scored at 4-1/4"
  • Daffodil Delight card stock 1-3/4" x 4-1/4"
  • Whisper White card stock scrap
  • Moonlight DSP 1-1/2" x 4-1/4"
  • Whisper White card stock 4" x 5-1/4"
  • Ink: Versamark, Primrose Petals, Hello Honey
  • Markers: Daffodil Delight, Crushed Curry, Soft Sky, Pool Party, Coastal Cabana, Pink Pirouette, Pretty in Pink, Strawberry Slush, Pear Pizzaz, Old Olive, Blender Pen
  • Accessories: Bitty Banners Framelits, Deco Labels Framelits, Paper-Piercing Tool, Stampin' Pierce Mat, Embossing Buddy, Gold embossing powder, Heat Tool, Stampin' Dimensionals, Rhinestones, Paper Lace Doilies

I started off by folding the Hello Honey card stock on the score line. Then I glued down the paper doily onto the left side of the card stock with some glue stick. I glued the Moonlight DSP onto the Daffodil Delight card stock and then stuck that onto the card front with some glue stick.

Now onto the flower panel. I cut a scrap of Whisper White card stock with the 3rd from smallest Deco Labels Framelit. I stamped the flower image from So Very Grateful onto the card stock in Versamark ink. Then I covered the stamped image with gold embossing powder, tapped off the excess, and heated it with my Heat Tool. I colored the flowers in and then used my Paper Piercing Tool and Stampin' Pierce Mat to add the pierced holes around the edge of the label. I stuck this panel onto the card front with a few Stampin' Dimensionals.


Next I stamped the greeting banner onto a scrap of Whisper White card stock in Primrose Petals ink then cut it out with the Bitty Banners Framelit. I added a couple small Rhinestones on each end of the banner and stuck the banner onto the card front with a couple Stampin' Dimensionals.


For the inside I took the 4" x 5-1/4" piece of Whisper White card stock and stamped the flower image in the corner using Hello Honey ink and glued it inside the card with some glue stick.

A simple, yet pretty Mother's Day card. 

Thursday, June 5, 2014

Simple Father's Day Card and Gift

I'm back with another Father's Day card! Back on Tuesday I posted this grungy Father's Day card. Now I'm onto a more simple, clean lined one. It's been a while since I've used Lovely as a Tree so I decided to pull it out for my second Father's Day card.


Here is what you'll need: 
  • Smoky Slate card stock 4-1/4" x 11", scored at 5-1/2"
  • Basic Gray card stock 3-7/8" x 5-1/8"
  • Moonlight DSP 3-3/4" x 5"
  • Lost Lagoon card stock 2-3/4" x 4-1/4"
  • Whisper White card stock 2-1/2" x 4"
  • Stamps: Lovely as a Tree, Teeny Tiny Wishes
  • Ink: Old Olive, Soft Sky, Mossy Meadow, Hello Honey
  • Accessories: Stampin' Dimensionals, Linen Thread


I folded the Smoky Slate card stock on the score line as usual. Then I glued the DSP onto the Basic Gray card stock with some glue stick. Then glued that layer onto the card front with more glue stick. Simple right? 

Now for the fun part. Take your Soft Sky ink pad and use it directly on the Whisper White card stock and swipe it down from the top towards the center with a light touch. The new foam ink pads really grip the card stock so you don't want to press down very hard at all. 

Now take your Old Olive ink pad and swipe across the bottom to create some grassy hills. Stamp the pine tree from Lovely as a Tree onto the card stock in Mossy Meadow ink. Then stamp the greeting from Teeny Tiny Wishes in the upper right hand corner in Hello Honey ink. 


I glued the lovely stamped panel onto the Lost Lagoon card stock with some glue stick then wrapped some Linen Thread around the panel and tied it into a knot. As an afterthought I grabbed my 0.005 doodling pen (I think it's a Prismacolor) and added black faux stitching around the Lost Lagoon panel. Then I just stuck this lovely layer onto the card front with a few Stampin' Dimensionals. I really love the look of the little scene against the ultra modern pattern. 


Now for a super simple gift. This is kind of a gag gift and it's safe to post since I know my dad doesn't read here. Dad is always saying he will do something when he gets around to it. So to be funny I made him a round to it. It's just a washer from the hardware store stamped with some metal letter punches. If you're new to using a metal letter punch like I am, don't be afraid to really whack it hard with the hammer. I had to get pretty rough with it to get a good impression on each of the letters.


After I had all my letters stamped I took some Black Tuxedo DecoArt Multisurface Satin paint just on my finger and rubbed it into the stamped letters. Then I just let it sit for the time it took for me to grab a paper towel and wipe the paint of my finger and wiped the washer down with a mostly dry paper towel to remove the excess paint. The paint will stay in the grooves of the letters making them easier to see. After letting the paint dry for about 10 minutes I just quickly sprayed it with a layer of a clear sealer. Super simple.

So now you know how to make a round to it. I'm not sure it will have any effect on things actually getting done though...

If it works I might have to make a few for my husband...

Tuesday, June 3, 2014

Grungy Father's Day

Since Father's Day is right around the corner I thought it would be a good idea to go ahead and make my cards and get them out of the way rather than my usual procrastination until the last minute and post about it weeks after the holiday. I pulled out some new goodies for this one.


Here is what you need:

  • Hello Honey card stock 5-1/2" x 8-1/2", scored at 4-1/4"
  • Moonlight DSP 4" x 5-1/4"
  • Lost Lagoon 5/8" x 5-1/2"
  • Whisper White 1/4" x 5-1/2"
  • Basic Gray 1/4" x 4-1/4"
  • Basic Gray 1/4" x 4"
  • Stamps: Gorgeous Grunge, Teeny Tiny Wishes
  • Ink: Lost Lagoon, Mossy Meadow, Hello Honey
  • Accessories: Chevron Border Punch, Silver Glimmer Paper, 2-Way Glue Pen, Stampin' Dimensionals


I started off by folding the gorgeous Hello Honey card stock on the score line. Then I stamped the splatter images from Gorgeous Grunge onto the DSP in Lost Lagoon, Mossy Meadow, and Hello Honey ink. This piece was glued onto the card front with some glue stick and the two narrow strips of Basic Gray card stock were glued onto the left side of the card with 2-Way Glue Pen. These were actually scraps that were left over from some other project.


I used the Chevron Border Punch on a piece of Silver Glimmer Paper and glued just the chevrons onto the card front with 2-Way Glue Pen.

For the greeting I grabbed a scrap of Whisper White card stock that happened to be 1/4" x 5-1/2" and stamped the greeting from Teeny Tiny Wishes onto the strip in Hello Honey. Somehow I managed to actually get the greeting stamped straight onto this tiny strip on the first try. I'm still trying to figure out how that happened.


Anyway, that was glued down onto the 5/8" x 5-1/2" strip of Lost Lagoon card stock and then it was stuck onto the card front with a few Stampin' Dimensionals.

It's not my most favorite card of all time. I was going for the over the top grungy/layered look which is a style I struggle with. But oh well. It will still work. One Father's Day card down! One more to go!

Are you ready for Father's Day or do you procrastinate like I typically do? 

Tuesday, May 20, 2014

Happy Easter Card

Today I have a simple Easter card to share with you. This is the first of the projects that the ladies made at the April Make and Take. Simple, quick, and oh so cute. Although I've used this as an Easter card you could easily change up the greeting to use it for just about anything. 


  • Soft Sky card stock 5-1/2" x 8-1/2", scored at 4-1/4"
  • Wisteria Wonder card stock 4" x 4"
  • Afternoon Picnic DSP 3-1/4" x 3-1/4"
  • Stamps: Mixed Bunch, Delightful Dozen
  • Ink: Wisteria Wonder, Daffodil Delight
  • Accessories: Window Frames Framelits, Blossom Punch, 3/4" Circle Punch, Large Oval Punch, crimper, Pearls, Lace Doilies


To make this lovely start off by folding the Soft Sky card stock on the score line. Now use some glue stick to glue down the Lace Doily onto the card front near the bottom. I just put glue stick in the center of the doily. Stamp the greeting from Delightful Dozen in the bottom right corner in Wisteria Wonder ink. Then add three of the smallest pearls right under the greeting.


Now take the Wisteria Wonder card stock and use the 3rd from smallest Window Frames Framelit in the Big Shot to cut out the shape. Use the 2nd from smallest Window Frames Framelit to cut out the Afternoon Picnic DSP. Now glue these together with glue stick. Glue the layered labels onto the card front with a few Stampin' Dimensionals.


Next stamp the flower image from Mixed Bunch onto a scrap of Whisper White card stock in Wisteria Wonder ink. Punch out the flower with the Blossom Punch. Stamp the flower center onto a scrap of Whisper White card stock in Daffodil Delight ink. Use the 3/4" Circle Punch to punch that image out. Stick the flower center onto the flower with a Stampin' Dimensional then add one of the large Pearls into the center.


For your leaves use the Large Oval Punch twice on a scrap of Old Olive card stock. Fold the ovals in half length-wise then run them through a paper crimper at an angle. Unfold them and you have your leaves! Just glue the ends of the leaves together with some Glue Stick then glue the leaves onto the backside of the flower with a Stampin' Dimensional. Use another Stampin' Dimensional to stick the flower onto the card front in the center of the labels. 

Saturday, April 5, 2014

Love Banner

Here is a fun card I made a while back.. like before Valentine's Day. What can I say... I'm still getting caught up on posts. I just had an idea to create a heart banner and went with it! 


  • Crumb Cake card stock 5-1/2" x 8-1/2", scored at 4-1/4"
  • Sweet Sorbet DSP, Strawberry Slush DSP, Pool Party card stock, Whisper White card stock
  • Stamps: Hardwood
  • Ink: Baked Brown Sugar, Versamark
  • Accessories: Expressions Thinlits, Heat and Stick Powder, Dazzling Diamonds glitter, Heat Tool, 2-Way Glue Pen, Trio Heart Punch (retired a long time ago), Small Heart Punch, Full Heart Punch, Whisper White Baker's Twine, Glimmer Brads, Paper Piercing Tool


So I started off by folding the Crumb Cake card stock on the score line and stamping the fabulous Hardwood background image onto the card front with Baked Brown Sugar ink. Next I took a length of Whisper White Baker's Twine and tied a bow onto each end. I stuck this down at the top of the card front with a couple glue dots. I took the tip of my Paper Snips to fold the glue dots in half before putting them on the card so I wouldn't have a huge spot of exposed glue dot behind the cute bow. 

Next I used the Trio Heart Punch, which retired a long time ago but it's so cute I've hung onto it, to punch a bunch of hearts in DSP and Whisper White scraps. I also used the Small Heart Punch a couple times on Pool Party card stock and DSP. All the hearts were stuck onto the banner and card with some 2-Way Glue Pen. 


I punched a large heart with the Full Heart Punch from some Sweet Sorbet DSP and glued it down in the bottom right corner of the card. Next I cut the greeting from Crisp Cantaloupe card stock with the Expressions Thinlit die. I wanted my "love" to sparkle so I tapped the Versamark pad over the entire word, covered it with Heat & Stick Powder, heated it up with my Heat Tool, then dumped Dazzling Diamonds glitter onto it and heated it up just little more to set the glitter in the adhesive. Then I stuck the greeting onto the card front with more 2-Way Glue Pen.


I decided it needed something more so I used my Paper Piercing Tool to poke a couple holes above the bows of the banner and added a Glimmer Brad into each hole. So now it looks like I have two glimmery "nails" holding the banner up.

So cute and fun! 


Wednesday, March 19, 2014

I (heart) You

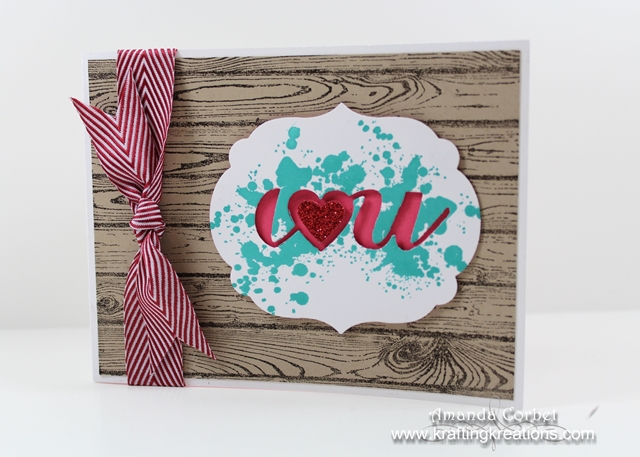
I have another project from the February Make and Take to share with you today! Yay! When I started working on this one I was trying to come up with a masculine Valentine's card. But as I was working on it I just wanted that bright pop of the Strawberry Slush behind the die cut I heart u. So this ended up being what I would consider a girly Valentine. 

Label Card Thinlits, Hardwood, Gorgeous Grunge

  • Whisper White card stock 4-1/4” x 11”, scored at 5-1/2"
  • Crumb Cake card stock 4” x 5-1/2”
  • Whisper White card stock 3-1/2” x 4”
  • Strawberry Slush card stock 3-1/2” x 4”
  • Strawberry Slush card stock 4” x 5-1/4”
  • 17” Cherry Cobbler Chevron Ribbon
  • Stamps: Hardwood, Gorgeous Grunge
  • Ink: Early Espresso, Strawberry Slush, Bermuda Bay
  • Accessories: Labels Framelits, Label Card Thinlits, Stampin’ Dimensionals, 2-Way Glue Pen, Small Heart Punch, Red Glimmer Paper, Paper Snips
This one isn't very difficult, but there are several steps so just hang in there with me okay? I folded the Whisper White card stock on the score line. Then I stamped the oh so fabulous Hardwood background stamp onto the Crumb Cake card stock in Early Espresso ink. I glued this onto the card front with some glue stick.

Next I took the piece of Whisper White card stock and stamped the splotch image from Gorgeous Grunge twice close to each other in Bermuda Bay ink. I took this over to the Big Shot and used the I heart u thinlit from the Label Card Thinlits to cut the greeting into those grungy splotches. I followed that up by cutting out the greeting with the 3rd from smallest Labels Framelit.

You really want to die cut the greeting first. That way if the die moves or slips or something you can still have it centered in your label shape when it's done. Now take the small piece of Strawberry Slush card stock and use the same 3rd from smallest Labels Framelit on that piece. Glue the Strawberry Slush label onto the card front with some glue stick. Then stick the grungy greeting label on top of the Strawberry Slush label with a few Stampin' Dimensionals.

Label Card Thinlits, Hardwood, Gorgeous Grunge

Next take your Small Heart Punch and use it on some Red Glimmer Paper. Then take your glimmery heart and stick it inside the greeting heart with half a Stampin' Dimensional. Just wrap the Cherry Cobbler chevron ribbon around the card front and tie it into a knot and your card front is finished! 

Now onto the inside...
Take the larger piece of Strawberry Slush card stock and stamp the lines image from Gorgeous Grunge several times across the top of the card stock in Strawberry Slush ink then stick this piece inside the card with some glue stick. We're not wasteful here so glue the cut out greeting from the label you made for the front onto the card stock with some 2-Way Glue Pen. Now just punch another small glimmery heart and glue it inside the larger heart with some more 2-Way Glue Pen.

Label Card Thinlits, Hardwood, Gorgeous Grunge

Now you have a bright, fun, cheerful Valentine for someone who loves pink and turquoise. In other news... I've been super busy crafting away lately and I'm super excited to show you what I've been doing. 


Friday, March 14, 2014

Love You Manly Valentine

Today I want to share with you one of the Valentine's cards that my guests made at the February Make and Take. I usually try to have both a girly valentine and a manly valentine. The girly ones are easy to come up with, but a manly valentine??? Those are quite a bit harder to design. 

When you're creating things for Valentine's Day you just want to reach for those pinks and reds. Especially with all the fun things you see on Pinterest around that time. So it's much harder to stay away from those girly colors and not come up with something that isn't five different shades of pink with lace and pearls and bling and over the top girly. 

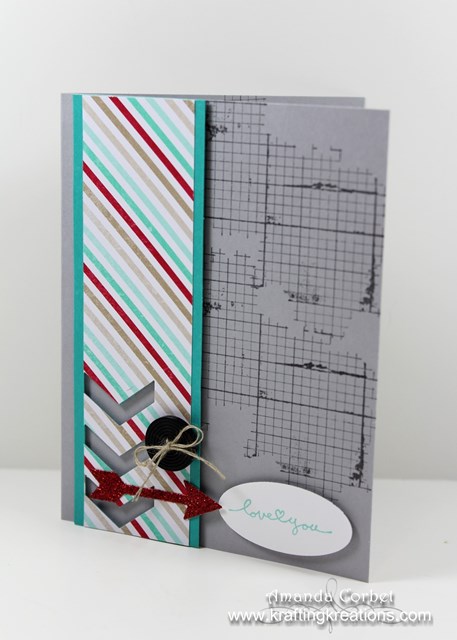
So this is what I came up with and I'm pretty darn pleased with it! Although I think it took me an hour to design just this card! I kept hemming and hawing about how to place that stripey DSP and what stamp to use to fill up all that gray space on the right and where to add what greeting all while trying to keep the red to a reasonable amount.


  • Smoky Slate card stock 5-1/2" x 8-1/2", scored at 4-1/4". 
  • Coastal Cabana card stock 1-3/4" x 5-1/2"
  • Fresh Prints DSP 1-1/2" x 5-1/2"
  • Stamps: Best of Love, Off the Grid
  • Ink: Coastal Cabana, Basic Gray
  • Accessories: Chevron Border Punch, Large Oval Punch, Red Glimmer Paper, Label Card Thinlits, Neutrals Buttons, Linen Thread, Stampin' Dimensionals, 2-Way Glue Pen

First off fold the Smoky Slate card stock on the score line and stamp the Off the Grid image onto the card front twice in Basic Gray ink. Next up glue the strip of Fresh Prints DSP onto the strip of Coastal Cabana card stock. Use the Chevron Border Punch just on one end to punch those three lovely chevrons at the bottom of the strip. It takes a little more oomph to punch through the DSP and the card stock, but it's totally doable. Then stick this layer onto the left side of the card front with a few Stampin' Dimensionals. 


Next up stamp the greeting from Best of Love onto a scrap of Whisper White card stock in your Coastal Cabana ink then punch out the greeting with the Large Oval Punch. Stick the greeting onto the card front with a couple more Stampin' Dimensionals.


To get the glimmery red arrow use the arrow die from the Label Card Thinlits pack with a scrap of Red Glimmer Paper in the Big Shot. Glue this onto the DSP with a little 2-Way Glue Pen. To finish it off take some linen thread and run it through a nice big Basic Black button from the Neutrals button pack and tie the twine into a bow (easier said than done). Then stick the button onto the card front with another Stampin' Dimensional. This card really has a lot of dimension with all those dimensionals!


Now open up the card and stamp the Off the Grid image again in Basic Gray ink. Then take the chevrons that you punched out earlier and glue them inside the card with some more 2-Way Glue Pen. No wasting chevrons on this card! 

That's it! A cute and fun, yet still manly, Valentine's card! Or anniversary... or anytime you want to say "I love you".  


Monday, January 6, 2014

Happy Birthday or Halloween

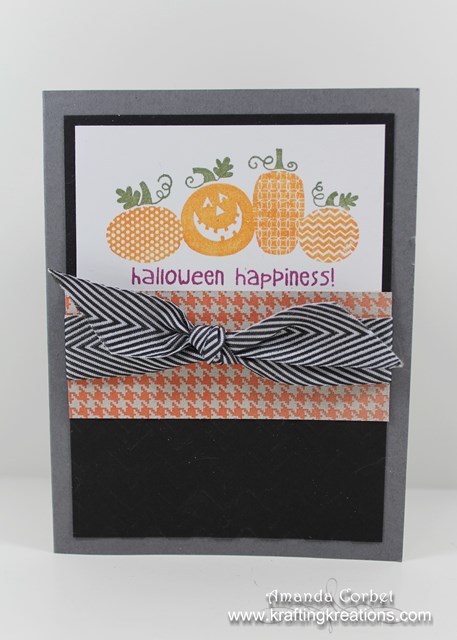
There are a lot of people that don't really send Halloween cards including me. But I wanted to have a Halloween option at the October Make and Take last year. So I created a card that could either be a Halloween card or a masculine birthday card depending on which stamp sets were used. That way my guests could decide for themselves which they would like to make. 


  • Basic Gray card stock 5-1/2" x 8-1/2"
  • Basic Black card stock
  • Whisper White card stock
  • Sweater Weather DSP
  • Basic Black Chevron ribbon
  • Whisper White
  • Basic Black
  • Stamps: Best of Halloween, Halloween Happiness, Perfectly Penned, Best of Birthdays
  • Markers: Marina Mist, Pumpkin Pie, Rich Razzleberry, Old Olive
  • Ink: Midnight Muse, Black Stazon, Pumpkin Pie
  • Accessories: Basic Black chevron ribbon, Paper Snips, Chevron embossing folder

Both cards had the exact same cut dimensions and just used different stamp sets. You have to be a bit creative the with the card design to make sure that it will work for both options, but it's an easy way to let my guests chose what they would like to make. 

For the Birthday option the greeting from Perfectly Penned was stamped onto the small piece of Whisper White card stock in Night of Navy ink. I glued this layer down onto the top of the big piece of Basic Black card stock. Then I ran this piece through the Big Show with just the bottom of the Basic Black card stock inside the Chevron embossing folder. Then just glue on the DSP, wrap the ribbon around the card stock, tie it into a knot, and stick this layer onto the card front with a few Stampin' Dimensionals.

On the inside I simply stamped the present and "celebrate" from Best of Birthdays onto the top of the large piece of Whisper White card stock in Black Stazon ink and colored in the images with Marina Mist and Pumpkin Pie markers. I stuck this down into the card with Glue Stick. The strip of Basic Black card stock was glued down with 2-Way Glue Pen just under the stamped images to add a little more interest to the inside of the card.

For the Halloween card I just colored in the Halloween Happiness stamp with Old Olive, Pumpkin Pie, and Rich Razzleberry markers, breathed on the stamp to re-moisten the ink, and stamped it onto the card stock. Then for the inside piece I stamped the haunted house and "Trick or Treat" from Best of Halloween in Black Stazon and Pumpkin Pie ink. 

A fun and simple card with two very different occasions! 


Friday, October 18, 2013

Trick or Treat!

So I'm finally getting around to posting my project for last week's Friday Mashup. I've been busy cleaning and creating and haven't spent as much time scheduling blog posts. Oops!  With so many things on my "to do list" my posts are going to be rather sporadic for a while. 


  • Stamps: Best of Halloween
  • DSP: Witches' Brew DSP
  • Card Stock: Basic Gray, Basic Black, Pumpkin Pie, Smoky Slate
  • Ink: Black Stazon, Basic Black, Versamark
  • Accessories: Ovals Framelits, Heat & Stick Powder, Stampin' Dimensionals, Black and Orange Glitter, Rhinestones, black permanent marker, Stampin' Sponge, Paper Snips, 2-Way Glue Pen


Here's your Mashup Challenge:
  1. Create a project using "the Sketch."
  2. Create a "Spooky" project.
  3. Or Mash it Up and create a "Spooky project using the above sketch. "

I really don't use Halloween cards or projects that much, but for some reason they are just so much fun to create! I guess it's a great excuse to go over the top with details and embellishments. This card is no different, although it was pretty easy to create. 

I started off with a 5-1/2" x 8-1/2" piece of Basic Gray card stock and scored it at 4-1/4". Next I cut a piece of the Witch's Brew DSP with the bats 2-3/4" x 5-1/2" and adhered it onto a 2-7/8" x 5-1/2" piece of Basic Black card stock before adhering it down onto the card front. Next I took two scraps of DSP that were 1" and 3/4" wide. The striped piece was about 4-1/4" long and the spider piece was about 3-5/8" long. I used Paper Snips to add the dove-tail shape to one end and adhered this onto the card front with Glue Stick. 


I stamped the tree and owl image from Best of Halloween onto a scrap of Smoky Slate card stock in Jet Black Stazon ink. Then I took my Basic Black ink pad and swiped it directly across the card stock to create the ground. I used a Stampin' Sponge to sponge on a little more black near the ground to make it look like there was fog covering the ground. I cut this image out with the 2nd from smallest from smallest Oval framelit. 

Next I took a scrap of Pumpkin Pie card stock and used the smallest and 2nd from smallest Oval framelits to make an oval frame. I covered the frame with Versamark ink, poured on some Heat and Stick powder, tapped off the excess, heated it with my heat tool, poured on some Orange glitter, tapped off the excess, and heated it quickly with my heat tool again to set the glitter. After all that was done I adhered the frame onto the tree oval with 2-Way Glue Pen. I adhered this onto the card front with a couple Stampin' Dimensionals. 


I added the Trick or Treat onto the bottom left corner of the card front by stamping in Versamark and using Heat and Stick powder just like I did for the oval frame, except this time I used the Black glitter. For the Rhinestones I just colored them with a black permanent marker then added them onto either side of the greeting. 


Now that the front of the card was finished I needed to pretty up the inside! I cut a piece of Smoky Slate card stock 4" x 5-1/4". I rubbed my Basic Black ink pad across the edges intentionally trying to make it messy. Then I took two more scraps of DSP, cut them into banners and adhered all the layers together and to the inside of the card with glue stick. These banners are about 2" x 3-5/8" for the large one, and 1-3/8" x 3" for the smaller one. 

Now that I've finished this spooky Halloween card I just need to figure out who I am going to send it to!