Tuesday, April 30, 2013

Bloomin’ Marvelous!

I was wishing thoughts of Spring all through January. As a result, this is a fun springy card that my guests made at the February Make and Take using the Bloomin' Marvelous Sale-A-Bration stamp set. 


  • Stamps: Bloomin’ Marvelous
  • Card Stock: Raspberry Ripple, Old Olive, Whisper White, Baja Breeze
  • Ink: Baja Breeze, Primrose Petals, So Saffron, Black Stazon
  • Accessories: Primrose Petals Stitched Satin Ribbon, Bitty Butterfly Punch,  Rhinestones, Glue Dots


I started off by cutting a piece of Raspberry Ripple card stock 5-1/2” x 8-1/2” and scored it at 4-1/4”. Next I cut a piece of Whisper White card stock 3-1/2” x 4-3/4”. I stamped the blossom image in Primrose Petals, So Saffron, and Baja Breeze ink across the card stock in a wavy type pattern. I stamped the greeting onto the card stock in Black Stazon.


I adhered the stamped Whisper White card stock onto a 3-3/4” x 5” piece of Old Olive card stock. Then I wrapped the panel with a piece of Primrose Petals Stitched Satin ribbon and adhered the panel onto the card front. I stamped the butterfly image onto a scrap of Baja Breeze card stock in Baja Breeze ink then punched it out with the Bitty Butterfly punch. I adhered the butterfly onto the card front with a Glue Dot then added Rhinestones into the center of the butterfly.


Simple, cute, and fun! 


Monday, April 29, 2013

Craft Project Central!

Doc McStuffin's Gift Ensemble: 

Giving a birthday gift to a little one, or know of a little one who is feeling a under the weather?  Doc McStuffin’s is here to help!  This new TV show is all the rage with kids and who doesn’t love a little punch art?  Create these simple "Doc" inspired creations for your little cutie for party favors or as get well gifts!!


This adorable project comes to you designed by Niki!

If you would like to subscribe to the May edition of Craft Project Central and get 10 wonderful tutorials for only $10 then click HERE


Friday, April 26, 2013

Sunshine Flower Card Tutorial

Good morning! It’s Friday and that means it’s time for 
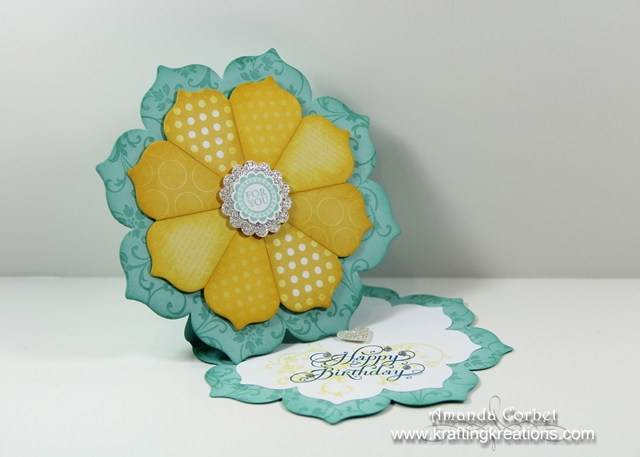
another Friday Mashup challenge! Take a look at the bright and cheery card I made with this week’s sunshine inspiration.


  • Stamps: Elements of Style, A Round Array, Beautiful Birthday
  • DSP: Polka Dot Parade, Daffodil Delight, Silver Glimmer Paper
  • Card Stock: Pool Party, Whisper White
  • Ink: Daffodil Delight, Pool Party, Island Indigo
  • Accessories: Floral Frames Framelits, Stampin’ Trimmer, Simply Scored, 1-1/4” Scalloped Circle Punch, 7/8” Scalloped Circle Punch, Stampin’ Dimensionals, Stampin’ Sponge, Multipurpose Liquid Adhesive, Small Heart Punch


Here's your Mashup Challenge:
  1. Create a project showcasing "Sunshine".
  2. Create an "Easel card" project.
  3. Or Mash it Up and create an "Easel Card project with some Sunshine".

This fun twisted easel card is actually pretty easy to make. So is the starburst flower. So here is the complete tutorial!

1. Cut one piece of Pool Party card stock 5-1/2” x 9-1/2”. With the 9-1/2” side against the top of your Simply Scored, score at 4-3/4”. Fold on the score line.

2. Take the largest Floral Frames Framelit and place it on the folded card stock. Make sure that the die extends past the card stock on the same side as the fold. Run this through your Big Shot.

3. Un-fold the flower shaped card that you now have. Place it onto your Simply Scored as shown. You want to score between the petals that are lined up with the black line on my Simply Scored. Fold on the score line.


4. Now you have your card base. The portion standing up is what you will adhere your card front onto.


5. Stamp the inside of the card (the non-scored side) with the image from Elements of Style in Pool Party ink. Sponge around the flower shape with Pool Party ink and a Stampin’ Sponge.


6. Cut one piece of Whisper White card stock 4-1/2” x 4-1/2”. Run this through the Big Shot with the second from largest Floral Frames Framelit. Stamp the image from Elements of Style onto the Whisper White flower with Daffodil Delight ink by stamping off on a scrap paper first. Then stamp the Beautiful Birthday greeting on top of the swirl with Island Indigo ink. Adhere this flower inside the card base. Add Rhinestones onto the greeting as desired.

7. Cut one piece of Pool Party card stock 5-1/2” x 5-1/2”. Run this through the Big Shot with the largest Floral Frames Framelit. Stamp the flower with the image from Elements of Style in Pool Party ink. Sponge around the edges with Pool Party ink and a Stampin’ Sponge. Use Multipurpose Liquid Adhesive to adhere this onto the folded up flap of the card base.

8. Add a fold in the card base as shown below. This will help the card stand up easier.


9. Use the Small Heart Punch on a piece of Silver Glimmer Paper. Add half of a Stampin’ Dimensional onto the back of the heart. Open up the card and hold the front flower in the position that you would like it to stand. Adhere the glimmer heart into place right where the bottom right petal of the flower meets the inside of the card. This heart will hold the card open when it’s standing up.


10. Now for the flower. Cut one piece of Whisper White card stock 4-1/2” x 4-1/2”. Use a ruler and pencil to lightly draw lines from corner to corner creating a perfect X in the card stock.


11. Cut two pieces of DSP 3” x 3”. I used Polka Dot Parade and Brights Collection DSP. Use your ruler and pencil to lightly draw one line from one corner to the opposite corner. Repeat with the other piece of DSP.


12. Place one piece of DSP on your Stampin’ Trimmer.  Line up the points without the pencil mark in the cutting groove. Cut. Repeat with the other piece of DSP.


13. Now take one of your DSP triangles and line up the point and the pencil mark in the cutting groove of your Stampin’ Trimmer. Cut. Repeat with the remaining DSP triangles. Use an eraser to erase the pencil lines. Sponge around the edges of each triangle with Daffodil Delight ink and a Stampin’ Sponge.


14. Adhere your triangles onto the Whisper White card stock from Step 10 with Anywhere Glue Stick. Line up the long side of the triangle with the X lines. Repeat with the remaining DSP triangles alternating patterns as you go.


15. You should now have something that looks like this.


16. Place the second from largest Floral Frames Framelit onto  your DSP/card stock layer. Line up the points between the petals with the lines where one DSP meets the next. Use a Post-It Note to hold the die in place and run it through your Big Shot.


17. Now you have your beautiful perfectly portioned DSP flower.


18. Stamp the image from A Round Array onto a scrap of Whisper White card stock in Pool Party ink. Punch out the image with the 7/8” Scalloped Circle Punch. Use the 1-1/4” Scalloped Circle punch on a piece of Silver Glimmer Paper. Adhere the stamped scalloped circle onto the glimmer scalloped circle with Multipurpose Liquid Adhesive.

19. Adhere the Flower onto the card front with Stampin’ Dimensionals. Adhere the glimmer label into the center of the flower with a Stampin’ Dimensional.

20. Your fabulous flower easel card is now complete!


What do you think? 


Thursday, April 25, 2013

Craft Project Central!

Car Coupon Keeper and Emergency Cards: 

This Car Coupon Keeper with a stash of emergency cards, is a must for every woman’s car!  The Coupon Keeper has four pockets for coupons, a pad of paper with a pretty matching pen, and a large clip that holds everything together.  The keeper also has four beautiful cards with envelopes that are neatly tucked inside for those times that you need a card at the last minute!!


This pretty project comes to you designed by Chris! If you have a chance head on over to Chris' blog and let her know how gorgeous her project is! 

If you would like to subscribe to the May edition of Craft Project Central and get 10 wonderful tutorials for only $10 then click HERE


Craft Project Central!

Floral Scrapbook Wall Hanging: 

Do you have an extra special family picture that you’d like to display, but are getting tired of the plain-frame look?  Here’s a way to show off your family picture and your creativity!  This is a 10: x 10" scrapbook page inserted into a shadow box.  putting it into a shadow box also enables you to use a lot of dimension that would normally be too fat for a scrapbook album!  This project can easily be customized to the colors of the room you want to display it in.  It would also make a great class for National Scrapbooking Month!


This great scrapbook/decor project comes to you designed by Christy! If you have a chance head over to Christy's blog and let her know how beautiful her project is! 

If you would like to subscribe to the May edition of Craft Project Central and get 10 wonderful tutorials for only $10 then click HERE


Craft Project Central!

Baby Gift Pail and Coordinating Thank You Notes: 

This adorable whale set makes the perfect wrapping for any baby shower! The neutral colors are perfect for a boy or a girl!  Add a special gift inside and you are ready to go!


This sweet ensemble comes to you decorated by Heidi! If you have a chance head on over to Heidi's blog and let her know how adorable her project is! 

If you would like to subscribe to the May edition of Craft Project Central and get 10 wonderful tutorials for only $10 then click HERE


Craft Project Central!

Portable Storage for Embossing Folders and Framelits: 

If you love attending crops and retreats or need a way to transport your embossing folders and Framelits to workshops, this is the project for you!  This portable storage Folder takes up little room and will help you to be organized and take more supplies with you!  You’ll be able to store 12 embossing folders and 12 sets of Framelits in this one little folder!


This this beautiful and useful project comes to you designed by Kris! If you have a chance head on over to Kris' blog and let her know how fabulous her project is! 

If you would like to subscribe to the May edition of Craft Project Central and get 10 wonderful tutorials for only $10 then click HERE


Wednesday, April 24, 2013

Time to Say Goodbye!

It's that time of year when we get ready to say goodbye to the retiring stamps and accessories from the 2012-2013 Stampin' Up Catalog! 


You can view the retiring stamp set list HERE

You can view the retiring accessories list HERE

The retiring stamp sets will be available only until June 3rd and retiring accessories are only while supplies last, so make sure to order now! 

Also, as a special treat, anyone who orders from my online store between now and June 3rd will receive a card kit in the mail with goodies from the new catalog! 
In case you haven't already heard Stampin' Up is doing a Color Refresh this year. This means that we are losing some of our current colors and will be getting back some of our favorite In Colors as well as one brand new color! Yay!!! Pool Party is staying! I didn't know what I was going to do without Pool Party! 

So make sure to get your most loved goodies before they're gone for good! 


Tuesday, April 23, 2013

Thinking Of You

Good morning everyone! I have a sketch challenge card to share with you today. I was in a hurry to get this done, so I pretty much used whatever was on my table top. But it resulted in a pretty cute and simple card. Take a look: 


  • Stamps: Sassy Salutations
  • DSP: Comfort Cafe, Pool Party Core'dinations, Silver Glimmer Paper
  • Card Stock: Pool Party, Midnight Muse, Whisper White
  • Ink: Midnight Muse
  • Accessories: Apothecary Accents Framelits, Fancy Fan Embossing Folder, Sanding Block, Stampin' Dimensionals

Here is the sketch that was created by yours truly! 


I started off with a 5-1/2" x 8-1/2" piece of Pool Party card stock and scored it at 4-1/4". Next I cut a piece of Midnight Muse card stock 3-3/4" x 5". I cut a piece of Comfort Cafe DSP 3-5/8" x 3" and adhered it onto the left side of the card front. Next I cut a piece of Pool Party Core'Dinations card stock 1-3/4" x 3-5/8". I ran the Pool Party card stock through the Big Shot in the Fancy Fan folder and used the Sanding Block to sand off the raised texture then adhered it onto the right side of the card front. 


I cut a piece of Silver Glimmer Paper 1/4" x 3-5/8" and adhered it over where the textured card stock and DSP met. For the greeting I stamped the image from Sassy Salutations onto a scrap piece of Whisper White card stock in Midnight Muse ink. I cut out the image with the Apothecary Accents framelit and adhered the greeting label onto the card front with Stampin' Dimensionals. 

Super simple, yet still pretty cute. What do you think? 


Saturday, April 20, 2013

Blog Candy Winners!

It's time to draw the winners for the two prizes I listed on this post! 


The winner of the FREE April Craft Project Central subscription is....
Suzanne E

The winner of the Owl Box and Cards set is...
Joan


I have contacted the winners via email. Thanks for all of you that entered !


Friday, April 19, 2013

Just Because Friday Mashup 106

Are you ready for another Friday Mashup challenge? Well… here it is! I had a lot of fun with this one!


  • Stamps: Vintage Verses, Circle Circus
  • DSP: Wisteria Wonder, Silver Glimmer
  • Card Stock: Whisper White, Sahara Sand, Wisteria Wonder, Perfect Plum
  • Ink: Wisteria Wonder, Perfect Plum, Sahara Sand
  • Accessories: Delicate Doilies Sizzlit, 1-3/4” Circle Punch, 1-1/4” Circle Punch, 1” Circle Punch, 3/4” Circle Punch, 3/16” Corner Punch, Stampin’ Dimensionals, Rhinestones, 2-Way Glue Pen


Here's your Mashup Challenge:
  1. Create a card using the colors "Sahara Sand, Perfect Plum & Wisteria Wonder".
  2. Create a card " and Mail it to someone".
  3. Or Mash it Up and create a card with "Sahara Sand, Perfect Plum, Wisteria Wonder & Mail it".


This card was so much fun to make! I started off with a 5-1/2” x 8-1/2” piece of Whisper White card stock scored at 4-1/4”. I cut a piece of Wisteria Wonder DSP 2” x 5-1/2” and adhered it onto the right side of the card front. I punched the two right corners with the 3/16” Corner Punch. Then I cut a piece of Silver Glimmer Paper 1/8” x 5-1/2” and adhered it right next to the DSP.

Next I cut a piece of Sahara Sand card stock 4” x 4” and ran it through the Big Shot on the Delicate Doilies Sizzlit to cut out the largest doily. Next I cut a piece of Perfect Plum card stock 1” x 4” and used Paper Snips to cut both ends into a dove-tail shape. I adhered the banner on top of the doily. I took the largest circle from Circle Circus and stamped it onto a scrap of Whisper White card stock in Wisteria Wonder ink by stamping off.  I stamped the greeting from Vintage Verses on top of the stamped circle in Perfect Plum ink then cut out the circle with my 1-3/4” Circle Punch. I adhered this on top of the banner/doily. 


I stamped several other circles from Circle Circus onto scraps of Perfect Plum, Wisteria Wonder, and Sahara Sand card stock in the matching ink then punched out the circles. I adhered all but two of the circles onto the card front with a 2-Way Glue Pen. The two remaining circles and doily layer were adhered onto the card front with Stampin’ Dimensionals. I had to add some more sparkle though, so I added Rhinestones onto both ends of the banner.

For the “actually mail it” portion of the challenge I sent this card to my Mom to let her know just how special she is.

I love how fun and funky this looks with all those layered circles!

If you have a chance head on over to the Friday Mashup to see what the rest of the design team has created and play along with the challenge! 


Wednesday, April 17, 2013

Elegant Butterflies

It’s been quite a while since I’ve posted a sketch card. So I thought I would share this week’s sketch from Stampin’ Connection SCCSC166. Take a look at the card I made.


  • Stamps: Friendly Phrases, En Francais, Papillion Potpourri
  • DSP: Wisteria Wonder
  • Card Stock: Bashful Blue, Whisper White, Elegant Eggplant
  • Ink: Bashful Blue, Wisteria Wonder, Elegant Eggplant
  • Accessories: Stamp-A-Ma-Jig, Delicate Butterfly Punch, Stampin’ Dimensionals, Rhinestones, Dazzling Details, Glue Dots

Here is the sketch that was created by Liz Goldhawk: 

SCCSC166-001

This card was so much fun to put together! I started off with a 5-1/2” x 8-1/2” piece of Bashful Blue card stock that I scored at 4-1/4”. I stamped the En Francais background image onto the card front in Bashful Blue ink.

Next I cut a piece of Elegant Eggplant card stock 3-1/4” x 4-1/4”. Then I cut a piece of Whisper White card stock 1-5/8” x 4-1/8” and adhered it onto the left side of the Elegant Eggplant card stock. The next piece is Wisteria Wonder DSP that was cut at 1-1/2” x 4-1/8” and adhered right next to the Whisper White card stock. Instead of overlapping the DSP and the Whisper White card stock, the edges are right against each other leaving a mostly smooth transition.


I stamped the solid butterfly image from Papillion Potpourri five times in Bashful Blue ink. Then I used my Stamp-A-Ma-Jig to stamp the detailed butterfly image on top of the Bashful Blue image in Elegant Eggplant ink. Next I stamped the greeting from Friendly Phrases onto the Whisper White card stock in Wisteria Wonder ink.

I adhered this panel onto the card front with Stampin’ Dimensionals. I stamped the larger butterfly image onto a scrap of Whisper White card stock in Wisteria Wonder ink. Then I punched out the butterfly with the Delicate Butterfly punch and used a Glue Dot to adhere it onto the corner of the center panel. I added Rhinestones in the center of the larger butterfly and one Rhinestone next to the greeting. Finally I added some Dazzling Details onto the stamped Elegant Eggplant butterflies.


I really love how this turned out. It almost looks like the butterflies are floating on top of the card stock. I also really love this color combination! Who would have thought Bashful Blue was so great with Elegant Eggplant?