Thursday, January 31, 2013

Fall Thinking of You

I started off creating this card for a Friday Mashup challenge last fall, but then used the wrong greeting so it didn't fit the challenge anymore. But it’s 
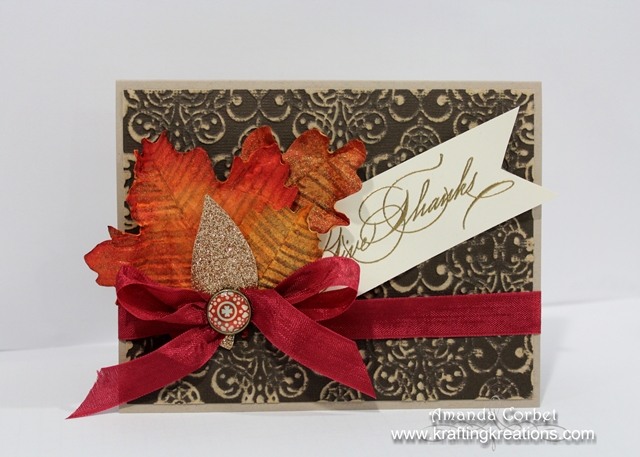
still a fun fall card!


  • Stamps: French Foliage, Sassy Salutations, Woodgrain
  • Card Stock: Crumb Cake, Early Espresso, Very Vanilla, Brushed Copper
  • Ink: Cherry Cobbler, Pumpkin Pie, Daffodil Delight, Versamark, Crumb Cake
  • Accessories: Early Espresso embossing powder, Heat Tool, Early Espresso 1/8” Taffeta Ribbon, Antique Brads, Crop-A-Dile, Top Note Die, Corner Rounder punch, Paper Snips


To start I cut a piece of Crumb Cake card stock 5-1/2” x 8-1/2” and scored it at 4-1/4”. Next I cut a piece of Early Espresso card stock 3-3/4” x 5” and a piece of Crumb Cake card stock 3-5/8” x 4-7/8”. I used the Corner Rounder punch on all four corners of both pieces of card stock. Then I stamped the Woodgrain background stamp onto the piece of Crumb Cake card stock in Crumb Cake ink. I adhered this piece onto the Early Espresso card stock, then onto the card front. Next I cut a piece of Very Vanilla and Brushed Copper card stock 4” x 5” and ran it through the Big Shot on the Top Note Die.

I have been hoarding saving my last few pieces of this Brushed Copper card stock for something special. Stampin’ Up sadly retired this beautiful card stock several years ago. I only have a few small pieces left now. I don’t know what I’ll do after they’re gone!


Anyway… back to the card. I stamped the leaves from French Foliage in the upper left hand corner of the Very Vanilla top note in Cherry Cobbler, Pumpkin Pie, and Daffodil Delight ink. For the two-toned leaves I used the Rock-N-Roll technique.  Next I stamped the greeting from Sassy Salutations onto the card front in Versamark ink, covered the stamped image with Early Espresso embossing powder, tapped off the excess, and heated it with the Heat Tool.


Next I took Paper Snips and cut the Very Vanilla top note on the stich lines and adhered it on top of the Brushed Copper top note. I cut a piece of Early Espresso 1/8” Taffeta ribbon, adhered it onto the back of the card stock with a little SNAIL Adhesive, wrapped it around the corners and tied it into a bow. I used my Crop-A-Dile to punch a hole right under the bow. I spread the prongs on my Antique Brad really wide, straddled the knot on the bow, and inserted them into the hole in the card stock before spreading the prongs on the backside of the card stock. I adhered this panel onto the card front with some Stampin’ Dimensionals.

Now I just have to send this special card to a special someone!

What do you think? What favorite supplies are you hoarding saving? 


Wednesday, January 30, 2013

Birthday Presents Anyone?

Are you in need of some birthday presents? How about the ones on this card? Another sketch challenge! This one is for SCCSC140. This will make a fabulous guy’s birthday card I think. Take a look!


  • Stamps: Seasonal Sayings, Woodgrain
  • Card Stock: Basic Gray, Basic Black, Whisper White, Daffodil Delight, Baja Breeze, Real Red
  • Ink: Black Stazon, Baja Breeze, Daffodil Delight, Basic Gray
  • Markers: Baja Breeze, Real Red, Daffodil Delight
  • Accessories: Argyle embossing folder, Square Lattice embossing folder, Real Red 1/8” Taffeta Ribbon, Baja Breeze 1/8” Taffeta Ribbon, Daffodil Delight 1/8” Taffeta Ribbon, Stampin’ Dimensionals, Paper Snips, Stampin’ Sponge, 2-Way Glue Pen, Glue Dots, SNAIL Adhesive

 Here is the sketch that was created by Susie Nelson: 


I started off this card by cutting a piece of Basic Gray card stock 4-1/4” x 11” and scored it at 5-1/2”. I stamped the card front with the Woodgrain background stamp in Basic Gray ink. Next I cut three strips of Basic Black card stock 1/4” x 4-1/4” and adhered them onto the left side of the card front.

Then I cut a piece of Whisper White card stock 2” x 3-1/2” and adhered it onto a 3-5/8” x 2-1/8” piece of Real Red card stock before adhering it onto the card front. I cut a piece of Whisper White card stock 1” x 3-3/4” and stamped the greeting from Seasonal Sayings onto the card stock in Black Stazon ink. I colored in the letters of the greeting with Baja Breeze, Real Red, and Daffodil Delight markers then used Paper Snips to cut the right edge into a dove-tail shape. I curled the strip over my finger to give it some shape and adhered it onto the card front with a couple Stampin’ Dimensionals.


Present time! Who doesn’t love presents? Well here is how you make these. Cut one piece of Baja Breeze card stock 1-1/4” x 1-3/8”, another piece of Baja Breeze 1-3/8” x 1-5/8”, and one piece of Daffodil Delight 1-3/4” x 1-3/4”. I ran the Baja Breeze pieces through the Big Shot in the Argyle embossing folder and sponged the edges with Baja Breeze ink. I ran the Daffodil Delight piece through the Big Shot in the Square Lattice embossing folder and sponged the edges with Daffodil Delight ink.


I cut a piece of ribbon just long enough to go around each present and adhered the ends onto the back of the card stock with a little bit of SNAIL Adhesive. Then I adhered the presents on top of one another. I tied a small bow in each of the ribbon colors and adhered each bow on top of the coordinating present with a Glue Dot. The line of presents was adhered onto the card front with a few Stampin’ Dimensionals.

Cute huh? I am totally pleased with myself on this one! 


Tuesday, January 29, 2013

Craft Project Central!

Journal and Candle Gift Set: 

Turn any plain composition book or journal into a special keepsake you will love or love to give as a gift!  This project incorporates beautiful designer fabric and gives your journal a wonderful soft texture that will make you love holding it in your hand.  And don’t worry, if you don’t sew, this is a no-sew fabric project that is easy enough for anyone to do!


This gorgeous project was designed by Niki

If you would like to subscribe to the January edition of Craft Project Central and get 10 wonderful tutorials for only $10 then click HERE


Friday, January 25, 2013

Happy Chinese New Year Friday Mashup 94!

I had a tough time with this challenge. I usually don’t make any new year’s cards, much less Chinese New year. So if you know someone that needs a Chinese New Year card let me know. I’ll be willing to send this one off to someone who could use it! So here is what I came up with!


  • Stamps: Easter Blossoms, Everything Eleanor, Teeny Tiny Wishes
  • Card Stock: Cherry Cobbler, Early Espresso, Very Vanilla, Vellum
  • Ink: Versamark, Black Stazon, Sahara Sand
  • Accessories: Gold Stampin’ Dazzle Marker, Paper Crimper, Fancy Fan embossing folder, Cherry Cobbler seam binding ribbon, Stampin’ Dimensionals, Word Window Punch, Modern Label punch, Gold embossing powder, Embossing Buddy, Heat Tool, Craft Knife, 3” Circle Die, 2-1/2” Circle Punch, Multipurpose Liquid Adhesive

Image Source

So here is the "Mashup" Challenge:
  1. Make a project with a "Chinese New Year (Year of the Snake) Theme".
  2. Or Make a project using the "Paper Lantern Technique".
  3. Or "Mash it Up" and create a project for the "Chinese New Year featuring the Paper Lantern Technique". 

I started off by cutting a piece of Cherry Cobbler card stock 5-1/2” x 8-1/2” and scored it at 4-1/4”. Next I stamped the card front with the swirl image from Everything Eleanor in Versamark ink several times. I covered the stamped images with Gold embossing powder, tapped off the excess, and heated it with the Heat Tool. This gives the background some nice shiny gold swirls!

Next I cut a piece of Very Vanilla card stock 3-1/4” x 4-1/4”. I stamped the branch image from Easter Blossoms (retired) onto the card stock in Sahara Sand ink. I adhered this onto a 3-3/8” x 4-1/4” piece of Early Espresso card stock. Next I used the 2-1/2” Circle punch to punch a hole in the card stock. You have to press pretty hard, but it will punch through two layers of card stock. Next I adhered this layer onto the left side of the card front. Then I used the 2-1/2” Circle punch again to punch the Cherry Cobbler card base through the hole in the Very Vanilla/Early Espresso layer.

I used my craft knife to cut a slit in the fold of the card right above the center of the circle then ran a piece of Cherry Cobbler seam binding ribbon through the slit and the hole in the card front and tied the ribbon into a bow.

For the lantern part I used the 3” Circle die to cut a piece of Vellum card stock. I stamped the branch image from Eastern Blossoms (retired) in Black Stazon ink. I colored the backside of the vellum (the side opposite from the stamping) with a pink permanent marker to color in the flowers. Then I ran the vellum circle through the Paper Crimper to add the crimped texture. I used the Gold Stampin’ Dazzle marker to color just the raised ridges of the crimping with the gold pen.

I cut two pieces of Early Espresso card stock 1/2” x 1-3/4”. I ran these through the Big Shot in the Fancy Fan embossing folder then colored the raised texture with the gold pen and added some more gold decorative lines inside the raised texture. I adhered these pieces onto the top and bottom of my crimped Vellum circle with a little bit of Multipurpose Liquid Adhesive. After the glue dried I adhered my Vellum lantern over the punched hole with a couple Stampin’ Dimensionals.


I stamped the greeting from Teeny Tiny Wishes onto a scrap of Very Vanilla card stock in Versamark ink. I covered the stamped image with Gold embossing powder, tapped off the excess, and heated it with my Heat Tool then punched out the greeting with the Word Window punch. I used the Modern Label punch on a scrap of Cherry Cobbler card stock, adhered the two labels together with 2-Way Glue Pen, and adhered the label onto the card front with a couple Stampin’ Dimensionals.


Now I just stood the card up and placed a battery-powered tea light behind the hole in the card base and you have a glowing flickering lantern!

Head over to the Friday Mashup to see what the rest of the design team has created and enter your project! 


Thursday, January 24, 2013

Matchbook Mint

This is a project from quite some time ago that has been lurking on my hard drive. It's a super simple and really cute way to package a mint.

Sometimes I have a hard time coming up with something that is small, 3D, and cute that my Make and Take guests will like. Well while I was on my last cruise I received a really cute little matchbook with a mint in it as one of our Fish Extender gifts. I just thought this was the cutest thing on earth! So I had to make my own version, and it was a quick and cute project for the Make and Take.


These would make fabulous wedding or party favors too! Not to mention they are quick to make!
  

  • Stamps: Easy Events
  • Card Stock: Whisper White, Summer Starfruit, Pool Party
  • Ink: Black Stazon
  • Markers: Lucky Limeade, Pool Party
  • Accessories: Simply Scored, Decorative Label punch, Stampin’ Dimensionals, staple, individually wrapped mint.

This project is so super cute and easy I just know you’re gonna want to make a bunch of them!

1. First I cut my Summer Starfruit card stock 2” x 5-5/8”. Then, with the 5-5/8” side against the top of your Simply Scored, score at 1/2”, 3”, and 3-1/4”.

2. Fold on all the score lines.

3. Stamp the image from Easy Events onto a scrap of Whisper White card stock and color in with markers as desired. Punch out the stamped image with the Decorative Label punch.

4. Use the Decorative Label punch on a piece of Pool Party card stock. Use Paper Snips to cut the Pool Party label in half and cut off the points.

5. Adhere the Pool Party label halves behind the stamped label. Adhere the label layer onto the longer end of the Summer Starfruit card stock with Stampin’ Dimensionals.

6. Fold the small end of the Summer Starfruit card stock up, place an individually wrapped mint inside with the wrapping between the small end and the back, use a stapler to attach it.


7. Tuck the end of the front behind the short flap to hold it closed.


You’re done!

So super-duper simple! 


Wednesday, January 23, 2013

Craft Project Central!

Oh Whale Card and Box Set: 

Start 2013 off with a cute and ‘punny’ card set featuring a brand new set in the Spring Catalog!  When you’re done you will have a Valentine’s Day card, a Thank You card, a Get Well card, and a Welcome Baby card as well as a reusable box to store them all in!  This project makes for a fun class or club project too!


This super cute set was created by Tara! If you have a chance swing by Tara's blog to let her know how stinkin' cute her project is!

If you would like to subscribe to the January edition of Craft Project Central and get 10 wonderful tutorials for only $10 then click HERE


Tuesday, January 22, 2013

Autumn Give Thanks

I was playing away in my craft room one evening last fall when my Mom came over and she wanted to learn how to make the leaves that I showed you in THIS tutorial. So we made this lovely fall card!


  • Stamps: Hand Penned Holidays
  • Card Stock: Early Espresso Core’Dinations, Crumb Cake, Very Vanilla
  • Ink: Versamark
  • Accessories: Lacy Brocade embossing folder, Gold embossing powder, Embossing Buddy, Heat Tool, Cherry Cobbler Seam Binding Ribbon, Autumn Accents Die, Crop-A-Dile, Bronze Builder Brads (retired), Sanding Block,  Comfort Café DSP, 1/2” Circle Punch

I started off by cutting a piece of Crumb Cake card stock 5-1/2” x 8-1/2” and scored it at 4-1/4”. Next I cut a piece of Early Espresso Core’Dinations card stock 4”x 5-1/4”. I ran this through the Big Shot in the Lacy Brocade embossing folder then took the sanding block to it to reveal the texture. I adhered this onto the card front.


I made the leaves just like I did in the tutorial and used some Stampin’ Dimensionals to adhere them onto the card front. I used the small hole of my Crop a Dile to punch through the card front where the stem of the glimmer leaf is. Then I wrapped a piece of Cherry Cobbler Seam Binding ribbon around the card front and tied it into a knot.

I took a Bronze Build-A-Brad and spread the prongs and placed the prongs on either side of the knot in the bow, then through the hole in the card front and spread the prongs on the inside of the card. I used my 1/2” Circle punch on a piece of Comfort Café DSP and used that for the patterned portion of my brad.


Finally I stamped my greeting onto a 1-1/2” x 3-1/2” piece of Very Vanilla card stock in Versamark ink. I poured Gold embossing powder over the stamped image and tapped off the excess before heating it with my Heat Tool. I used Paper Snips to cut the dove-tail shape in one end and adhered the greeting strip behind the leaves.

This one was a little labor intensive, but well worth the effort! 


Monday, January 21, 2013

Simple Sunflower

I have had this sunflower background image for quite some time and hadn’t even mounted it yet, much less inked it. Terrible, I know! So I finally decided to pull it out to make this card for the November Make and Take.


  • Stamps: Sunflower, Sassy Salutations
  • Card Stock: Lucky Limeade, Very Vanilla
  • Ink: Daffodil Delight, Lucky Limeade, Chocolate Chip
  • Accessories: Chocolate Chip marker, Lucky Limeade Baker’s Twine, Glimmer Brad, Crop-A-Dile, Fancy Fan embossing folder, Stampin’ Dimensionals, Stampin’ Sponge, Top Note die, water spray bottle

I started off by cutting a piece of Lucky Limeade card stock 5-1/2” x 8-1/2” and scored it at 4-1/4”. Next I ran the card front through the Big Shot in the Fancy Fan embossing folder to add the wonderful scalloped background. Next I cut a piece of Very Vanilla card stock 4” x 5” and ran it through the Big Shot on the Top Note die.

I inked up the entire sunflower image with Daffodil Delight ink. Then I took the wide end of the Chocolate Chip marker and colored in just the center of the sunflower. Then I took a spray bottle filled with water and misted the air above the stamp a couple times, then stamped the image onto the card stock. I stamped the greeting from Sassy Salutations onto the top note in Lucky Limeade ink.


Next I sponged around the edges of the top note shape with Chocolate Chip ink the took a piece of Lucky Limeade Baker’s Twine and wrapped it around the top note and tied it into a bow. I used the Crop-A-Dile to punch a hole in the top note right under the knot in the bow. Then I took a glimmer brad and spread the prongs wide enough to go around the knot in the bow, inserted it through the hole in the top note, and spread the prongs on the back. This way the brad stays in the center of the knot. Finally I adhered the top note shape onto the card front with Stampin’ Dimensionals.

This was super quick, easy, and fun! 


Craft Project Central!

Tea For Two Gift Set: 

This pretty Tea for Two gift set is sure to make a good friend smile!  The wall decor piece can be hung or set in a frame holder.  The simple treat cone can be filled with any kind of yummy treat, and the Oh, Hello card will be sure to set the tone for it all!  This fun set makes a great class project too!


This gorgeous project was created by Julie! If you have a chance head over to Julie's blog and let her know how wonderful her project is.

If you would like to subscribe to the January edition of Craft Project Central and get 10 wonderful tutorials for only $10 then click HERE


Friday, January 18, 2013

Craft Project Central!

Burlap Valentine Decor: 

The look of burlap has become quite popular for home decor.  Here are two tun Valentine projects that will bring the shabby chick look of burlap to your decor.  Each pennant on the "sweet love" banner is burlap with designer paper stitched on top.  Accents of glittered hearts, dyed ribbon and paper flowers finish off the banner.  The framed Amore art piece really pops with rolled paper roses.  These two coordinating decor pieces would really show someone how special they are to you or would be a great addition to your own decor this Valentine’s Day!


This gorgeous decor set was created by Carrie! If you have a chance please stop by Carrie's blog and let her know how fabulous her project is! 

If you would like to subscribe to the January edition of Craft Project Central and get 10 wonderful tutorials for only $10 then click HERE


Birthday Flowers Friday Mashup 93!

It’s Friday again! That means it’s time for another Friday Mashup challenge! I had some fun with color on this one! Take a look:


  • Stamps: Wacky Wishes
  • DSP: Sycamore Street
  • Card Stock: Pool Party, Island Indigo, Whisper White, Lucky Limeade, Calypso Coral
  • Markers: Island Indigo, Lucky Limeade, Calypso Coral, Pool Party, Rich Razzleberry
  • Accessories: Apothecary Accents Framelits, Floral Fusion Sizzlit, In Color Designer Printed Brads, Paper Piercer, Stampin’ Pierce Mat


So here is the "Mashup" Challenge:
  1. Make a project with a "Birthday Theme".
  2. Or Make a project using "Brads".
  3. Or "Mash it Up" and create a "Birthday project with some brads". 

When I saw this DSP I wondered what kind of flowers would grow on such brightly colored vines. So I made some bright flowers! I started off by cutting a piece of Pool Party card stock 4-1/4” x 11” and scored it at 5-1/2”. Next I cut a piece of Sycamore Street DSP 3” x 5-1/2” and adhered it onto a 3-1/4” x 5-1/2” piece of Island Indigo card stock.

I inked up the greeting stamp from Wacky Wishes with the markers so that the greeting letters matched the colors in the DSP. After all the letters were colored I breathed on the stamp to re-moisten the ink and stamped it onto a scrap of Whisper White card stock. I cut out the greeting with the Apothecary Accents Framelits. I adhered the greeting label into the center of the card front with Stampin’ Dimensionals.


Next I took scraps of Pool Party, Calypso Coral, Lucky Limeade, and Whisper White card stock and ran them through the Big Shot one at a time on the Floral Fusion Sizzlit to cut out the blossoms. I folded the petals up to give them a little bit of dimension and used some Two-Way Glue Pen to adhere the petals together. I made sure to mix up the colors on each flower. Next I placed the DSP layer onto my Stampin’ Pierce mat and placed the flowers where I wanted them to go.


I used the Paper Piercer to pierce a hole through the center of each of the flower and the DSP/Island Indigo layer. I added an In Color Designer Brad in the center of each blossom to hold them onto the card front and add another playful pattern to the mix. Then I simply adhered the panel onto the card front with lots of Anywhere Glue stick.


I just love how bright, fun, and cheerful this card is! Head on over to the Friday Mashup to see what the rest of the design team created! 


Thursday, January 17, 2013

Blossoms for My Friend

I have another sketch challenge for you! I just can’t get enough of this wonderful Sycamore Street DSP and Madison Avenue stamp set! I just a few more days you will be able to get these items for FREE during Sale-A-Bration! Find out more about Sale-A-Bration on my Promotions page!


  • Stamps: Madison Avenue, My friend
  • DSP: Sycamore Street
  • Card Stock: Island Indigo, Pool Party, Whisper White, Rich Razzleberry
  • Ink: Lucky Limeade, Pool Party, Rich Razzleberry
  • Accessories: Lucky Limeade marker, Floral Fusion Sizzlit, Itty Bitty Shapes Punch Pack, Rhinestones, Labels Framelits, Paper Snips, Stampin’ Dimensionals, In Color Designer Printed Brads, Paper Piercer, Stampin’ Pierce Mat, Stamp-A-Ma-Jig, Multipurpose Liquid Adhesive


This card was create for SCCSC153 that was designed by yours truly.


I started off with a piece of Island Indigo card stock cut at 5-1/2” x 8-1/2” and scored it at 4-1/4”. I cut a piece of Sycamore Street DSP 4” x 5-1/4”. I ran a scrap of Whisper White card stock through the Big Shot with the Label Framelit. Next I stamped the leaves from Madison Avenue onto the Whisper White card stock in Lucky Limeade ink. I made the stems taller by using my Stamp-A-Ma-Jig to line up the stem and stamped it again in Lucky Limeade ink. I used the Lucky Limeade marker to add a line of shadow on each leaf. For the blossoms I stamped the image on two of the stems in Pool Party ink and the center one in Rich Razzleberry ink.


I adhered the stamped Whisper White label onto the DSP and then this layer onto the card front. I used my Paper Piercer and Stampin’ Pierce mat to pierce three holes in the upper right hand corner of the card front and added three In Color Designer Printed brads.


For the 3D portion of the flowers I ran a scrap of Pool Party and a scrap of Rich Razzleberry card stock through the Big Shot on the Floral Fusion die to cut out the smallest flower on the die. Next I stamped the small center image twice onto Pool Party card stock in Pool Party ink and one onto Rich Razzleberry card stock in Rich Razzleberry ink. I punched out the small center image with the four petal punch from the Itty Bitty Shapes Punch Pack. I sponged the edges of all the flowers with the coordinating ink then simply bent the petals up and glued them together with some Multipurpose Liquid Adhesive. I used the same glue to adhere the flowers onto the stamped flowers and finally added a small Rhinestone into the center of each flower.


The greeting from My Friend was stamped onto a scrap of Pool Party card stock in Rich Razzleberry card stock then I used my Paper Snips to cut a dove-tail in each end and adhered it onto the card front with Stampin’ Dimensionals. 


Sycamore Birthday

I was catching up on making cards for the Sketch Challenges on Stampin’ Connection, and now I’m catching up on getting them actually posted! Lol! Here is the card that I created for SCCSC150.


  • Stamps: Afterthoughts (retied)
  • DSP: Sycamore Street, Island Indigo
  • Card Stock: Sahara Sand, Summer Starfruit, Pool Party, Whisper White
  • Accessories: Window Frames Framelits, Paper Snips, Stampin’ Pierce Mat, Paper Piercer, Silver brads


Here is the sketch that was created by yours truly! 


When I started on this card I had this scrap of Sycamore Street DSP sitting on my table that was practically begging to be used. I just love this pattern! I started off with a piece of Sahara Sand card stock cut at 5-1/2” x 8-1/2” and scored at 4-1/4”. Next I cut three strips of Island Indigo DSP 3/4” x 4-1/4” and used Paper Snips to cut a dove-tail in one end. I adhered these onto the card front.


Next I cut the Sycamore Street DSP down to 1-3/4” x 4-1/4” and adhered it onto a 1-7/8” x 4-1/4” piece of Summer Starfruit. I adhered this panel onto the card front covering the ends of the Island Indigo DSP. Next I stamped the greeting from Afterthoughts (retired) onto a scrap of Whisper White card stock in Tangerine Tango ink. I cut out the greeting with a Word Window Framelit (2nd from smallest I think). I also cut a piece of Pool Party card stock with the same Word Window Framelit. I used Paper Snips to cut the pool party window frame shape in half and adhered both halves behind the Whisper White greeting window frame.


Next I placed the greeting panel onto my Stampin’ Pierce Mat and used my Paper Piercer to pierce a hole in each corner of the window frame where I added a Silver Brad in each hole. I adhered this panel onto the card front with Stampin’ Dimensionals. That’s it! Done!