Showing posts with label 3D. Show all posts

Monday, February 8, 2016

Blushing Heart Treat Pouch

Last week I had the opportunity to present a Stampin' Up! workshop for my lovely host Mary. So I put together three different projects to show at her workshop. This first project I thought was a very simple and super sweet Valentine's treat using the Envelope Punch board.


  • Go Wild DSP Stack 6" x 6" 
  • Whisper White cardstock 3-1/4" x 3-1/4"
  • Basic Black cardstock 1" x 8-1/2"
  • Stamps: Enjoy the Little Things
  • Ink: Smoky Slate, Rose Red
  • Accessories: 2-3/8" Scalloped Circle Punch, 2" Circle Punch, Sweetheart Punch, Tear & Tape Adhesive, Stampin' Dimensionals, Blushing Bride Glimmer Paper, Envelope Punch Board
I wanted to keep this project super simple while allowing my guests to chose which pattern of paper they wanted from the Go Wild DSP stack. So I went with the 3-1/2" x 3-1/2" envelope size on the Envelope Punch board since the DSP stack papers were already 6" x 6".


Next the ladies stamped the "enjoy the little things" greeting onto the Whisper White cardstock in Rose Red ink. The greeting was flanked on both the top and bottom with the delicate border image stamped in Smoky Slate ink. This piece was glued inside the envelope with glue stick. Now four Dove chocolate hearts were added into the center of the envelope.

A single piece of Tear & Tape Adhesive was applied onto one of the narrow ends of the Basic Black cardstock strip. The flaps of the envelope were folded closed over the chocolates then the strip of Basic Black cardstock was wrapped around the envelope and the end of the Basic Black cardstock with adhesive was adhered to the other end of the cardstock strip forming a belly band.

Finally it was on to the punching. The 2-3/8" Scalloped Circle punch was used on a scrap of Whisper White cardstock. The 2" Circle punch was used on a scrap of Smoky Slate cardstock. These two were adhered together with glue stick and then adhered onto the Basic Black belly band with a small strip of Tear & Tape Adhesive.

Next the Sweetheart punch was used to punch a glimmery heart from Blushing Bride Glimmer paper. The sparkly heart was adhered onto the Smoky Slate circle with a Stampin' Dimensional.


Wednesday, February 11, 2015

Sweet Valentine's Box

Today I have one of the projects from the February Make and Take to share with you. This sweet little treat box was super cute and super easy to make. Filled with Hershey's Kisses it makes a sweet little Valentine's gift.


Stacked With Love DSP 1-1/2" x 4-1/4"
18" Basic Black 1/8" Taffeta Ribbon
Accessories: Tiny Treat Boxes, Silver Glimmer Paper, Bitty Banner Framelits, Small Heart Punch, Large Heart Punch, Stampin' Dimensionals, Stacked With Love Washi Tape


Start off by folding the box up. Then trim the Stacked With Love DSP strip with Paper Snips to make one end a banner shape. Use lots of glue stick to glue this on the box. Then add a couple strips of Stacked With Love Washi Tape for some fun pattern.

Use the smallest banner framelit in the Big Shot to cut out the XOXO banner from another piece of Stacked With Love DSP. Use the small Heart Punch on a piece of Silver Glimmer Paper. Glue the small glimmery heart onto the XOXO banner, then stick this onto the front of the box with a Stampin' Dimensional.


Now use the Large Heart Punch on a piece of Silver Glimmer Paper and glue the sparkly heart onto the top of the box. Fill the box up with your Kisses then wrap the ribbon around the box and tie it into a bow. 

You're done! See, I told you it would be super easy.


Monday, February 9, 2015

Fun Valentine's Decor

I have another sweet little Valentine's decor project to share with you today. I saw this version on Pinterest and thought it was so absolutely adorable that I just HAD to make one! I wanted to just stick with using what I had on hand already so mine is a little different. 

Friday, January 23, 2015

Fall or Halloween Treat Box

Here is a cute little treat box from the September Make and Take last year. This particular box was all dressed up for Halloween, but it would make a really adorable Valentine's treat box if you switched out the colors and put a heart on the front.


  • Bermuda Bay card stock 3-3/4" x 8-1/2"
  • Tangelo Twist card stock 2" x 10"
  • Basic Black card stock (two pieces) 1-7/8" x 1-7/8"
  • Motley Monsters DSP 1-3/4" x 1-3/4"
  • Basic Black 1/8" Ribbon 10"
  • Stamps: Chalk Talk
  • Ink: Bermuda Bay
  • Accessories: 1-3/8" Circle Punch, 1/8" Basic Black Ribbon, Scalloped Tag Topper Punch, Sticky Strip, Paper Snips


With the 8-1/2" edge of the Bermuda Bay card stock against the top of your Simply Scored score at 2", 4", 6", 8". Then rotate the card stock 90 degrees clockwise and score at 1-7/8". Use Paper Snips to trim the card stock so it looks like the image below. Then add Sticky Strip onto the one narrow flap on the right side. Fold the card stock on the score lines. 


Form your box by removing the Sticky Strip liner from the narrow flap and adhere it behind the card stock on the other end. Then fold in and glue your bottom flaps in place. 

Now take your Tangelo Twist card stock and place it on your Simply Scored with the 10" edge against the top. Score at 1", 2", 4", 6", 8", and 9". Punch both ends with the Scalloped Tag Topper punch. Then add Sticky Strip in the locations shown. Fold the card stock on the score lines. 


Remove the Sticky Strip liner from your Tangelo Twist card stock. Place the little Bermuda Bay box into the center section of the Tangelo Twist card stock then fold up the ends of the Tangelo Twist to adhere to the sides of your little box. 

Put a treat in your box then thread the Basic Black ribbon through the holes and tie it into a bow. Glue the DSP onto the Basic Black card stock then glue it onto the front side of the box. Finally stamp the "for you" from Chalk Talk onto a scrap of Whisper White card stock in Bermuda Bay ink. Punch out the greeting with the 1-3/8" Circle Punch and stick it onto the front of the box with a Stampin' Dimensional. 


This little box is perfect for a sweet treat. What do you think? 


Friday, January 16, 2015

Winter Gift Exchange

Last fall I once again participated in the Craftaholics Anonymous Gift Exchange. Basically you sign up, you are assigned an exchange partner, then you both make something and send it to the other person. Here is what I sent my exchange partner.


Here is a nice view of everything. 


 I made this lovely "JOY" banner for the holidays with some thin cardboard, DSP, a variety of dies, some Champagne Glimmer Paper, Gold Satin ribbon, and some gold baker's twine.


Each letter was accented with some Crumb Cake holly leaves and Cherry Cobbler Dazzling Details for the berries.  The sparkly gold baker's twine was a score from Pick Your Plum and looked really nice holding each letter of the banner together.


Next up I water colored this pretty picture. Not too bad if I do say so myself. After the water color paint was dry I doodled around the edges of the flowers and leaves. Then I spritzed the whole thing with some Vanilla Smooch Spritz to give it some sparkle.


The words "life doesn't have to be perfect to be wonderful" was stamped onto the water color paper and embossed in silver. The frame was another Pick Your Plum score and was gorgeous!


Next up, some earrings that are just like the Glam Earrings I made for my sister-in-law for Christmas. I really loved these and wish I would have kept them for myself...


Finally a wood slice ornament with a wood burned snowflake on one side and a stamped greeting on the other. 


All in all I think it was a pretty generous gift and were things that I would have like to receive myself. Unfortunately I did not get a gift in return from my exchange partner. But I had fun making these! Click HERE if you want to sign up to be notified when the next gift exchange party is. Click HERE to see a lot of the other gifts that were given and received. 


Monday, August 11, 2014

Purse Gift Bag and Top Dog Dies Giveaway!

Here is the final Top Dog Dies post using the Purse Card Die Set. This is my favorite project of them all! 


You can find a complete tutorial for this project on the Top Dog Dies Blog.


I really did have a lot of fun playing with these dies. So just to recap, here are all the projects that I made. 


To enter for a chance to win free dies just click HERE. You can enter anytime between now and August 31st. One winner will be selected on September 5th to win $50 in exclusive wafer-thin dies!


A Bag From a Purse?

Don't want a purse shape? Well you can use the Purse Card Die set from Top Dog Dies to create a fun little bag too! How you ask? Well I'm about to show you!


  • Stamps: Cycle Celebration
  • Card Stock: Crushed Curry, Bermuda Bay, Whisper White, Smoky Slate
  • DSP: Moonlight
  • Ink: Bermuda Bay
  • Accessories: Purse Card Die, Silver Glimmer Paper, Stampin' Dimensionals, Brights Candy Dots, Multipurpose Liquid Adhesive, Decorative Label Punch


To make this adorable little bag start off by cutting a piece of Crushed Curry card stock 4-1/4" x 11" and run it through the Big Shot on the Purse Card Die. Now line up the score line on your card with the a grove on your scoring tool. I have taken a fine point permanent marker and colored in the 6" score line just for this kind of project where I need to line up two points. Now score 3/4" from the center on both sides of the score line. 


Now rotate your card 90 degrees and line up the edge of the handle with the grove and add a score line there. It's difficult to see in the picture so I've indicated the score lines with white lines. Now take your Paper Snips and cut where you see the red lines. Use a craft knife and a ruler to cut off the flap inside the handle. Fold on all the score lines except the very middle one!


Next cut two pieces of Bermuda Bay card stock 1-1/2" x 2-3/4". Apply liquid glue on the angled flaps. Glue the side pieces onto the side flaps. 


Then use liquid glue to glue the bottom flap up onto the sides. Yay! Now you have a bag!


Now it's time to decorate the bag. Grab a couple scraps of Bermuda Bay card stock and run them through the Big Shot on the Purse Card Die to cut out a couple of the handles that do not have the flap. Trim off any card stock extending past the bottom of the handles. Now glue the Bermuda Bay handles onto the bag. Cut a piece of Silver Glimmer Paper 1/8" wide and glue it onto the bottom of the handles. Trim off the Glimmer Paper where it extends past the edge of the handle. Repeat until all your handles have a glimmery band. 


Next cut a piece of Moonlight DSP 2-3/8" x 2-1/2" and cut a piece of Smoky Slate card stock 2-1/2" x 2-5/8". Glue the two pieces together then stick it onto the front of the bag with a few Stampin' Dimensionals. Stamp the greeting from Cycle Celebration onto a scrap of Whisper White card stock in Bermuda Bay ink. Punch out the greeting with the Decorative Label Punch. Add a couple Brights Candy Dots onto the label then stick it on the front of the bag with a Stampin' Dimensional. 


Now your bag is done! I really love the decorative detail on the sides that the purse die creates!


Take a look at some of the other projects I made using this wonderful die set!


Monday, June 16, 2014

Star Spangled Decor

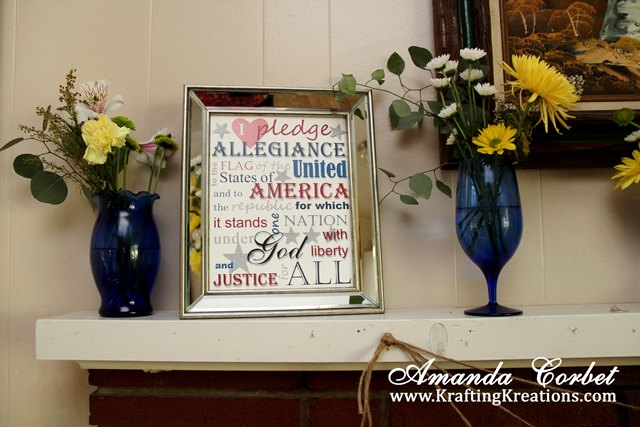
I wanted to spruce up my mantle and have it decorated for the 4th of July. So I came up with a couple fun projects. I really like having a holiday themed banner hanging on the mantle, so here is a fun one with some sparkly red white and blue stars.

Sadly the grocery store didn't have any red and white bouquets that were inexpensive. Red and white flowers would have really made my mantle patriotic for this photo! But the yellow ones are pretty and add some sunshine indoors. I love having fresh flowers in the house.


I also made this fun Pledge of Allegiance printable and popped it into a mirrored 8" x 10" frame. I remember saying this every morning when I was in elementary school. If you want one of these fun printables for yourself but don't want to fiddle around with all that text then hop on over to my store and get one that is ready to print and pop into a frame. 


Now on to the banner tutorial! Here is what you'll need...
  • (6) Real Red card stock 5-1/4" x 5-1/4"
  • (5) Night of Navy card stock 4-1/4" x 4-1/4"
  • (16) Whisper White card stock 3-1/4" x 3-1/4"
  • (5) Real Red card stock 2-1/2" x 2-1/2"
  • (6 Dazzling Diamonds glimmer paper 2-1/2" x 2-1/2"
  • (5) Dazzling Diamonds glimmer paper 1-1/2" x 1-1/2"
  • (10) Red glimmer paper 1-1/2" x 1-1/2"
  • Ink: Night of Navy
  • Accessories: Hearts & Stars decorative mask, Dots & Stripes decorative mask, Stars Framelits, Stampin' Dimensionals, Sponge Daubers, Vanilla Shimmer Smooch Spritz, twine, Cherry Cobbler reinker, Stampin' Spritzer, rubbing alcohol, Stampin' Pierce Mat, Paper Piercing Tool, Eclectic Piercing Pack

1. Die cut the six large pieces of Real Red card stock in the Big Shot with the largest Stars Framelit. Fill a Stampin' Spritzer with 25 drops Cherry Cobbler ink and fill the remainder of the spritzer with rubbing alcohol. Now lay your star in a box and place the stripes decorative mask on top and spritz a few times. Remove the mask, set the star aside to dry, and repeat until all your red stars have stripes. Once they dry they are subtle, but a nice detail. 


2. Use the 3rd from smallest Star Framelit to die to cut the Whisper White card stock. For now you will only need 6 of these. Set aside the rest. Use glue stick to glue a Whisper White star into the center of the red striped stars. Now use your Stampin' Pierce Mat, Paper Piercing tool, and Eclectic Piercing Template to add a row of pierced dots around and inside the Whisper White star. Repeat on the remaining five red stars. 


3. Use the 2nd from smallest Star framelit to die cut the larger pieces of Dazzling Diamonds glimmer paper. Stick the glittery stars inside the Whisper White stars with a Stampin' Dimensional.


4. Now take the rest of your Whisper White stars. Use the Stars decorative mask with a Sponge Dauber and Night of Navy ink to dab some navy stars onto the star die cut. Repeat with the remaining nine stars. 


Don't they look cute?


5. Now use the smallest Stars framelit to die cut the Red Glimmer Paper. Use a Stampin' Dimensional to stick the red glimmery star into the center of the White/Navy star. Repeat with the remaining nine White/Navy stars.


6. Use the 4th from smallest Star Framelit to die cut the Night of Navy card stock pieces. Place the star inside a box with the Stars decorative mask on top. Spritz with Vanilla Shimmer Smooch Spritz. Repeat on the remaining Night of Navy stars and allow it to dry.


7. Die cut the small pieces of Real Red card stock with the 2nd from smallest Stars Framelit and use the Stampin' Pierce Mat, Paper Piercing Tool, and Eclectic Piercing Pack to pierce a row of dots inside the red star. Die cut the small pieces of Dazzling Diamonds Glimmer Paper with the smallest Stars Framelit. Glue the Dazzling Diamonds star inside the Real Red star. Now stick this layered star onto the Night of Navy star with a Stampin' Dimensional. Repeat to finish the four remaining Night of Navy stars.


8. Now cut your twine to the desired length. I don't remember at the moment what the lengths are that I cut my twine, but I will come back later to update that little tidbit of information.


9. Use a hot glue gun to glue the twine onto the backsides of the stars. But make sure that you glue the twine on closer to the top of the star. If you glue it right in the middle the stars will want to flip around to the backside 
(ask me how I know...). And that is no fun after putting all that work into the front side of the stars. 


10. Then simply tie the ends of the twine into a knot and hang it up on your mantle!


Don't you just love it when a project turns out exactly how you envisioned it? That was this one for me! I think it took about an hour and a half to put this all together. If you decide not to do the piercing it goes faster. But those pierced borders are the perfect detail to dress up those stars!


Have you been working on anything fun to add some patriotic colors to your decor before the 4th of July? I've got one more patriotic project planned for this year that I hope to have up next week!