Showing posts with label Shop. Show all posts

Tuesday, February 2, 2016

Shop Update!

I've been busy busy getting lots of new items listed in my Etsy Shop! I've got lots and lots of jewelry items listed now! Hop on over and take a gander.


I also just finished this custom size of my popular Firepit sign and it's shipping out to it's new home today!


If you are looking for a custom sign or mixed media artwork just email me at amandac@kraftingkreations.com or contact me through my Etsy Shop and I will help make your idea become a reality!

Friday, January 15, 2016

Hand Painted Signs now in the Shop!

I've had an Etsy store set up for quite some time now, but I haven't been great about actually listing the items I make. So I'm working away this year to actually get my store stocked up. So yesterday I added my stock of hand painted signs and mixed media canvases into my little shop window on the internet.

If you want to take a gander at my wares just click HERE.


Monday, June 23, 2014

Never Let Anyone Dull Your Sparkle!

Fair warning, this is a sponsored, and picture heavy, post. But... it's also a tutorial! There is even a handy dandy coupon so you can get some DecoArt goodness with a discount! Opinions are 100% mine. I have loved using DecoArt paints for quite some time on any painting project I chose to tackle. I have wanted to make one of these signs for quite a while so it just seemed natural to tie it in with a coupon so you can get some paint goodness at a discount.

So.... here is what I painted...


This sign has some fun bright colors and lot of sparkle!


Do you know it's really hard to get a good photograph of glitter and actually show that it's sparkly? This sign looks so much more fab and sparkly in real life.


So.. what do you need???
  • Electronic cutter
  • 12" x 12" piece of Vinyl
  • 12" x 12" cutting mat for electronic cutter
  • 12" x 12" transfer paper
  • 1 x 6 that is 18" long (or a 5-1/2" wide x 18" long hunk of wood)
  • DecoArt Americana Paint: Titanium White, Citron Green, Whispering Turquoise, Purple Pizzaz
  • DecoArt Multisurface Satin in Dolphin (or an Americana shade of gray, but this is what I had)
  • DecoArt Decou-Page
  • DecoArt Glamour Dust Glitter Paint in Turquoise and Lavender
  • Painter's Tape, four sponges, plastic tray for paint, craft knife, bone folder or old gift card, and a craft paint brush
Start off by making sure your board is sanded to make it smooth then wipe it off with a damp rag to get all the dust of. Now mix Titanium White paint half and half with some water and brush it onto the front and sides of the board. Allow this to dry for at least an hour so it is completely dry. You don't want the vinyl to pull up the paint later. You can also paint the backside with this whitewash too if you are picky like me. 

Create a file in your electronic cutter software to cut your vinyl template with the words. I used my Silhouette Cameo with Silhouette vinyl and it worked like a charm. Don't want to hassle with getting the template just right? Well if you're using a board the same size as the instructions you can just download this pattern from my store. It even comes with a large size JPEG file so you can make it bigger if you want! 


Weed out the letters and borders from the vinyl. Then cover with the 12" x 12" transfer paper. Rub it down really good with a bone folder or an old credit card. Now take a craft knife and carefully cut between the vinyl so you have two separate pieces to work with. Pull up the first piece slowly to make sure you have all the vinyl pieces. 


Then apply the vinyl onto the sign being careful to center it between the top and the bottom edges so your words are straight. Then add the other half just like you did the first. Make sure you rub the vinyl down really good to get it to stick to the board and peel the transfer paper up slowly to make sure all your vinyl pieces stuck. 


Now take some painter's tape and cover up the seam between the two pieces of vinyl, but make sure you don't cover up any of the letters. 


Coat all of the letters with some DecoArt Decou-Page. No matter how well you rub down the vinyl you will always have some paint bleed underneath on the first coat. So if your first coat is clear then that clear layer will bleed through but you can't see it when it's done. So you end up with nice crisp paint lines. 


Add a small squirt of each paint color into some sort of disposable plastic container. 


One color at a time dab the sponge into the paint. Then using a dabbing up and down motion sponge the paint onto the letters. Use a different sponge for each color of paint. Make sure you're careful when you get close to a word that is in a different color. Allow the paint to dry on the letters for about 15-20 minutes then add another coat of paint onto the letters to get nice coverage. 


Allow the letters to dry again for 15-20 minutes or until it is completely dry. Now squirt a little Turquoise Glamour Dust Glitter Paint into your tray. Take a fresh sponge and sponge just the bottom half of the letters you painted in the Whispering Turquoise. Allow that to dry for 10-15 minutes and add a second coat just to the bottom half of the letters. This gives them kind of a sparkly ombre look. 


Now squirt some Lavender Glamour Dust Glitter Paint into your container and with a fresh sponge dab on the glitter paint over the word "sparkle". Allow this to dry for 10-15 minutes. Repeat to add two more coats of Lavender glitter paint allowing it to dry between each layer. 


Now just let the paint dry completely. I left it sitting for about an hour but that's because I had to cook dinner. 30-45 minutes should do the trick though. Then just gently peel off the vinyl. Carefully use a craft knife or needle tool to pick up the edges of the center of the letters like e, a, o. 


Now your sign is done! If you would like to protect all your hard work you could add a spray sealer of Americana Glossy or Matte sealer to protect your paint while still letting the glitter sparkle and shine. Just add some hangers to the back and hang it up. Or just lean it on a shelf for display. 


Now are you ready for a coupon??? Of course you are! Who doesn't want to get crafty goodies for less. 

Get free shipping!!!

Here is what you have to do...


Make sure you put something in your cart from one of these categories: 


When you are ready to check out add the following coupon code: 


Then your order will have free shipping! This coupon code is valid for only US addresses and only from June 22nd to June 30th! So head on over and snatch up the paint so you can make one of these fun signs for your home!

Do you love this sign and want one for your space but don't want to have to get your fingers painty? Here it is in my shop! It took a couple tries to get a good tutorial done for you. So I actually ended up with a couple of these signs. Mine has the word "sparkle" in turquoise. So I thought I would share this lovely with someone who would prefer to have some purple thrown in. There are just so many great colors of the Glamour Dust Glitter Paint I had to play with more than just one!

What projects would you use glitter paint on to add some sparkly glam to your space?
Linking up to these parties. 

Monday, June 16, 2014

Star Spangled Decor

I wanted to spruce up my mantle and have it decorated for the 4th of July. So I came up with a couple fun projects. I really like having a holiday themed banner hanging on the mantle, so here is a fun one with some sparkly red white and blue stars.

Sadly the grocery store didn't have any red and white bouquets that were inexpensive. Red and white flowers would have really made my mantle patriotic for this photo! But the yellow ones are pretty and add some sunshine indoors. I love having fresh flowers in the house.


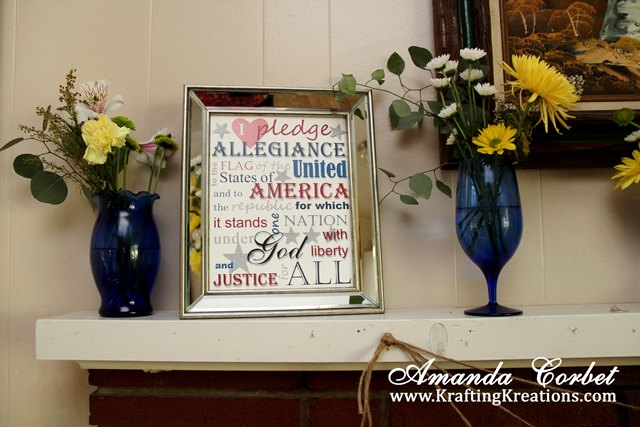
I also made this fun Pledge of Allegiance printable and popped it into a mirrored 8" x 10" frame. I remember saying this every morning when I was in elementary school. If you want one of these fun printables for yourself but don't want to fiddle around with all that text then hop on over to my store and get one that is ready to print and pop into a frame. 


Now on to the banner tutorial! Here is what you'll need...
  • (6) Real Red card stock 5-1/4" x 5-1/4"
  • (5) Night of Navy card stock 4-1/4" x 4-1/4"
  • (16) Whisper White card stock 3-1/4" x 3-1/4"
  • (5) Real Red card stock 2-1/2" x 2-1/2"
  • (6 Dazzling Diamonds glimmer paper 2-1/2" x 2-1/2"
  • (5) Dazzling Diamonds glimmer paper 1-1/2" x 1-1/2"
  • (10) Red glimmer paper 1-1/2" x 1-1/2"
  • Ink: Night of Navy
  • Accessories: Hearts & Stars decorative mask, Dots & Stripes decorative mask, Stars Framelits, Stampin' Dimensionals, Sponge Daubers, Vanilla Shimmer Smooch Spritz, twine, Cherry Cobbler reinker, Stampin' Spritzer, rubbing alcohol, Stampin' Pierce Mat, Paper Piercing Tool, Eclectic Piercing Pack

1. Die cut the six large pieces of Real Red card stock in the Big Shot with the largest Stars Framelit. Fill a Stampin' Spritzer with 25 drops Cherry Cobbler ink and fill the remainder of the spritzer with rubbing alcohol. Now lay your star in a box and place the stripes decorative mask on top and spritz a few times. Remove the mask, set the star aside to dry, and repeat until all your red stars have stripes. Once they dry they are subtle, but a nice detail. 


2. Use the 3rd from smallest Star Framelit to die to cut the Whisper White card stock. For now you will only need 6 of these. Set aside the rest. Use glue stick to glue a Whisper White star into the center of the red striped stars. Now use your Stampin' Pierce Mat, Paper Piercing tool, and Eclectic Piercing Template to add a row of pierced dots around and inside the Whisper White star. Repeat on the remaining five red stars. 


3. Use the 2nd from smallest Star framelit to die cut the larger pieces of Dazzling Diamonds glimmer paper. Stick the glittery stars inside the Whisper White stars with a Stampin' Dimensional.


4. Now take the rest of your Whisper White stars. Use the Stars decorative mask with a Sponge Dauber and Night of Navy ink to dab some navy stars onto the star die cut. Repeat with the remaining nine stars. 


Don't they look cute?


5. Now use the smallest Stars framelit to die cut the Red Glimmer Paper. Use a Stampin' Dimensional to stick the red glimmery star into the center of the White/Navy star. Repeat with the remaining nine White/Navy stars.


6. Use the 4th from smallest Star Framelit to die cut the Night of Navy card stock pieces. Place the star inside a box with the Stars decorative mask on top. Spritz with Vanilla Shimmer Smooch Spritz. Repeat on the remaining Night of Navy stars and allow it to dry.


7. Die cut the small pieces of Real Red card stock with the 2nd from smallest Stars Framelit and use the Stampin' Pierce Mat, Paper Piercing Tool, and Eclectic Piercing Pack to pierce a row of dots inside the red star. Die cut the small pieces of Dazzling Diamonds Glimmer Paper with the smallest Stars Framelit. Glue the Dazzling Diamonds star inside the Real Red star. Now stick this layered star onto the Night of Navy star with a Stampin' Dimensional. Repeat to finish the four remaining Night of Navy stars.


8. Now cut your twine to the desired length. I don't remember at the moment what the lengths are that I cut my twine, but I will come back later to update that little tidbit of information.


9. Use a hot glue gun to glue the twine onto the backsides of the stars. But make sure that you glue the twine on closer to the top of the star. If you glue it right in the middle the stars will want to flip around to the backside 
(ask me how I know...). And that is no fun after putting all that work into the front side of the stars. 


10. Then simply tie the ends of the twine into a knot and hang it up on your mantle!


Don't you just love it when a project turns out exactly how you envisioned it? That was this one for me! I think it took about an hour and a half to put this all together. If you decide not to do the piercing it goes faster. But those pierced borders are the perfect detail to dress up those stars!


Have you been working on anything fun to add some patriotic colors to your decor before the 4th of July? I've got one more patriotic project planned for this year that I hope to have up next week! 

Friday, June 13, 2014

You Are My Sunshine Printable

This is one of the decorations I made for the baby shower. It was a fun printable with words from You Are My Sunshine. I just adore how this came out! It's so fun with the blues, yellows, and gray with all those fun fonts and a little chevron pattern going on.


I popped it into a 11" x 14" frame with an 8" x 10" mat and it was done! I took the glass out for these photos, but it has the glass back in it now. I didn't want to blind you with glare coming off the glass.


Love love love this!


I think I might have to find a spot in my craft room to hang this permanently. It would look oh so adorable in a nursery too!


And here it is on the table with the favors at the baby shower. For all the other deets on the baby shower just click HERE. You will find lots of links to recipes and games.


If you want to get one of these fun printables to bring some sunshine into your home or for a fabulous party decor then just click here to head on over to my shop to get the download.

Linking up at these fabulous parties:
Take a Look Tuesday at Sugarbee Crafts
Create Link Inspire at The Crafty Blog Stalker
Inspire me Monday at My Uncommon Slice of Suburbia
Patriotic Categorically Crafting at Someday Crafts
Lou Lou Girls Fabulous Party at Lou Lou Girls
Your Whims Wednesday at My Girlish Whims
Wow Me Wednesday at Ginger Snap Crafts


Tuesday, June 10, 2014

Rain Shower Baby Shower Invitations

My sweet sister-in-law is expecting a little boy. So naturally I offered to host a baby shower. She actually got two baby showers because her family lives an hour away. So rather than have a bunch of people drive that far it was determined that it would be easier just to have one in each location. The invites I posted yesterday were for the other shower. Kari had asked me to make both and I was happy to help.

To keep it simple (and cute) I decided to just go with the rain shower theme and stick with light blue, gray, and yellow.


I used the Hardwood and Inviting stamp sets as well as the Decorative Dots embossing folder for the clouds and Watercolor Wonder DSP for the banners. Soft Sky card stock with Soft Sky in really add a nice pattern to the background.  For the clouds and Soft Sky piece I used the My Digital Studio kit Sweet Dreams with my Silhouette to cut out all the pieces. 


It's not nearly as pretty as in real life, but behind the rain drop cut outs you can see the sparkle of some Silver Glimmer paper.


I finished them off with some Daffodil Delight stitched grosgrain ribbon that is now retired.


I just love that bright banner like a ray of sun shine poking out behind the clouds! 


I also had a lot of fun creating the inside panel with all the necessary information in a subway art kind of style. Some of the information has been changed to protect privacy.


I had so much fun with these! I also made several extra so there are a few sets sitting in my Etsy store. Click on over to get some if you have a need for some adorable baby shower invitations!