Friday, May 31, 2013

New Stampin' Up! Catalog!!!!

The brand new Stampin' Up! catalog is here an you can begin ordering from it today! There are so many wonderful goodies in this new catalog! My wish list is 3 pages long! I just know you're gonna love it! 


Also, retiring items from the 2012-2013 Catalog are available to order (while supplies last) until June 3rd. 

There is also a nice little sale going on: 

So don't waste any time! Click below to begin shopping for your retiring items and your must have new goodies including the fabulous new In Colors! 


Royal Thank You!

It's Friday again! For a short week it has been very busy and seemed very long! Well it's time for another Friday Mashup challenge. Take a look at and card I made. 
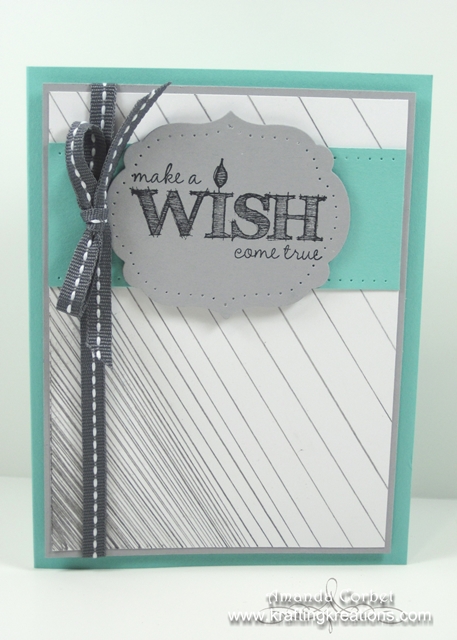


  • Stamps: Oh Hello! 
  • Card Stock: Pacific Point, Whisper White
  • Ink: Pacific Point
  • Accessories: Whisper White Stitched Grosgrain Ribbon, Ovals Framelits, Pacific Point Marker, Paper-Piercing Tool, Stampin' Pierce Mat, Occasions Piercing Pack, Stampin' Dimensionals, Dazzling Details. 


Photo Source
Here's your Mashup Challenge:
  1. Create a project using "the colors of your favorite sports team"
  2. Create a "clean and simple project".
  3. Or Mash it Up and create a "clean and simple project using the colors of your favorite sports team".

This week's challenge is all about your favorite sports team. Well... I'm not really a sporty kind of person. They just don't really interest me. Thankfully my husband has the same opinion I do and I don't have to suffer through watching the games. So for this challenge I just went with a local team that has the easiest colors possible. The Royals and their blue and white colors. Pacific Point just happens to be pretty close to Royals blue, not quite there, but the closest that SU has to it. I was also in a hurry to get this done (because of the busy week) so clean and simple was right up my alley.

I started off with a 5-1/2" x 8-1/2" piece of Pacific Point card stock and scored it at 4-1/4". I stamped the chevrons from Oh Hello onto the card front in Pacific Point ink alternating images as I went. I didn't bother with the Stamp-A-Ma-Jig. I needed to get this done quickly, so I just eye-balled it. I made three rows of chevrons in a stair-step fashion then I wrapped a piece of Whisper White Stitched Grosgrain Ribbon around the bottom of the card front, tied it into a bow, and trimmed the ribbon ends.


I stamped the greeting in Pacific Point ink onto a scrap of Whisper White card stock then cut it out with the third from smallest Oval Framelit in the Big Shot. I used my Paper-Piercing Tool, Stampin' Pierce Mat, and Occasions Piercing Pack to pierce holes around the oval. To add some dimension to the text I took my Pacific Point marker and used the fine-point end to shade the letters in the greeting. Then I adhered the oval onto the card front with a few dimensionals. 


Now of course I couldn't just stop there. If you've read my blog for any length of time you know I gotta add some sort of bling to everything! So I took out my trusty Dazzling Details and quickly drew inside the stitched chevrons to add my sparkle. 

That was it! I think that's about as clean and simple as I can manage. What can I say... I just love adding details! 

If you have a chance head on over to the Friday Mashup to see what the rest of the design team has created, and to enter your project in the challenge! 


Thursday, May 30, 2013

Craft Project Central!

Card File Box and Business Card Holder: 
Here’s a cute and easy little box to make to store your cards in.  The box has dividers so you can sort your cards by different occasions.  This project also includes a business card or small note pad holder, that can also be used to hold addresses, and postage stamps!  Makes a great gift or class or club project!


This gorgeous project comes to you designed by Buffy!

If you would like to subscribe to the May edition of Craft Project Central and get 10 wonderful tutorials for only $10 then click HERE!


Craft Project Central!

Birthday Gift Box and Card: 
This beautiful gift box is perfect for giving a small gift to a special person.  The matching card is sure to impress too.  This fun project can be used for more than just birthdays!  How about as a teacher appreciation gift, or as a thank you gift to a friend or neighbor!  Also makes for a fun class project!


This lovely and fun project comes to you designed by Chris!

If you would like to subscribe to the May edition of Craft Project Central and get 10 wonderful tutorials for only $10 then click HERE!


Craft Project Central!

Best of Flowers Cards and Tote: 
Have a blooming good time making this cheerful and pretty Best of Flowers card tote and cards!  In this project you will learn how to make an easy hidden message card and a scaled down version of an easel card.  Lot of crafting fun and the set makes a wonderful gift for teachers, co-workers, neighbors, you name it!  Also makes a fun class project!


This beautiful project comes to you designed by Sharon!

If you would like to subscribe to the May edition of Craft Project Central and get 10 wonderful tutorials for only $10 then click HERE!


Craft Project Central!

Oval Box and Card Set: 
Here’s a soft, delicate gift box and matching card for you to make.  Perfect for filling with jewelry, candy, or a small gift, this sturdy, yet elegant gift box is sure to be a hit.  Present it with the matching card and have a coordinating gift for that special person in your life.  This project also makes for a fun class or club project!


This beautiful set comes to you designed by Tara!

If you would like to subscribe to the May edition of Craft Project Central and get 10 wonderful tutorials for only $10 then click HERE!


Craft Project Central!

Pocket Pouch Satchel and Cards: 
Sometimes you want just a little extra pizzazz when it comes to sending out a note card to someone special!  This project is perfect for that need.  This adorable satchel holds four coordinating cards and can be done up in lots of varied themes to appeal to almost anyone, young or old!  And while you’re at it, make several sets to have on hand for gifts!
 

This absolutely gorgeous project comes to you designed by Donna!

If you would like to subscribe to the May edition of Craft Project Central and get 10 wonderful tutorials for only $10 then click HERE!


Wednesday, May 29, 2013

Craft Project Central!

Interactive Gift Box and Card: 

Are you looking for a fun way to present a special birthday gift?  This fun interactive box has a special drawer where you can place your gift.  When the recipient opens the drawer, out pops open a special little note card where you can hide a message.  The fun gift box is sure to surprise whoever receives it and the matching birthday card is sure to impress.  This project is also a fun class project!


This tutorial was designed by me! And here is a short video showing you how this fun gift box is interactive! 


In the video I meant to say May edition of Craft Project Central. For some reason my brain has been on June. 

To get this fun tutorial just subscribe to the May edition and then meet one of the bonus project requirements of subscribing to two or more months in a row, putting the Craft Project Central badge on your blog, or referring a friend and when they subscribe, letting CPC know!


Friday, May 24, 2013

Make a Wish!

Good morning! It’s Friday! That means it’s time for another Friday Mashup Challenge!  Getting my Artisan Contest entry done really threw me off my usual schedule and now I’m so behind!  I’ll get caught back up eventually. This week’s challenge was really a tough one. It took me quite a while to come up with something and here it is!


  • Stamps: Make a Wish
  • Card Stock: Coastal Cabana, Smoky Slate, Whisper White
  • Ink: Black Stazon
  • Accessories: Basic Gray Stitched Grosgrain Ribbon, Labels Framelits, Festive Paper Piercing Pack, Paper Piercer, Stampin’ Pierce Mat, Stampin’ Dimensionals, ruler, pencil, Essentials Paper Piercing Pack


Photo Source
Here's your Mashup Challenge:
  1. Create a project using "your choice of a Neutral & a Splash of one Bright Color".
  2. Create a project "using a Pencil (regular graphite #2)".
  3. Or Mash it Up and create a project "using pencil & your choice of a neutral & a Splash of a Bright Color".

I started off with a piece of the new Coastal Cabana card stock cut at 5-1/2” x 8-1/2” and score it at 4-1/4”. This is such a wonderful bright color! Next I cut a piece of Whisper White card stock 3-7/8” x 5-1/8”. I used a pencil and a ruler to randomly draw lines at an angle across the card stock. I sprayed some hair spray onto the card stock to prevent the pencil lines from getting smudged.  I was going for kind of an ombre look with it darker on corner and lighter in the other corner. I adhered this onto a 4” x 5-1/4” piece of the new Smoky Slate card stock.


Next I cut a piece of Coastal Cabana card stock 1-1/2” x 3-7/8” then pierced along both long edges with my Paper Piercer, Stampin’ Pierce Mat, and Essentials Paper Piercing Pack. Then I adhered it onto the Whisper White card stock. I tied a piece of Basic Gray Stitched Grosgrain Ribbon around the panel and tied it into a bow, then adhered this panel onto the card front with Stampin’ Dimensionals.


I stamped the greeting from Make a Wish onto a scrap of Smoky Slate card stock in Black Stazon ink. I cut the greeting out on the Big Shot with the third from smallest Labels Framelit. Then I used the Festive Piercing Pack to pierce around the shape before adhering the label onto the card front with Stampin’ Dimensionals.

I love how the sketchy looking greeting pairs with the pencil lines! This has been such a fun, and challenging, challenge!


Head on over to the Friday Mashup to see what the rest of the design team has come up with!


Watermark Photos with My Digital Studio!

Learn how to add a watermark to your project photos using My Digital Studio! 


Tuesday, May 21, 2013

Wisteria Flower

Good morning! I have a card to share with you that I created quite a while ago. Take a look: 


  • Stamps: Sassy Salutations
  • DSP: Tea for Two
  • Card Stock: Crumb Cake, Lucky Limeade, Elegant Eggplant, Wisteria Wonder
  • Ink: Early Espresso
  • Accessories: Blossom Punch, Silver Glimmer Paper, Snow Flurry Die, In Color Designer Brads, Rhinestones, Honeycomb embossing folder, Stampin’ Dimensionals


I started off by cutting a piece of Crumb Cake card stock 5-1/2” x 8-1/2” and scored it at 4-1/4”. Next I cut a piece of Tea for Two DSP 2” x 4-1/4”. I sponged both long edges of the DSP with Early Espresso ink and then adhered the DSP onto the left side of the card front. I stamped the greeting from Sassy Salutations onto the bottom right corner of the card front in Early Espresso ink.


I then ran the card front through the Big Shot in the Honeycomb embossing folder and sponged around the outside edges to highlight some of the texture detail. The flower was from scraps in my scrap bin. The Lucky Limeade lacy circle was die cut from the Perfect Pennants Die, the Wisteria Wonder and Elegant Eggplant flowers were punched with the Blossom Punch, and the Silver Glimmer Paper piece is from the Slow Flurries Die that is retired now. 


I stacked the flowers and Glimmer Paper up and used my Paper Piercer and Stampin' Pierce Mat to pierce a hole in the center and added a Wisteria Wonder patterned brad. Then I adhered the flower to the lacy circle with a Stampin' Dimensional, and the whole thing was adhered onto the card front with a Stampin' Dimensional. To finish it off I added a couple of Rhinestones next to the greeting for just a little more bling. 

I love using things in my scrap bin to put together a nice card! What do you think? 


Saturday, May 18, 2013

Craft Project Central!

Pocket Pouch Satchel and Cards: 

Sometimes you want just a little extra pizzazz when it comes to sending out a note card to someone special!  This project is perfect for that need.  This adorable satchel holds four coordinating cards and can be done up in lots of varied themes to appeal to almost anyone, young or old!  And while you’re at it, make several sets to have on hand for gifts!


This gorgeous butterfly project was designed by Donna

If you would like to subscribe to the May edition of Craft Project Central and get 10 wonderful tutorials for only $10 then click HERE!


Friday, May 17, 2013

Thank U!

Good morning everyone! Happy Friday! Sorry I’ve been MIA this last week and a half. I have been so busy trying to get my projects for my Artisan Design Team Contest entry done and with the Make and Take last week. I just got the supplies from the Make and Take put away last night! Sorry, no peeking. You don’t get to see the projects I made until after I get back from Convention.

Anyway… on to the Friday Mashup card from last weeks challenge. I’ll post the challenge for this week this afternoon.


  • Stamps: A Round Array
  • DSP: Quatrefancy
  • Card Stock: Strawberry Slush, Whisper White
  • Ink: Strawberry Slush
  • Accessories: 7/8” Scalloped Circle Punch, Apothecary Accents Framelits, Dazzling Details , Stampin’ Dimensionals


Here's your Mashup Challenge:
  1. Create a project using "the sketch".
  2. Create a "set of cards".
  3. Or Mash it Up and create a "set of cards using the sketch".

I guess I missed the mash up part huh? I didn’t even realize that until yesterday. Oops!  Oh well. I started off with a piece of Strawberry Slush card stock cut at 5-1/2” x 8-1/2” and scored at 4-1/4”. I had these scraps sitting in my bin from the fabulous new Quatrefancy DSP. I used most of one package to make some 3D swaps for convention.  So I cut down the pieces to 2” x 3” and 2” x 2-1/2”. I adhered the DSP onto the card front.

I stamped the greeting from A Round Array ( I love this set!) in Strawberry Slush onto a scrap of Whisper White card stock, then punched it out with my 7/8” Scalloped Circle Punch. I already had the Whisper White label shape that was cut with the Apothecary Accents Framelits. So I just used a Stampin’ Dimensional to adhere the scalloped circle onto the label, and another to adhere the label onto the card. Just to add a little bit of sparkle, because a card always has to have at least a little bit of sparkle, I added some Dazzling Details around the Whisper White label shape.


Bright, fun, and cheerful! Did you get a chance to play along with last week’s Friday Mashup challenge? Take a look at the Rock Starand Glammettes that were chosen! 


Celebrate Pool Party

Okay, now I have today’s Friday Mashup challenge to share with you! Yay! It’s on time too! This challenge was an easy one for me and used up more of my every growing scrap bin.


  • Stamps: Perfectly Penned
  • DSP: Sycamore Street (SAB), Silver Glimmer Paper
  • Card Stock: Pool Party, Pool Party Core’dinations
  • Ink: Midnight Muse
  • Accessories: Pop Up Posies Designer Kit, Vanilla Shimmer Smooch Spritz, Paper Snips, Pool Party Baker’s Twine, Honeycomb embossing folder, Stampin’ Dimensionals, Stampin’ Sanding Block, Paper-Piercing Tool, Stampin’ Pierce Mat


Photo Source 
The Fabulous Maryann @ Domestically Speaking

Here's your Mashup Challenge:
  1. Create a project using "A Monochromatic Color Scheme".
  2. Create a project "using Baker's Twine".
  3. Or Mash it Up and create a "Monochromatic project using some Baker's Twine".


I was in a hurry so everything that I used for this card was already out on my table top or in my scrap bin. I love monochromatic cards! So much fun! So I went with my all-time favorite color Pool Party! You have no idea how relieved I was when I saw Stampin’ Up was keeping Pool Party.


Back to the card... I started off with a piece of Pool Party (the best color EVER!) card stock cut at 5-1/2” x 8-1/2” and scored it at 4-1/4”. Next I adhered a piece of Pool Party Core’dinations that was 3-1/2” x 5-1/4” and already textured with the Honeycomb embossing folder and sanded. I cut a piece of Silver Glimmer Paper 1/2” x 5-1/4” and adhered it just above the textured card stock.


I cut a scrap of Sycamore Street DSP down to 1-1/2” x 3-3/4”. I stamped the greeting from Perfectly Penned onto the DSP in Midnight Muse ink and used Paper Snips to cut the right side in a dove-tail shape. I adhered this onto the card front with Anywhere Glue Stick on the left side and a Stampin’ Dimensional on the right side.  Next I took some of the flowers from the Pop Up Posies Designer kit, stacked them up, pierced them with my Paper Piercing Tool and Stampin’ Pierce Mat and added a brad from the kit in the center of the flower.


I fluffed up the petals then sprayed the flower with Vanilla Shimmer Smooch Sprtiz before adhering it onto the left side of the banner with Stampin’ Dimensionals. Finally I just wrapped a long piece of Pool Party Baker’s Twine around the card a few times and tied it into a bow. 


If you have a chance head on over to the Friday Mashup to see what the rest of the design team has created and maybe even play along! 


Tuesday, May 14, 2013

Craft Project Central!

This and That Desk Set:

With teacher appreciation week and the end of the school year quickly approaching, this desk set would be the perfect coordinating gift!  The projects in this desk set include Note Cards and a pretty Note Card Holder to put them in, a Pencil Holder, Post-it Note Holder, and more!  In addition to teachers, this set makes a great gift for friends, neighbors, co-workers, and don’t forget to make a set for yourself!


This beautiful desk set was created by Julie

If you would like to subscribe to the May edition of Craft Project Central and get 10 wonderful tutorials for only $10 then click HERE!


Saturday, May 11, 2013

Craft Project Central!

Clutch Purse Card Set: 

Everyone needs cards, don’t they?  Well, here’s a card set anyone would love to have!  This card set includes six cards with coordinating envelopes and a pretty little clutch purse to put them in!  The set would make a great teacher gift for the end of the school year, and a fun stamp class, too!   Make several sets to have on hand for last minute gifts and while you’re at it, make a set for yourself!


This bright and fun set was designed by Christy

If you would like to subscribe to the May edition of Craft Project Central and get 10 wonderful tutorials for only $10 then click HERE!


Craft Project Central!

Birthday Explosion Box and Greeting Card: 

We celebrate birthdays the most it seems, and it’s hard to dress up money or a gift card that we so often give.  Make this birthday themed explosion box that can hold a gift card, money, or small gift items, and can also be used for a cute centerpiece for the party table!  When  you give this box, your present will look thoughtful and elegant!  This project is great too, for small classes and camps!


This gorgeous birthday set was designed by Monika

If you would like to subscribe to the May edition of Craft Project Central and get 10 wonderful tutorials for only $10 then click HERE!


Craft Project Central!

Spring Framed Art and Cards: 

Butterflies are synonymous with Spring, and this framed art makes the perfect decor or gift for the season!  The banner that adorns the top left corner of the frame features letter tags that each have a decorative edge created from assorted punches, and the 3D butterflies are each decorated with a sparkly rhinestone jewel.  The bottom right corner of the frame is adorned with punched flowers that have a soda pop top in the center.  This ensemble also features four coordinating note cards!  Make this ensemble for yourself, as a gift, or as a fun class project!


This gorgeous and fun spring project was designed by Regina

If you would like to subscribe to the May edition of Craft Project Central and get 10 wonderful tutorials for only $10 then click HERE