Saturday, September 29, 2012

Treasure Chest Gift Box and Card!

It's time to share with you my project for the September edition of Craft Project Central. Here it is! 

Treasure Chest Gift Box and Card: 

Do you have some precious treasure that you would like to give to someone?  What better way to keep it safe than in this Treasure Chest Gift Box?!  The Treasure Chest would also make a wonderful decoration or card holder at a buccaneer’s pirate party or a pretty princesses’ party!  The gift box is 5" tall and 8" wide and is just waiting to be filled with treasures!


To get the instructions for this bonus project, just subscribe to September and then meet one of the bonus project requirements of subscribing to two or more months in a row, putting the Craft Project Central badge on your blog, or referring a friend and when they subscribe, letting us know! 

Would you like to win a FREE subscription for the September Craft Project Central projects? All you have to do is leave a comment on this post with your email address! I will draw a winner Friday the 5th of October! 


Friday, September 28, 2012

Autumn Leaves Friday Mashup 78!

It's Friday again! Yay! Another week done! That means that it's time for another wonderful Friday Mashup challenge. But first take a look at my card featuring some beautiful leaves. 


  • Stamps: French Foliage, Friendly Phrases, En Francais
  • Card Stock: Sahara Sand, Pumpkin Pie, Early Espresso, Very Vanilla
  • Ink: Daffodil Delight, Pumpkin Pie, Cajun Craze, Cherry Cobbler, Crumb Cake, Early Espresso
  • Accessories: Sponge Daubers, Embossing Buddy, Gold embossing powder, Heat Tool, Stampin' Pierce Mat, Paper Piercer, Gold Brads, Stampin' Dimensionals, Early Espresso Baker's Twine, 2-Way Glue Pen, Sticky Strip, Corner Rounder Punch, Decorative Label Punch


So here is the "Mashup" Challenge:
  1. Make a "Fall Leaves" themed project.
  2. Or Make a project with "Twine".
  3. Or "Mash it Up" and create a "Fall Leaves Themed project using Twine". 


I've also created a video to show you exactly how I created this fall inspired card! I hope you like it! 

Sahara Sand 4-1/4" x 11", scored at 5-1/2"
Very Vanilla 2" x 5-1/2"
Early Espresso 2-1/8" x 5-1/2"


Thursday, September 27, 2012

Starfruit Thank You

I guess I’ve been in the mood to make “Thank You” cards lately. Maybe that’s a hint that I need to send them more. This card I created for the SCCSC138 sketch challenge on Stampin’ Connection. Take a look:
  

  • Stamps: Blooming with Kindness, French Foliage, Woodgrain
  • Card Stock: Crumb Cake, Early Espresso, Very Vanilla
  • DSP: Comfort Café
  • Ink: Summer Starfruit, Early Espresso, Crumb Cake
  • Accessories: Summer Starfruit Stitched Satin Ribbon, Window Frames Framelits, Apothecary Accents Framelits, Paper Piercer, Stampin’ Pierce Mat, Essentials Paper Piercing Pack, Stampin’ Dimensionals, Glimmer Brads
Here is the sketch that was created by yours truly:


This card was quick and fun! I started off with a 5-1/2” x 8-1/2” piece of Crumb Cake card stock and scored it at 4-1/4”. Then I stamped the Woodgrain background image onto the card front in Crumb Cake ink. This just gives a nice subtle background pattern to the card. Next I cut three pieces of Comfort Café DSP 3/4” x 3-3/4”. I adhered these strips onto the right side of the card front. Then I wrapped a piece of Summer Starfruit Stitched Satin ribbon around the card front and tied it into a bow.

Next I grabbed a scrap of Very Vanilla card stock and stamped the leaf from French Foliage onto the card stock in Summer Starfruit ink. I stamped the greeting from Blooming with Kindness on top of the leaf in Early Espresso ink. Then I cut out the greeting with the label from the Apothecary Accents Framelits. I used the second smallest Window Frames framelit on a scrap of Early Espresso card stock to cut out the mat.

I adhered the stamped Very Vanilla label onto the Early Espresso window frame. Then I used the Essentials Paper Piercing Pack, Paper Piercer, and Stampin’ Pierce mat to add the pierced holes around the Early Espresso window frame shape. I adhered this layer onto the card front with a Stampin’ Dimensional.


Finally I used the Paper Piercer again to add the three holes in the upper left hand corner of the card front and added a gold Glimmer Brad into each hole. The gold Glimmer Brad doesn’t look too far off from the Summer Starfruit color. That’s it! 


Wednesday, September 26, 2012

Blog Candy Winner Again!

Unfortunately Sarah did not claim her Cricut prize package. I cannot send the prize without an address. So I will draw another name from those who left comments on my post. The new winner is.......

Tricia! 
"Thanks for all the great posts! I have learned a lot from you. And now a chance to win this! Wow!"

Please send me an e-mail at amanda.c09@hotmail.com with your mailing address so I can get your goodies out to you! 


Craft Project Central!

Spooky Treats Set and Card: 

Get a jump start on your Halloween projects!  These cute containers can hold great treats for your kids, co-workers, teachers, and friends!  And if you don’t celebrate Halloween or make Halloween treats, you can still use the templates to make goodies for other occasions or holidays!


This spooky project comes to you designed by Heidi! If you have a chance please stop by Craft Project Central and leave Heidi a comment on her project! 

If you would like to subscribe to the September edition of Craft Project Central and get 10 wonderful tutorials for just $10 then click HERE


Tuesday, September 25, 2012

Lucky Birthday Owl

I have the final card from the August Make and Take to share with you today! This one uses the adorable Owl punch and lots of chevrons! Take a look:


  • Stamps: Itty Bitty Banners
  • DSP: Summer Smooches, Silver Glimmer Paper
  • Card Stock: Basic Grey, Basic Black, Lucky Limeade, Sahara Sand, Whisper White
  • Ink: Black Stazon
  • Accessories: Chevron Embossing Folder, Paper Piercer, Stampin’ Pierce Mat, Stampin’ Dimensionals, 2-Way Glue Pen, Owl Punch, Bitty Banners Framelits, Neutrals Brads


For this fun birthday card I started off with a piece of Basic Grey card stock cut at 5-1/2” x 8-1/2” and scored at 4-1/4”. Next I cut a piece of Summer Smooches DSP 2-1/2” x 4-1/2” and adhered it onto a 2-5/8” x 4-5/8” piece of Basic Black card stock. This was adhered onto the card front.

Then I cut a piece of Lucky Limeade card stock 1-3/4” x 3”. I stamped the greeting from Itty Bitty Banners onto a scrap of Whisper White card stock in Black Stazon ink. I cut out the shape by running the card stock through the big shot with the Bitty Banners Framelits. This was adhered onto the bottom of the Lucky Limeade card stock.

Next up was the owl. I used the Owl punch to punch the body from Basic Grey card stock. The eyes were from Whisper White, Sahara Sand, and Basic Black card stock. The belly was from a scrap of the background DSP  and finally Silver Glimmer paper was used for the heart. All the pieces were adhered together with a 2-Way Glue Pen.


The owl was adhered onto the Lucky Limeade card stock with a Stampin’ Dimensional. The panel was adhered onto the card front with a couple Stampin’ Dimensionals. Finally I used my Paper Piercer and Stampin’ Pierce Mat to pierce the three holes in the lower right hand corner of the card front. I added a Black brad into each hole.

That’s it! Cute and relatively fast to put together? It’s been a while since I’ve pulled out my Owl punch. Have you used the Owl punch recently? 


Monday, September 24, 2012

Hello Eleanor!

Hello everyone! Here is another fun Make and Take card for you! This one features the beautiful Everything Eleanor stamp set. Take a look:


  • Stamps: Everything Eleanor, Lovely and Lacy
  • DSP: Floral District           
  • Card stock: Raspberry Ripple, Daffodil Delight, Whisper White, Old Olive
  • Ink: Old Olive, Raspberry Ripple, Sahara Sand
  • Accessories: Scallop Edge Border Punch, Paper Snips, Rhinestones, Stampin’ Dimensionals


This really was a quick and easy card. I started off by cutting a piece of Raspberry Ripple card stock 5-1/2” x 8-1/2” and scored it at 4-1/4”. Next I cut a piece of Daffodil Delight card stock 3-1/2” x 4-1/2” and punched just the two long sides with the Scallop Edge Border Punch. I adhered this piece into the center of the card front.

Next I cut a piece of Floral District DSP 2-1/4” x 5-1/2” and stamped the swirl image from Everything Eleanor a couple times in Old Olive ink. I adhered this onto a 2-3/8” x 5-1/2” piece of Old olive card stock then adhered this layer onto the card front.

For label I just stamped the label image onto a scrap piece of Whisper White card stock in Sahara Sand ink. I stamped the greeting from Lovely and Lacy into the center of the label in Raspberry Ripple ink. Then I used Paper Snips to cut out the label shape and adhered it onto the card front with a couple Stampin’ Dimensionals. I added one large Rhinestone onto each side of the label shape just to add a little bit of sparkle.


See? I told you it was easy. The thing my guests had the most difficult time with was how to position the swirl so it looked like mine! 


Sunday, September 23, 2012

Blog Candy Winners!

It's time to draw the winners from my Birthday Blog Candy! So here goes! 

The winner for the Stampin' Wheel set is.....

Hillary!!! "Happy birthday! What a wonderful gift!"

The winner for the Cricut set is.....

Sarah!!! "Thanks for the great blog candy"

Ladies, please send me an e-mail at amanda.c09@hotmail.com with your shipping address so I can send you your goodies! 

Thank you all for the lovely comments! 


Craft Project Central!

Tea Tag Gift Box and Pop-Up Card: 

This lovely ensemble makes the perfect gift or project for an upcoming class or workshop!  The tea bag box holds several tea bags, and the coordinating card is sure to "wow" them when they open it and see the pop-up tea cup!


This beautiful project was created by Laurie! If you have a chance please head on over to Craft Project Central and leave Laurie a comment on her project! 

If you would like to subscribe to the September edition of Craft Project Central and get 10 fabulous tutorials for just $10 then click HERE


Friday, September 21, 2012

Fall Trees Friday Mashup 77

It’s Friday! It’s time for another Friday Mashup Challenge! Are you ready? Well take a look at the card I made then maybe you’ll be ready.


  • Stamps: Lovely as a Tree, Just Believe
  • Card Stock: Very Vanilla, Early Espresso, Lucky Limeade
  • Ink: Early Espresso, Old Olive, Lucky Limeade, Pumpkin Pie
  • Markers: Daffodil Delight, Cajun Craze, Cherry Cobbler, More Mustard
  • Accessories: Apothecary Accents Framelits, Paper Piercer, Stampin’ Pierce Mat, Glimmer Brads, Raspberry Ripple Stitched Grosgrain ribbon, Woodgrain embossing folder, Stampin’ Dimensionals, Sponge Dauber, Post-It Notes, craft knife, Stampin’ Sponge

Photo  Source

So here is the "Mashup" Challenge:
  1. Make a "Indian Summer" themed project.
  2. Or Make a project with any three colors from "Cajun Craze, More Mustard, Raspberry Ripple, Lucky Limeade & Early Espresso".
  3. Or "Mash it Up" and create a "Indian Summer Themed project with the color combo". 


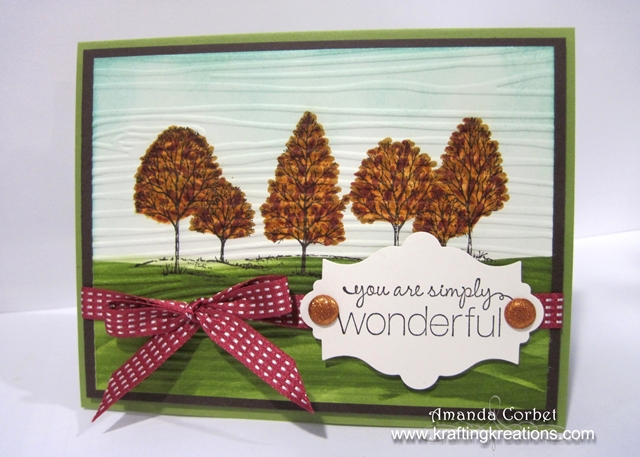
What automatically comes to mind when I think of Indian Summer is how the air starts to get cooler and the trees just start to change colors. Getting out those sweaters for the first time because the mornings are just a little bit chilly. I just love getting to see Mother Nature transform the trees into their beautiful and vibrant colors. So for this challenge I decided to try to make some fall leaves on my Lovely as a Tree image. I think it turned out pretty well. I even put together a tutorial so you can give it a try if you like it.

I started off by cutting a piece of Very Vanilla card stock 3-3/4” x 5”. I stamped the line of trees from Lovely as a Tree onto my Very Vanilla card stock and onto a wide Post-It Note.


Use a craft knife to cut out the tops of the trees. Try to make sure it’s not straight perfect lines. These are trees full of leaves after all so there is no perfect shape.


Place your Post-It Note over your trees. Make sure to line up the images as best as possible. Now take your marker and just dab all over with the side of the marker tip to apply the color. I used Daffodil Delight, More Mustard, Cajun Craze, and Cherry Cobbler markers to color mine.


Now take a sponge dauber and dab on some ink to fill in the trees. I used Pumpkin Pie here, but I think it would have looked better with Daffodil Delight.


Now remove your Post-It Note.


For the grass just take the edge of you Lucky Limeade ink pad and swipe it across the card stock. You don’t have to press very hard to transfer a nice rich color. Use a sponge to add a little bit of Pool Party ink to the sky by starting off the edge of the card stock and moving inward with a swirling motion. This will give you a light suggestion of a blue sky.


Now add shadows to the grass with the edge of your Old Olive ink pad. Also, to get rid of the straight edges on the trees take a couple of your markers and dab more color just around the edges of the trees to make them look fluffy. I just used More Mustard and Cajun Craze for this part.


I wanted to add a little more depth so I ran my image panel through the Big Shot in the Woodgrain embossing folder. I adhered this onto a 4” x 5-1/4” piece of Early Espresso card stock. I wrapped a piece of Raspberry Ripple Stitched Satin ribbon around the panel and tied it into a bow. This panel was adhered onto the card front with Stampin’ Dimensionals.


For the greeting I stamped the image from Friendly Phrases onto a scrap of Very Vanilla card stock in Early Espresso ink, then ran it through the Big Shot with the Apothecary Accent Framelit to cut out the shape. Then I used a Paper Piercer and Stampin’ Pierce mat to add a hole in each end of the label. A Pumpkin Pie Glimmer Brad was added in each hole and the label was adhered onto the card front with Stampin’ Dimensionals.


So what to do you think of my trees? I think they turned out pretty well. 


Craft Project Central!

Ready-to-go Flat Fold Box and Note Cards: 

Small gift/treat boxes are nice to have on hand, and they’re even better when they can be folded and stored flat until ready to use.  This project ensemble includes a flat-fold box, a decorative floral adornment, and four note cards, complete with coordinating envelopes!  And using the cute Hoop La La stamp set, it makes a great gift for those that love cross stitch!  This project is a quick, easy, and fun class project and also makes a great craft fair project to make and sell!


This fabulous project was designed by Regina! If you have a chance please head on over to Craft Project Central and leave Regina a comment on her project!

If you would like to subscribe to the September edition of Craft Project Central and get 10 wonderful tutorials for just $10 then click HERE


Thursday, September 20, 2012

Fall Thank You

I’ve brought you another Make and Take card today! This one is another one using the fabulous woodgrain pattern, but this time with embossing!


  • Stamps: French Folige, Sassy Salutations
  • DSP: Candlelight Christmas, Champagne Glimmer Paper
  • Card Stock: Very Vanilla
  • Ink: More Mustard, Pumpkin Pie, Cherry Cobbler, Always Artichoke, Early Espresso
  • Accessories: Cherry Cobbler Seam Binding Ribbon, Corner Rounder Punch, Woodgrain embossing folder

This card may look complicated, but it really was pretty easy! I started out by cutting a piece of Very Vanilla card stock 4-1/4” x 11” and scored it at 5-1/2”. I cut another piece of Very Vanilla card stock 4” x 5-1/4”. I stamped the bottom of the smaller piece of Very Vanilla card stock with the leaves from French Foliage in More Mustard, Always Artichoke, Pumpkin Pie, and Cherry Cobbler inks.

For the two-tone leaves I inked up the stamp first with Pumpkin Pie ink, then touched just the edges onto the Cherry Cobbler ink pad and stamped it. Remember to clean your stamp after each time you stamp it and always ink up with the lighter color first! This will prevent you from contaminating your lighter colored ink pads with a darker ink.


I stamped the greeting from Sassy Salutations just a little above the leaves in Early Espresso ink. Then I ran the card stock through the Big Shot in the Woodgrain embossing folder. Next I cut a piece of Candlelight Christmas DSP to 1-1/2” x 4” and adhered it at the top of the textured card stock. I cut a piece of Champagne Glimmer Paper 1/2” x 4” and adhered it just under the DSP. Then I used a Corner Rounder punch on all four corners of the panel just to soften the look of the edges a little. I also used the Corner Rounder punch on all four corners of the card base to make it match.


Finally I wrapped a piece of Cherry Cobbler Seam Binding ribbon around the panel where the DSP and the glimmer paper met and tied it into a bow. Then I adhered this panel directly onto the card front with Anywhere Glue stick!

The result, a fabulous bunch of leaves with texture and a little bit of sparkle! I am so ready for fall! I just love seeing the trees transform into the bright range of colors. What is your favorite thing about fall? 


Wednesday, September 19, 2012

Craft Project Central!

Thanksgiving Table Setting: 

With autumn fast approaching, it’s time to turn our thoughts to sweaters, crispy leaves, and Thanksgiving dinners (October 8th for our Canadian friends!).  This project will help you get set for your family get together by providing instructions on a warm and inviting holiday table setting, including a centerpiece, place cards, favors for your guests, a ‘grateful’ box for your guests to write what they are grateful for, and so much more!  Just add the food, the family and friends, and you’re ready to go!


This gorgeous project was created by Tara! If you have a chance please head on over to Craft Project Central and leave Tara a comment on her project! 

If you would like to subscribe to the September edition of Craft Project Central and get 10 fabulous tutorials for just $10 then click HERE!


Tuesday, September 18, 2012

Pool Party Butterfly

Good morning everyone! I have the first card from the August Make and Take to show you! I think this one was my absolute favorite of the evening! Take a look:


  • Stamps: Papillion Potpourri, Sweet Essentials, Woodgrain
  • Card Stock: Pool Party, Whisper White, So Saffron, Crumb Cake
  • Ink: So Saffron, Island Indigo
  • Accessories: Large Scallop Edgelit, Essentials Paper Piercing Pack, Stampin’ Pierce Mat, Paper Piercer, Stampin’ Dimensionals, Delicate Butterfly Punch, Whisper White Organza ribbon, Decorative Label Punch, Rhinestones, Glue Dots


This one took quite a few tools and was a little more time consuming, but so worth the effort! I started off with a piece of Pool Party card stock cut at 5-1/2” x 8-1/2” and scored it at 4-1/4”. I stamped the greeting from Sweet Essentials into the lower right hand corner in Island Indigo ink.


Next I cut a piece of Whisper White card stock 3” x 5-1/2” and ran it through the Big Shot with the Large Scallop Edgelit. A tip for making sure the scallops are straight: line up the bottom of the scallops of the die with the cut edge of the card stock, then just be careful that it doesn’t shift when you put the clear plate on top of it to run it through the Big Shot. I adhered the now scalloped card stock down onto the card front.

I cut a piece of So Saffron card stock 2-1/4” x 5-1/2” and stamped the Woodgrain background stamp onto the card stock in So Saffron ink. I’m absolutely loving the woodgrain look lately! I adhered the stamped So Saffron card stock onto a 2-3/8” x 5-1/2” piece of Crumb Cake card stock. Then I used the Decorative Label punch and punched through both layers of card stock closer to one short edge. I used the fabulous new Essentials Paper Piercing pack, Stampin’ Pierce Mat, and Paper Piercer to add the piercing around the decorative window.

I wrapped a piece of Whisper White Organza ribbon through the punched hole, and around the edge of the card stock and tied it into a knot. This panel was adhered onto the card front with Stampin’ Dimensionals.

Now for the butterfly. I stamped the butterfly image from Papillion Potpourri onto a scrap of Pool Party card stock in Island Indigo ink and punched out the image with the Decorative Butterfly punch. I adhered the butterfly inside the decorative window with a Glue Dot and added three small Rhinestones into the center of the butterfly.


That’s it! I love how simple it looks with the butterfly recessed inside the window! But I also really love the simple woodgrain accent with the background stamp. Are there any particular patterns that you are loving lately? 


Monday, September 17, 2012

It's a Tag!

I recently participated in a tag swap so I had to make up some tags. One batch was for Christmas, that I posted last week, and the second batch was for everyday things. Well this is the everyday tag that I created for the swap. I really love the Blooming with Kindness stamp set!


  • Stamps: Blooming with Kindness, En Francais
  • Card Stock: Wisteria Wonder, Whisper White, Elegant Eggplant
  • Ink: Wisteria Wonder, Elegant Eggplant, Versamark
  • Accessories: Clear embossing powder, Embossing Buddy, Heat Tool, Stampin’ Sponge, Beautiful Wings embosslit, Curly Label Punch, Rhinestones, Stampin’ Dimensionals, Crop-A-Dile, Whisper White Organza ribbon, Corner Rounder Punch

I started off by cutting a piece of Whisper White card stock 2-1/4” x 3-1/4” and a piece of Wisteria Wonder card stock 2-1/2” x 3-1/2”. I used the Corner Rounder punch on both pieces of card stock to round the corners.

I stamped the En Francais background stamp onto the Whisper White card stock in Wisteria Wonder ink, then sponged around the edges with more Wisteria Wonder ink. Then I stamped the flower image from Blooming with Kindness on top of the script in Versamark ink. I covered the stamped image with Clear embossing powder, tapped off the excess, and heated it with the heat tool. After the embossing cooled I sponged over the top of the flower in a swirling motion with Elegant Eggplant ink. This really makes the flower stand out more. I adhered this layer onto the Wisteria Wonder card stock.


I cut a piece of Elegant Eggplant card stock 3/8” x 2-1/2” and adhered it across the bottom of the tag. I stamped the greeting from Blooming with Kindness onto a scrap of Whisper White card stock in Elegant Eggplant ink and punched it out with the Curly Label punch. I adhered the greeting label on top of the Elegant Eggplant strip with a Stampin’ Dimensional.


I used the large hole on my Crop-A-Dile to punch the hole in the top of the tag and threaded some Whisper White Organza ribbon through it. For one finishing touch I pulled out the Whisper White butterflies from my scraps, adhered them onto the tag, and added a small Rhinestone into the center.


I could easily see this tag being tied onto a bouquet of flowers or a gift bag to show someone how much they are appreciated. I should make more tags just to have on hand for when I need them.  Come back tomorrow to see the Christmas tag!