Tuesday, August 31, 2010

Blue, White, and Silver Christmas

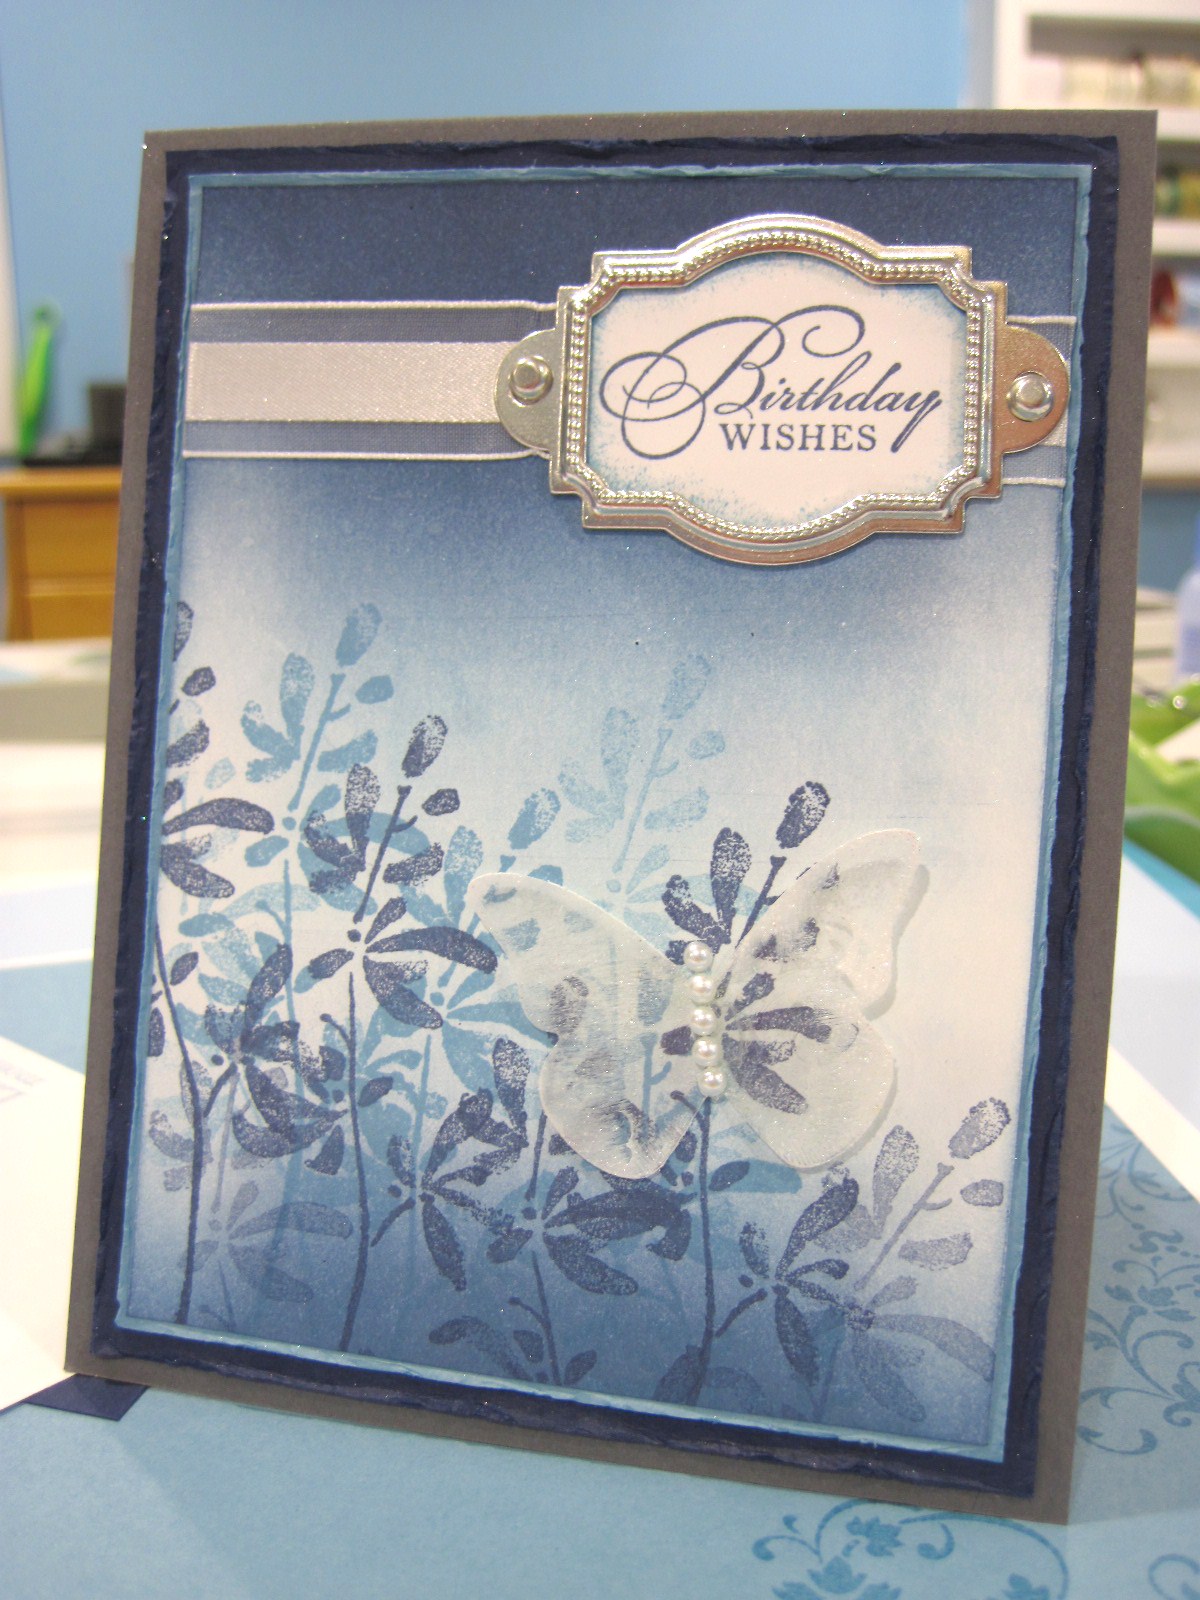
Here is the swap card for the Blue, White, & Silver group that I mentioned yesterday.

Stamps: Season of Joy, Snow Swirled
Cardstock: Whisper White, Marina Mist, Night of Navy
Ink: Marina Mist, Night of Navy
Accessories: 5/8" Night of Navy Satin ribbon, Perfect Polka Dots Textured Impressions Die, Silver Brads, Crystal Effects, Dazzling Diamonds glitter, Stampin' Dimensionals, Needle Tool, Mat Pack

The card base is 5 1/2" x 8 1/2" Whisper White cardstock scored at 4 1/4". A piece of Whisper White cardstock was cut at 3 3/4" x 5" and run through the Big Shot with the Perfect Polka Dots Textured Impressions Die. This was adhered to a 4" x 5 1/4" piece of Marina Mist cardstock. I used the Needle Tool and Mat Pack to punch two holes in the upper left hand corner and added two Silver Brads. Some 5/8" Night of Navy Satin ribbon was tied around the panel and into a knot. I just love how rich and pretty this satin ribbon is. It's just wonderful! These panels were then adhered to the card front.

On a 2" x 3" piece of Whisper White cardstock I stamped the tree from Season of Joy in Marina Mist ink. Then I stamped the "Seasons Greetings" from Snow Swirled on the bottom of the piece in Night of Navy ink. Some Crystal Effects was added on top of the star on the tree and then coated with Dazzling Diamonds glitter. This made the star really sparkle and shine! After the Crystal Effects dried this panel was adhered to a piece of 2 1/8" x 3 1/8" Night of Navy cardstock. This was adhered to the card front with Stampin' Dimensionals to make it pop up off the card.

I hope you have enjoyed these Christmas card swaps and get you thinking about making your own Christmas cards this year! Come back tomorrow to see a scrapbook page created in My Digital Studio!

Monday, August 30, 2010

Green, Red, and Gold Christmas

Sorry, no tutorial today. I've been busy lately preparing for a local festival that I will have a booth at. I will have to show you some pictures of the chaos. So instead for today I have a swap card. Yay swaps! This is one that I submitted for the Red, Green, & Gold Christmas card swap. It's never too early to start getting ideas for your Christmas cards!

Stamps: Season of Joy, Simple Snowflake
Cardstock: Bravo Burgundy, Always Artichoke, Old Olive, Naturals White, Brushed Gold
Ink: Bravo Burgundy, Old Olive, Versamark
Accessories: Gold embossing powder, Heat Gun, Brayer, Needle Tool, Mat Pack, Gold Brads, Embossing Buddy, 5/8" Old Olive Satin Ribbon, Stampin' Dimensionals

The card base is Bravo Burgundy cardstock cut at 5 1/2" x 8 1/2" and scored at 4 1/4". I used the Simple Snowflake stamp with Bravo Burgundy ink all over the card base to create a subtle patterned background. A piece of Naturals White cardstock was cut at 2 1/2" x 4 1/4" and brayered with Old Olive ink. When brayering start just off of the paper on one edge and work your way onto and down the paper as you roll back and fourth. This will give you a fading effect with your ink. "Merry Christmas" was stamped in Bravo Burgundy ink in the lower right hand corner. This cardstock was then adhered to a piece of Always Artichoke cardstock cut at 2 5/8" 4 1/4", and this was then layered on a piece of Brushed Gold cardstock cut at 2 7/8" x 4 1/4". These layers were then adhered to the card front.

On a 2" x 3" piece of Naturals White cardstock I used the embossing buddy, stamped the tree in Versamark, and heat embossed with Gold embossing powder. A piece of 5/8" Old Olive Satin ribbon was cut at 1 1/2" long and the ends were adhered together. This was adhered in the upper left hand corder of the cardstock. I then used the Needle Tool and mat pack to pierce a hole through the cardstock and the ribbon. Then I added a gold brad. This was adhered to a 2 1/8" x 3 1/8" piece of Old Olive cardstock. Then the panels were adhered to the card front with some Stampin' Dimensionals to pop it out a bit.

I hope that I've inspired you to start thinking about your own Christmas cards. Make sure to come back tomorrow to see what I submitted for the Blue, White, & Silver group! Have fun stamping!

Friday, August 27, 2010

Fancy Favor Box

Here is a super cute box that is super easy to put together. This was the 3D item at the Make & Take this month. This box was made using the Fancy Favor Box Die. Take a look:


Stamps: Baroque Motifs, Cute By The Inch
Cardstock: Pacific Point Textured, Not Quite Navy, Whisper White
Ink: Not Quite Navy
Accessories: Fancy Favor Box Die, Curly Label Punch, Paper Snips, Whisper White Organza ribbon, Hobby Blade,  1/2" Circle Punch

I started off with a 5 3/4" x 12" piece of Pacific Point Textured cardstock. I ran this through the Big Shot on the Fancy Favor Box Die. This wonderful die not only cuts out your shape but also adds all the score lines you need on the box! The box front was stamped with thw swirls from Baroque Motifs in Not Quite Navy ink. Sticky Strip was used on the side flap and one bottom flap to form the box. Adhere the side flap first and then fold the bottom flaps down and adhere the last bottom flap.

The 1/2" Circle Punch was used to punch holes at the top on both the front and back of the box. This is a hole for the ribbon to go through to tie the box closed, although the box would look just a cute left open. The image from Cute By The Inch was stamped in Not Quite Navy ink on a scrap of Whisper White cardstock. The square was cut out with paper snips and adhered to a scrap of the Pacific Point Textured cardstock and the Paper Snips were used again to cut a mat around the Whisper White square.

The Curly Label Punch was used to punch a label out of a scrap of Not Quite Navy cardstock. The layered squares were adhered to the bottom of the Not Quite Navy curly label. The Hobby Blade was used to cut a slit near the top of the curly label for the ribbon to slide through. Slide one end of the ribbon through the slot in the curly label and then through the holes in the box. Tie the ribbon into a bow on top of the box and trim the ribbon ends. Thats it!

These adorable little boxes would be easy to make in bulk for party favors and you can dress them up however you like! Thanks for stopping by!


Thursday, August 26, 2010

Simple Christmas Card

From August through December I will have at least one Christmas card at each Make & Take to help give others ideas of what they may want to do for their Christmas cards. So here is the first one. This card was inspired by a card created by Megan Burleson that she posted on Stampin' Connection. Take a look at my version:


Stamps: Season Of Joy
Cardstock: Cherry Cobbler, Whisper White
Ink: Old Olive, Cherry Cobbler, Versamark
Accessories: 1/4" Real Red Grosgrain Ribbon, Scallop Edge Border punch, Gold embossing powder, Heat Gun, Embossing Buddy

This card was super simple, but yet still pretty. A piece of Whisper White cardstock was cut at 4" x 9" and scored at 5 1/2". The end of the short side of the Whisper White cardstock was punched with the Scallop Edge border punch. The poinsetta was stamped in Cherry Cobbler ink in the center of the card front. The swirls were stamped in Old Olive ink around the poinsetta.

A piece of Cherry Cobbler cardstock was cut at 4 1/4" x 5 7/16". It needs to be just shy of 5 1/2" because this piece goes behind the Whisper White flap and will not meet up with the bottom of the Whisper White card back evenly if the Cherry Cobbler isn't cut slightly shorter. Make sense? The Cherry Cobbler cardstock was stamped with the poinsetta in Cherry Cobbler ink all over the piece of cardstock.

The embossing buddy was used in the bottom right corner and "Merry Christmas" was stamped in Versamark and heat embossed with Gold embossing powder. Then this panel was adhered behind the scalloped edged tab of the Whisper White cardstock. A piece of 1/4" Real Red Grosgrain ribbon was tied around the card front and into a knot. That completes a very simple Christmas card that only uses one stamp set! The poinsetta on the would look really good with some red glitter on top of it, but I already had two time comsuming cards at the Make & Take this month so I wanted to keep this one really simple.

These would be easy cards to make if you have a large number of Christmas cards that you send out. Come back tomorrow to see a cute little box that was the 3D item this month!

Wednesday, August 25, 2010

Owl Card

This adorable owl card is the next one that my guests made at the Make & Take. This one was by special request after my sister saw this card that I posted previously.

Stamps: Watercolor Trio
Cardstock: Sahara Sand, Whisper White, Cherry Cobbler, Old Olive, Early Espresso, Crumb Cake, Basic Black
Ink: Old Olive, Early Espresso
DSP: Greenhouse Gala
Accessories: Elegant Lines Textured Impressions Die, Scallop Oval Punch, Two-Step Bird Punch, Two-Step Owl Punch, Needle Tool, Mat Pack, Gold Brads, 5/8" Daffodil Delight Grosgrain ribbon, Stampin' Dimensionals, Two-Way Glue Pen

The card base is Sahara Sand cardstock cut at 5 1/2" x 8 1/2" and scored at 4 1/4". The next layer is Whisper White cardstock cut at 4 1/8" x 5 3/8" which is adhered to the card front. A piece of Cherry Cobbler cardstock was cut at 4" x 5 1/4" and run through the Big Shot in the Elegant Lines Textured Impressions Die. A piece of 5/8" Daffodil Delight Grosgrain ribbon was wrapped around the panel and adhered to the back of the Cherry Cobbler cardstock.

The sentiment from Watercolor Trio was stamped in Old Olive ink on a scrap of Whisper White cardstock and punched out with the Scalloped Oval Punch. I'm really going to miss the stamp set Watercolor Trio because the images and sentiments are so wonderful I find I'm using them all the time. If you want this stamp set make sure to order it within the next seven days before it is unavailable for order. Remember the Summer Mini Catalog items are no longer available after August 31st so order what you want soon! The scalloped oval was sponged around the edge with Early Espresso ink and then adhered on top of the ribbon on the Cherry Cobbler cardstock. Then the Needle Tool and Mat Pack were used to punch a hole on either side of the scalloped oval and two Gold Brads are added through the scalloped oval, ribbon, and Cherry Cobbler cardstock.

The Cherry Cobbler cardstock panel is then adhered to the card front. The Two-Step Owl Punch was used to punch the owl body from Early Espresso Cardstock, the large part of the eyes from Crumb Cake cardstock, the middle part of the eye from Whisper White cardstock, the smallest part of the eye from Basic Black cardstock, the heart from Cherry Cobbler cardstock, and the belly from a scrap of Greenhouse Gala DSP. The branch was punched with the Two-Step Bird Punch from Old Olive cardstock. The owl parts were adhered together with the Two-Way Glue Pen. The branch was adhered to the card front with the Two-Way Glue Pen and then the owl was adhered to the card front with a Stampin' Dimensional.

I just love this adorable little owl that you can make with the Two-Step Owl Punch because you can make so many cute expressions with the eyes and the owl is just so darn cute! You can add this wonderful Two-Step Owl Punch to your collection with item number 118074. You can click here to shop Stampin' Up online now!

Come back tomorrow to see a simple and quick Christmas card!

Tuesday, August 24, 2010

Masculine Sunset

This is the masculine card my guests made at the Make & Take this month. I always try to do one masculine card each time because they are more difficult to come up with. This time I challenged them with some sponging. Everyone was really suprized about how easy it was, although I really had to convince one person to try it out. Everyone loved it! Take a look:


Stamps: Nature Silhouettes, Occasional Quotes
Cardstock: Early Espresso, Basic Black, Crumb Cake, Very Vanilla
Ink: Daffodil Delight, Peach Parfait, Poppy Parade, Early Espresso, Basic Black
Accessories: Stampin' Sponges, Needle Tool, Mat Pack, 1 3/4" Circle punch, post-it notes, Harlequin Texturz Plate, Log Cabin Smooch Spritz

The card base is Early Espress cardstock cut at 5 1/2" x 8 1/2" and scored at 4 1/4". The next layer is a piece of Basic Black cardstock cut at 4" x 5 1/4" that was run through the Big Shot with the Harlequin Texturz Plate and sprayed with Log Cabin Smooch Spritz to give it a nice coppery sparkle. After the Smooch dried this was adhered to the card front.

The image panel is a 3" x 3" piece of Very Vanilla cardstock. The entire panel was first sponged with Daffodil Delight ink. Then I put a post-it note on a piece of copy paper and punched out a 1 3/4" circle with the 1 3/4" Circle punch making sure to get some of the sticky part inside the circle punch. The post-it circle was removed from the copy paper and placed in the center of the image panel. The sticky part on the circle holds the post-it down while you sponge. Or at least helps you hold the circle down. Then Peach Parfait ink was sponged on the upper half of the cardstock. Then Poppy Parade ink was sponged on the top quarter of the cardstock. The post-it circle was then removed and voila! You have a beautiful sunset.

Next the deer (or wolf, I gave my guests the option) was stamped in Early Espresso ink in the center. Early Espresso ink was sponged by pouncing with the sponge to create the ground up to the deer (or wolf's) feet. Then Basic Black ink was sponged in the same way at the very bottom to add some depth to the color of the ground.

This panel was adhered to a 3 1/8" x 3 1/8" piece of Early Espresso cardstock and then to the top of a 3 1/4" x 4 1/4" piece of Crumb Cake cardstock. I used the Mat Pack and the Needle Tool to punch holes in a line across the Crumb Cake cardstock under the image panel. "Birthday Wishes" from Occasional Quotes was stamped in Early Espresso ink on a 1/2" x 3 1/4" piece of Very Vanilla cardstock. The top and bottom edge of the cardstock were sponged with Early Espresso ink and this was adhered to the bottom of the Crumb Cake cardstock.

Although this is a little involved for a Make & Take the result is a really pretty yet masculine card. I hope that you give sponging a try to see how truly easy it is to make a beautiful scene! Come back tomorrow to see the next Make & Take card!

Monday, August 23, 2010

Concord Fairy - August Make and Take 1

Sorry there weren't any posts this weekend. I was busy preparing for the Make & Take and then recovering, and other things came up this weekend. Here is the first card that my guests made at the Make & Take. Don't you just love this little fairy?


Stamps: A Little Bit Of Magic
Cardstock: Whisper White, Concord Crush
DSP: Presto Patterns DSP
Ink: Bashful Blue, Concord Crush, Black Stazon, Blush Blossom
Accessories: Sponge Daubers, Scallop Trim Punch, Aquapainter, Stampin' Dimensionals, Crystal Effects, Dazzling Diamonds glitter, Markers: Old Olive, Pretty In Pink, Crumb Cake, Concord Crush, Early Espresso

The card base is 5 1/2" x 8 1/2" Concord Crush cardstock scored at 4 1/4".  A piece of Presto Patterns DSP was cut at 1 7/8" x 4 1/4" and, using two sponge daubers, was sponged with Bashful Blue and Concord Crush ink. This was adhered to a piece of Whisper White cardstock cut at 2 1/4" x 4 1/4" and punched on one side with the Scallop Trim border punch.

The image panel is Whisper White cardstock cut at 3" x 3". The image of the fairy from A Little Bit of Magic was stamped in Black Stazon ink onto the Whisper White cardstock. I used the Aquapainter to pick up some Blush Blossom ink from the lid of the ink pad (to do this sqeeze the center of the ink pad while it is closed and then open the ink pad half way). This is what I used to color the skin on my fairy. I colored in the wings using the same method with Bashful Blue ink. The remainder of the fairy was colored in with Pretty In Pink, Concord Crush, Crumb Cake, Old Olive, and Early Espresso markers.

I added Crystal Effects to the wings along the lines and covered the crystal effects with Dazzling Diamonds glitter. After the Crystal Effects on this panel was dry it was adhered to a 3 1/8" x 3 1/8" piece of Concord Crush cardstock. Then this was adhered to a 3 1/4" x 3 1/4" piece of Whisper White cardstock and adhered to the card front with Stampin' Dimensionals.

This one was a more time consuming card, but I had to let everyone use this adorable little fairy before they are gone! I even received an order for that stamp set that night! Make sure to come back tomorrow an every day through Friday to see all of the cards from the Make & Take this month!

Wednesday, August 18, 2010

Elegant Eggplant Scrapbook Page

The scrapbook page I have to show you today is one that I will be demonstrating at a workshop tonight. I will have to add a photo later. Take a look:

Stamps: Awash With Flowers
Cardstock: Elegant Eggplant Textured Cardstock, Whisper White, Certainly Celery, Going Grey, Old Olive
DSP: Greenhouse Gala DSP
Ink: Elegant Eggplant, Black Stazon
Accessories: Scallop Trim Border Punch, Pear Pizzaz Marker, Paper Snips, Two-Way Glue Pen, Stampin' Dimensionals, Sticky Strip, Round Tab Punch, Aquapainter


The page started with a 12" x 12" piece of Elegant Eggplant Textured cardstock. I cut at 2" x 12" piece of Greenhouse Gala DSP and adhered it to a 2 1/4" x 12" piece of Going Grey cardstock. I cut a piece of Whisper White cardstock to 2" x 12" and punched the edge with the Scallop Trim Border punch. This was adhered to the back of a 3" x 12" piece of Certainly Celery cardstock. The Certainly Celery layers were adhered to the scrapbook page, then the Greenhouse Gala DSP layers were adhered to the Certinaly Celery cardstock.

For the center mats I used a 7 3/8" x 7 3/8" piece of Going Grey cardstock adhered to a 7 1/2" x 7 1/2" piece of Whisper White cardstock which was adhered to a 8 1/2" x 8 1/2" piece of Old Olive cardstock then adhered to the page. So now there is room to place a photo that is cropped to 7 1/4" x 7 1/4". The main reason for the size of this panel is because I really don't have that many different colors of 12" x 12" and I really wanted to use Old Olive because it looks so bright and cheerful with the Elegant Eggplant, but all I had was 8 1/2" x 11". So I started off with the 8 1/2" x 8 1/2" Old Olive cardstock and worked my way down. Now I'm glad that I did have only the 8 1/2" x 8 1/2" because I like how clean and simple this layout looks.

I didn't want to clutter up the layout with a journaling block so I created a pocket under the Old Olive layer for a 3 1/2" x 4 1/2" piece of Whisper White cardstock to hide. I created the pocket on the back a bit larger than the cardstock by putting sticky strip around where the cardstock would go. Then I used the Round Tab punch to punch out an Elegant Eggplant tab and adhered it to the Whisper White cardstock with some small pieces of sticky strip. This tab will be pulled on each time someone reads the journaling so I wanted the adhesive to be super strong.

I stamped the flower outline from Awash With Flowers on scraps of Whisper White cardstock in Black Stazon ink. I colored in the stem portion with the Pear Pizzaz marker. The flower petals I colored in by squeezing the center of an ink pad to get some ink on the lid. Opened the pad half-way and used an Aquapainter to pick up the color and color in the flower petals. This gives a nice watercolor look to the flower. Then I cut the flowers out with paper snips. The first flower was adhered to the corner of the Going Grey mat with the Two-Way Glue pen, the second flower was adhered with one Stampin' Dimensional, and the third flower was adhered with two Stampin' Dimensionals stacked one on top of the other. This makes the flowers at three different levels and adds dimension to the page.

I'm pretty pleased with this scrapbook page and I think my hostess will be too! What do you think? Come back tomorrow to see what I have to show you! Have fun stamping!

Tuesday, August 17, 2010

Christmas Ornaments

This is the second card that I created for the Christmas in July Swap. Yes, I do know that it is early for Christmas cards, but I do love Christmas! Also I like to provide others with ideas so they can start thinking about what they are going to do for their Christmas cards. I always try to have mine done before Thanksgiving, but time doesn't always agree with me. But if you plan out what you want to do for your Christmas cards then you can order the supplies ahead of time and not have to rush making your cards in December as well as all the family get-togethers and present shopping. Take a look:


Stamps: Serene Snowflakes, Perfect Punches, Lovely as a Tree, Tree Trimmings
Cardstock: Whisper White, Cherry Cobbler, Early Espresso, Old Olive
Ink: Cherry Cobbler, Old Olive, Pacific Point, Always Artichoke, Versamark
Accessories: Gold Embossing Powder, Heat Gun, Crystal Effects, 1/8" Early Espresso Taffeta ribbon, Scallop Edge Border punch, 1 3/4" Scallop Circle punch, Crop-A-Dile, Paper Snips, Aquapainter, Two-Way Glue Pen

The card base is 5 1/2" x 8 1/2" Old Olive cardstock scored at 4 1/4". The image panel is Whisper White cardstock cut at 3 3/4" x 5 1/2". I used the pine tree from Lovely as a Tree and stamped in both Old Olive and Always Artichoke ink. This makes it look like just a branch from a Christmas tree. The ornament strings from Tree Trimmings were stamped in Early Espresso ink. This panel was then adhered to the card front.

A piece of Cherry Cobbler cardstock was cut at 2" x 3 3/4" and stamed with a snowflake from Serene Snowflakes in Cherry Cobbler ink. This was layered on a piece of Early Espresso cardstock cut at 1 1/4" x 3 3/4" that had the edge punched with the Scallop Edge Border punch. The punched Early Espresso cardstock was adhered to the back of the Cherry Cobbler cardstock so that all you can see is the scallops. Two 1/8" holes were punched in the center of the Cherry Cobbler cardstock with the Crop-A-Dile. A long piece of 1/8" Early Espresso Taffeta ribbon was threaded through the holes in the Cherry Cobbler cardstock and then the cardstock was adhered to the card front covering the left side of the Whisper White cardstock. 

The "Joy at Christmas" from Perfect Punches was stamped in Versamark ink on scraps of Whisper White cardstock and heat embossed with gold embossing powder. The ring around the center of the image was colored in by squeezing the closed Old Olive ink pad, opening the pad half-way and picking up the color with an Aquapainter to apply the ink to the cardstock. This give a nice watercolored effect and the color isn't quite as deep as when you use just the marker. The spaces in each of the scallops were colored in with a Cherry Cobbler marker. The scallop circle was punched out with the 1 3/4" Scallop Circle punch. An 1/8" hole was punched in the top of the scallop circle and the ribbon was threaded through the hole and tied into a bow to hold on the circle.

The ornaments were stamped in Old Olive, Cherry Cobbler, and Pacific Point ink on scraps of Whisper White cardstock. The images were each cut out with paper snips. I used a marker in the same color as the image to color the cut edges of the cardstock around the ornaments. Then I applied a layer of Crystal Effects to each ornament. This makes the color more bold and makes the ornament look glassy and shiny like a real ornament. After the ornaments dried they were adhered to the card front with a Two-Way Glue Pen.

These were a little time consuming, but the end result was well worth the effort. What do you think?

Come back tomorrow to see a scrapbook page layout that will be featured at my scrapbook themed Workshop! Have fun stamping!

Monday, August 16, 2010

Pink Christmas

This is the first of two cards that I made for the Christmas in July swap on Stampin' Connection. I wanted to go with non-traditional colors for one of my cards so here it is:


Stamps: All Holidays, Serene Snowflakes
Cardstock: Pink Pirouette, Baja Breeze, Early Espresso
Ink: Whisper White Craft, Early Espresso, Pink Pirouette
Accessories: Clear Embossing Powder, White Gel Pen, Silver Brads, Silver Foil Smooch Spritz

The card base is Pink Pirouette cardstock cut at 5 1/2" x 8 1/2" and scored at 4 1/4". I stamped the small snowflakes from Serene Snowflakes in Pink Pirouette and Whisper White Craft ink all over to create my own snowflake DSP. The Early Espresso cardstock was cut at 2 1/4" x 5 1/2". The large snowflakes were stamped in Whisper White Craft ink and heat embossed with Clear Embossing Powder. I colored in parts of the snowflakes with the White Gel Pen and then added a Silver Brad in the center of each snowflake. The panel was then sprayed with Silver Foil Smooch Spritz to give it some sparkle. This was layered on a piece of Baja Breeze cardstock cut at 2 3/8" x 5 1/2" and this was adhered to the card front. The greeting from All Holidays was stamped on the upper right hand side of the card in Early Espresso ink.

Thats it! Now I have a pretty pink Christmas card to give someone. It's fun to make Christmas cards in non-traditional colors. Christmas cards don't always have to be red and green or blue and white. They can be any color you want. Now I challenge you to make a Christmas card from non-traditional colors. Come back tomorrow to see my other more traditional Christmas card! Have fun stamping!

Sunday, August 15, 2010

Kissed Christmas

Yesterday I showed you the Kissing Technique on some ornaments from the Definitely Decorative set. If you missed the tutorial you can find it here. Take a look at the card I created with the ornaments I made yesterday.


Stamps: Definitely Decorative, Solid Stripes, Fine Flourish, Christmas Greetings
Cardstock: Cherry Cobbler, Whisper White
DSP: Greenhouse Gala DSP
Ink: Certainly Celery, Riding Hood Red, Early Espresso
Accessories: Scallop Edge Border punch, 1/8" Early Espresso Taffeta ribbon, Stampin Dimensionals, Crystal Effects, Dazzling Diamonds, Paper Snips

The card base is 5 1/2" x 8 1/2" Cherry Cobbler scored at 4 1/4". A piece of Whisper White cardstock was cut at 3" x 5 1/2". One side was punched with the Scallop Edge Border punch and the scallop edge was sponged with Early Espresso ink. A piece of Greenhouse Gala DSP was cut at 2 1/2" x 5 1/2". The top and bottom edge were sponged with Early Espresso ink and "Merry Christmas" from Christmas Greetings was stamped in Early Espresso ink in the bottom right hand corner. Two pieces of 1/8" Early Espresso ribbon were glued to the front and over the top of the DSP with Crystal Effects. The Tombow Multipurpose Adhesive would work great for this, but I don't have any right now. The DSP was adhered to the punched and sponged Whisper White cardstock, and then this was adhered to the card front.

The ornaments made yesterday with the kissing technique were cut out with Paper Snips and the edges were sponged with Early Espresso ink. The striped ornament was adhered to the card front with some Anywhere Glue Stick. The ornament stamped with Fine Flourish was adhered to the card front with a Stampin' Dimensional. Some small bows were tied with 1/8" Early Espresso Taffeta ribbon and adhered at the top of both of the ornaments with some Mini Glue Dots. As an afterthought I used some Crystal Effects in the center of the popped up ornament and added some Dazzling Diamonds glitter. Gotta have some sparkle on your ornaments! At least I do! That's it!

I hope you enjoyed seeing the Kissing Technique and my simple and quick Christmas card! Come back tomorrow to see some Christmas card swaps!

Saturday, August 14, 2010

Kissing Technique Tutorial

This weeks tutorial is on the Kissing Technique. For this technique you will need one solid image stamp (or mostly solid image stamp), one detailed stamp, a light color of ink, and a darker color of ink. And of course you need cardstock. This is a simple technique, but really has a nice result.


Ink up your solid image stamp in the lighter color ink.


Ink up your detailed stamp in the darker colored ink.


Place your solid image stamp rubber side up on the table.


Stamp the detailed stamp on top of the rubber of the solid image stamp.


Stamp the solid image on your cardstock.


You now have a stamped image that has and addtional pattern on it.


Come back tomorrow to see the card I make with these two ornaments.

Friday, August 13, 2010

Aways Elegant Marina Pizzaz

This is the second card I made for the New Catalog Swap. Take a look:

Stamps: Always Elegant
Cardstock: Old Olive, Early Espresso, Naturals White, Marina Mist
DSP: Greenhouse Gala
Ink: Early Espresso
Accessories: Scallop Edge Border punch, Curly Label punch, Needle Tool, Mat Pack, Antique Brass Metallic Brads, 1/8" Marina Mist Taffeta ribbon, Stampin' Dimensionals, Markers: Marina Mist, Pear Pizzaz

The card base is Old Olive cardstock cut at 5 1/2" x 8 1/2" and scored at 4 1/4". A piece of Naturals White cardstock was cut at 4" x 4 1/2" for the image panel. I used the Mat Pack and Needle tool to add the holes all the way around the top and both sides. The image from Always Elegant was stamped in Early Espresso ink and allowed to dry overnight. The image was then colored in with Marina Mist and Pear Pizzaz markers. This is a really elegant image to use for just about any occasion. I will definitely be using this stamp set a lot in the future. The image panel was adhered to the card front lining it up at the top and along the sides.

A piece of Early Espresso cardstock was cut at 3 5/8" x 4 1/4" and punched with the Scallop Edge Border punch. A piece of Greenhouse Gala DSP was cut at 2 1/4" x 4 1/4" and adhered to the Early Espresso punched cardstock. I used the Needle Tool and Mat Pack to punch two holes in the left upper corner. Then I added two Antique Brass brads from the Metallic Brads container and adhered the cardstock to the card front.

I stamped "always" in Early Espresso ink on scraps of Naturals White cardstock and punched it out with the Curly Label Punch. I also punched out a curly label from scraps of Marina Mist cardstock. The Marina Mist curly label was cut in half and adhered to the back of the Naturals White curly label. Some 1/8" Marina Mist Taffeta ribbon was tied into a knot around the top of the curly label and the label was adhered to the card front with a Stampin' Dimensional.

I really enjoyed making the cards for this swap and the cards I got back were absolutely fabulous. I will have to show you some of those next week. Well...so little time so much to do! I'm off to work, then finishing some birthday presents, making food for a pot-luck birthday party, and finishing samples for my workshop and Make & Take next week.

Come back tomorrow to see another fun technique tutorial! Have fun stamping!


Thursday, August 12, 2010

Glowing Happiness Shared

Today I have a swap card for you! I just love making swaps and sharing ideas with other demonstrators. This is the first card I made for the New Catalog Swap on Stampin' Connection hosted by Kim Bolzenthal.


Stamps: Bella Toille, Happiness Shared
Cardstock: Whisper White, Cherry Cobbler, Early Espresso
Ink: Daffodil delight, Early Espresso, Stazon
Accessories: Scallop Edge Border Punch, 5/8" Daffodil Delight Grosgrain ribbon, Aqua Painter, White Gel Pen, Stamp-a-ma-jig
Markers: Old Olive, Pear Pizzaz, Pretty In Pink, Regal Rose, Rose Red, Early Espresso, Crumb Cake, Daffodil Delight

The card base is Whisper White cardstock cut at 4 1/4" x 11" and scored at 5 1/2". The card front was stamped with the Bella Toille background stamp in Daffodil Delight ink. The sentiment from Happiness Shared was stamped in the corner in Early Espresso ink using the Stamp-a-ma-jig to get it lined up perfectly.

The image panel is Whisper White cardstock cut at 2 1/2" x 3 1/2". The flower from Happiness Shared was stamped in Stazon ink. I squeezed the center of the Daffodil Delight ink pad while it was closed and then opened it half way and used the Aquapainter to pick up the color and add a soft glow behind and around the flower. You can barely see it, but its a really nice effect. The flower was then colored in with Old Olive, Pear Pizzaz, Pretty In Pink, Regal Rose, Rose Red, Daffodil Delight, Crumb Cake, and Early Espresso markers.
Some White Gel Pen dots highlight the stamens on the flower. Here is a close up of the colored flower image.

Three pieces of 5/8" Daffodil Delight Grosgrain ribbon were cut at 2 inches, folded over, and adhered with some mono adhesive. These were adhered to the back of the image panel evenly spaced along one side. The image panel was then adhered to a 2 5/8" x 3 5/8" piece of Cherry Cobbler cardstock. A piece of Early Espresso cardstock was cut at 2" x 3 5/8" and the long side was punced with the Scallop Edge Border punch. This was adhered behind the Cherry Cobbler cardstock so that just the scallops are visible. All of this was then adhered to the card front.

Other than the coloring these swaps were pretty quick and easy to make. I really enjoy coloring and love the shading and effects you can get with the Aquapainter or the markers that perfectly match all of the wonderful SU colors. Well, I'm off to prepare for my first scrapbooking workshop. Lots of pages to plan out for the demonstrations and make and takes.

Come back tomorrow to see the other card I made for the New Catty Swap! It uses the new set Always Elegant. Have fun stamping!

Tuesday, August 10, 2010

Blue Watercolor

Today I have another CASEd card for you. This one was inspired by Claudia Perry's card posted on Stampin' Connection. If you have access to Stampin' Connection you can see Claudia's card here. Take a look:


Stamps: Watercolor Trio
Cardstock: Basic Grey, Night of Navy, Marina Mist, Whisper White, Acetate
Ink: Marina Mist, Night of Navy, Whisper White Craft
Accessories: Brayer, Silver Hodgepodge Hardware, Whisper White Organza ribbon, Designer Label Punch, Beautiful Wings Embosslit Die, Mini Glue Dots, Basic Pearl Jewel Accents, Irridescent Ice Embossing Powder

The card base is 5 1/2" x 8 1/2" Basic Grey cardstock scored at 4 1/4". The image panel is 3 5/8" x 4 7/8" Whisper White cardstock. I used my brayer to add Marina Mist ink to the top and bottom of the cardstock. Then I used the brayer with Night of Navy ink on the top and bottom of the cardstock making sure to not completely cover the Marina Mist ink.

The leaves from Watercolor Trio were stamped in Marina Mist and Night of Navy ink all across the bottom. A piece of Whisper White Organza ribbon was added across the top of the panel. This panel was adhered to a piece of Marina Mist cardstock cut at 3 3/4" x 5", then this was adhered to a piece of Night of Navy cardstock cut at 4" x 5 1/4". Both the Night of Navy and Marina Mist panels had the edges of them distressed to give them some texture.

The sentiment from Watercolor Trio was stamped in Night of Navy ink on a scrap of Whisper White cardstock and punched out with the Designer Label punch. The edges of the punched image were sponged with Marina Mist cardstock then the label was added to the panels with the frame and brads from the Silver Hodgepodge Hardware kit. The panels were added to the card front.

I meant to add a butterfly to the card front but I forgot about it until this morning. I will add one tonight and then come back and add a photo with the butterfly added. Well...so much to do so little time.

Here is the card with the butterfly added.


The butterfly was made with a scrap of acetate that I cut in the Beautiful Wings Embosslit die. I rubbed the edges in Whisper White Craft ink and added Irridescent Ice embossing powder to it and heat embossed it. The butterfly is adhered to the card with a Mini Glue Dot and some Basic Pearl Jewel Accents were added for the butterfly body. Here is a close up of the butterfly.


Come back tomorrow to see my weekly scrapbook page. I have a creation from MDS to show you! Have fun stamping!

Monday, August 9, 2010

Bright Birthday Card

Here is yet another birthday card. This is another one using the absolutely adorable Two Step Owl Punch. Take a look:


Stamps: Watercolor Trio
Cardstock: Sahara Sand, Whisper White, Daffodil Delight, Early Espresso, Kraft, Basic Black, Old Olive
Paper: Greenhouse Gala DSP
Ink: Early Espresso
Accessories: Elegant Lines Textured Impressions Die, 5/8" Old Olive Grosgrain Ribbon, Silver Hodgepodge Hardware, Two Step Owl Punch, Two Step Bird Punch, Two Way Glue Pen, Stampin' Dimensionals

I CASED this card from a card created by Michele Reynolds. You can view Michele's card by clicking here.

The card base is Sahara Sand cardstock cut at 5 1/2" x 8 1/2" and scored at 4 1/4". I cut a piece of Daffodil Delight cardstock 4" x 5 1/4" and ran it through the Big Shot in the Elegant Lines Textured Impressions Die. A piece of 5/8" Old Olive Grosgrain Ribbon was wrapped around the panel. The panel was adhered to a piece of Whisper White cardstock cut at 4 1/8" x 5 3/8" and these layers were adhered to the card front.

The body of the owl was punched in Early Espresso cardstock; the belly from a scrap of Greenhouse Gala cardstock; the eyes from Kraft, Whisper White, and Basic Black; and the heart from Daffodil Delight. The owl was adhered together using the Two Way Glue Pen. The branch from the Two Step Bird Punch was punched from Old Olive cardstock and adhered to the card front with the Two Way Glue Pen. The owl was adhered to the card with a Stampin' Dimensional.

I stamped "Birthday wishes" from Watercolor Trio in Early Espresso ink on a scrap of Whisper White cardstock. I am really going to miss the wonderful sentiments that are included in this set. You can only get this set until August 31st so make sure that you get your order put in before then if you want this wonderful set in your collection! You can order online 24-7 by clicking the shop now button on the top of the right sidebar.

The sentiment was punched out using the Designer Label Punch and adhered to the card front. The frame and brads from the Silver Hodgepodge Hardware kit were added to finish it off. What do you think?

Don't you just love that adorable owl punch! It's so much fun to make different expressions with the eyes. Come back tomorrow to see another CASED card! Have fun stamping!

Sunday, August 8, 2010

Daffodil Delight Flower For You

Todays card uses the flower that I showed you how to make in the tutorial yesterday. If you missed it you can find it here. Take a look:


Stamps: Bella Toille, Cute By The Inch (Level 2 hostess)
Cardstock: Whisper White, Poppy Parade, Peach Parfait, Daffodil Delight, Pear Pizzaz
Ink: Peach Parfait, Poppy Parade, Daffodil Delight
Paper: Greenhoue Gala DSP
Accessories: 5/8" Daffodil Delight Grosgrain ribbon, Scallop Square punch, Fancy Flower Punch, Silver Hodgepodge Hardware, Basic Pearls Jewel Accents, Two Way Glue Pen, Sticky Strip, Stampin' Dimensionals, Gold Glow Smooch Spritz, Perfect Polka Dots Textured Impressions Die, Needle Tool, Paper Snips

The flower was made with Pear Pizzaz, Daffodil Delight and Whisper White cardstock with Daffodil Delight and Peach Parfait ink, a large silver brad from the Hodgepodge Hardware kit, and a large Basic Pearl Jewel Accent. You can find the tutorial by clicking the link at the top of this post.

The card base is Whisper White cardstock cut at 5 1/2" x 8 1/2" and scored at 4 1/4". The card front was stamped with the Bella Toille background stamp in Peach Parfait ink. I had a scrap of Greenhouse Gala DSP sitting on my work table that was 2 1/4" x 4". I wrapped a piece of 5/8" Daffodil Delight Grosgrain ribbon around the DSP and adhered it to a piece of Poppy Parade cardstock cut at 2 3/8" x 4 1/4" then adhered that to the card front.

I stamped the image from Cute By The Inch in Poppy Parade ink on a scrap of Whisper White cardstock and cut it out using paper snips. I used the Two Way Glue Pen to adhere my stamped square to a scrap of Daffodil Delight cardstock and cut around it with the paper snips. This was then adered to a piece of Peach dParfait cardstock punched with the Scalloped Square punch. This was adhered to the card front with a Stampin' Dimensional. The flower that I made yesterday was adhered to the card front with a piece of sticky strip.

Now after I completed the card and put it on a display shelf with all of the other cards I've made recently, I realized that I had used the same colors from the color challenge this week without even trying to. Its funny how that happens sometimes.  

Here is a close up of the flower. The only thing I added from yesterday was spraying it with some Gold Glow Smooch Spritz to give the flower some sparkle.  


Come back tomorrow to see another paper creation! Have fun stamping!

Friday, August 6, 2010

3D Fancy Flower Tutorial

This weeks tutorial is on making the flower that I used on my Summer Fun scrapbook page a few days ago. This flower is pretty easy to make and very pretty.

The supplies you will need are: Fancy Flower Punch, Whisper White cardstock, Pear Pizzaz Cardstock, Daffodil Delight cardstock, Daffodil Delight ink, Peach Parfait ink, Stampin' Sponges, large brad, Basic Pearls Jewel Accents, Perfect Polka Dots Textured Impressions die, Big Shot, Needle tool.


Punch one flower from Pear Pizzaz Cardstock, three flowers from Whisper White cardstock, and three flowers from Daffodil Delight cardstock.


Place three of the flowers inside the Perfect Polka Dots Textured Impressions die and run it through the big shot. This will give some of the petals a very nice texture.


Now you are ready to add some color to your flowers.


Sponge the top of the texture and the edges of the flowers with Daffodil Delight ink. You will also want to sponge around the edges on the back side. These will be visible when you shape your flower.


I did not sponge on the green flower. You can also see that I sponged the textured Daffodil Delight flower with Peach Parfait just to make one of them stand out a little more.


Now use your bone folder to distress the paper. You really want to soften it up by using your bone folder to "curl" the flower. You will want to rotate the flower to make sure you get the entire thing. Then flip the flower over and repeat on the other side. This will be done on all of your punched flowers to make them softer.

You want to keep distressing the Daffodil Delight and Pear Pizzaz cardstock until you can see the layers of the cardstock splitting.


Once the cardstock starts splitting on the edge you can carefully tear the two layers apart. See the lovely soft texture you get by doing this?  


Now you have all of your flowers ready to go.


Stack them up however you choose. I put some of the flowers with the "inside" of the cardstock facing up and some of them with the "inside" of the cardstock facing down. It really gives a nice variety to the layers of cardstock.


Use your needle tool to punch a hole through all of the layers. You may have to use a drilling motion to get all the way through.


Insert a large brad into the hole that you created with the needle tool. Flatten out the back of the brad. This is what will hold your flower together.


Use your needle tool to position a Basic Pearl Jewel Accent into the center of the brad.


Use your fingers to curl, scrunch, and shape the flower until you are happy with it.


Now your 3D fancy flower is ready to be used on a project.

I hope you enjoyed today's tutorial. I would love to see the flowers you make. Please post a link to your blog or photo in the comments section.

Come back tomorrow to see what I do with this lovely flower. Have fun stamping!

Punched Flower Passion

Today I have for you a pretty quick and simple card. Or at least quick and simple for me anyway. Take a look:


Stamps: Inspired By Nature, Punch Potpurri
Cardstock: Naturals White, Blushing Bride, Peach Parfait, Chocolate Chip, Concord Crush, Poppy Parade
Ink: Chocolate Chip, Pear Pizzaz, Concord Crush, Blushing Bride, Poppy Parade
Accessories: Perfect Details Texturz Plate die, Stampin' Dimensionals, Scallop Trim Corner Punch, 5/8" Chocolate Chip Satin Ribbon (retired), Basic Pearls Jewel Accents, Boho Blossoms Punch

The card base is Naturals White cardstock cut at 5 1/2" x 8 1/2" and scored at 4 1/4". A piece of Blushing Bride cardstock was cut at 4" x 5 1/4" and ran through the Big Shot with the Perfect Details Texturz Plate die to give it some nice swirls. A piece of 5/8" Chocolate Chip Satin Ribbon (retired) was wrapped around the panel before it was adhered to the card front.

The image panel is a piece of Naturals White cardstock cut at 2 3/4" x 3 1/2". The grass from Inspired By Nature was stamped in Pear Pizzaz ink. The sentiment was stamped in Chocolate Chip ink in the bottom left hand corner. A piece of Chocolate Chip cardstock was cut at 2 7/8" x 3 5/8" and a piece of Pear Pizzaz cardstock was cut at 3 1/8" x 3 7/8". The corner of all three panels were punched with the Scallop Trim Corner Punch and adhered together.

On scraps of Blushing Bride, Concord Crush, and Poppy Parade cardstock I stamped the flowers from Punch Potpurri in the ink color that matched the cardstock. Then I punched out the sets of flowers and picked one of each color. I used my fingers to curl the ends of the flower petals to give them some shape and adhered them to the image panel with the Two Way Glue Pen. To finish it off I added some Basic Pearl Jewel Accents to each of the flower centers. What do you think?

Come back tomorrow to see a tutorial on how to make a 3D flower!