Wednesday, February 29, 2012

Baby Prints

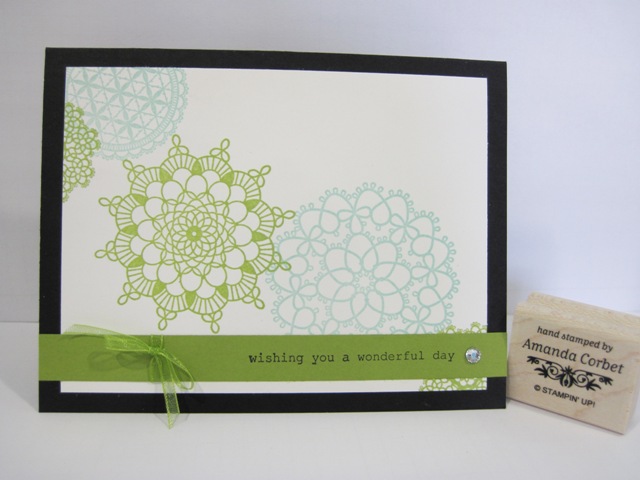
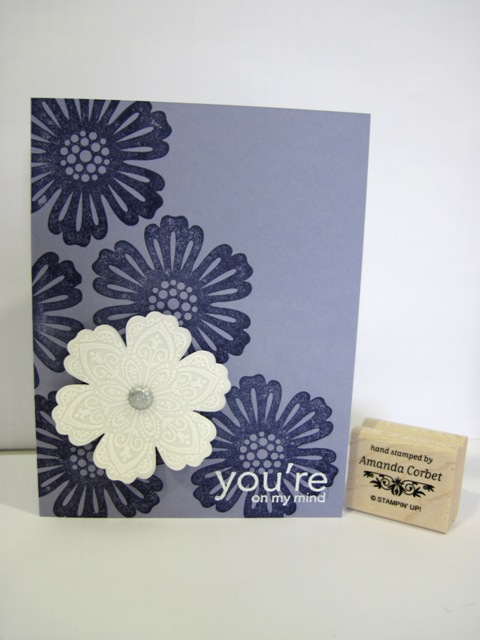
Good morning! It's Wednesday! Only two more days until the weekend! Today I'm sharing with you the third card from the February Make and Take. I gave my guests the option of making a baby boy card or a baby girl card. 

Let me tell you...It's not easy at all to come up with a design that doesn't require a whole bunch of cut pink and blue card stock that may or may not be used. I used the main color just for the card base. That way whatever isn't used by my make and take guests is just another card base already scored and ready to go for another project! 

Anyway...here are the two options: 


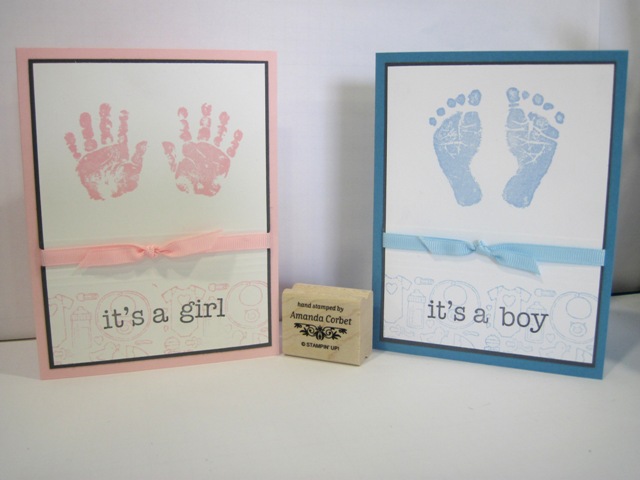
  • Stamps: Baby Prints, Packed for Baby
  • Card Stock: Pretty in Pink, Marina Mist, Basic Grey, Whisper White
  • Ink: Pretty in Pink, Marina Mist, Basic Grey
  • Accessories: Simply Scored, 1/4" Grosgrain ribbon in Pretty in Pink and Bashful Blue 

I started off by cutting the card base 5-1/2" x 8-1/2" in Pretty in Pink and Marina Mist card stock. Both were scored at 4-1/4". Next I cut a piece of Whisper White card stock 3-3/4" x 5" for each card front.
With the 5" side of the Whisper White card stock at the top of my Simply Scored I added score lines at 2-3/4", 3-1/4", 3-3/8", and 3-1/2". This just adds a little bit of a line detail on the front of the card and helps separate the top of the card from the bottom.

The image from Packed for Baby was stamped onto the bottom of the Whisper White card stock (the shorter section) in Pretty in Pink or Marina Mist ink. The greeting from Baby Prints was stamped on top of the Packed for Baby image in Basic Grey ink.

Then I stamped the hands or the feet from Baby Prints in Pretty in Pink or Marina Mist ink onto the top portion of the Whisper White card stock. I adhered the stamped Whisper White card stock onto a 3-7/8" x 5-1/8" piece of Basic Grey card stock. A Pretty in Pink or Bashful Blue 1/4" Grosgrain ribbon was wrapped around the panel and tied into a knot. I trimmed the ribbon ends and then adhered the panel onto the card front.


Another quick and easy card that is a perfect card for a Mom to be or great for a birth announcement! I just love the adorable little hand a feet prints! So cute! 

Thanks for stopping by!

Tuesday, February 28, 2012

Wonderful Doilies

Today I'm going to share with you the second card from the February Make and Take! This one was inspired by a non-Stampin' Up card that was created by Maile at Simply Stamped. You can find her card HERE.


  • Stamps: Delicate Doilies, Bring on the Cake
  • Card Stock: Whisper White, Basic Black, Lucky Limeade
  • Ink: Pool Party, Lucky Limeade, Basic Black
  • Accessories: Rhinestones, Lucky Limeade ribbon (Everyday Enchantment Embellishments SAB pack)

This is another super quick and easy card to put together, but looks great! I started off by cutting the card base at 5-1/2" x 8-1/2" from Basic Black card stock and scored it at 4-1/4". Next I cut two pieces of Whisper White card stock 3-3/4" x 5".

Both pieces of Whisper White card stock were stamped with the Delicate Doilies stamp set in Pool Party and Lucky Limeade ink. I just randomly stamped them onto the card stock in a kind of diagonal line. One piece was adhered onto the card front and the second was adhered onto the inside of the card. After all, on a black card you really need a lighter piece of card stock on the inside to be able to see the writing.

Then I cut a piece of Lucky Limeade card stock 1/2" x 5-1/2". The greeting from Bring on the Cake was stamped onto the right side of the Lucky Limeade strip in Basic Black ink. I cut a 9" long piece of the Lucky Limeade organza ribbon (that you can get FREE during Sale-A-Bration) and tied it into a bow around the left side of the card stock strip. The strip was adhered onto the card front. Then, just to finish it off, I added a large Rhinestone just to the right of the greeting. This just gives the card a little bit of sparkle.


I love how simple and easy this card was to put together. The bright colors are sure to make anyone's day wonderful!

Thanks for stopping by!

Craft Project Central!

Here are the last two Craft Project Central projects for February!

Sweet Shop Box of Sweet Note Cards:


Using Stampin’ Up!’s Sweet Shop Designer Series Paper and Designer Stickers, create this set of sweet note cards and a box designed to look like a Sweet Shop, complete with a striped awning, to hold them.  This ensemble will look nice on a desk and the handy note cards will be ready to include with a special gift!  This project is a fun class or club project too!


This adorable project was created by Regina!

Tea Towel Love for Mom:

Do you love and want to craft with fabric, but you don’t sew?  Well then, this is the project for you!  You can make this Tea Towel with LOVE for your mom, or change up the colors and the words and give someone a special springtime gift.  How about LUCK for a St. Patrick’s Day gift or SPRING for an Easter gift?  If you’ve got an iron, you can make up a bunch of these as they are quick and inexpensive!


This project is the February Bonus Project. To earn this wonderful tutorial you just need to subscribe to two or more months in a row, put the CPC badge on your blog, or refer a friend and let Jacque at CPC know when they subscribe!

This great project was created by Julie!

To subscribe to all of the fabulous tutorials for February at Craft Project Central just click HERE!

Thanks for stopping by!

Monday, February 27, 2012

Wisteria and Eggplant Mixed Bunch

Happy Monday everyone! I hope you had a fabulous weekend! Today I'm sharing with you the first card from the February Make and Take. This one was pretty quick and easy. Take a look!


  • Stamps: Mixed Bunch, Upsy Daisy
  • Card Stock: Wisteria Wonder, Whisper White, Vellum
  • Ink: Elegant Eggplant, Versamark
  • Accessories: Blossom punch, White embossing powder, Heat Tool, Paper Piercer, Mat Pack, Glimmer Brads, Stampin' Dimensionals

 I started off with a Wisteria Wonder card stock cut at 5-1/2" x 8-1/2" and scored it at 4-1/4". I stamped the flower from Mixed Bunch all over the left side of the card front in Elegant Eggplant ink. Next I stamped the more detailed flower from Mixed Bunch in Versamark ink onto a piece of Vellum card stock. Then I poured White embossing powder over the stamped image, tapped off the excess, and heated it with the heat tool.

One the flower was embossed I punched it out with the Blossom punch. I used the Blossom punch on a scrap of Whisper White card stock also. The flowers were stacked on top of one another and the Paper Piercer and Mat Pack to punch a hole in the center of the flowers. A silver Glimmer Brad was added in the hole and the brad prongs were spread apart on the back of the flower. The flower was adhered onto the card front with Stampin' Dimensionals.


Like I said, super quick and easy, but also super pretty! I just love this stamp set! I can't wait until I have more time to play with it in my craft room. You will definitely be seeing lots of cards made with these beautiful flowers! 

I CASEd THIS card. It was one of the make and takes at Leadership. I was not able to attend, but Cristena and several other demos were kind enough to share photos of all the wonderful projects that were available. 

Thanks so much for stopping by! 


Thursday, February 23, 2012

Simple Scene


Hello everyone! It's been a while since I've posted a card. It's been crazy busy lately. I still have several sketch cards to share with you as well as the projects from the February Make and Take. Here is one of the sketch cards. This was created using the Creating Pretty Cards #8 sketch. 


  • Stamps: Lovely as a Tree, Bring on the Cake
  • Card Stock: Baja Breeze, Calypso Coral, Whisper White
  • Ink: Pool Party, Island Indigo, Lucky Limeade, Always Artichoke, Sahara Sand, Black Stazon, Calypso Coral
  • Accessories: Paper Snips, Scallop Edge border punch, Rhinestones, Calypso Coral ribbon (SAB Everyday Enchantment pack), Corner Rounder punch, Stampin' Dimensionals, Snow Burst embossing folder. 


Here is the sketch: 


The card base is Baja Breeze card stock that I cut at 5-1/2" x 8-1/2" and scored at 4-1/4". Next I cut a piece of Whisper White card stock 4" x 4-1/4" and ran it through the Big Shot in the Snow Burst embossing folder. Then I cut a piece of Calypso Coral card stock 1-1/4" x 4-1/4" and punched one edge with the Scalloped Edge border punch. I adhered the Calypso Coral strip behind the textured Whisper White card stock and adhered this panel onto the card front.

For the image panel I started off with a 3-1/2" x 4" piece of Whisper White card stock. The trees from Lovely as a Tree were stamped onto the middle of the card stock in Black Stazon ink. After cleaning off the stamp I stamped the trees again behind the first row in Sahara Sand ink. This creates a shadow of trees further off in the background.

To color the sky I simply swiped the Pool Party ink pad directly across the top half of the card stock several times. Then I sponged Island Indigo ink onto the top quarter of the card stock and along the sides. The ground was created by swiping the Lucky Limeade ink pad directly across the card stock a couple of times. Some darker shadows were added to the grass by swiping with Always Artichoke ink.

After the image panel was done I punched the two right corners with the Corner Rounder punch. Then I tore the left side until my card stock fit just right on top of the Whisper White layer. The image panel was adhered onto the Whisper White panel with Stampin' Dimensionals.


The greeting from Bring on the Cake was stamped in Calypso Coral ink onto a scrap of Whisper White card stock that happened to be about 1/2" wide. I used Paper Snips to cut the dove tails on either side of the greeting. This strip was adhered onto the image panel with more Stampin' Dimensionals.

To finish it off I wrapped two pieces of Calypso Coral ribbon around the card front and tied it into a bow. Then I added three Rhinestones onto some of the top scallops in the Calypso Coral border just to give the card a little sparkle.

I really love the Lovely as a Tree stamp set. It's a great go to set for any occasion and its really easy to create a pretty scene with. This card is definitely one of my favorites! What is your favorite go to stamp set?

If you participate in this sketch challenge this month make sure to head on over to Craft Project Central and get it linked! You could win a free subscription to Craft Project Central if your card is chosen as one of the winning entries! 

Craft Project Central!

Leprechaun and Pot of Gold: 


St. Patrick’s Day is less than a month away and this happy little leprechaun wants to share his pot of gold!  This cute project with a punch art card is perfectly paired with a little Pot O’ Gold!  Fill it with foil wrapped chocolates for a special st. Patty’s Day gift! Celebrate the holiday or give as a good luck treat!


This project was designed by Kim


To get this tutorial and ten other fantastic tutorials subscribe to the February edition of Craft Project Central by clicking HERE

Thanks for stopping by! 

Wednesday, February 22, 2012

Back Up Your Blog!

You want to make sure to regularly back up your blog onto a hard drive. Otherwise, if something goes wrong all your blog content is lost. That would be terrible! I would hate to lose all of the hard work that I've put into my blog and to have to start from scratch! So make sure to back up your blog regularly!

Here is how you do it:

These instructions are for Blogger.

~ Go to your Blogger dashboard
~ click on Settings (1),
~ then click on Other (2),
~ then click on Export Blog (3).
~ It will then ask you where to save it & voila.
Or, if you're using the old Blogger Interface go to your Blogger dashboard, Settings, and click Export Blog right at the top. Then choose where to save it.

Now if something does go wrong, just go to the same location, click Import Blog, and then locate the most recent back up file that you saved. Voila! Your blog will be back to what it was before, without the tears and frustration of having to start over!
So make sure to save a back up of your blog now!

Thanks for stopping by!

Monday, February 20, 2012

Blog Candy Winner!!!!!!

The winner of the February subscription to Craft Project Central is........


Sheri - confessed craftaholic
"What a great and useful idea. This would be fantastic for a gift, or for yourself! Thanks for sharing."

Thank you everyone for all of your kind comments on my Year of Cards Gift Box. If you would like to subscribe to the February edition of Craft Project Central to get my tutorial and 9 other fabulous tutorials just click HERE! It's only $10.00 for ten great tutorials!
 
Thanks for stopping by!

Sunday, February 19, 2012

Craft Project Central!

Designer Meal Planner:

This Menu Planner, Shopping List, and Notes set is designed to keep you organized when planning meals for your family! And shouldn’t something that is set out in your living space (hung with magnets on your refrigerator) be cute too? This set is so cute and functional you will have no problem planning meals for a week. You’ll have space to make quick notes on what you need to grab the next time you go to the store, as well as a categorized shopping list! Make several sets and give them away as gifts!


This great project was designed by Carrie!

Thanks for stopping by!

Thursday, February 16, 2012

Just For You

Good morning everyone! I've managed to get behind on sketch cards again so I will be sharing several of them soon. Here is the first one. This was created for the SCCSC104 sketch challenge on Stampin' Connection. Take a look!


  • Stamps: Fresh Vintage, Precious Butterflies
  • Card Stock: Whisper White, Wisteria Wonder, Concord Crush
  • Ink: Wisteria Wonder
  • Accessories: Doily Sizzlit, Blossom Bouquet triple layer punch, Everyday Enchantment brads, Stampin' Dimensionals, Paper Piercer, Mat Pack, Two Way Glue Pen
Here is the sketch that was created by Susie Nelson:


I started off by cutting the card base 5-1/2" x 8-1/2" from Wisteria Wonder card stock and scored it at 4-1/4". A piece of Whisper White card stock was cut at 3-3/4" x 5" and was adhered onto the card front.

I already had the doily half which was cut from Concord Crush card stock sitting in my scrap basket. It fit just perfectly with this sketch! The doily half was adhered onto the middle of the card front, making sure to leave enough room in the bottom right hand corner for my greeting.

Next I cut a piece of Whisper White card stock 1-5/8" x 4-1/2". The floral image from Fresh Vintage was stamped all over the Whisper White card stock in Wisteria Wonder ink. I adhered this panel onto a 1-3/4" x 4-5/8" piece of Concord Crush card stock. Then I ahdered this panel onto the left side of the card front.

Then I used the Blossom Bouquet triple layer punch to punch out the least detailed flower from a Wisteria Wonder scrap, the middle flower from a Lucky Limeade scrap, and the most detailed flower from a Whisper White scrap. The flower layers were adhered together with a Two-Way Glue Pen. Then I used my Paper Piercer and Mat Pack to pierce a hole through the center of the flower and added an Everyday Enchantment brad. The flower was adhered onto the card front with Stampin' Dimensionals.


To finish it off I stamped the greeting from Precious Butterflies onto the bottom right hand corner of the card front in Wisteria Wonder ink. I just love the new Doily Sizzlit!

Thanks for stopping by!

Craft Project Central!

Everyday Enchantment Purse and Cards:

You’re going to love this purse and four matching cards with envelopes made with the new Everyday Enchantment Designer Series Paper and the Fresh Vintage stamp set. The new Adorning Accents embossing folders and the Adorning Accents Edgelits dies give this project an elegant look especially when used with the Labels Collection Framelits die. This purse and cards set makes a great gift and is a quick and easy class project!

This project was designed by Glenda!


Thanks for stopping by!

Wednesday, February 15, 2012

Celebrate!


I'm finally sharing with you the last and easiest card from the January Make and Take. Take a look:


  • Stamps: Outlined Occasions (SAB)
  • Card Stock: Calypso Coral, Very Vanilla
  • DSP: Everyday Enchantment (SAB)
  • Ink: Black Stazon
  • Markers: Pool Party, Lucky Limeade, Calypso Coral
  • Accessories: Lucky Limeade ruffled ribbon, Rhinestones

This card is so super simple and easy you'll be done with it before you know it. I started off by cutting the Calypso Coral card base 5-1/2" x 8-1/2" and scoring it at 4-1/4". Then I cut a piece of Very Vanilla card stock 4" x 5-1/4". A piece of DSP was next. It was cut at 2" x 5-1/4". I adhered the DSP onto the Very Vanilla card stock.

Then the greeting from Outlined Occasions was stamped in Black Stazon ink. The letters of the greeting were colored in with Pool Party, Lucky Limeade, and Calypso Coral markers. The Very Vanilla layer was adhered onto the card front. Then just to dress it up I added a piece of Lucky Limeade ruffled ribbon around the card front and tied it into a knot.

It was so simple and pretty. But I thought it could use just a little bit more so I added a couple of Rhinestones onto the swirls of the greeting. That's it! This card also shows off two of the great things that you can get for FREE during Sale-A-Bration. Click on the Promotions tab to find out more info.

Thanks for stopping by!

Tuesday, February 14, 2012

Masculine Valentine

Here is the last Valentines Day card from the January Make and Take. This one is more masculine. Take a look:


  • Stamps: I {Heart} Hearts, Word Play
  • Card Stock: Basic Grey, Whisper White, Basic Black
  • DSP: Neutrals, Red Glimmer Paper          
  • Ink: Basic Grey, Versamark
  • Accessories: Black embossing powder, Heat Tool, Embossing Buddy, 1/8" Real Red taffeta ribbon, Small Heart punch, Stampin' Dimensionals
I started off with a 5-1/2" x 8-1/2" Basic Grey card base that was scored at 4-1/4". Next I cut a piece of Whisper White card stock 4" x 5-1/4" and adhered a 2-1/2" x 4" piece of Basic Grey striped DSP onto the bottom. Then I stamped the pretty heart from I {Heart} Hearts in Basic Grey ink.

The greeting from Word Play was stamped onto the Whisper White card stock with Versamark ink. Then Black embossing powder was poured over the stamped image, the excess tapped off, and heated with the heat tool. This gives us a nice shiny greeting.

Next a piece of Basic Black card stock was cut at 1/2" x 4" and was adhered over the center of the card stock where the edge of the DSP met the Whisper White card stock. A piece of 1/8" Real Red taffeta ribbon was tied around the panel and into a knot. Then this panel was adhered onto the card front.


To finish it off I used the Small Heart punch with some Real Red Glimmer paper to punch out a heart. This was adhered onto the bottom of the card front with half of a Stampin' Dimensional to make the glimmery heart pop!


I really love how simple this is and how pretty it turned out. That little glimmery heart at the bottom is just so cute! And yet the card is manly enough to be given to your favorite guy on valentines day.

Happy Valentines Day!!!!

Thanks for stopping by!

Monday, February 13, 2012

Year of Cards Gift Box and Some Candy!

Here is my project for Febrary for Craft Project Central!

Year of Cards Gift Box:

Do you have too many birthdays and occasions to remember? Or, do you know someone who would love to receive a years worth of occasion cards? This beautiful and sturdy gift box contains six portfolios with a pocket for each month of the year. On each month’s pocket there is a tag where you can write names, dates, and occasions for that month to help you remember all of those special dates and occasions! Each pocket in the portfolio will hold five to six A2 size cards and envelopes depending on how bulky the cards are. That means that this beautiful gift box can hold 60 – 72 cards and envelopes! This project is also a great class project!

To subscribe to the February edition of Craft Project Central just click HERE. You will get this tutorial and 9 other fabulous tutorials for just $10!


Would you like to win this tutorial and tutorials for all of the other fantastic projects from February? Just leave a comment on this post by Monday the 20th at noon for a chance to win 10 wonderful tutorials for FREE!


Thanks for stopping by!

Craft Project Central!

Everyday Enchantment Cork Coasters and Card:
This project makes a fun and useful housewarming or hostess gift. Pair it up with the coordinating note card and you’re set! With all of the gorgeous Designer Series Papers from Stampin’ Up!, the possibilities are endless!! This project also makes a great class, club or stamp camp project!


This beautiful project was designed by Laurie!


Faux Book Card
This pretty-vintage greeting card has a Faux Book look that will wow the recipient whether they’re a book lover or not! The compartment inside is deep enough for a gift card (how about a Borders gift card), or any other small treat! This project is also a quick and easy club, class, or stamp camp project!


This fabulous project was designed by Monika!

You can get these an many other great tutorials by subscribing to the February edition of Craft Project Central by clicking HERE!

Thanks for stopping by!

Monday, February 6, 2012

Gate Fold Valentine

Today I have the second card from the January Make and Take to share with you! This one was really fun! I cased this card from someone else, but I can't find her blog at the moment. I will update this post later with the link to her card.


  • Stamps: Distressed Dots, Take it to Heart, Delightful Dozen
  • Card Stock: Crumb Cake, Very Vanilla, Early Espresso
  • DSP: Everyday Enchantment, Red Glimmer Paper
  • Ink: Crumb Cake, Early Espresso
  • Accessories: Heart Punch, Tasteful Trim Die, Extra Large Oval Punch, Corner Rounder punch, Two-Way Glue Pen
Cut two pieces of Crumb Cake card stock 4-1/4" x 11" and score both pieces at 2-3/4" and 5-1/2". Fold on the score lines. Stamp the half of the card stock pieces with the 2-3/4" score line with the Distressed Dots background stamp in Crumb Cake ink.

Fold the card stock on the 5-1/2" score line like you would for a normal card. Punch the top two corners with the Corner Rounder punch. Repeat on the other card stock piece. 

Adhere the 5-1/2" long side of one card stock piece on top of the other 5-1/2" long section of card stock. Fold on the score lines as shown in the picture below. You want really good creases on your score lines so you may want to use a bone folder.


To punch the hearts use the Large Heart punch and insert the card stock all the way into the punch until it can't go any further. Then line up the point of the heart with the 2-3/4" fold line and punch. Repeat this on the other side of the card. Make sure that the card stock is all the way in the punch so your hearts will line up!


Stamp the hearts from Take it to Heart in Early Espresso ink on either side of the punched hearts. Cut two pieces of Early Espresso card stock 1/2" x 11" and run it through the Big Shot on the Tasteful Trim die to cut out the ric-rac. Adhere the ric-rac above and below your punched out heart on both sides of the card.

Cut a piece of Everday Enchantment DSP 4" x 5-1/4". Punch the top two corners with the Corner Rounder punch. Adhere the DSP onto the inside of the card. Stamp the greeting from Delightful Dozen onto a scrap of Very Vanilla card stock in Early Espresso ink. Punch out the greeting with the Extra Large Oval punch and adhere the oval onto the inside of the card close to the top of the card.


Use the Large Heart punch with some Red Glimmer Paper to punch out a glimmery heart. Close one side of the card front and adhere your heart in place using the punched out half heart on the card flap to position the glimmery heart.

Now your card is finished!

This is such a fun technique! I wonder how great it would look with some other punches. What do you think?

Thanks for stopping by!

Craft Project Central!

Valentine Mail Box and Cards Ensemble:

This Valentine Ensemble would be a great gift for a teacher or any sweet Valentine on your list! This cute little paper Mailbox can hold these darling 3" x3" Note Cards or chocolate treats for the kids! The Do Not Disturb door hanger has a pocket to hold mints or any other small treat! Once you have the templates you can easily recreate this project for any theme or occasion. Makes a great WOW project for workshops, classes and Stamp Camps!


This project was designed by Holley!

To subscribe to the February edition of Craft Project Central just click HERE!


Thanks for stopping by!

Saturday, February 4, 2012

Craft Project Central!

Here are two fabulous tutorials that you can get with the February subscription to Craft Project Central! You get 10 tutorials for just $10 when you subscribe!

Hanging Heart Treat Holder and Card:
Our first project this month is a great Valentine Heart Treat Holder filled with decorated Hershey’s Kisses and a pretty coordinating card. You only have two weeks to get your Valentines projects done and this is a fun one to try! It’s also a great class or club project!


This project was created by Heidi!


Valentine Gift Box, Earrings, and Cards:
This pretty heart box has a special pair of earrings hidden inside. You can create them with Stampin’ Up! brads in just s few minutes! Not only is this a great gift for Valentine’s Day, but it would be wonderful for Mother’s Day, birthdays, and so much more! Makes a great class or club project too!


This project was created by Chris!
 
Subscribe to the February issue of Craft Project Central to get the tutorials for these and many more wonderful projects!

Thanks for stopping by!