Saturday, August 31, 2013

Craft Project Central!

Teacher’s Pet – August Bonus Project:

Want to make a great impression?  Here is the perfect gift for the teacher you love!  This ensemble has a can perfect for you to fill with cookies or candy.  A cute box to load up with goodies and a card to top it off!


This absolutely adorable set was designed by Heidi! If you have a chance please head on over to Heidi's blog and leave her a comment on her project!

If you would like to subscribe to the August edition of Craft Project Central and get 10 wonderful tutorials for only $10 then click HERE!

More August projects that you may have missed: 


Friday, August 30, 2013

So Many Candles!

It’s Friday again! And what do you know… I’m actually posting the Friday Mashup challenge on Friday! Yeah! I knew I could do it! 

I was in need of a birthday card for my niece Megan so I mashed up the Mashup challenge to make her birthday card. She turned nine last Sunday so I wanted to have nine candles on the card for her!

She said the funniest thing week before last… She told me that her favorite color is yellow and her second favorite color is turquoise, but turquoise might bump yellow to her second favorite color. I just couldn’t help laughing at that. So of course I had to use both her favorite colors!


  • Stamps: A Dozen thoughts, Cycle Celebration
  • DSP: Polka Dot Parade
  • Card Stock: Tempting Turquoise, Whisper White, Daffodil Delight
  • Ink: Tempting Turquoise, Daffodil Delight
  • Accessories: Strawberry Slush Ruffled Ribbon, Vintage Faceted Buttons, Linen Thread, Rhinestones,  Label Card Thinlits Dies, Silver glimmer Paper, Scallop Trim Border Punch, Dazzling Details, Stampin’ Dimensionals, 2-Way Glue Pen

Photo Source
Here's your Mashup Challenge:
  1. Create a project with using "A-B-C (use elements on your projects starting with the letters A, B, C). "
  2. Create a project using a "1-2-3 card recipe (1 embellishment, 2 Stamp Sets, 3 Colors) ."
  3. Or Mash it Up and create a project "A-B-C & a 1,2,3 card recipe. " 


The challenge this week at the Friday Mashup is a tough one! I had to really think about the products I was using and how to incorporate each thing into the card.

So here is the breakdown:
A: A Dozen Thoughts stamp set. This seems like cheating, but I absolutely could not think of an element that started with an A!
B: Bow, Button, Banner
C: Candles

1 Embellishment (Okay I’m assuming this meant at least one embellishment, because I kinda used five. Oops!)
2 Stamp Sets (Got that one!)
3 Colors (Tempting Turquoise, Daffodil Delight, and Strawberry Slush) I must say that it took me FOREVER to decide on a third color to add that wouldn’t look terrible. I struck a winner with the bright splash of pink in that adorable ruffled ribbon!

Okay, so if you want to make your own version of this cutie here is how it’s done. Start off by cutting a piece of Tempting Turquoise card stock 5-1/2” x 8-1/2” and score it at 4-1/4”. Next cut a piece of Whisper White card stock 4” x 5-1/4”. Stamp the candles in Tempting Turquoise ink. Make sure your center candle starts close to the top. I wish mine went a little higher on the card. Also, make sure to leave enough space between your turquoise candles to add your Daffodil Delight candles. Stamp the Daffodil Delight candles. Adhere this layer onto the card front and add some Dazzling Details onto the candle flames for some sparkle.


Now cut a piece of Daffodil Delight card stock 1-3/4” x 5-1/2” and punch one long edge with the Scallop Trim Border Punch. Cut a piece of Daffodil Delight Polka Dot Parade DSP 1-1/4” x 5-1/2” and adhere it onto your Daffodil Delight card stock. Next cut a piece of Silver Glimmer Paper 1/8” x 5-1/2” and adhere it right at the top edge of the DSP strip with 2-Way Glue Pen. Adhere this panel onto the bottom of your card front with Stampin’ Dimensionals. I just lined the bottom of the Daffodil Delight card stock up with the bottom edge of the Whisper White card stock.

Then cut a piece of Strawberry Slush ruffled ribbon 20 inches long, wrap it around the card front and tie it into a bow. Next take a piece of Linen Thread that is about 10 inches long. Run the thread under the center of the bow, then run the two ends of the thread through the holes in a Vintage Faceted Button and tie the thread into a small bow. That will keep your button firmly attached and doesn't require any adhesive!


Finally stamp the greeting from A Dozen Thoughts onto a scrap of Whisper White card stock in Tempting Turquoise ink. Use the straight banner Thinlit from the Label Card Thinlits set to cut out the banner in the Big Shot. Now fold the banner on the wonderful little score lines and use 2-Way Glue Pen to adhere the banner onto the card front. Now just add a medium Rhinestone onto each end of the banner and you’re done!


I hope you get a chance to try out this challenge! Although it took some thought, it was really fun and kinda forced me outside my comfort zone a little bit. Head on over to the Friday Mashup to see what the rest of the design team came up with!


Wednesday, August 28, 2013

Craft Project Central!

Decorated Clipboard and Note Cards:

It’s Back-to-School season and it’s time to show those teachers that we really appreciate them.  This decorated clipboard includes a corkboard to pin up important notes, along with an attached clothespin to clip up additional messages.  It’s an all in one message center! Also included are some note cards for the teacher to send home some cute messages on!


This fun and creative set was designed by Jen! If you have a chance please head on over to Jen's blog and leave her a comment on her project.

If you would like to subscribe to the August edition of Craft Project Central and get 10 wonderful tutorials for only $10 then click HERE!


Finally All About You!

Here is the first project from the June Make and Take! One of these days I will get caught up with my posts. J This one was really fast and easy.


  • Stamps: Really Good Greetings
  • DSP: Eastern Elegance, Pool Party Core’dinations
  • Card Stock: Coastal Cabana, Smoky Slate, Whisper White
  • Ink: Midnight Muse, Deco Labels Framelits, Silver Dazzling Details, Basic Gray Stitched Grosgrain Ribbon, Stampin’ Dimensionals, Chevron embossing folder, Sanding Block

I started off by cutting a piece of the fabulous new Coastal Cabana card stock 5-1/2” x 8-1/2” and scored it at 4-1/4”. Next I cut a piece of Pool Party Core’dinations card stock 3-3/4” x 5” and ran it through the Big Shot in the Chevron embossing folder. I used the sanding block to reveal the softer inside color of the card stock, and then adhered this piece onto the card front.


Next up I cut a piece of Eastern Elegance DSP 2” x 4-1/4” and adhered it onto a 2-1/8” x 4-1/4” piece of Whisper White card stock. I adhered this onto the left side of the card front. I wrapped a piece of Basic Gray Stitched Grosgrain Ribbon around the card front and tied it into a knot.


I stamped the greeting onto a scrap of Smoky Slate card stock in Midnight Muse ink and ran it through the Big Shot with the smallest Deco Labels Framelit. I adhered the label on top of the DSP with some Stampin’ Dimensionals then added some silver brackets on the top and bottom of the label with Silver Dazzling Details. That’s it! It’s bright, fun, and simple! 


Tuesday, August 27, 2013

Fall Thoughts

I’m late posting the Friday Mashup again. Better late than never right? Well here is the card I created.

  • Stamps: Magnificent Maple, A Dozen Thoughts
  • DSP: Modern Medley
  • Card Stock: Baked Brown Sugar, Very Vanilla, Coastal Cabana
  • Ink: Old Olive, Versamark, Baked Brown Sugar
  • Accessories: Paper Piercer, Stampin’ Pierce Mat, Glimmer Brads, Pewter embossing powder, Embossing Buddy, Heat Tool, Aqua Painter, Paper Snips, Early Espresso Baker’s Twine Stampin’ Dimensionals, Stylish Stripes embossing folder


Here's your Mashup Challenge:
  1. Create a project with the "Sketch Liliana created."
  2. Create a project with a "School Theme (books, pencils, rulers, numbers, etc."
  3. Or Mash it Up and create a "School themed project using Liliana's Sketch. "

I totally left out the “back to school” element. Sorry Lilliana, I just couldn’t come up with anything school related. I got started and I’ve been itching to use the new Marvelous Maple stamp that’s been sitting on my table for a while.

If you want to make this card here is what you need to do. Start off with a piece of Baked Brown Sugar card stock cut at 5-1/2” x 8-1/2” and score it at 4-1/4”. Now run your card front through the Big Shot in the Stylish Stripes embossing folder.

Next cut a piece of Very Vanilla card stock 3” x 4” and stamp the Marvelous Maple image all over in Old Olive ink. Cut a piece of Modern Medley DSP 3” x 3-3/4” and adhere it behind the leaf panel. Adhere this layer onto the card front with Stampin’ Dimensionals.


For the greeting cut a piece of Coastal Cabana card stock 1/2” x 3-1/2” and stamp the greeting from A Dozen Thoughts onto the center of the strip in Baked Brown Sugar ink. Use Paper Snips to cut both ends into a dove-tail shape. Then use your Paper Piercer and Stampin’ Pierce Mat to pierce a hole in each end of the banner. Add a Glimmer Brad into each of the pierced holes. Adhere this strip onto the very bottom of the leaf panel with Stampin’ Dimensionals.


Now for the leaf on top! Stamp the leaf image in Versamark onto a scrap of Modern Medley DSP. Cover the stamped image with Pewter embossing powder, tap off the excess, and heat it with the Heat Tool. Use Paper Snips to fussy cut around the leaf image. Now squeeze your closed Baked Brown Sugar ink pad to transfer some ink to the lid. Open the ink pad half-way and use an Aqua Painter to pick up ink off the lid and brush it over the embossed leaf. Wipe off any excess ink on your leaf with a paper towel.


Cut about a 8” piece of Early Espresso Baker’s Twine, wrap it around the stem of your leaf, and tie it into a bow. Use Paper Snips to trim your Baker’s Twine shorter if necessary. Now add your leaf onto the card front with a few Stampin’ Dimensionals and you’re done!

I just love how the Coastal Cabana greeting strip really pops off the card front! I am SO ready for fall to come!


Saturday, August 24, 2013

Craft Project Central!

Mosaic Madness Desk Set
Don’t you just love the new Wood Mount Cases?? They have so many uses! Here is a great desk set to give to anyone on your holiday or birthday gift list.  All the elements fit nicely in the case and go with a matching gift card.  Makes for a fun class or club project as well!

This pretty project was designed by Michelle! If you have a chance please head on over to Michelle's blog and leave her a comment on her beautiful project! 

If you would like to subscribe to the August edition of Craft Project Central and get 10 wonderful tutorials for only $10 then click HERE!


Wednesday, August 21, 2013

Wonderful Butterfly

I just love butterflies! They are my go to image when I need to add a little something. I think sometimes I use them way too much! This card I cased from Joanne at Sleepy in Seattle. Now here is my version!


  • Stamps: Swallowtail, Loving Thoughts
  • Card Stock: Whisper White, Wisteria Wonder
  • Ink: Elegant Eggplant, Versamark
  • Accessories: White embossing powder, Embossing Buddy, Heat Tool, Rhinestones, craft knife, Pool Party Seam Binding Ribbon, Sponge Dauber
This card was so easy and a definite wow! I started off by cutting a piece of Whisper White card stock 5-1/2” x 8-1/2” and scored it at 4-1/4”. Next I cut a piece of Wisteria Wonder card stock 4” x 5-1/4”. I stamped the Swallowtail image onto the card stock in Versamark ink, covered the stamped image with White embossing powder, tapped off the excess, and heated it with my Heat Tool.


I used a Sponge Dauber with some Elegant Eggplant ink to sponged inside the butterfly and around the edges of the butterfly. 


The greeting from Loving Thoughts was stamped into the lower right hand corner with Elegant Eggplant ink. I adhered this panel onto the card front and added three Rhinestones in the upper left hand corner.


Finally I used a craft knife to cut a slit in the fold of the card, inserted a piece of Pool Party Seam Binding Ribbon through the slit, wrapped it around the card front, and tied it into a knot. See… SUPER simple! But such a cool effect! What do you think? 


Craft Project Central!

Gingham Garden Purse and Card Set: 

This pretty little purse and monogram card set makes the perfect personalized gift for someone special.  The new school year is starting and teachers love having cards on hand.  How about that special co-worker or neighbor!  Make several to have on hand and customize the monogram when ready to give!  Makes a fun class or club project as well!


This lovely project was designed by Rosemarie! If you have a chance please head on over to Rosemarie's blog and leave her a comment on her beautiful project! 

If you would like to subscribe to the August edition of Craft Project Central and get 10 wonderful tutorials for only $10 then click HERE!


Monday, August 19, 2013

Good Thoughts

I think this has to be my favorite card from the July Make and take. It goes together pretty easily even though it looks time consuming.

  • Stamps: Too Kind
  • DSP: Smoky Slate
  • Card Stock: Soft Sky, Calypso Coral, Whisper White
  • Ink: Smoky Slate, Old Olive, Crisp Cantaloupe, Calypso Coral, Soft Sky
  • Accessories: Stampin’ Spritzer, Stampin’ Dimensionals, Apothecary Accents Framelits, Stampin’ Pierce Mat, Paper Piercing Tool, Silver Brads


To start on this one you need a 5-1/2” x 8-1/2” piece of Soft Sky card stock scored at 4-1/4”. Next cut a piece of Whisper White card stock 3-3/4” x 5”. Stamp the stem from Too Kind onto the left side of the card stock twice in Old Olive ink. Now stamp the larger flowers in Crisp Cantaloupe ink. Stamp the smaller flower images in Calypso Coral ink.


Now fill a Stampin’ Spritzer with water and about 20 drops of Soft Sky re-inker. Spritz this onto the right side of the stamped panel a couple times. Once your image panel is completely dry adhere a 1” x 5” piece of Smoky Slate Chevron DSP onto the bottom of the panel. Adhere this layer onto a 3-7/8” x 5-1/8” piece of Calypso Coral card stock.


Stamp the large flower image onto a scrap of Soft Sky card stock in Soft Sky ink. Now stamp the greeting on top of the flower in Smoky Slate ink. Cut out the greeting with the Apothecary Accents Framelits in your Big Shot. Use your Stampin’ Pierce Mat and Paper-Piercing Tool to pierce a hole in each end of the label. Add a Silver Brad into each hole. Adhere the label onto the card front with Stampin’ Dimensionals. Now adhere the image panel onto the card front with Stampin’ Dimensionals.


That’s it! What do you think? 


Sunday, August 18, 2013

Craft Project Central!

Organization Gift Set: 

Do you know someone who could use some more organization in their craft space? Or could you use some pretty organization yourself? This set will make your space a little more cheerful while helping you stay organized! You can corral all those wonderful ideas and inspirations on the pretty framed pin board complete with rose push pins. You can keep your notes from running away with the pretty clipboard. All your lovely completed cards will be nicely sorted in the hanging card pockets sorted by category making them easy to find.


This project was designed by Me

If you would like to subscribe to the August edition of Craft Project Central and get 10 wonderful tutorials for only $10 then click HERE!


Friday, August 16, 2013

XOXO

It’s Friday Mashup time again! This week it’s my turn to give you a challenge! I want you to take that clear block and use it in a new way.


Most of my card designs usually lean towards the simple side. Not too many layers. Not too much going on. But I tried specifically to kick this one up a notch and make it more over the top. This is definitely over the top for me. I think I like it a lot, but it’s still too simple. It’s always hard stepping out of your comfort zone and I just feel like this one was only a baby step. What do you think?

  • Stamps: Chevron background
  • Card Stock: Basic Gray, Soft Sky, Whisper White, Rich Razzleberry
  • Ink: Basic Gray, Rich Razzleberry, Tempting Turquoise, Soft Sky
  • Accessories: Pretty Print embossing folder, Chevron border punch, Rich Razzleberry Stitched Grosgrain ribbon, Circles Thinlits, Stampin’ Dimensionals, Silver Glimmer Paper, Two-Way Glue Pen


Here's your Mashup Challenge:
  1. Create a project using "Clear Block Stamping (use your clear block as a stamp)."
  2. Create a project using "Color-blocking."
  3. Or Mash it Up and create a project using "Clear Block Stamping & Color-blocking."

So to make this card start out with a piece of Basic Gray card stock cut at 5-1/2” x 8-1/2” and score at 4-1/4”. Use the Chevron background stamp with Basic Gray ink to stamp the card front. Now cut a piece of Whisper White card stock 3” x 4”. Use three different sized clear blocks to stamp in Rich Razzleberry, Tempting Turquoise, and Soft Sky using the Clear Block Stamping technique.

Next run this card stock through the Big Shot in the Pretty Print embossing folder. Adhere this onto a 3-1/4” x 4-1/4” piece of Soft Sky card stock. Cut a banner from a 1/2” wide strip of Whisper White card stock. Wrap a piece of Rich Razzleberry Stitched Grosgrain ribbon around the panel and tie it into a knot.


Use the “xoxo” die from the Circle Thinlits set on a scrap of Rich Razzelberry card stock and adhere this onto the banner with Two-Way Glue Pen.

When I first saw the Chevron border punch in the catalog I though “eh, I don’t really think I could use that one much” so I waited to order it. But now that I have it I love it! I haven’t used it to make a border yet (you know, like it was meant to be used… lol) but I love using it just to punch out the chevron pieces to add on top of a card! So use the Chevron border punch with some Silver Glimmer Paper and adhere your three glimmery chevrons onto the left side of your banner then adhere the banner onto the image panel with Stampin’ Dimensionals.


Finally adhere the panel onto the card front with some Stampin’ Dimensionals. That’s it!  You’re done! 


Craft Project Central!

Welcome Topiary Home Decor:
Welcome your houseguests with this vintage-style topiary welcome banner.  This would look great in any home’s entryway.  Make one as a gift and another one for yourself.  Colors can be customized to match your entryway’s color scheme.  This would also make a great home décor class.

This pretty project was designed by Christy! If you have a chance please head on over to Christy's blog and leave her a comment on her beautiful project! 

If you would like to subscribe to the August edition of Craft Project Central and get 10 wonderful tutorials for only $10 then click HERE!


Thursday, August 15, 2013

Clear Block Stamping Technique

I bet you have a pretty amazing background stamp in your crafting collection that you didn't realize you had. What am I talking about? Your clear block of course! Yes you can use it to hold your stamps, but the clear block alone can make one pretty awesome background pattern. 

You need a clear stamp block that is clean, an ink pad, and some card stock. That's it!


Now press your clear block onto your ink pad just like you would a stamp. 


Now press your block onto your card stock. 


You now have a unique textured background! So cool right? Well you can get even more fancy with it. 

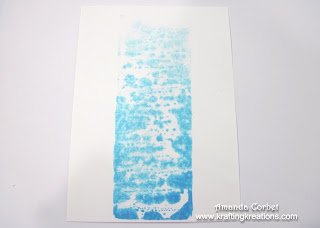
On the one below I used an Aqua Painter and some Tempting Turquoise re-inker. I just started coloring at one end and let the aqua painter run out of ink the further I went to the other end. 


Then I just stamped it onto the card stock and I got this really cool ombre look!


I just can't wait to use this to make an amazing card! 

 
 Give this technique a try. I just know you'll love the results you get! No two cards will be exactly alike and you get such a fun and interesting pattern!