
It’s Friday again! And what do you know… I’m actually
posting the Friday Mashup challenge on Friday! Yeah! I knew I could do it!
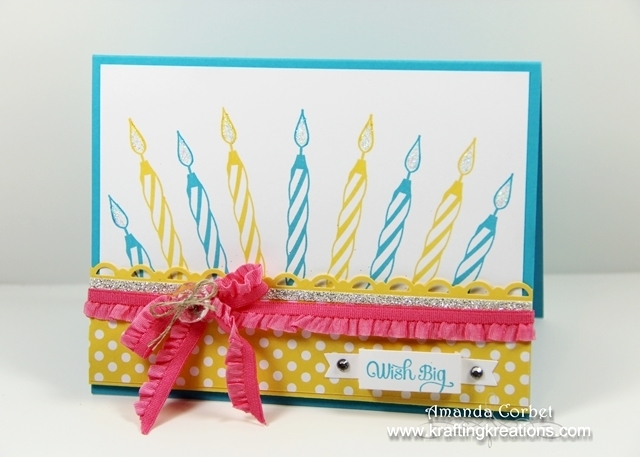
I was in need of a birthday card for my niece Megan so I
mashed up the Mashup challenge to make her birthday card. She turned nine last
Sunday so I wanted to have nine candles on the card for her!
She said the funniest thing week before last… She told me
that her favorite color is yellow and her second favorite color is turquoise,
but turquoise might bump yellow to her second favorite color. I just couldn’t
help laughing at that. So of course I had to use both her favorite colors!
- Stamps: A Dozen thoughts, Cycle Celebration
- DSP: Polka Dot Parade
- Card Stock: Tempting Turquoise, Whisper White, Daffodil Delight
- Ink: Tempting Turquoise, Daffodil Delight
- Accessories: Strawberry Slush Ruffled Ribbon, Vintage Faceted Buttons, Linen Thread, Rhinestones, Label Card Thinlits Dies, Silver glimmer Paper, Scallop Trim Border Punch, Dazzling Details, Stampin’ Dimensionals, 2-Way Glue Pen
 |
| Photo Source |
- Create a project with using "A-B-C (use elements on your projects starting with the letters A, B, C). "
- Create a project using a "1-2-3 card recipe (1 embellishment, 2 Stamp Sets, 3 Colors) ."
- Or Mash it Up and create a project "A-B-C & a 1,2,3 card recipe. "
The challenge this week at the Friday Mashup is a tough
one! I had to really think about the products I was using and how to
incorporate each thing into the card.
So here is the breakdown:
A: A Dozen Thoughts stamp set. This seems like cheating,
but I absolutely could not think of an element that started with an A!
B: Bow, Button, Banner
C: Candles
1 Embellishment (Okay I’m assuming this meant at least
one embellishment, because I kinda used five. Oops!)
2 Stamp Sets (Got that one!)
3 Colors (Tempting Turquoise, Daffodil Delight, and
Strawberry Slush) I must say that it took me FOREVER to decide on a third color
to add that wouldn’t look terrible. I struck a winner with the bright splash of
pink in that adorable ruffled ribbon!
Okay, so if you want to make your own version of this cutie
here is how it’s done. Start off by cutting a piece of Tempting Turquoise card
stock 5-1/2” x 8-1/2” and score it at 4-1/4”. Next cut a piece of Whisper White
card stock 4” x 5-1/4”. Stamp the candles in Tempting Turquoise ink. Make sure
your center candle starts close to the top. I wish mine went a little higher on
the card. Also, make sure to leave enough space between your turquoise candles
to add your Daffodil Delight candles. Stamp the Daffodil Delight candles.
Adhere this layer onto the card front and add some Dazzling Details onto the
candle flames for some sparkle.

Now cut a piece of Daffodil Delight card stock 1-3/4” x
5-1/2” and punch one long edge with the Scallop Trim Border Punch. Cut a piece
of Daffodil Delight Polka Dot Parade DSP 1-1/4” x 5-1/2” and adhere it onto
your Daffodil Delight card stock. Next cut a piece of Silver Glimmer Paper 1/8”
x 5-1/2” and adhere it right at the top edge of the DSP strip with 2-Way Glue
Pen. Adhere this panel onto the bottom of your card front with Stampin’
Dimensionals. I just lined the bottom of the Daffodil Delight card stock up
with the bottom edge of the Whisper White card stock.
Then cut a piece of Strawberry Slush ruffled ribbon 20 inches
long, wrap it around the card front and tie it into a bow. Next take a piece of
Linen Thread that is about 10 inches long. Run the thread under the center of
the bow, then run the two ends of the thread through the holes in a Vintage
Faceted Button and tie the thread into a small bow. That will keep your button
firmly attached and doesn't require any adhesive!
.jpg)
Finally stamp the greeting from A Dozen Thoughts onto a scrap
of Whisper White card stock in Tempting Turquoise ink. Use the straight banner
Thinlit from the Label Card Thinlits set to cut out the banner in the Big Shot.
Now fold the banner on the wonderful little score lines and use 2-Way Glue Pen
to adhere the banner onto the card front. Now just add a medium Rhinestone onto
each end of the banner and you’re done!

I hope you get a chance to try out this challenge! Although
it took some thought, it was really fun and kinda forced me outside my comfort
zone a little bit. Head on over to the Friday Mashup to see what the rest of
the design team came up with!
