Sunday, July 26, 2009

In Color Medallion

I created this card for the Splitcoaststampers sketch challenge #238 which can be found here. I just got my order yesterday which had all of the new In Color inks, paper, and markers, and also the fabulous Medallion stamp. Of course I had to use my newest toys, so both of my challenge cards this week use the new Stampin Up In Colors.

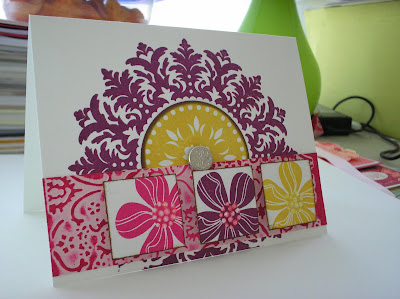
I stamped the medallion in Rich Razzleberry on Whisper White cs. I then stamped another medallion on another piece of Whisper White in Crushed Curry ink and cut out the circle. To cut out just the center circle I used the third from the smallest nestabilities die from the large standard circles set. I still had to trim some of the white around the center circle, but it saved the rest of the medallion so I can use it later instead of throwing it away. The Crushed Curry center circle was then sponged with Soft Suede ink and a brad was used to hold them together. The brad was from the Silver Hodgepodge Hardware set.

I used a piece of Pink Pirouette cs and ran it through a cuttlebug embossing folder and brayered the top with Melon Mambo ink. Three 1.25” squares were cut out of Whisper White and stamped with the flower from Eastern Blooms in Melon Mambo, Rich Razzleberry, and Crushed Curry. The edges of the squares were inked with Soft Suede using the direct to paper technique. The three squares are popped up using scrap rubber and I added some Diamond Stickles to the flower centers for some sparkle.


Happy Dandelions

I created this card for the Midnight Madness sketch challenge #11 which can be found here. I am so glad that I had the time to play with this sketch this week. I’ve wanted to use this Gina K. stamp set for a while now and finally got the chance. When this stamp set came out I really wanted it. I hadn’t bought Gina K. stamps before and realized that this one which is called Many Wishes was a free with three stamp set. So I purchased three other stamp sets just so I could get the Many Wishes set. Kinda crazy I know, but oh well I guess I’m just a stampaholic.

The first thing I did was cut a piece of Whisper White CS 3.25” square. This was then brayered with Crushed Curry, Melon Mambo, Dusty Durango, and then sponged a little with Rich Razzleberry. The stems and sentiment were stamped in Soft Suede and the flower heads were stamped in PTI’s Fresh Snow ink. The bottom edge was torn and then layered on a piece of Melon Mambo, which was also torn at the bottom. I then used some glue and some white flocking that I added Dazzling Diamonds glitter to and this was used to create the fluffly little ends of the dandelion. This adds just a little sparkle and texture.

The card base is Whisper White with Rich Razzleberry matted on it and some Raspberry Tart DSP. The main image panel that was matted on Melon Mambo is popped up with scrap rubber. I used some misc. white ribbon at the top with flower from the Flower Fusion Too set and some silver brads. What do you think?

Friday, July 24, 2009

Embossed Silhouettes

For this card I started with a Sage Shadow card. I then stamped the sentiment from SU’s Heard from the Heart in Chocolate Chip ink on some SU Dainty Dots dsp and added it to the card. With the scalloped ovals nestabilities I cut out one scalloped oval in Chocolate Chip and one smaller scalloped oval in Very Vanilla. I then cut out a standard oval in Very Vanilla that would fit on the scalloped Very Vanilla oval. The two scalloped ovals were adhered together and set aside. For the standard oval I embossed with clear embossing powder and Versamark two of the images from SU’s Pocket Silhouettes. After heat embossing these I sponged in the center with Bashful Blue ink and around the edge of the oval with Sage Shadow ink. This was then adhered to the other ovals. All of the ovals are popped up off the card using scrap rubber and a piece of misc. light blue ribbon was used to finish it off. What do you think?

Baroque Card Box

This is the fourth project that we created at my make and take. I used the tutorial for an A2 card box that can be found here.

The bottom is made of Chocolate Chip cs and the top is Sage Shadow cs. The top was stamped in Chocolate Chip with the swirls from the SU set Baroque Motifs. I used the eyelet border punch on the edges of the box, and sponged the corners with more Chocolate chip ink. For the panel on top of the box I used Nestabilities Labels 2 dies in Chocolate Chip and Very Vanilla to cut and emboss the label shape. Pretty in Pink was stamped on the Very Vanilla cs using one of the motif stamps from the Baroque Motifs set. The sentiment, from the SU Best Yet set, was embossed with gold embossing powder over the pink motif. Some misc. pink ribbon and PTI Dark Chocolate ribbon were used to finish it off. It looks like this box will hold a lot of cards because the bottom is 1.5” deep.


Golden Daisies

This is the third card that we made at my make and take. The inspiration was from a card that I had seen on Splitcoaststampers.com. Here.

It starts with a Chocolate Chip card which was stamped with the SU Weathered background stamp in Basic Black ink. A piece of Very Vanilla was then stamped with the daisies and sentiment from the SU set Upsy Daisy in Basic Black ink. The Very Vanilla was then torn at a diagonal across the middle. These two pieces were then sponged with So Saffron and Close to Cocoa all the way around the edges. Then I just added some Goldenrod stickles to some of the daisies. This was a simple and quick card to make that looks interesting. What do you think?

Bashful Butterfly

This is the second card that my mom, sister, and I made at our make and take. The inspiration came from this card that I saw on Splitcoaststampers.com: Here.

This card was started with a 4.25” x 4.25” card made from Night of Navy cs. I then added a piece of Bashful Blue that was 3.75” x 3.75” which leaves a wide border on all sides. The leaves and the sentiment were then stamped in Night of Navy ink on the Bashful Blue cs. All of the images used on this card are from the Great Friend SU stamp set. The butterfly was stamped twice, both on Whisper White cs. One piece was mounted on the Basic Black cs and then punched with the slot punch from SU. Some misc. white ribbon was threaded through the slot punch and tied around the side of the Whisper White and Basic Black stack. This was then adhered to the Bashful Blue cs. The other butterfly was colored in with a Bashful Blue marker and cut out. You can’t really tell in this picture, but the second butterfly is popped up on the first and the wings are curled. Then I just added some stardust stickles to the butterfly and the leaves. What do you think?

Thursday, July 23, 2009

Nestabilities Storage

One afternoon I was doing chores and as usual my mind wandered to how I want my craft room to look when it’s finished and how I want some things on shelves out where I can see them and others in drawers. While using my nestabilities one night, which were still on the cards that they were purchased on, the adhesive came completely off of the card when I pulled off a die. That got me thinking of a better way to store these. I like some things to be stored so they are not only easy to get to, but also look interesting as a decoration in my room.

I had what I consider a scathingly brilliant idea for storing my dies. I asked by husband to make a picture frame for me in his wood shop with a ¼” plywood back for where the picture would normally go. I painted the picture frame white. On the ¼” plywood I glued down some magnet sheets with spray adhesive and trimmed them to fit the ¼” plywood. I then used some more spray adhesive to adhere some beautiful wrapping paper that I found in the Hallmark section at Wal-mart. This paper fits perfectly with my craft room colors which are teal, white, and lime green. The pattern is also a very elegant backdrop for my dies. Then I simply added my nestabilities in the order I wanted them displayed. Because the entire inside of the frame is a magnet sheet the dies will stick anywhere in any order.


Although I don’t have many sets right now, I have plenty of room to expand, and if I have to I can make another with a different paper in the back. I just love how this looks and how easy it is to see what dies I have and get to them. The inside opening of the frame is 16 in. x 27 in. My craft room isn't finished yet so I leaned my Nestabilities frame up against the wall in what used to be my craft room, which is now my husband's office. The color of the wall in the picture will be the color on the walls of my craft room when it gets finished. What do you think?

Tuesday, July 21, 2009

Watercolor Rose

I know I haven’t posted in a while, but last week was not only a very busy week at work, it was also the end of the college semester. I was so busy between working overtime and finishing my last few assignments and test that I didn’t get a chance to play in the last few sketch challenges. I hope to be able to participate now though. Anyway, here is the first of the cards that we made at my Make and Take last week. The others I will post throughout the rest of the week.

This watercolor rose card was started by stamping the Fifth Avenue Floral rose on Shimmery White cs in Versamark and embossing in clear embossing powder. You then put the paper in a container and spray it with a misting bottle to saturate the paper. You then use an Aqua-painter and reinkers to color in the rose. With some practice, and 30 minutes drying time, you end up with a pretty water colored and shimmery image. This was mounted on Pretty in Pink cs that was run through a Cuttlebug embossing folder and mounted on Whisper White and Rose Red cs. The rose is popped up off of the three square layers and the square layers are popped off of the card using scrap rubber.

The card is Whisper White cs with Rose Red cs and Raspberry Tart dsp layered on it. The sentiment is from Oval All which was cut out and placed on a scalloped oval piece of Rose Red. This was cut using the SU’s scalloped oval punch. As usual all supplies are SU. I am really pleased with how this turned out. I’m not sure I want to give it away. What do you think?

Sunday, July 12, 2009

Sunrise Field (Cased)

I made this card for my husband’s birthday. I wanted to make him a really pretty scenic card so I browsed through my favorites and found a Zindorf tutorial for “Sunrise Field” which you can find here: http://zindorf.blogs.splitcoaststampers.com/2009/04/03/sunrise-field-tutorial-196/

I love Michelle Zindorf’s tutorials because they are so detailed and easy to follow. I started off sponging the sky using So Saffron, Barely Banana, Bashful Blue, Not Quite Navy, and Night of Navy. The ground hill in the background was created using a post-it-note and sponging more Not Quite Navy and Basic Black. The ground was created using a post-it-note to create the horizon and it was sponged with Close To Cocoa with a little black around the edges and underneath the hill. I used the spotted leaf stamp with Close to Cocoa and Basic Black to create the spots on the ground. The straight edged shadows on the field were created using a post-it-note mask and some Basic Black ink.

The trees were stamped in Basic Black and are from the Lovely as a Tree and Branch Out sets. Then the whole thing was sponged with Basic Black around the edges and the corners. This image was mounted on Very Vanilla, Certainly Celery, and Night of Navy. The sentiment is from the Elegant Greetings set and is embossed in gold embossing powder. The four gold brads in the corners of the main image finish it off. Mine turned out a little too dark. I think I was too heavy with my sponging. I will have to try again sometime to make it lighter. I’m please with how it turned out though. You have to check out Michelle Zindorf’s tutorials if you haven’t seen them. They are absolutely amazing and make it so easy that anyone can create these beautiful scenic cards.

Saturday, July 4, 2009

Sketch Challenge #235

This card I made for the Splitcoaststampers SC#235 which can be found here: http://www.splitcoaststampers.com/forums/showthread.php?t=445739

I started with a Whisper White card and a piece of Tangerine Tango on top of it. Then there is a piece of Whisper White that was sponged from the center out first with So Saffron the Pink Pirouette, then Kiwi Kiss, and finally Riding Hood Red. The circles were all from Whisper White cardstock that I stamped various butterfly images in Black Stazon. The butterflies were from the sets SU God’s Beauty, SU Measure of a Life, and Inkadinkado Garden Delight. I colored these in with SU markers in a variety of colors.

The white circles with the butterflies were cut out using the 1 ½” nestabilities die from the large circles. The larger circles I cut out of Baja Breeze, Kiwi Kiss, Tangerine Tango, Pink Pirouette, and Riding Hood Red cs using my Cricut with a 1 ½” shadow circle. The four butterflies in the corners I used stickles Diamonds glitter to highlight the butterflies. The other four outside circles are popped up with scrap rubber.

The center circle was stamped with PTI’s Butterfly Kisses in Bashful Blue. The sentiment is from PTI’s Mega Mixed Messages and was stamped in Night of Navy. This was popped up with double scrap rubber to make it stand higher than the others. I like the combination of all of the Spring/Summer In Colors here. I really need to order the new In Colors so I can play with them too. The card ended up being a huge 5 ½ inches square, but I wanted to make sure you could see a good portion of the butterflies. What do you think?

Friday, July 3, 2009

Midnight Madness #8

This card I made for the Midnight Madness Sketch Challenge #8 which can be found here: http://priscillastyles.blogspot.com/

I started off with a Going Grey card. I then stamped the flourish from Friends 24-7 on Whisper White cs in Baja Breeze and Close to Cocoa using the rock-n-roll technique. The stamp-a-ma-jig helped with the placement so I could make my own DSP. I then sponged the edges with Close to Cocoa. I used Going Grey and Basic Black cut with the largest nestabilities circle and scalloped circle dies, sponged the Going Grey piece with Close to Cocoa.
For the circles I use Kiwi Kiss that was run through the Bubbles cuttlebug embossing folder and then, like everything else, sponged the edges with Close to Cocoa.

The main image is the bird from Friends 24-7 that was stamped on Whisper White cs and colored with SU markers. I then sponged around the edge with Baja Breeze, Close to Cocoa, and Chocolate Chip. This is layered on Kiwi Kiss, Baja Breeze, and Whisper White all sponged around the edges with Close to Cocoa. This was added to the card popped up with some scrap rubber. I used some misc light blue ribbon and some misc lime green ribbon to finish it off. What do you think?