
One afternoon I was doing chores and as usual my mind wandered to how I want my craft room to look when it’s finished and how I want some things on shelves out where I can see them and others in drawers. While using my nestabilities one night, which were still on the cards that they were purchased on, the adhesive came completely off of the card when I pulled off a die. That got me thinking of a better way to store these. I like some things to be stored so they are not only easy to get to, but also look interesting as a decoration in my room.
I had what I consider a scathingly brilliant idea for storing my dies. I asked by husband to make a picture frame for me in his wood shop with a ¼” plywood back for where the picture would normally go. I painted the picture frame white. On the ¼” plywood I glued down some magnet sheets with spray adhesive and trimmed them to fit the ¼” plywood. I then used some more spray adhesive to adhere some beautiful wrapping paper that I found in the Hallmark section at Wal-mart. This paper fits perfectly with my craft room colors which are teal, white, and lime green. The pattern is also a very elegant backdrop for my dies. Then I simply added my nestabilities in the order I wanted them displayed. Because the entire inside of the frame is a magnet sheet the dies will stick anywhere in any order.
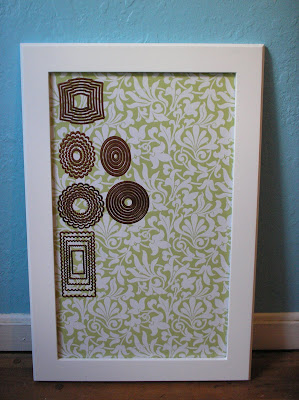
I had what I consider a scathingly brilliant idea for storing my dies. I asked by husband to make a picture frame for me in his wood shop with a ¼” plywood back for where the picture would normally go. I painted the picture frame white. On the ¼” plywood I glued down some magnet sheets with spray adhesive and trimmed them to fit the ¼” plywood. I then used some more spray adhesive to adhere some beautiful wrapping paper that I found in the Hallmark section at Wal-mart. This paper fits perfectly with my craft room colors which are teal, white, and lime green. The pattern is also a very elegant backdrop for my dies. Then I simply added my nestabilities in the order I wanted them displayed. Because the entire inside of the frame is a magnet sheet the dies will stick anywhere in any order.

Although I don’t have many sets right now, I have plenty of room to expand, and if I have to I can make another with a different paper in the back. I just love how this looks and how easy it is to see what dies I have and get to them. The inside opening of the frame is 16 in. x 27 in. My craft room isn't finished yet so I leaned my Nestabilities frame up against the wall in what used to be my craft room, which is now my husband's office. The color of the wall in the picture will be the color on the walls of my craft room when it gets finished. What do you think?