Tuesday, May 31, 2011

Melon Celery Birthday - Cupcake Class 1

I am finally getting around to posting the samples from my special Cupcake Card Class. This was a special class that I held where the ladies pre-paid and received the cupcake stamp set, cupcake punch, Springtime DSP, Glitter Paper, and ribbon as well as getting to make 6 cards and taking home the remaining supplies.

This first card was inspired by a card created by Dawn Olchefske. You can find her card and her blog HERE.
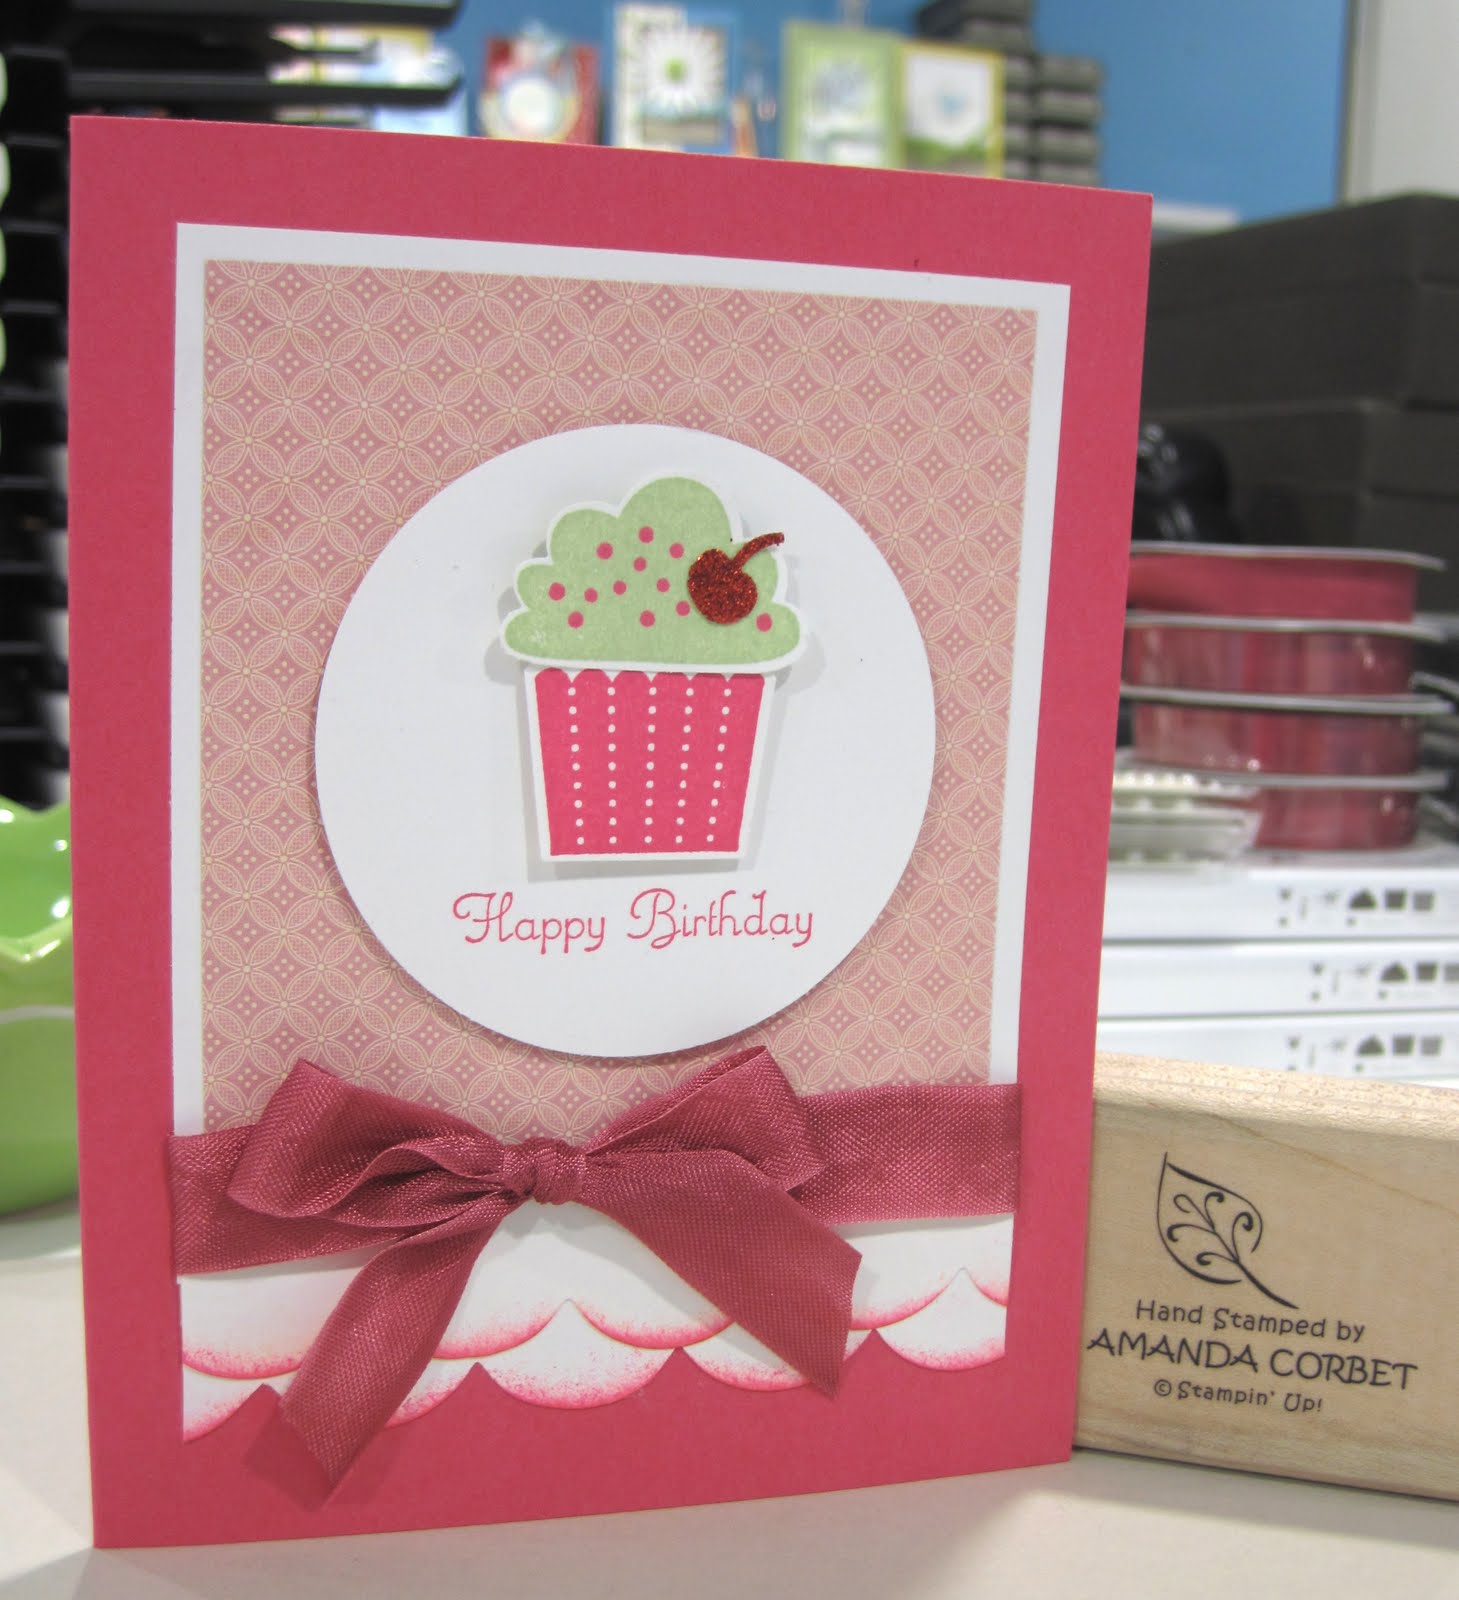
So here is the first card:


Stamps: Create A Cupcake
Cardstock: Melon Mambo, Whisper White, Glitter Paper
DSP: Springtime DSP
Ink: Melon Mambo, Certainly Celery
Accessories: Tasteful Trim Die, 2 ½” Circle Punch, Cupcake Punch, Stampin’ Sponge, Rose Red Seam Binding ribbon, Stampin’ Dimensionals, Two-Way Glue Pen

The card base is Melon Mambo cardstock cut at 5 ½” x 8 ½” and scored at 4 1/4”. A piece of Whisper White cardstock was cut at 3 ½” x 4” and set aside. Two pieces of Whisper White cardstock were cut at 3 ½” x 1” and were run through the Big Shot on the Tasteful Trim Die. When placing these on the tasteful trim die make to place them so that the scallops on one piece will alternate with the scallops on the other piece so the scallops do not line up directly one on top of the other. Does this make sense? You can see what I mean in the photo.

The edges of the scalloped pieces were sponged with Melon Mambo ink. One layer of scallops is adhered on top of the other and then the 3 ½” x 4” Whisper White panel is adhered to the very top of the top row of scallops. A piece of Springtime DSP is cut at 3 ¼” x 3 ¾” and adhered onto the large section of Whisper White cardstock. A piece of Rose Red Seam Binding ribbon is wrapped around the cardstock over where the large panel meets the scallops and tied into a bow. This panel was adhered to the card front.

The cupcake top was stamped in Certainly Celery ink and the sprinkles were stamped in Melon Mambo ink. The cupcake bottom was stamped in Melon Mambo ink. The cupcake pieces were punched out with the Cupcake Punch and a cherry was punched from Real Red Glimmer Paper. The cherry was adhered to the cupcake top with the Two-Way Glue Pen.

The 2 ½” Circle Punch was used on a scrap of Whisper White cardstock to punch out a circle. The greeting was stamped in Melon Mambo ink at the bottom of the circle. The cupcake top and cupcake bottom were adhered to the circle with Stampin’ Dimensionals. The circle was adhered to the card front with more Stampin’ Dimensionals.
I hope you’ve enjoyed seeing the first of the Cupcake Card Class cards! Come back tomorrow to see another!

Monday, May 30, 2011

White and Red Valentine

This card I started to case from a card created by Jayne Mercer called Love Defined. You can find her blog HERE. I started off trying to make my card exaclty like hers, but it kept evolving more and more. I would lay it out and think hmmm...it needs some texture or it needs some color. So this is what I ended up with.


Stamps: Valentine Defined, Perfect Punches
Cardstock: Whisper white, Pink Pirouette
Ink: Versamark, Pink Pirouette
Markers: Pink Pirouette, Sahara Sand, Real Red, Basic Black
Accessories: Scalloped Oval Punch, 1 3/8" x 5/8" Oval Punch, Silver Brads, Needle Tool, Mat Pack, Dazzling Diamonds Glitter, Tombow Multipurpose Adhesive, Final Press Textured Impressions Folder, 5/8" Real Red Satin Ribbon, Clear Embossing Powder, Embossing Buddy, Heat Tool, Paper Snips, shimmer paint mist.

I started off with a piece of Whisper White cardstock cut at 5 1/2" x 8 1/2" and scored at 4 1/4" on the long side. The card front was run through the Big Shot in the Final Press Textured Impressions Folder and then sprayed with shimmer paint mist. You can't really tell in the photo, but the textured card front has a very fine subtle shimmer to it.

Tip: To make the shimmer paint mist take a fine misting bottle, I used one of those travel hair spray bottles that I emptied and washed out. Fill the bottle with rubbing alcohol and add just a couple drops of shimmer paint into the bottle. It really doesn't take much. Shake up the bottle and spray onto your cardstock. Set your cardstock aside for a minute or so to dry and it's ready to be used. This gives you a very fine subtle shimmer to your card.

Next I cut a piece of Whisper White cardstock 2" x 5 1/2" and rubbed the entire thing with my Embossing Buddy. This little guy keeps the embossing powder from sticking to your cardstock in un-inked places. Very helpful tool! I stamped the tree image from Valentine Defined several times across the top of the cardstock in Versamark, covered the stamped images with Clear Embossing Powder and heated the embossing powder. (For a tutorial on Heat Embossing click on the Tutorials tab at the top of the page.)

The embossed tree panel was adhered to a piece of Pink Pirouette cardstock cut at 2 3/4" x 5 1/2". A piece of 5/8" Real Red Satin Ribbon was added around the panel and adhered to the back. The greeting "love" from Valentine Defined was inked up with Real Red and Basic Black markers, breathed on to re-moisten the ink and stamped onto a scrap of Whisper White cardstock. The "love" was punched out with the 1 3/8" x 5/8" Oval Punch and set aside. The scalloped oval greeting from Perfect Punches was stamped in Pink Pirouette ink on a scrap of Whisper White cardstock and punched out with the Scalloped Oval Punch.

The "love" oval was adhered to the pink scalloped oval and Tombow Multipurpose Adhesive was used to add a line of glue around the "love" oval where Dazzling Diamonds glitter was added to give the greeting some sparkle. After the glue dried, which only takes a couple of minutes the scalloped greeting oval was adhered on top of the Real Red Satin Ribbon with Stampin' Dimensionals. The Needle Tool and Mat Pack were used to pierce a hole through the cardstock panel on either side of the scalloped oval and a Silver Brad was added in each of the holes. This panel was then adhered to the card front.

Now for the colorful tree. The tree image was inked up with Sahara Sand, Pink Pirouette, and Real Red markers, breathed on to re-moisten the stamp, and stamped onto a scrap of Whisper White cardstock. The tree was trimmed out with Paper Snips and then the entire thing was inked with Versamark, covered in Clear Embossing Powder, heated with the Heat Tool, and then adhered to the card front with Stampin' Dimensionals.

Whew! That was a lot of steps. Isn't it interesting how you start a project with one picture in your head of how it will look and as you go along working on it the project evolves into something entirely different?

Well...Now I'm off to create something new! Have fun stamping!

Sunday, May 29, 2011

Vintage Yellow Blossom

When I first got my hands on the Build A Blossom stamp set and Bold Blossom punch I just had to play around with it. This is one of the cards that I created.


Stamps: Build A Blossom
Cardstock: Daffodil Delight, Chocoalte Chip, Whisper White, Pear Pizzaz, So Saffron
Ink: So Saffron, Old Olive
Accessories: Vellum, 5/8" Old Olive Satin Ribbon, Brayer, Vintage Wallpaper Textured Impressions Folder, Glimmer Brad, 1/2" Circle Punch, Needle Tool, Mat Pack, Stampin' Dimensionals

This one was started with a piece of Daffodil Delight cardstock cut at 5 1/2" x 8 1/2" and scored at 4 1/4" on the long side. A piece of Chocolate Chip cardstock was cut at 4" x 5 1/4" and was adhered to the card front. Next a piece of Whisper White cardstock was cut at 3 7/8" x 5 1/8". I used the Inked Dry Embossing technique on the Whisper White cardstock with So Saffron ink and the Vintage Wallpaper Textured Impressions Folder. To find a tutorial on the Inked Dry Embossing technique go to the Tutorials tab.

The textured Whisper White cardstock was adhered to the card front. A piece of 5/8" Old Olive Satin Ribbon was added around the card front and tied into a bow.

Using a scrap of So Saffron cardstock six large petals were stamped in Daffodil Delight ink and punched out with the Bold Blossom punch. The same large petals were stamped in Daffodil Delight ink on Vellum and were punched out with the Bold Blossom punch. The leaves were stamped in Old Olive ink on a scrap of Pear Pizzaz cardstock and punched out with the Bold Blossom punch. The petals and leaves were adhered together to create a flower. The 1/2" Circle Punch was used with a scrap of Chocolate Chip cardstock and the Chocolate Chip circle was adhered in the center of the flower. The Needle Tool and Mat Pack were used to pierce a hole in the center of the flower and a Glimmer Brad was added.

The flower was adhered to the card front with Stampin' Dimensionals to make the flower pop up off the front of the card. I love this new stamp set and punch. You can make a wonderful big bold flower to adorn any project you can imagine!

Have a wonderful day and have fun stamping!

Saturday, May 28, 2011

Birthday Wishes for Grandpa

This is another birthday card that I made recently. This one was for my husband’s grandfather.


Stamps: Lovely As A Tree, Occasional Quotes
Cardstock: Not Quite Navy, Cajun Craze, Whisper White
Ink: Tempting Turquoise, Pacific Point, Old Olive Always Artichoke, Early Espresso, Basic Black
Accessories: Twill Tape (?), Word Window Punch, Modern Label Punch, Black Brads, Needle Tool, Mat Pack.

The card base is Not Quite Navy cardstock cut at 5 ½” x 8 ½” and scored at 4 ¼”. A piece of Whisper White cardstock was cut at 3 7/8” x 5 1/8”. The top of the cardstock was brayered first with Tempting Turquoise ink and then with Pacific Point ink, not covering the Tempting Turquoise ink entirely. The tree tops were stamped with Pacific Point ink taking care not to ink up the grassy hills under the trees. These Pacific Point trees were stamped across the card right where I wanted the horizon line to be.

The next row of trees was stamped in Basic Black ink. This time I included the hills when inking up my stamp. Next I used the direct to paper technique to color in the grassy area first with Old Olive ink and then with Always Artichoke ink to add some shadows. The edges of the panel were sponged with Early Espresso ink all the way around.

The image panel was adhered to a piece of Cajun Craze cardstock cut at 4” x 5 ¼”. A piece of what I believe is Twill Tape, came from the grab bag, was added around the panel and tied into a knot. The panel was then adhered to the card front.

The greeting from Occasional Quotes was stamped on a scrap of Whisper White cardstock in Basic Black ink and punched out with the Word Window punch. The Modern Label punch was used with a scrap of Old Olive cardstock to get a second label. The Whisper White greeting was adhered to the Old Olive modern label then the Mat Pack and Needle tool were used to pierce a hole through the labels and the card front. Two black brads were added to the holes to finish off the card.

That’s it for this lovely scenic birthday card. Have fun stamping!

Friday, May 27, 2011

Faux Silk

I’m still working on catching up with months of creations that I still need to share with you. This is one that I was playing around with for a Make and Take but later decided that the technique was a little too time consuming and finicky to use for a Make and Take project. This is my first try at using the Faux Silk technique.


Stamps: En Francais, Elements of Style
Cardstock: So Saffron, Whisper White, More Mustard,
Ink: Peach Parfait, Soft Suede
Accessories: Designer Label Punch, tissue paper, Eyelet Border Punch, 5/8” Daffodil Delight Grosgrain ribbon, Paper Snips

The card base is So Saffron cardstock cut at 5 ½” x 8” with a 4 ¼” score. The half that is 3 ¾” wide is the card front. The card front was stamped with the En Fraincais background stamp in Peach Parfait ink. A strip of Whisper White cardstock was cut at 1 ¼” x 5 ½” and one side was punched with the Eyelet Border punch. This piece was adhered behind the edge of the card front.

A piece of Whisper White cardstock was cut at 1 7/8” x 5 ½” and set aside. A piece of tissue paper much larger than the Whisper White cardstock was stamped with the flourish from Elements of Style in Peach Parfait ink and the bird was stamped in Soft Suede ink. The tissue paper was wadded up and straightened out again. Don’t straighten it out all the way though. Glue stick was added over the entire piece of Whisper White cardstock and the stamped tissue paper was adhered to the Whisper White cardstock allowing some wrinkles to form to make it look like silk. The tissue paper sticking out past the Whisper White cardstock was trimmed off with Paper Snips.

This silk panel was adhered to a piece of More Mustard cardstock that was cut at 2” x 5 ½”. Some 5/8” Daffodil Delight Grosgrain ribbon was added around the bottom of the panel, tied into a knot, and then the panel was adhered to the card front.

The greeting from Elements of Style was stamped on a scrap piece of Whisper White cardstock in Soft Suede ink. This was punched out with the Designer Label punch. Another label was punched from a scrap of More Mustard cardstock, cut in half length-wise, and adhered behind the Whisper White label to create a mat. The label was adhered to the card front with Stampin’ Dimensionals.

It took me several tries to get this one decent looking card with this technique. It seemed to take forever for the ink to dry completely on the tissue paper. Maybe it was the type of tissue paper I was using? When gluing down the tissue paper I would smear the ink on one of the stamped images or it would smear when I wadded up the tissue paper.

Either way, I don’t think this technique will see a Make and Take any time soon. I don’t want a card that is too difficult for my customers to get good results. That would not make them very happy at all. I do like this technique and will try again some other time and just let the tissue paper sit for 30 minutes or so to dry.

Have fun stamping!

Thursday, May 26, 2011

Purple Butterflies and Flowers

This is a card I created for my 7 year old niece Emily’s birthday. I normally don’t make cards for kids birthdays because most kids really don’t care about cards. But I decided that seven is about the right age for them to be able to appreciate it. I wasn’t disappointed either. When she opened the card she said “ooooooohhhhh pretty!” Well here is the card that I made for her. Her favorite color is purple so it HAD to be all about purple!


Stamps: Doodle This (retired), A Little Birthday Cheer (retired), Butterfly Prints
Cardstock: Concord Crush, Lovely Lilac (retired), Almost Amethyst (retired)
Ink: Whisper White Craft, Almost Amethyst (retired), Concord Crush
Accessories: Butterfly Punch, Basic Pearls Jewel Accents, Concord Crush Marker, misc. ribbon (non-SU)

The card base is Concord Crush cardstock cut at 5 ½” x 8 ½” and scored at 4 ¼”. The flowers from Doodle This were stamped in Whisper White craft ink all over the card front and this was then set aside to dry.

A piece of Whisper White cardstock was cut at 2 5/8” x 3 5/8”. The flowers from Doodle This were stamped in Lovely Lilac (retired) and Almost Amethyst (retired) inks. The greeting from A Little Birthday Cheer (retired) was stamped in Concord Crush ink in the bottom right corner of the panel. The stamped Whisper White cardstock was adhered to a 2 ¾” x 3 ¾” piece of Almost Amethyst cardstock which was then adhered to a 3” x 4” piece of Lovely Lilac cardstock. This panel was then adhered to the card front.

The butterfly from Butterfly Prints was stamped in Concord Crush ink on a scrap of Almost Amethyst cardstock and punched out with the Butterfly Punch. Three pearls were added for the butterflie’s body and the butterfly was adhered to the card front with a glue dot.

Next I used a piece of ribbon from my stash that is not SU. The pretty purple polka-dot ribbon was tied into a bow and adhered to the card front with some glue dots.

Sorry for the glare from the window in the photo. I took the picture right before we walked out the door to go to the birthday party. Nothing like procrastinating right? Have fun stamping!

Wednesday, May 25, 2011

Trendy Birthday Card

This is a card that I made for my brother’s birthday a while ago. Take a look:


Stamps: Trendy Trees, Wood Grain, Teeny Tiny Wishes
Cardstock: Basic Grey, Whisper White, Old Olive, River Rock
Ink: Bashful Blue, Pear Pizzaz, Always Artichoke, Early Espresso, Basic Black
Accessories: 5/8” Chocolate Chip Grosgrain ribbon, Silver Brads, Needle Tool, Mat Pack, Word Window punch, Stampin’ Dimensionals

The card base is Basic Grey cardstock cut at 5 ½” x 8 ½” and scored at 4 ¼”. The Wood Grain background stamp was stamped onto the card front with Basic Black ink.

Next a piece of Whisper White cardstock was cut at 2 5/8” x 3 5/8”. The top half of the cardstock was smeared with Bashful Blue ink using the direct to paper technique. The bottom half was smeared with Old Olive and Always Artichoke ink to look like hills. The trees from Trendy Trees were stamped in Early Espresso, Old Olive, and Always Artichoke. This image panel was adhered to a piece of River Rock cardstock cut at 2 ¾” x 3 ¾”, which was then adhered to a piece of Old Olive cardstock cut at 3” x 4”.

A piece of 5/8” Chocolate Chip Grosgrain ribbon (retired) was tied around the panel into a knot. The panel was adhered to the card front with Stampin’ Dimensionals. The greeting from Teeny Tiny Wishes was stamped on a scrap of River Rock cardstock in Old Olive ink. The greeting was punched out with the Word Window punch and the edges were sponged with Early Espresso ink. The Needle Tool and Mat Pack were used to pierce a hole through each side of the greeting all the way through the card front. Silver brads were added into the holes.

That’s it for this quick and simple masculine card! I hope you’ve enjoyed it as well and will try the direct to paper technique sometime. Have fun stamping!

Tuesday, May 24, 2011

Concord Pear Hello

Today I am finally caught up with sharing all of my sketch challenge cards with you. But I still have all of the Make and Take projects from March through May and some other projects to share. I hope to be caught up completely with my posting soon. But for now lets get to the card details. This week's sketch SCCSC67 was created by Susie Nelson. Here is the sketch:


And here is my card:


Stamps: Hello Blossom
Cardstock: Concord Crush, Whisper White, Peach Parfait, Daffodil Delight
DSP: Pear Pizzaz DSP
Markers: Pear Pizzaz, Peach Parfait, Daffodil Delight, Old Olive
Accessories: Needle Tool, Mat Pack, Glimmer Brad, Stampin' Dimensionals, Blossom Bouquet Triple Layer Punch, Mistletoe Ribbon Originals (retired)

I started out with a 5 1/2" x 8 1/2" piece of Concord Crush cardstock scored at 4 1/4" along the long side. Next I cut three different patterns of Pear Pizzaz DSP into 1 1/2" x 3 3/4" rectangles. These were adhered to 1 3/8" x 3 5/8" Whisper White rectangles. Then the DSP/white rectangles were adhered to the card front.

Tip: When creating a tryptic pattern like this glue down the center one first, then the outer two. This will help you get the spaces between the middle and outer pieces more even.

Another piece of Whisper White cardstock was cut at 2 3/8" x 3 3/8". The stamp Hello Blossom was inked up with Concord Crush, Daffodil Delight, Pear Pizzaz, Old Olive, and Peach Parfait markers. You just color the marker right onto the stamp, breathe on the stamp to re-moisten the ink, and stamp your image. Voila! You get a stamped image that is multiple colors! This was adhered to a 2 1/2" x 3 1/2" pieces of Peach Parfait cardstock. Some Mistletoe Ribbon Originals ribbon (retired, but you can still find it in the Clearance Rack) was added around the panel and tied into a knot. The panel was adhered to the card front with Stampin' Dimensionals.

Now I played with my new Bouquet Blossom Triple Layer Punch. This tool is so amazing. You can punch three progressive images from the same tool just by adjusting the slider on the punch. So I punched the least detailed image in Concord Crush cardstock, the middle image in Daffodil Delight cardstock, and the most detailed image in Whisper White cardstock. I adhered the three flower layers together and used the Needle Tool and Mat Pack to pierce a hole in the center where I added a Peach Parfait glimmer brad. The flower was adhered to the card front with Stampin' Dimensionals.
This sketch was so much fun to play with! Thanks Susie!


If you are a Stampin’ Up Demonstrator you can find the sketch challenge thread HERE. If you are not a demonstrator I would still love to see your creations. Please post a link to your project in the comments section of this post. Have fun stamping!

Friday, May 20, 2011

Masculine Thank You

How is everyone this wonderful Friday morning? Today I’m going to share with you the sketch challenge from last week SCCSC66 which was designed by Liz Goldhawk. Here is the sketch:


And here is my card:


Stamps: Sanded, Solid Stripes, Thank You Kindly
Cardstock: Crumb Cake, Early Espresso, Very Vanilla, Old Olive
DSP: Elegant Soiree
Ink: Soft Suede, Early Espresso, Crumb Cake
Accessories: Stampin’ Sponge, Stampin’ Dimensionals, Two-Way Glue Pen, Tasteful Trim Die, Decorative Label Punch, 2” x 1 3/8” Oval Punch

The card base is Crumb Cake cardstock cut at 4 ¼” x 11” and scored at 5 ½”. The card front was stamped with the Sanded background stamp in Soft Suede ink. A piece of Elegant Soiree DSP was cut at 4 ¼” x 2 ¾” and one of the 4 ¼” sides was torn. The DSP was adhered to a piece of Early Espresso cardstock that was cut at 4 ¼” x 3”. The 4 ¼” side of the Early Espresso cardstock that had the torn DSP edge was torn to give the layer a nice shabby edge. Since I tore the DSP in the wrong direction and ended up with a bright white line on the pattern side I wanted to use, I lightly inked the edges with Early Espresso ink with a sponge.

Tip: When tearing DSP hold the paper with the pattern that you want to use away from you and tear the edge towards you. This will make sure that the white edge left from the tear is on the side that you will be gluing down and will not be visible. Now if you want that white edge hold the pattern that you want to use towards you and tear the edge towards you.

A 1” x 4 ¼” piece of Very Vanilla cardstock was adhered behind the straight edge of the Early Espresso/DSP layer so that about half of the width shows. This panel was adhered to the card front. A piece of Early Espresso cardstock was run through the Big Shot with the Tasteful Trim Die to get the piece of ric-rac (zig-zag) or whatever you want to call it. This was adhered to the card front with the Two-Way Glue Pen.

The greeting from Thank You Kindly was stamped on a scrap of Very Vanilla cardstock in Soft Suede ink. The image Solid Stripes was stamped over the greeting in Crumb Cake ink, but I stamped off the image once before stamping it over my greeting to give the stripes a lighter look. The greeting was punched out with the 2” x 1 3/8” Oval Punch. The Decorative Label punch was used on a scrap of Old Olive cardstock to punch a label. The edges of both the label and the oval were sponged with Early Espresso ink before being adhered together. The greeting label was adhered to the card front with Stampin’ Dimensionals.

I really do find it challenging to make masculine cards, but this sketch just seemed to scream masculine to me. I hope you get a chance to give this sketch a try. I would love to see what you create with it!

If you are a Stampin’ Up Demonstrator you can find the sketch challenge thread HERE. If you are not a demonstrator I would still love to see your creations. Please post a link to your project in the comments section of this post. Have fun stamping!

Thursday, May 19, 2011

Fabulous Petals

This bright floral card was created for the SCCSC65 sketch challenge on Stampin’ Connection. This sketch was created by me. Here is the sketch.


And here is my card.


Stamps: Fast and Fabulous, Perfect Punches
Cardstock: Daffodil Delight, Not Quite Navy, Whisper White
DSP: Paisley Petals DSP
Ink: Daffodil Delight, Early Espresso, Not Quite Navy, Black Stazon
Markers: Daffodil Delight, More Mustard, Peach Parfait, Always Artichoke
Accessories: Stampin’ Dimensionals, Stampin’ Sponge, Frost White Shimmer Paint, plastic wrap, Scalloped Oval Punch, Perfect Polka Dots Textured Impressions Folder

The card base is Daffodil Delight cardstock cut at 5 ½” x 8 ½” and scored at 4 ¼”. The card front was run through the Big Shot in the Perfect Polka Dots Textured Impressions Die to add a little bit of dotted texture to the card.

A piece of Paisley Petals DSP was cut at 2 ½” x 5 ½” and adhered to a piece of Not Quite Navy cardstock cut at 2 ¾” x 5 ½”. A piece of Crochet Trim was adhered to the panel and the ends were adhered to the back of the Night of Navy cardstock. This panel was then adhered to the card front.

A piece of Whisper White cardstock was cut at 3 5/8” x 2 1/8”. The flower outlines from Fast and Fabulous were stamped in Black Stazon and the flowers were colored in with Daffodil Delight, More Mustard, Peach Parfait, and Always Artichoke markers. I then used the Mother of Pearl Technique to add Frost White Shimmer paint to the panel and sponged over the entire panel with Daffodil Delight ink. The edges of the panel were sponged with Early Espresso ink and the panel was adhered to a piece of Whisper White cardstock cut at 3 ¾” x 2 ¼”. Next this panel was adhered to the card front with Stampin’ Dimensionals.

The greeting from Perfect Punches was stamped in Not Quite Navy ink on a scrap of Whisper White cardstock then punched out with the Scalloped Oval punch. Two large pearls were added to either side of the greeting and the oval was adhered to the card front with Stampin’ Dimensionals.

I really hope you’ve enjoyed my bright spring-y card which also uses a wonderful new technique. You can find a tutorial HERE for the Mother of Pearl technique.

If you are a Stampin’ Up Demonstrator you can find the sketch challenge thread HERE. If you are not a demonstrator I would still love to see your creations. Please post a link to your project in the comments section of this post. Have fun stamping!

Mother of Pearl Technique

Today I'm sharing with  you a wonderful new technique called the Mother of Pearl Technique. It uses shimmer paint, plastic wrap, and ink to give you a totally unique and beautiful look to whatever cardstock or image you are using.

You do not have to use Whisper White cardstock or a stamped image. I still want to play around with different colors and see the results. But today I am going to show you how to do this technique on Whisper White cardstock that is stamped and colored to create a butterfly.

Stamp the desired image onto the Whisper White butterfly in Stazon ink and color in as desired.


Shake up your Frost White Shimmer Paint and add one drop into the bottom of a container or on a paper plate.


Dab your balled up plastic wrap into the shimmer paint to pick up the paint.


Dab the paint all over your butterfly.


Now your butterfly will look like this.


After the shimmer paint has dried (which only takes a minute or two) sponge the desired color all over the butterfly. Here is used Crumb Cake. After your finished sponging wipe the ink off the shimmer paint with a paper towel.

Now you can add your beautiful Mother of Pearl cardstock to your project. I just love the shimmery effect with the darker spots that you get from sponging the ink on. It really gives a nice touch to any card or project that really makes you say wow!

I hope you get a chance to try out this technique for  yourself. I just know you'll love it! Come back later today to see a card that I created using this tecnhique.

Wednesday, May 18, 2011

Melon Pink Wishes

Good morning! I hope all is well in your world on this wonderful Wednesday morning! Today I’m sharing with you another card that I created from the SCCSC64 sketch challenge by Susie Nelson. I had a really fun idea for a card with this sketch that I just HAD to make. You can find the post with the sketch HERE.


Stamps: Occasional Quotes
Cardstock: Pretty in Pink
Ink: Melon Mambo, Early Espresso, Elegant Eggplant
Accessories: 2 3/8” Scalloped Circle Punch, Modern Label Punch, Two-Step Bird Punch, Sponge Dauber, Vintage Wallpaper Textured Impressions Folder, Brayer, Basic Rhinestone Jewel Accents, Two-Way Glue Pen

The card base is Pretty in Pink cardstock cut at 5 ½” x 8 ½” and scored at 4 ¼”. I used the Inked Dry Embossing technique with a brayer, Melon Mambo ink, and the Vintage Wallpaper Textured Impressions Folder on the card front.

I used the 2 3/8” Scalloped Circle punch on a scrap of Springtime DSP and sponged the edges with Early Espresso ink. Next I used the Two-Step Bird Punch to punch the bird’s body from Melon Mambo cardstock which was then sponged with Early Espresso ink. The bird’s wing and one branch was punched from Springtime DSP scraps and two branches were punched from Old Olive scraps.

The leaves were adhered to the scalloped circle with the Two-Way Glue Pen. The wing was adhered to the bird with a Stampin’ Dimensional. A rhinestone was added for a sparkly eye and the bird was adhered to the scalloped circle with another dimensional. The scalloped circle/bird layer was adhered to the card from with more dimensionals. This is a really dimensional card if you haven’t noticed.
I hope you’ve enjoyed my second take on this sketch. If you are a Stampin’ Up Demonstrator you can find the sketch challenge thread HERE. If you are not a demonstrator I would still love to see your creations. Please post a link to your project in the comments section of this post. Have fun stamping!

Tuesday, May 17, 2011

Gradient Thank You

This week I will be catching up on posting my sketch challenge cards. I love participating in sketch challenges when I can find the time. They are a lot of fun and can help to push you out of the box to create a project that you normally wouldn’t have thought to do. Anyway… I’m starting off with SCCSC64 from Stampin’ Connection. Here is the sketch created by Susie Nelson.


And here is my card:


Stamps: Silhouette Sentiments, Because I Care
Cardstock: Whisper White
Ink: Daffodil Delight, Poppy Parade, Early Espresso, Not Quite Navy, Baja Breeze
Accessories: Modern Label Punch, 2 3/8” Scalloped Circle Punch, Stampin’ Sponge, post-it note, Brayer, Needle Tool, Mat Pack, Silver Brads, Stampin’ Dimensionals, Basic Rhinestone Jewel Accents

The card base is Whisper White cardstock cut at 5 ½” x 8 ½” and scored at 4 ¼”. I used the 2 3/8” scalloped circle punch with a post-it note, making sure to punch the scallop in the center of the post-it. The post-it with the scalloped hole in the middle was placed on the card and used as a reverse mask. Daffodil Delight, Poppy Parade, and Early Espresso ink were sponged inside the scalloped circle opening and the flowers from Silhouette Sentiments were stamped inside the circle in Early Espresso.

The large post-it mask was removed. I punched another scalloped circle from a post-it note making sure that the scalloped circle was in the sticky portion of the post-it and then place the scalloped circle over my sponged and stamped scalloped circle to protect the image. I then brayered Baja Breeze and Not Quite Navy ink on the top and bottom of the card front.

The greeting from Because I care was stamped in Early Espresso ink on a scrap of Baja Breeze cardstock and punched out with the Modern Label punch. The edges of the label were sponged with Early Espresso ink. Then the Needle Tool and Mat Pack were used to pierce a hole in each end of the label and a silver brad was added in each hole. The label was adhered to the card front with Stampin’ Dimensionals. To make the flowers in my sponged circle sparkle a little I added a few Basic Rhinestones Jewel Accents to some of the flowers.

If you are a Stampin’ Up Demonstrator you can find the sketch challenge thread HERE. If you are not a demonstrator I would still love to see your creations. Please post a link to your project in the comments section of this post.

I hope you get a chance to play along with a sketch sometime! Have fun stamping!

Monday, May 16, 2011

Paisley Petals

Today I have to share with a card that I made for the SCCSC61 sketch challenge. Here is the sketch:

And here is my card:


Stamps: Build A Blossom, Teeny Tiny Wishes
Cardstock: Cherry Cobbler
DSP: Paisley Petals DSP
Ink: Early Espresso, Cherry Cobbler, Baja Breeze
Accessories: Bold Blossom punch, Decorative Label punch, Glimmer brad, Stampin’ Sponge, Two-Way Glue Pen, Needle Tool, Mat Pack

The card base is Cherry Cobbler cardstock cut at 5 ½” x 8 ½” and scored at 4 ¼”. Next I cut various patterns from the wonderful Paisley Petals DSP into the following sizes: 1 ½” x 3 3/8”, 1 ½” x 1 ¾”, 1 3/4” x 2 5/8”, 2 5/8” x 3 3/8”. If you haven’t seen the Paisley Petals DSP there was as special during April where you could buy this DSP pack and the Four Frames stamp set. Although that special is expired you will be able to get these products after July 1st because they will be included in the new catalog! So the special in April was a wonderful sneak peak of what is to come in the new catty. I really LOVE all of the patterns in this DSP pack and you will see many more projects created with it.

Now…back to the card. The 1 ¼” x 1 ¾” piece of DSP was adhered to the card front in the upper left hand corner. The 1 ¼” x 3 3/8” piece of DSP was adhered in the bottom left hand corner of the card front. The 1 ¾” x 2 5/8” piece of DSP was adhered in the upper right hand corner of the card front. Finally the 2 5/8” x 3 3/8” piece of DSP was adhered in the bottom right hand corner of the card front. This card was a bit of a puzzle to figure out the DSP sizes, but I really like the effect.

Next I stamped the greeting from Teeny Tiny wishes in Early Espresso ink on a scrap of Marina Mist cardstock and then punched it out with the Decorative Label punch. The label edges were then sponged with Early Espresso ink. I also punched another decorative label from a scrap of Pear Pizzaz. The Pear Pizzaz label was cut in half length-wise and the points that were in the middle of the short sides were trimmed off. The label halves were then adhered behind the Marina Mist label to create a mat. The label was adhered to the card front.

For the flower I used the Rock-N-Roll technique with Baja Breeze and Cherry Cobbler ink to stamp six of the small flower petals. The petals were punched out with the Bold Blossom punch and adhered together with the Two-Way Glue Pen. The Needle Tool and Mat Pack were then used to pierce a hole into the center of the flower and a red Glimmer Brad was added. The flower was adhered to the card front with a Stampin’ Dimensional.

That’s it! I hope you look forward to seeing more creations made with this DSP because it is absolutely wonderful! If you are a Stampin' Up Demonstrator you can find the sketch challenge thread HERE. If you are not a Demonstrator I would still love to see your creations. Please post a link to your project in the comments section of this post. Have fun stamping!

Saturday, May 14, 2011

Top Note Gift Box Tutorial

Today I'm sharing with you the tutorial for the Top Note Gift Box that I made for my Mom's Mother's Day gift. I hope you like it! Click HERE to see the one I made for her.


For this box you will need: Top Note Die, Big Shot, Beautiful Butterflies Die, Paper Snips, Ribbon, 1 sheet of cardstock (Baja Breeze in this case), Marker coordinating with the DSP color, Two patterns of DSP, Sticky Strip, Large Buttons, cardboard. For the cardboard I just used the cardboard that comes in the package of DSP.

1. Cut two pieces of cardboard 4" x 5" and cut four pieces of DSP 4" x 5".

2. Adhere one piece of DSP to each side of both of the cardboard pieces.

3. Run each cardboard piece through the Big Shot with the Top Note die.

4. Color the edge of each top note with the coordinating marker. This makes the cardboard edge blend in with your DSP.

5. Cut a piece of cardstock 6 1/2" x 8". On the long side score at 2 1/2", 4", and 6 1/2".

6. On the short side score at 1 1/2" and 5". Please disregard the actual score line at 1". That was my mistake. It really does need to be at 1 1/2".

7. Cut on the score lines and remove the pieces as shown.

8. Fold on all of the score lines. Cut two pieces of DSP at 1 1/4" x 3 1/4" and adhere to the longer sides. Cut two pieces of DSP at 1 1/4" x 2 1/4" and adhere to the shorter sides. Cut two pieces of DSP 2 1/4" x 3 1/4" and adhere to the center and to the extended flap. I forgot to add the other largest piece of DSP on the extending flap. You can do it later, but it's easier to add it now.

9. Add sticky strip in the locations shown. Then remove the liner and fold the flaps in one at a time. The seam of your flaps will be on the outside of the box. 

10. Now your box will look like this, except it will have DSP on the top flap already.

11. Now flip your box over and add sticky strip as shown to the bottom and the top of the box.

12. Remove the liner from the sticky strip on the bottom of your box and carefully place it in the center of one of your top note.

13. Remove the liner from the sticky strip on the top of the box and carefully adhere the top note to your box.

14. For the sides cut two pieces of Whisper White 1 1/4" x 3 1/4" and two pieces of DSP 1 1/8" x 3 1/8". Adhere the DSP to the Whipser White and then adhere this to the long sides of the box. Cut two more pieces of Whisper White 1 1/4" x 2 1/4" and two pieces of DSP 1 1/8" x 2 1/8". Adhere the DSP to the Whisper White and then adhere this to the short sides of the box.

15. Add your ribbon around the box and tie it into a bow and trim the ends. I used a little bit of Snail Adhesive to stick the ribbon to the back and sides of the box so it would stay centered and then tied the bow.

16. For the big butterfly you will need: Beautiful Butterflies Die, Big Shot, Stazon ink, Stamp Set (Elements of Style), Markers (Optional, I used Baja Breeze, Marina Mist, Pear Pizzaz, and Old Olive), Basic Pearls Jewel Accents, Frost White Shimmer Paint, Plastic Wrap, Container, Baja Breeze cardstock, Whisper White cardstock, Vellum, Sticky Strip, inks for sponging (I used Crumb Cake and Early Espresso), paper towel.

17. Cut a piece of Baja Breeze cardstock, Whisper White cardstock, and Vellum 3 1/2" x 5". Score each one at 2 1/2". Fold on the score line and stack the folded cardstock together with the vellum in the middle. Place your cardstock onto your Beautiful Butterflies die and run it through the Big Shot. Set aside the colored cardstock and the vellum.

18. Stamp the desired image onto the Whisper White butterfly in Stazon ink and color in as desired.


19. Shake up your Frost White Shimmer Paint and add one drop into the bottom of a container or on a paper plate.

20. Dab your balled up plastic wrap into the shimmer paint to pick up the paint.

21. Dab the paint all over your butterfly.

Now your butterfly will look like this.

22. After the shimmer paint has dried (which only takes a minute or two) sponge the desired color all over the butterfly. Here is used Crumb Cake. After your finished sponging wipe the ink off the shimmer paint with a paper towel.

23. I added some Early Espresso sponging around the edges of the butterfly. Use a small piece of sticky strip in the center of the butterfly to adhere the Vellum to the Baja Breeze butterfly, then use another small piece of sticky strip to adhere your stamped butterfly to the Vellum. Curl the wings of the butterfly by rolling them around a marker or using your bone folder. Add some pearls to the center to create the butterfly body. 

22. Add sticky strip to the back of the butterfly to adhere it to the top of your box.


I also stamped the butterfly from Thanks for Caring in Baja Breeze ink on a scrap of Whisper White cardstock, then stamped the greeting in Basic Black ink and punched out the greeting with the Decorative Label punch. This I adhered to the top of the box with some glue stick.

Here is the finished outside of the box.


And the inside. If you folded your score lines good enough you will have no problem keeping the lid shut. If the lid does not want to stay closed all of the way add some ribbon to a button and adhere the button to the inside of the box lid with some sticky strip. This is just enough weight to keep the lid of the box closed. It also makes it look prettier on the inside.