
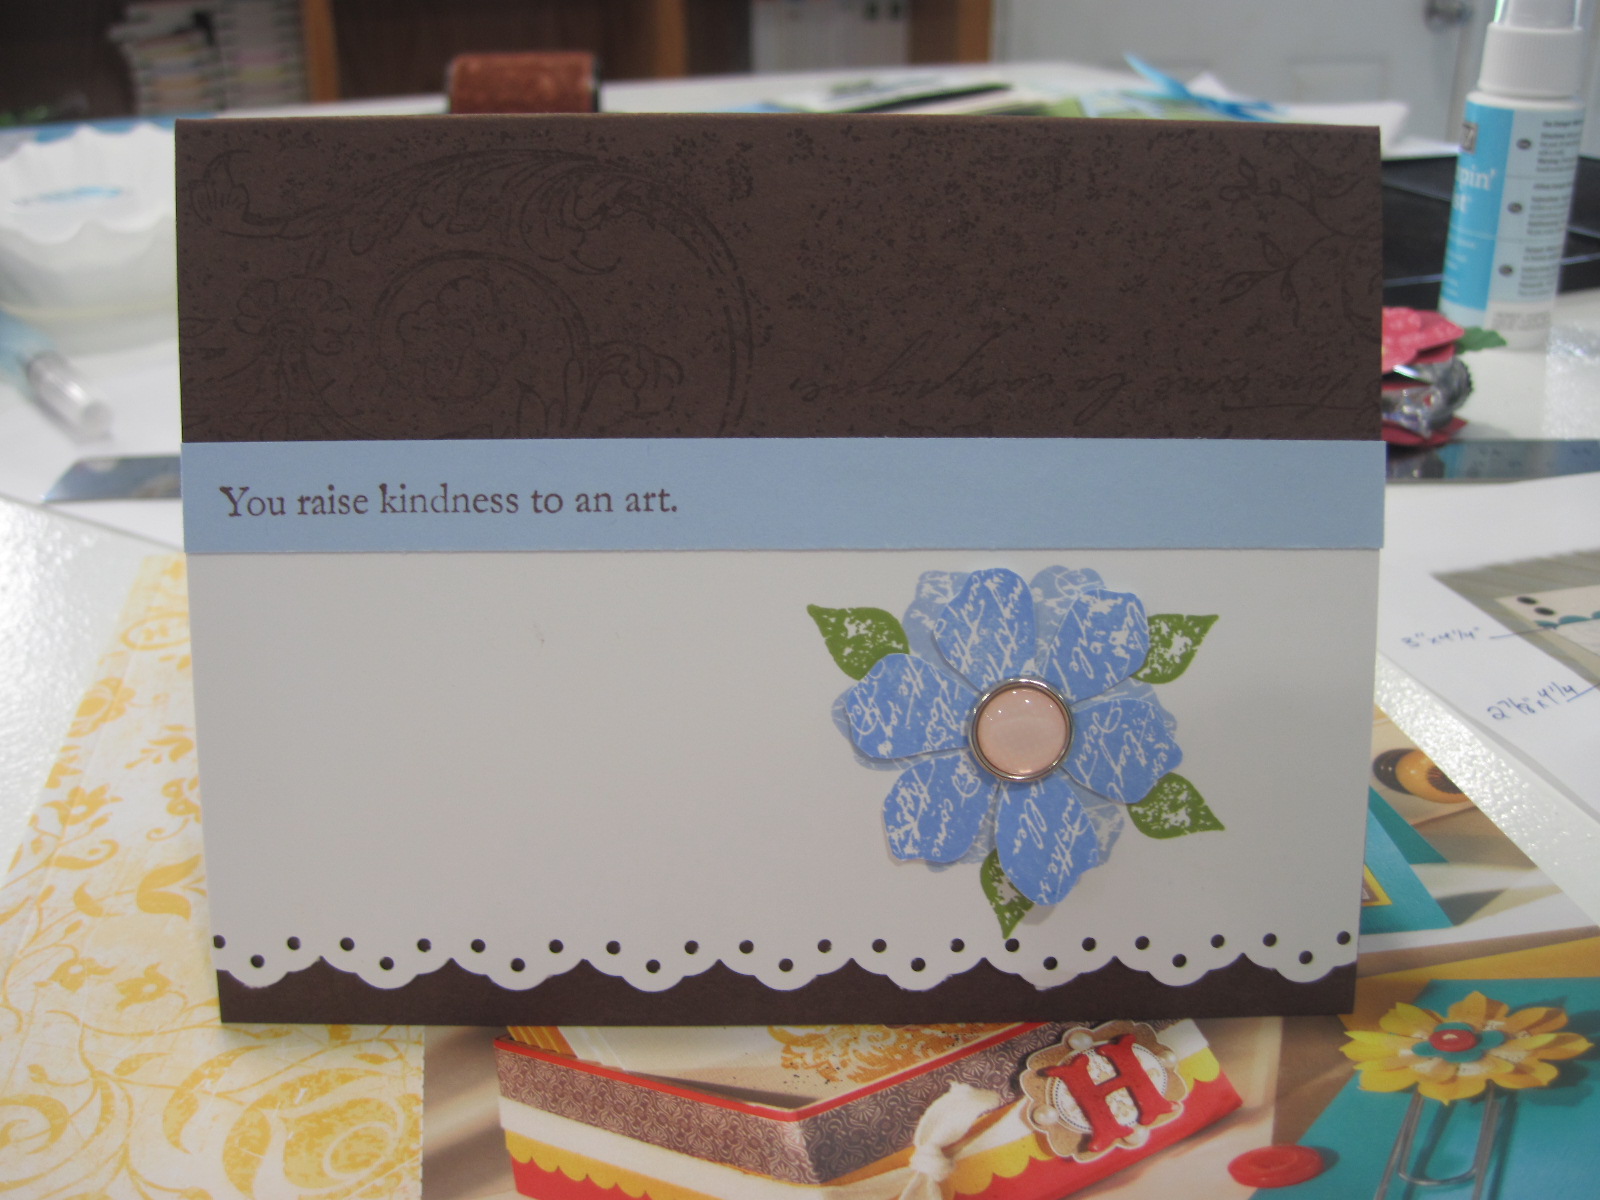
Stamps: Vintage Vogue, Very Vintage Wheel
Paper: Chocolate Chip, Whisper White, Bashful Blue
Ink: Bashful Blue, Ballet Blue, Old Olive, Chocolate Chip
Accessories: Eyelet Border Punch, Pretty In Pink Sending Love Epoxy Brads, Stampin Dimensionals
I first used the Very Vintage Wheel with Chocolate Chip ink on the Chocolate Chip card base. Then I used the Eyelet Border Punch on the edge of my Whisper White cardstock. On the right of the Whisper White I stamped the large flower from Vintage Vogue in Bashful Blue and the leaf several times in Old Olive. I then stamped the large flower in Ballet Blue on scrap cardstock and cut it out with Paper Snips. I used a needle tool to punch a hole in the center of the cut out flower and added a Pretty In Pink Sending Love Epoxy Brad. I used a Stampin Dimensional to pop up the flower off the card front. The sentiment from Vintage Vogue was stamped in Chocolate Chip ink on a strip of Bashful Blue cs. This card was inspired by a card created by lena95469 on Stampin Connection.

Stamps: With All My Heart, Wood Grain Background
Paper: Dusty Durango, Barely Banana, Chocolate Chip, Whisper White, Crushed Curry
Ink: Dusty Durango
Accessories: Ticket Corner Punch, Old Olive 5/8” Grosgrain Ribbon, Dusty Durango and Chocolate Chip markers.
The Dusty Durango card base was stamped with the large flower from With All My Heart in Dusty Durango ink. I then inked up the Wood Grain background stamp with Crushed Curry ink, placed my piece of Barely Banana cs on top of the stamp, covered this with a scrap piece of paper and rubbed over the cardstock. This easily transfers the entire image with less effort than trying to push down on the stamp on top of the cardstock. The now wood grained Barely Banana is adhered to the card base. I used a Hobby Blade to cut through the fold of the card base so I could run my Old Olive 5/8” Grosgrain ribbon through the slot and around the card and tied a knot. I then used the Dusty Durango and Chocolate Chip markers to color my “Friend” stamp from the set With All My Heart, breathed on the stamp, and then stamped my image on the Whisper White cs. The ticket corner punch was used on the corners of both the Whisper White and Chocolate Chip cs. These were then adhered to the card. This card was inspired by a card created by Carrie Gaskin on Stampin Connection.

Stamps: Well Scripted
Paper: Pink Passion, Whisper White, Barely Banana, Lavender Lace, Lovely Lilac, Old Olive, Sending Love DSP
Ink: Summer Sun, Perfect Plum
Accessories: Two-Step Bird Punch, Scallop Border Punch, Two-Way Glue Pen, ¼” Pretty In Pink Grosgrain ribbon, Mini Glue Dots, Scor-Pal
The card base is Pink Passion with a Whisper White layer. The Whisper White was scored on the Scor-Pal at 1 ½”, 1 ¾”, and 2”. The sentiment from Well Scripted was stamped on the Whisper White cs using Perfect Plum ink. The Sending Love DSP was punched with the Scallop Border Punch and adhered to the bottom of the Whisper White cs. I then punched three wings from the Two-Step Bird Punch out of Barely Banana, Lavender Lace, and Lovely Lilac cs. The Barely Banana wings were sponged with Summer Sun ink. The Lavender Lace and Lovely Lilac wings were sponged with Perfect Plum ink. These were then glued together using the Two-Way Glue Pen in the shape of a tulip. Three branches with leaves were punched from the Two-Step Bird Punch from Old Olive cs and glued to the front of the card with the Two-Way Glue Pen. The tulips were glued to the top of the branches to look like a bunch of flowers. A bow was tied from ¼” Pretty In Pink Grosgrain ribbon and adhered to the card front with a Mini Glue Dot.

Stamps: Well Scripted
Paper: Whisper White, Ballet Blue, Bashful Blue, Certainly Celery, So Saffron DSP, Thoroughly Modern DSP
Ink: Bermuda Bay, Ballet Blue
Accessories: Two-Step Bird Punch, Certainly Celery ¼” Grosgrain ribbon, Stampin Dimensionals, Scallop Border Punch, Two-Way Glue Pen
The card base is Whisper White with two pieces of DSP adhered near the bottom. The So Saffron DSP was punched with the Scallop Border Punch and a piece of Thoroughly Modern DSP below it. The Certainly Celery ¼” Grosgrain ribbon covers up the seam between the two DSP pieces. The bird was punched with the Two-Step Bird Punch from Ballet Blue cardstock and sponged with Bermuda Bay ink. The wing was punched from Bashful Blue cardstock and sponged with Ballet Blue ink. At the make and take my guests used Bermuda Bay ink to sponge the wing because I realized I needed the Ballet Blue ink at another table. It still looked really great though. The branch and leaves were punched from Certainly Celery cardstock and glued to the card base with a Two-Way Glue Pen. The bird was adhered over the branch and the wing was attached with a Stampin Dimensional to make the wing stand up off the page. The finishing touch was to stamp the sentiment from Well Scripted in Bermuda Bay ink. This card was inspired by a card created by Laura Fitzgerald on Stampin Connection.

Paper: Rose Red, Barely Banana, Garden Green, Melon Mambo DSP
Accessories: Fancy Flower Punch, ½” Circle Punch, Scalloped Oval Punch, Paper Crimper, Mini Glue Dots, Peppermint Patties
The final project was a flower peppermint patty. Two flowers were punched from both Rose Red cardstock and Melon Mambo DSP using the Fancy Flower Punch. Two ½” circles were punched from Barely Banana cardstock. Two scalloped ovals were punched from Garden Green cardstock using the Scalloped Oval Punch. One Rose Red flower was layered under a Melon Mambo flower and glued together. One ½” Barely Banana circle was glued into the center. The scalloped oval was folded in half and run through the Paper Crimper at an angle, then unfolded. This makes a really great looking leaf when you’re done. The leaf was glued to the back of the flower. Repeat for the other flower. Then glue both flowers to either side of your peppermint patty with a Mini Glue Dot.
All of the ladies had such a wonderful time chatting and creating together and I had fun helping those who needed it and chatting. I can’t wait until next month’s! I’ve already started planning the projects and they are going to be wonderful!


