Thursday, January 30, 2014

Mixed Media Christmas Cards

Last November I joined in on the Mixed Media Christmas Card swap that Tracy hosts. I totally had fun with this! I just started and kept adding and adding and adding until I felt it was done. There were only ten cards to make so it wasn't too bad to reproduce. I just worked through it one step at a time. 


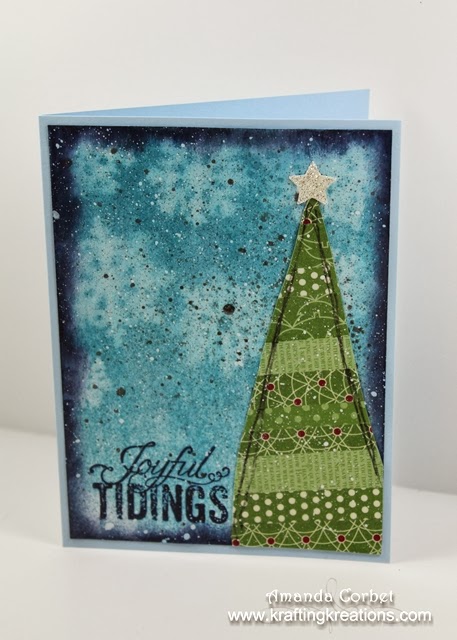
For the card base I cut a piece of retired Bashful Blue card stock 6-1/4" x 9". With the 9" side against the top of my Simply Scored I scored at 4-1/2". For the main image part I started off by cutting a piece of Mixed Media paper 4-1/4" x 6". I watered down some Whispering Turquoise DecoArt paint and just quickly brushed it over the entire piece of paper and let it dry. 

I die cut some snowflakes from the retired Northern Flurries Strip die from Stampin' Up, placed those on the paper, then misted the card stock with Island Indigo ink mixed with rubbing alcohol. Since the snowflakes were just a mask I picked them up and reused them on the other pieces.  


Next I took a Stampin' Sponge and some Night of Navy ink and sponged around the edges of the paper. I also stamped the greeting from Christmas Messages in the lower left hand corner in Night of Navy ink. Then I coated the whole thing with DecoArt Decou-page. I had to be quick when brushing over the greeting so I didn't smear the ink to much, but I love how the ink smeared around the edges of the paper. Next I spritzed the panel with some retired Silver Foil Smooch Spritz.

For the tree I cut hacked out some triangle shapes from Mixed Media paper. I really do mean hacked. I was't even attempting anything perfect or straight or the same length. I had taken a variety of retired Christmas DSP and cut random width strips of multiple patterns. I added decou-page onto the paper, and layered the strips, allowed it to dry, then trimmed the strips even with the Mixed Media paper edge. I added some black lines with a charcoal pencil and adhered the tree onto the panel and cut the bottom edge of the tree even with the edge of the panel.


I used the retired small star punch from Stampin' Up on some Silver Glimmer Paper to punch the star and glued it onto the top of the tree. Finally. I took some thinned down Titanium White DecoArt paint and used an old stencil brush to splatter the paint all over the paper. After allowing the splatters to dry I deemed these as done and adhered them onto the card front with some Multipurpose Liquid Adhesive.


As I mentioned before, this was so. much. FUN!!! I really am enjoying exploring mixed media. Plus it helps me use up some of my stash hoard of retired Stampin' Up supplies. 


Wednesday, January 29, 2014

Breathe some more...

At the beginning of the month I chose my word of the year as I mentioned yesterday. I also wanted to play around in my doodle journal. Now I don't really get these completed too quickly. I might spend 10 minutes here then 30 minutes three days later then 5 minutes a couple days later so I'm pretty pleased to have this one completed in the same month that I started it. I am also totally elated with how it came out!


When I started this doodle I decided that I wanted to doodle just to doodle but couldn't think of a topic so I just went ahead and used my word then started adding random flowers around it. Then I added more detail to the flowers. It really is almost like the doodle evolved on it's own even though I know I did it. 


Once I had the line drawing completed I started coloring in the flowers with Tombow Dual Brush Pen markers and a Stampin' Up Aqua Painter to spread the color and get the water-colored look. 


The Tombow markers give such a bright vibrant color and are so easy to spread around and blend with the Aqua Painter. To get the splotches on the turquoise background I just touched the Aqua Painter to the paper after the color had initially dried, and allowed that to dry. That creates these beautiful ridges around the second puddle of water.


This will be the one I hang up to remind me to enjoy the little things and relax a bit more. The bright vibrant colors just make me happy!


This post is linked up to Tracy Weinzapfel Studios and Balzer Designs.

Hand Painted Wine Glass Gift

I painted this lovely wine glass just to have some fun, but then decided to send it to Tracy with my Christmas Mixed Media Swap cards as a thank you for all she does. She really does inspire me to do different things and just have fun letting go. So I added her mantra "let it go" onto the bottom of the glass. I just love all the fun polka dots!


This was done with Folk Art enamel paints and I cured the paint and baked the glass as directed on the paint bottle. It says it's dishwasher safe at that point, but I think I would still hand wash something like this.


I think maybe now I'll have to paint a wine glass or to for myself. I make things all the time, but rarely keep much of anything for myself. Weird right??? I will have to fix that pronto! I'm off to Walmart to pick up more plain wine glasses!


Tuesday, January 28, 2014

Breathe...

I normally don't do New Year's resolutions. This year will be no different. However, I have decided to choose a word for the year. One single word that I can use to remind myself to make a difference in my life. 

The last year absolutely flew by. It seemed I was always running one direction or another trying to keep up while everything else was passing me by. It seemed I was just running from one deadline to the next non-stop. Since my term on two different design teams has ended I think I will get a chance to relax a little. 

Those terms ended just a few months before Christmas and I spent that time working on Christmas presents like crazy. I love to give handmade gifts for Christmas and always have a long list of things to make. I'm sure you've noticed a lack of posts the last couple months and preparing for Christmas is the reason why. I was busy working away, but I couldn't share anything with you in case the gift recipients happened to stop by my little spot of the internet. 

So in an effort to slow down, relax a little more, maybe actually get some projects done around the house that really need doing... my word for this year is 

Breathe

To be able to create for the sake of creating instead of trying to meet a deadline. To try new things just for the fun of it. To get some areas of the house organized and maybe fixed up that have been neglected. To not feel like I'm constantly running around like crazy and getting nothing done. To make the time to stop and smell the flowers or watch the sun set. 

Tracy over at Tracy Weinzapfel Studios has challenged those who follow along with her Mixed Media Monday videos to create a project using our word of the year. I actually created two! 


Here is the first one I made, and by far the faster one to make. I made this one the first week of January and honestly have no clue what colors of paint I used. I guess I should probably write that kind of stuff down huh?


The paper for the flower petals was some retired First Edition DSP from Stampin' Up. The background was done by watering down acrylic paint and dripping it from the top of the page. After it dried I turned my book around so the drips were coming up from the bottom. Some detail lines were added to the flowers with a silver Sharpie paint pen and the flower centers were made all sparkly with some Stickles. 


I added some of the things I want to enjoy more this year along the stems and leaves of the flowers.

I will share the other piece with my word of the year tomorrow. Have you picked out a word for the year?


This post is linked up to Tracy Weinzapfel Studios and Balzer Designs.

Sunday, January 19, 2014

Music Mixed Media Artwork

Here is a music inspired mixed media art piece that I made for a Christmas present. I had a lot of fun working on the different layers of this one. I would work on it for about 30 minutes here and there each time adding something wonderful. Sometimes I don't see the finished product in my head. I think that is one reason why I am enjoying exploring mixed media because i just start adding things to a page. Maybe stop and start on it 10 different times and it kind of evolves on its own. That is how this piece came about. 


I started by painting an 11" x 14" canvas with Midnight Blue DecoArt acrylic paint then decoupaged some torn pieces of old sheet music I had lying around in a pile that was originally intended for the trash can. Then I used some molding past with a palate knife to freehand the treble clef.


I brushed on some thinned down Titanium White paint and then some Whispering Turquoise working from left to right. I also stenciled on more Whispering turquoise in the bottom right corner. I decoupaged on some retired Stampin' Up Mica Flakes in the upper right hand corner to give it some sparkle.


Then added the doodled swirls with a Sharpie permanent marker. Finally I added the wood banners in the upper right hand corner and then the words on the doodles with a fine point Sharpie permanent marker.


I felt it was finished at this point and popped it into a black picture frame and wrapped it up. So. Much. Fun!


Saturday, January 18, 2014

So Very Grateful

I just had to play around some more with the So Very Grateful stamp set! I just have so much fun coloring in these lovely flowers. Take a look at this simple creation! 


  • Stamps: So Very Grateful, Four You
  • Card Stock: Crisp Cantaloupe, Pool Party, Whisper White
  • DSP: Sweet Sorbet (SAB)
  • Ink: Jet Black Stazon, Coastal Cabana
  • Markers: Daffodil Delight, Crushed Curry, Crisp Cantaloupe, Calypso Coral, Pear Pizzaz, Gumball Green, Pool Party, Coastal Cabana, Blender Pen
  • Accessories: Banners Framelits, Silver Glimmer Paper, Rhinestone Basic Jewels, Stampin’ Dimensionals.


For this card I started off with a 5-1/2” x 8-1/2” piece of Crisp Cantaloupe card stock and scored it at 4-1/4”. Next I cut a piece of Whisper White card stock 4” x 5-1/4” and stamped the flower images from So Very Grateful several times onto the card stock. The stamp images overlapped in the middle, but I knew I wanted to have the greeting go through the center of the flowers so I wasn’t worried about it.

If you want to make sure that you keep your stamped images from overlapping too far you can cover part of the card stock with a long Post-It Note, stamp the images, then move the Post-It Note over to the other side to stamp the top portion of the flowers.


I colored in the flowers with my Stampin’ Up markers then adhered this panel onto the card front. For the greeting I cut a piece of Whisper White card stock 3/4” x 4” and stamped the greeting from Four You onto the card stock in Coastal Cabana ink. I adhered this panel onto a 1” x 4” piece of Pool Party card stock.  I adhered this onto the card front with Stampin’ Dimensionals and added a medium and small Rhinestone on either side of the greeting.


For the banners I used the smallest Banner Framelit on a scrap of Sweet Sorbet DSP with the Pool Party flowers and the second from smallest Banner Framelit on a scrap of Silver Glimmer Paper. I used 2-Way Glue Pen to adhere these just under the edge of the greeting panel.


Done! Another simple yet pretty card thanks to the So Very Grateful stamp set. Now if I could just leave this one alone for a while to play with some of my other new goodies. 


Friday, January 17, 2014

Beautiful Hardwood

I am absolutely, totally, and completely in love with the new Hardwood and So Very Grateful stamp sets from the new Occasions Catalog! The Hardwood background stamp makes the most beautiful background image for just about anything and the flowers from So Very Grateful just beg to be colored in!


  • Stamps: Hardwood, So Very Grateful, Express Yourself
  • Card Stock: Pool Party, Whisper White
  • Ink: Coastal Cabana, Jet Black Stazon
  • Markers: Crisp Cantaloupe, Calypso Coral, Pool Party, Coastal Cabana, Pear Pizzaz, Gumball Green, Wisteria Wonder, Elegant Eggplant, Blender Pen
  • Accessories: Apothecary Accents Framelits, Rhinestone Basic Jewels, Whisper White Organza Ribbon, Stampin’ Dimensionals, Bitty Banners Framelits


I really just wanted to play around with this fabulous new floral stamp set.  I cut the label from the Apothecary Accents Framelits from a scrap of Whisper White card stock and stamped the larger flower image from So Very Grateful about four times onto the label in Jet Black Stazon ink. I colored in all the flowers and leaves with my lovely Stampin’ Up markers. Once it was all colored in I knew I wanted to keep the card pretty simple so the flowers would really stand out. I wrapped a piece of Whisper White organza ribbon around the bottom of the label and tied it into a bow.

For the card base I cut a piece of Pool Party card stock 5-1/2” x 8-1/2” and scored it at 4-1/4”. Then I stamped the Hardwood background image onto the card front in Coastal Cabana ink. I adhered the label onto the card front with some Stampin’ Dimensionals and added small Rhinestone Basic Jewels into the centers of the larger flowers. 


For the greeting I stamped “happy birthday” from Express Yourself onto a scrap of Whisper White card stock in Coastal Cabana ink and cut it out with the Bitty Banners Framelit in the Big Shot. With a Dimensional on the right side and 2-Way Glue Pen on the left side I adhered the banner onto the card front so the left side overlapped the label.


That’s it! Simple, and so gorgeous! Now of course I just couldn’t put this stamp set down so I made another card with these lovely flowers that I will share with you tomorrow. So make sure you come back to check it out!

What stamp set from the new Occasions catalog are you itching to get your inky fingers on?  


Thursday, January 16, 2014

Flying Mixed Media Artwork

I really wanted to play around with some of my mixed media to create a gift for my husband. I do like to give handmade gifts, but I just can never think of anything that I could make that I think he would like. So, since he is a small plane pilot and loves to fly I came up with this flying artwork. 


I printed an image of a Cessna on some vellum, sealed with a spray sealer to prevent the ink from running, then used decoupage to glue it onto a canvas that I had painted with a gradient blue effect.


Next I printed off a portion of a flight chart of our area, wadded it up, inked it up a bit, and decoupaged that onto the canvas. Then I took a Basic Black Stampin' Spot and added black ink smeared around the edges. This really brought out some of the texture. Then I coated the entire thing with decoupage to seal everything in.


I used a stencil and some White ink spray to add the chevrons and some molding past to create what is supposed to be a cloud that I'm not very pleased with. I added this quote with a gold paint pen. 


Then I took a photo of my husband getting into a Cessna, changed it to black & white, added the vignette, and had it printed. I glued the photo onto a piece of thick chipboard that I cut to size and painted with a dark blue Decoart paint. Then I just glued the photo onto the canvas with some hot glue.


I really do hope he likes it. 


Wednesday, January 15, 2014

Hand Painted Daisies Wine Glasses

These are some hand painted wine glasses that I made for my mom for Christmas! She just loves daisies and wine, so hey, why not? 


These were actually pretty easy to do. With some drying time and multiple layers of paint to make the petals opaque it came together pretty easily. I worked on it for 15 minutes here and 30 minutes there over just a couple days to get these done.


The idea for these came to me pretty late so I just grabbed some Folk Art enamel paint from Walmart for these. For the petals I painted a layer of white, a layer of blended white and yellow, then one more layer of white to get the soft yellow center to the flowers.


The best part about this paint, let it cure for a few hours, then bake as directed on the paint bottle and it is supposed to be dishwasher safe! I would still hand wash it. I always hand wash my wine glasses, but the paint bottle says it can go in the dishwasher if you're brave enough to try. Oh, and mom loved them too! 

I had so much fun painting these that I will have to play more with glass painting soon! 


Tuesday, January 14, 2014

Christmas Jewelry

Jewelry is always a relatively quick gift to make and it always goes over well. Here are the jewelry sets that I made for Christmas Gifts this year. 

A butterfly necklace and earrings for my best friend. 


Turquoise rose necklace and earrings for my niece Megan. The roses on these were made with polymer clay, mica powder, and the Stampin' Up Blossoms mold.


Pink rose jewelry set for my niece Lauren.


A purple rose set for by best friend's daughter.


This one I made to give, but then decided to give something else instead, so it is still looking for a home.


Then finally this lovely purple set for my niece Gabrielle.


I just love making sparkly things and everyone seemed to enjoy their gift.