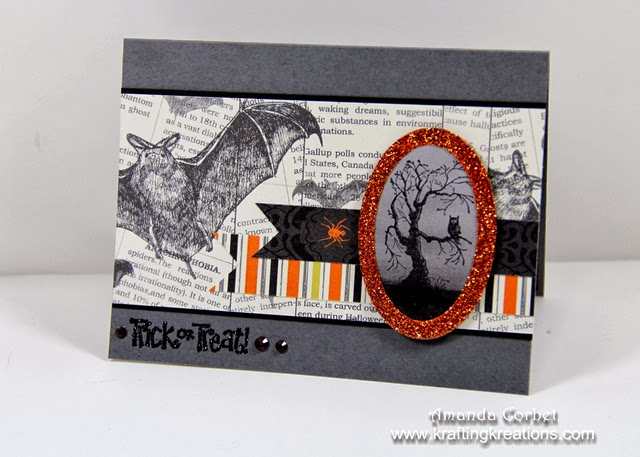
So I'm finally getting around to posting my project for last week's Friday Mashup. I've been busy cleaning and creating and haven't spent as much time scheduling blog posts. Oops! With so many things on my "to do list" my posts are going to be rather sporadic for a while.

- Stamps: Best of Halloween
- DSP: Witches' Brew DSP
- Card Stock: Basic Gray, Basic Black, Pumpkin Pie, Smoky Slate
- Ink: Black Stazon, Basic Black, Versamark
- Accessories: Ovals Framelits, Heat & Stick Powder, Stampin' Dimensionals, Black and Orange Glitter, Rhinestones, black permanent marker, Stampin' Sponge, Paper Snips, 2-Way Glue Pen
Here's your Mashup Challenge:
- Create a project using "the Sketch."
- Create a "Spooky" project.
- Or Mash it Up and create a "Spooky project using the above sketch. "
I really don't use Halloween cards or projects that much, but for some reason they are just so much fun to create! I guess it's a great excuse to go over the top with details and embellishments. This card is no different, although it was pretty easy to create.
I started off with a 5-1/2" x 8-1/2" piece of Basic Gray card stock and scored it at 4-1/4". Next I cut a piece of the Witch's Brew DSP with the bats 2-3/4" x 5-1/2" and adhered it onto a 2-7/8" x 5-1/2" piece of Basic Black card stock before adhering it down onto the card front. Next I took two scraps of DSP that were 1" and 3/4" wide. The striped piece was about 4-1/4" long and the spider piece was about 3-5/8" long. I used Paper Snips to add the dove-tail shape to one end and adhered this onto the card front with Glue Stick.
I stamped the tree and owl image from Best of Halloween onto a scrap of Smoky Slate card stock in Jet Black Stazon ink. Then I took my Basic Black ink pad and swiped it directly across the card stock to create the ground. I used a Stampin' Sponge to sponge on a little more black near the ground to make it look like there was fog covering the ground. I cut this image out with the 2nd from smallest from smallest Oval framelit.
Next I took a scrap of Pumpkin Pie card stock and used the smallest and 2nd from smallest Oval framelits to make an oval frame. I covered the frame with Versamark ink, poured on some Heat and Stick powder, tapped off the excess, heated it with my heat tool, poured on some Orange glitter, tapped off the excess, and heated it quickly with my heat tool again to set the glitter. After all that was done I adhered the frame onto the tree oval with 2-Way Glue Pen. I adhered this onto the card front with a couple Stampin' Dimensionals.
I added the Trick or Treat onto the bottom left corner of the card front by stamping in Versamark and using Heat and Stick powder just like I did for the oval frame, except this time I used the Black glitter. For the Rhinestones I just colored them with a black permanent marker then added them onto either side of the greeting.
Now that the front of the card was finished I needed to pretty up the inside! I cut a piece of Smoky Slate card stock 4" x 5-1/4". I rubbed my Basic Black ink pad across the edges intentionally trying to make it messy. Then I took two more scraps of DSP, cut them into banners and adhered all the layers together and to the inside of the card with glue stick. These banners are about 2" x 3-5/8" for the large one, and 1-3/8" x 3" for the smaller one.
Now that I've finished this spooky Halloween card I just need to figure out who I am going to send it to!


