
Good morning all! I hope you have a wonderful Wednesday! Today I’m going to share with you the fourth and final card from the March Make and Take. I just knew I HAD to use Baby Blossoms so this is what I came up with.

Stamps: Baby Blossoms, Silhouette Sentiments
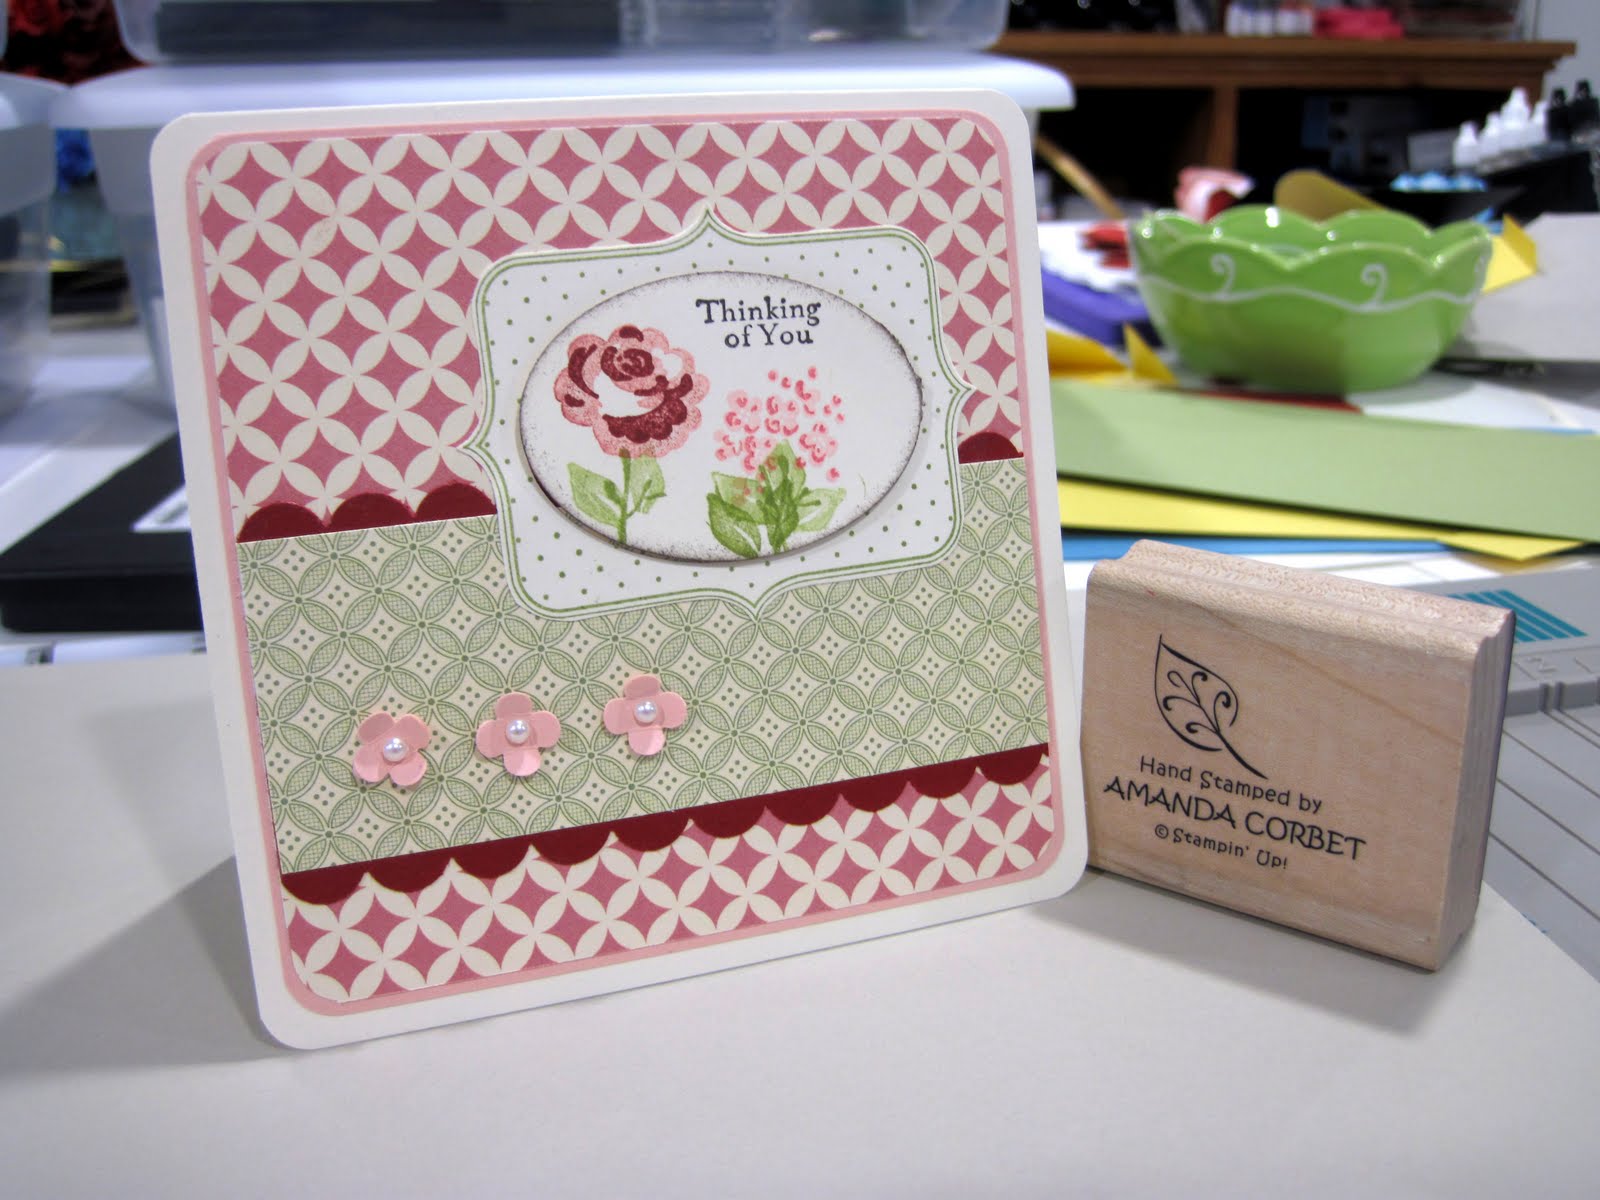
Cardstock: Very Vanilla, Blush Blossom, Cherry Cobbler
DSP: Springtime DSP
Ink: Early Espresso, Blush Blossom, Cherry Cobbler, Old Olive
Accessories: Scallop Edge Border Punch, Basic Pearls Jewel Accents, blossom from Punch Pack, 2” x 1 3/8” Oval Punch, Corner Rounder Punch, Paper Snips.
The card base is Very Vanilla cardstock cut at 4 ¼” x 8 ½” and scored at 4 ¼”. A piece of Blush Blossom cardstock was cut at 4” x 4” and a piece of Springtime DSP was cut at 3 7/8” x 3 7/8”. All of the corners on the card front, Blush Blossom cardstock, and DSP were punched with the corner rounder punch. Then the DSP was adhered to the Blush Blossom cardstock, and this layer was then adhered to the card front.
Next a piece of Cherry Cobbler cardstock was cut at 2 ¼” x 3 7/8” and both long sides were punched with the Scallop Edge Border Punch. A piece of Springtime DSP was cut at 1 ½” x 3 7/8” and was adhered to the center of the punched Cherry Cobbler cardstock. This was then adhered to the card front.
Three flowers were punched from a scrap of Blush Blossom cardstock using the small blossom punch from the Punch Pack. The petals were folded up and the blossoms were adhered to the card front in the bottom left hand corner of the DSP. A pearl was added to the center of each of the blossoms.
The frame from Baby Blossoms was stamped in Old Olive ink on a scrap of Very Vanilla cardstock and was cut out with Paper Snips. The frame was adhered to the card front. The greeting from Silhouette Sentiments was stamped on a scrap of Very Vanilla cardstock in Early Espresso ink and was then punched out with the 2” x 1 3/8” Oval Punch with the greeting in the upper right hand section of the oval.
The blossoms from Baby Blossoms were stamped in Blush Blossom, Cherry Cobbler, and Old Olive ink to fill some space in the oval. The rose was stamped in Cherry Cobbler by first stamping off with the background image and then regular stamping for the second image. The same was done with Blush Blossom ink for the other flowers. The edge of the oval was sponged with Early Espresso ink and the oval was adhered to the card front with Stampin’ Dimensionals.
Come back tomorrow to see the adorable Easter basket that we made for the 3D item at the March Make and Take!
Stamps: Baby Blossoms, Silhouette Sentiments
Cardstock: Very Vanilla, Blush Blossom, Cherry Cobbler
DSP: Springtime DSP
Ink: Early Espresso, Blush Blossom, Cherry Cobbler, Old Olive
Accessories: Scallop Edge Border Punch, Basic Pearls Jewel Accents, blossom from Punch Pack, 2” x 1 3/8” Oval Punch, Corner Rounder Punch, Paper Snips.
The card base is Very Vanilla cardstock cut at 4 ¼” x 8 ½” and scored at 4 ¼”. A piece of Blush Blossom cardstock was cut at 4” x 4” and a piece of Springtime DSP was cut at 3 7/8” x 3 7/8”. All of the corners on the card front, Blush Blossom cardstock, and DSP were punched with the corner rounder punch. Then the DSP was adhered to the Blush Blossom cardstock, and this layer was then adhered to the card front.
Next a piece of Cherry Cobbler cardstock was cut at 2 ¼” x 3 7/8” and both long sides were punched with the Scallop Edge Border Punch. A piece of Springtime DSP was cut at 1 ½” x 3 7/8” and was adhered to the center of the punched Cherry Cobbler cardstock. This was then adhered to the card front.
Three flowers were punched from a scrap of Blush Blossom cardstock using the small blossom punch from the Punch Pack. The petals were folded up and the blossoms were adhered to the card front in the bottom left hand corner of the DSP. A pearl was added to the center of each of the blossoms.
The frame from Baby Blossoms was stamped in Old Olive ink on a scrap of Very Vanilla cardstock and was cut out with Paper Snips. The frame was adhered to the card front. The greeting from Silhouette Sentiments was stamped on a scrap of Very Vanilla cardstock in Early Espresso ink and was then punched out with the 2” x 1 3/8” Oval Punch with the greeting in the upper right hand section of the oval.
The blossoms from Baby Blossoms were stamped in Blush Blossom, Cherry Cobbler, and Old Olive ink to fill some space in the oval. The rose was stamped in Cherry Cobbler by first stamping off with the background image and then regular stamping for the second image. The same was done with Blush Blossom ink for the other flowers. The edge of the oval was sponged with Early Espresso ink and the oval was adhered to the card front with Stampin’ Dimensionals.
Come back tomorrow to see the adorable Easter basket that we made for the 3D item at the March Make and Take!