
Today I’m going to share with you the third card from the March Make and Take. Yes, I’m still trying to catch up on my posting. I promise, one of these days I will. But first I would like to thank all of you who have left kind comments for me and have shown appreciation for the detailed instructions I typically give on my projects. For a while I was wondering if anyone was actually reading them or if anyone really wanted the detailed step-by-step instructions. So, thank you for letting my know that you like what I do!
Now on to the card. This card was cased from Selene Kempton’s card that you can find HERE. Here is the card!

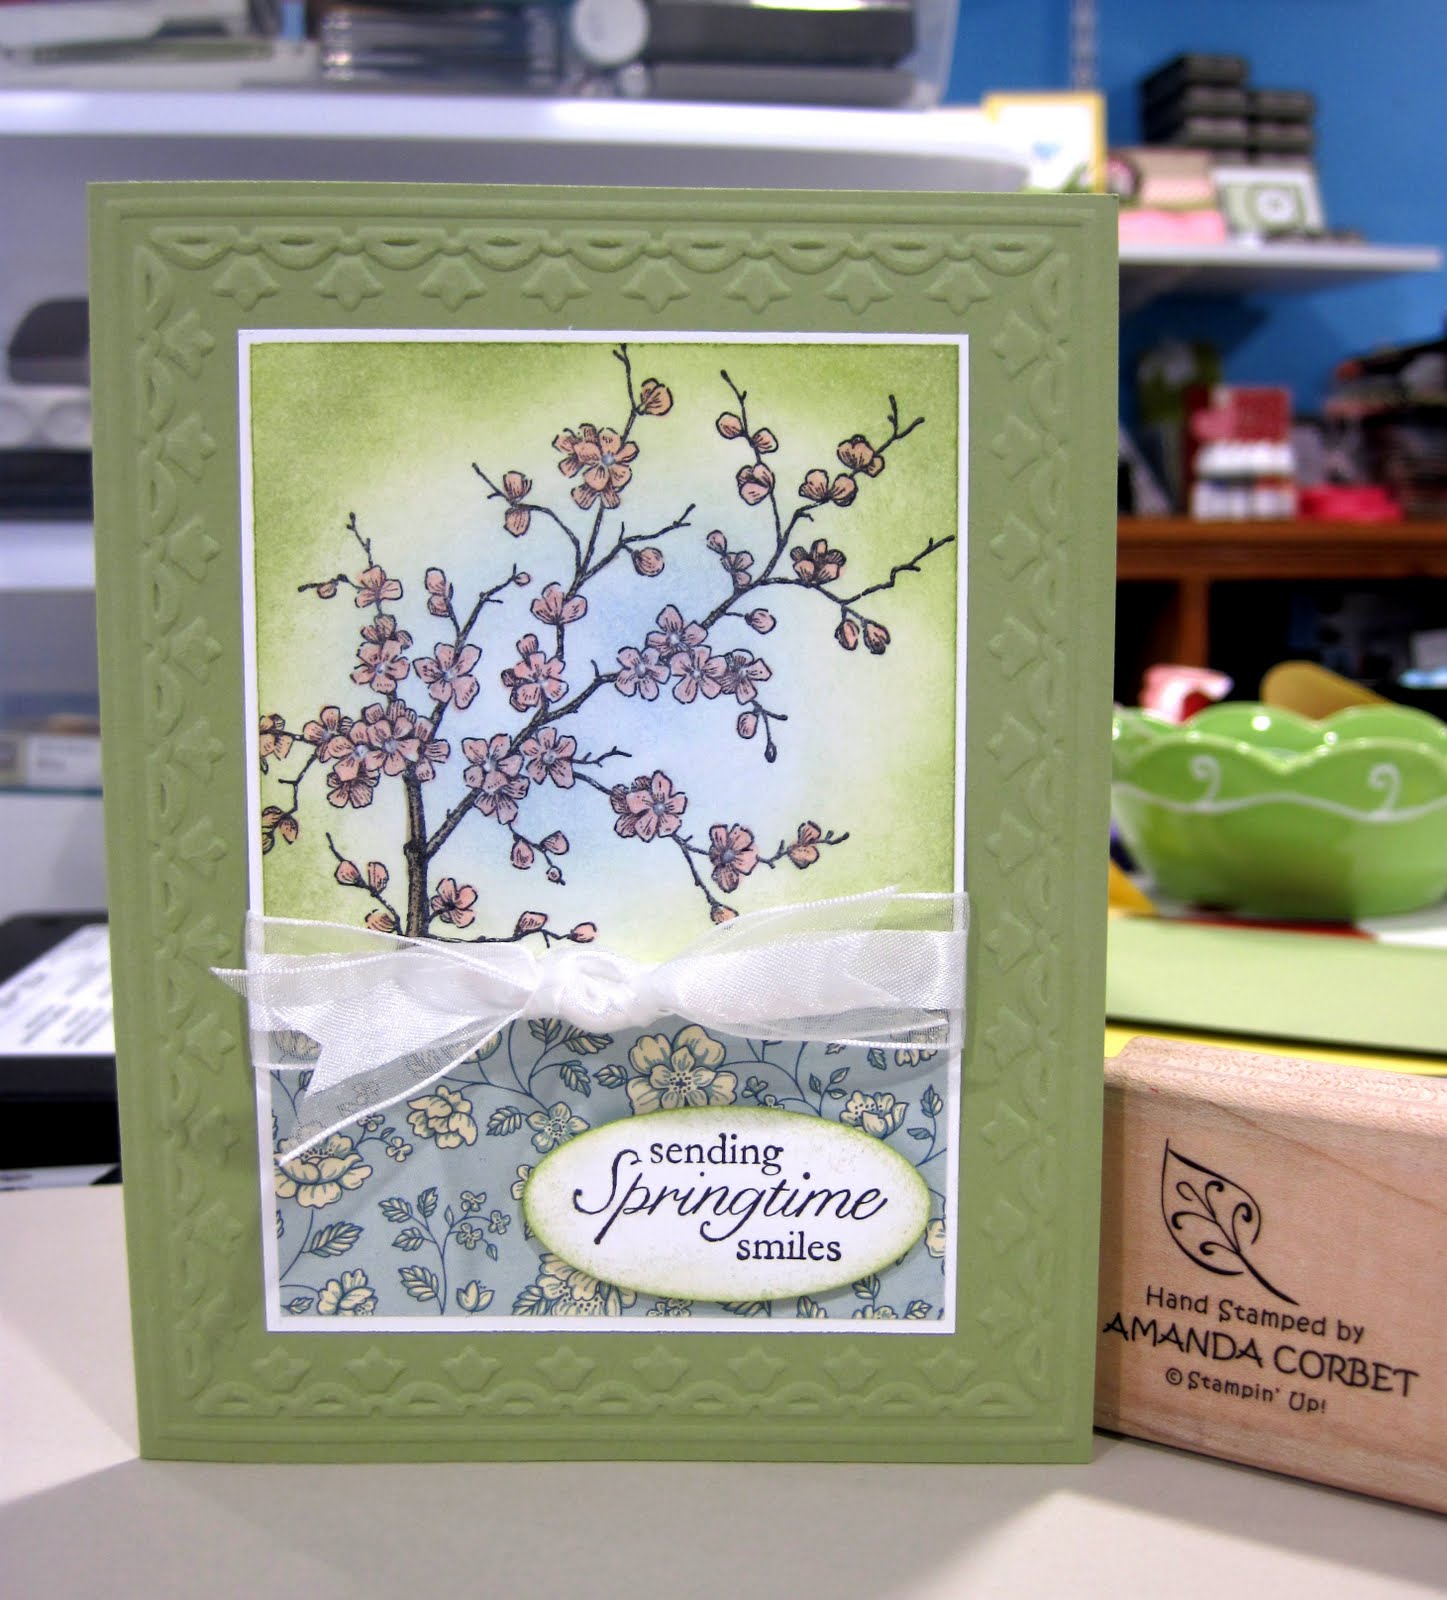
Stamps: Easter Blossoms
Cardstock: Pear Pizzaz, Whisper White
DSP: Springtime DSP
Ink: Black Stazon, Basic Black, Pear Pizzaz, Bashful Blue
Markers: Crumb Cake, Blush Blossom
Accessories: White Gel Pen, Whisper White Organza Ribbon, 1 ¾” x 7/8” Oval Punch, Framed Tulips Textured Impressions Folder, Stampin’ Dimensionals, Stampin’ Sponge
The card base is Pear Pizzaz cardstock cut at 5 ½” x 8 ½” and scored at 4 ¼”. The card front was run through the Big Shot in the Framed Tulips Textured Impressions Folder. A piece of Whisper White cardstock was cut at 2 5/8” x 2 7/8”. The flowering branch from Easter Blossoms was stamped in Black Stazon ink onto the Whisper White cardstock. Stampin’ Sponges were used to sponge Pear Pizzaz ink around the outside of the cardstock and Bashful Blue ink in the center of the cardstock.
The branch and flowers were colored in with the Crumb Cake and Blush Blossom markers. The centers of the flowers were colored with the White Gel Pen. This piece of cardstock was adhered to the top of a 3” x 4 ¼” piece of Whisper White cardstock. A piece of Springtime DSP was cut at 1 ½” x 2 7/8” and was adhered directly under the stamped and sponged cardstock. A piece of Whisper White Organza ribbon was wrapped around the center of the panel and tied into a knot. This image panel was adhered to the card front inside the framed tulips texture.
The greeting was stamped on a scrap of Whisper White cardstock in Basic Black ink and then was punched out with the 1 ¾” x 7/8” Oval Punch. The edges of the greeting oval were sponged with Pear Pizzaz ink and was adhered to the card front with Stampin’ Dimensionals.
That’s it! It really is easy to do. My guests weren’t so sure but boy were they pleased when they had a beautiful finished card to take home that they made. This one really is an easy wow card!

Now on to the card. This card was cased from Selene Kempton’s card that you can find HERE. Here is the card!
Stamps: Easter Blossoms
Cardstock: Pear Pizzaz, Whisper White
DSP: Springtime DSP
Ink: Black Stazon, Basic Black, Pear Pizzaz, Bashful Blue
Markers: Crumb Cake, Blush Blossom
Accessories: White Gel Pen, Whisper White Organza Ribbon, 1 ¾” x 7/8” Oval Punch, Framed Tulips Textured Impressions Folder, Stampin’ Dimensionals, Stampin’ Sponge
The card base is Pear Pizzaz cardstock cut at 5 ½” x 8 ½” and scored at 4 ¼”. The card front was run through the Big Shot in the Framed Tulips Textured Impressions Folder. A piece of Whisper White cardstock was cut at 2 5/8” x 2 7/8”. The flowering branch from Easter Blossoms was stamped in Black Stazon ink onto the Whisper White cardstock. Stampin’ Sponges were used to sponge Pear Pizzaz ink around the outside of the cardstock and Bashful Blue ink in the center of the cardstock.
The branch and flowers were colored in with the Crumb Cake and Blush Blossom markers. The centers of the flowers were colored with the White Gel Pen. This piece of cardstock was adhered to the top of a 3” x 4 ¼” piece of Whisper White cardstock. A piece of Springtime DSP was cut at 1 ½” x 2 7/8” and was adhered directly under the stamped and sponged cardstock. A piece of Whisper White Organza ribbon was wrapped around the center of the panel and tied into a knot. This image panel was adhered to the card front inside the framed tulips texture.
The greeting was stamped on a scrap of Whisper White cardstock in Basic Black ink and then was punched out with the 1 ¾” x 7/8” Oval Punch. The edges of the greeting oval were sponged with Pear Pizzaz ink and was adhered to the card front with Stampin’ Dimensionals.
That’s it! It really is easy to do. My guests weren’t so sure but boy were they pleased when they had a beautiful finished card to take home that they made. This one really is an easy wow card!
