
Good evening! I thought I would squeeze in another post today to share with you a card that I created for the SCCSC81 sketch challenge on Stampin' Connection. Take a peek:


Next I cut a piece of Very Vanilla cardstock 3 1/4" x 3". This will be used to create your panels. the 3" sides are the top and bottom. Make sure you sponge and stamp with a 3" long side at the top. I hope this makes sense. I sponged the top half of the cardstock with Daffodil Delight ink using a Stmapin' Sponge that was cut into wedges. I always sponge using a swirling motion starting from the outside edge working inward. Then I sponged Peach Parfait ink making sure not to cover the Daffodil Delight ink entirely. Finally I sponged Cajun Craze ink, again, making sure that I didn't entirely cover the Peach Parfait.
Then I stamped the trees from Lovely as a Tree in Black Stazon ink. I cleaned the stamp and stamped the trees twice more using Sahara Sand ink to get the lighter trees in the background. Now for the ground. To get the bold and rich color of the grassy hills I just swiped the Lucky Limeade ink pad across the cardstock in an arcing motion until the entire bottom was covered. Then to add some shadows to the hills I repeated the same swiping motion with the Always Artichoke ink pad.

To adhere the panels to the card front I put Stampin' Dimensionals on the back of all three. Then starting with the center panel I adhered the panels onto the card front. That is it! It really isn't too difficult. I hope you give it a try!
If you are a Stampin' Up Demonstrator you can find the sketch challenge thread HERE. If you are not a Stampin' Up Demonstrator I would still love to see your creations! Please post a link to your project in the comments section of this post!
Thanks for stopping by!

Stamps: Lovely as a Tree, Teeny Tiny Wishes
Cardstock: Lucky Limeade, Early Espresso, Very Vanilla
DSP: Spice Cake Designer Series Paper
Ink: Daffodil Delight, Peach Parfait, Cajun Craze, Lucky Limeade, Always Artichoke, Basic Black, Stazon, Sahara Sand
Accessories: Stampin' Dimensionals, Stampin' Sponge
Here is the sketch that was created by yours truly:

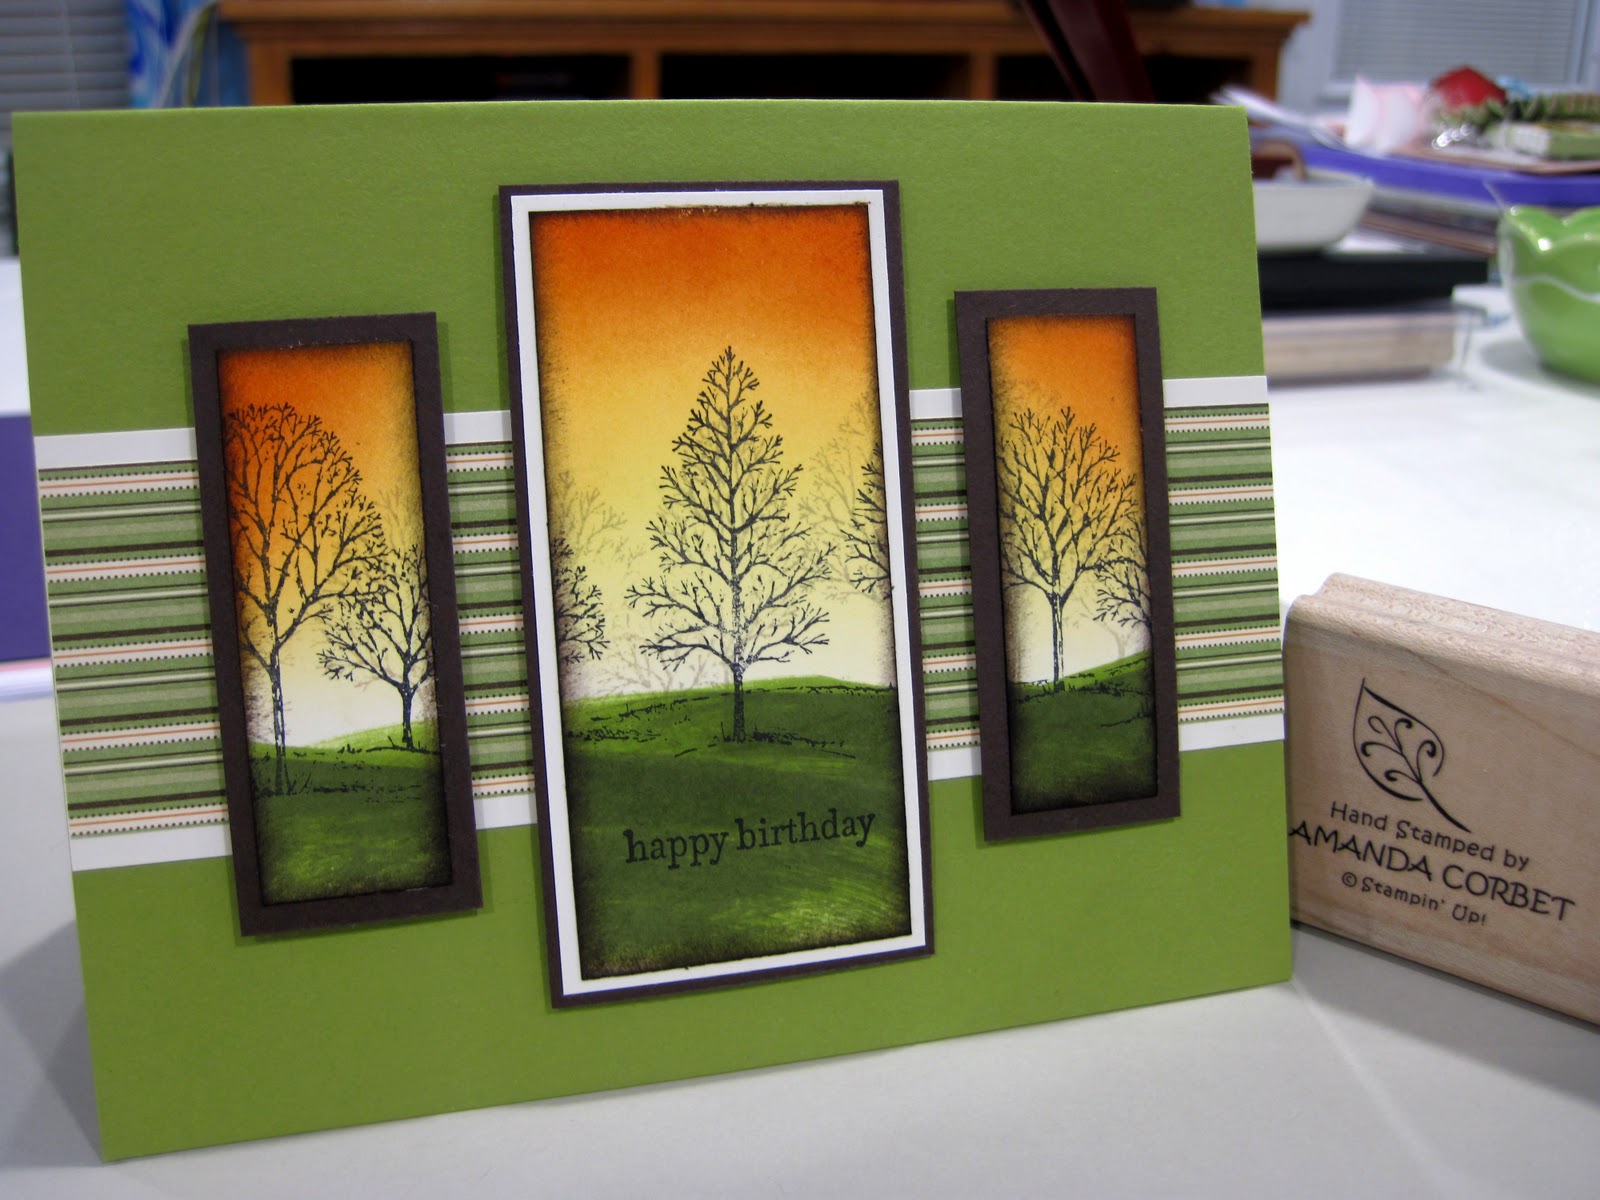
The card base is Lucky Limeade cardstock that was cut at 5 1/2" x 8 1/2" and scored at 4 1/4". A piece of Spice Cake DSP was cut at 2 1/2" x 5 1/2" and was adhered to a 2 3/4" x 5 1/2" piece of Very Vanilla cardstock before being adhered to the card front.
Next I cut a piece of Very Vanilla cardstock 3 1/4" x 3". This will be used to create your panels. the 3" sides are the top and bottom. Make sure you sponge and stamp with a 3" long side at the top. I hope this makes sense. I sponged the top half of the cardstock with Daffodil Delight ink using a Stmapin' Sponge that was cut into wedges. I always sponge using a swirling motion starting from the outside edge working inward. Then I sponged Peach Parfait ink making sure not to cover the Daffodil Delight ink entirely. Finally I sponged Cajun Craze ink, again, making sure that I didn't entirely cover the Peach Parfait.
Then I stamped the trees from Lovely as a Tree in Black Stazon ink. I cleaned the stamp and stamped the trees twice more using Sahara Sand ink to get the lighter trees in the background. Now for the ground. To get the bold and rich color of the grassy hills I just swiped the Lucky Limeade ink pad across the cardstock in an arcing motion until the entire bottom was covered. Then to add some shadows to the hills I repeated the same swiping motion with the Always Artichoke ink pad.
Now for the cutting to make the seperate panels. Cut 3/4" off of each of the sides. For the 3/4" wide side panels trim 1/2" off both the top and the bottom of the panel. All of the panels were sponged around the edges with Early Espresso ink just to soften up the edges a bit. The smaller side panels were adhered to a 1" x 2 1/2" piece of Early Espresso cardstock. The larger center panel that is now 1 1/2" x 3 1/4" was adhered to a 1 5/8" x 3 3/8" piece of Very Vanilla cardstock. This panel was then adhered to a 1 3/4" x 3 1/2" piece of Early Espresso cardstock. Next I stamped the greeting from Teeny Tiny Wishes in Basic Black ink on the bottom of the center panel.

If you are a Stampin' Up Demonstrator you can find the sketch challenge thread HERE. If you are not a Stampin' Up Demonstrator I would still love to see your creations! Please post a link to your project in the comments section of this post!
Thanks for stopping by!
