Tuesday, July 23, 2013

Sweet Sassie Non Winning Artisan Entry 8

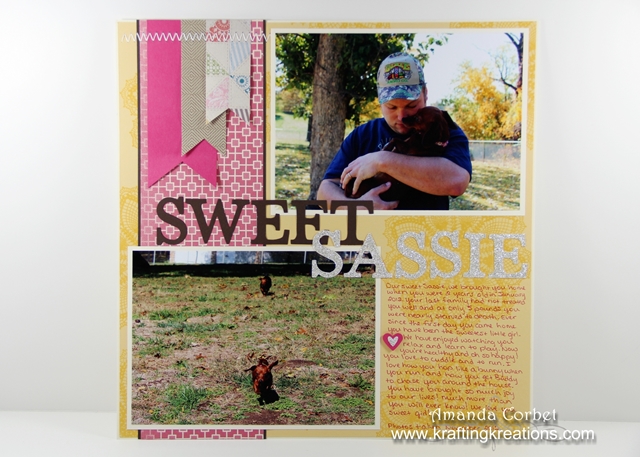
Today I have for you the final scrapbook page that I made. This page features one of my sweet little dogs Sassie. She is a miniature dachshund and sweet as can be!
  • Stamps: Hello Doily
  • DSP: Tea for Two, More Amore, Comfort Cafe
  • Card Stock: Very Vanilla, So Saffron, Early Espresso
  • Ink: Daffodil Delight
  • Accessories: Typeset Alphabet Dies, Small Heart Punch, Owl Builder Punch, Stampin’ Dimensionals, Silver Glimmer Paper, Melon Mambo Marker, sewing machine, white thread, 2-Way Glue Pen


I started off with a 12” x 12” piece of very Vanilla card stock. I cut a piece of So Saffron card stock 11-7/8” x 11-7/8” and stamped the Hello Doily image all over the card stock in Daffodil Delight ink. Then I adhered this layer onto the Very Vanilla card stock.


Next I cut a piece of More Amore DSP 5-1/4” x 12” and adhered it onto a 5-3/8” x 12” piece of Early Espresso card stock before adhering it onto the left side of the page.

Then I cut a piece of Melon Mambo 2” x 4-1/2”, Comfort Café DSP 1-1/4” x 4”, and Tea for Two DSP 1” x 3-1/2”. I use Paper Snips to cut a dove-tail in one end. I adhered these onto the More Amore DSP strip by putting a Stampin’ Dimensional close to the dove-tail end and Anywhere Glue Stick at the top edge of the page. Then I ran this through my sewing machine to add the zig-zag stitches. I trimmed the stitches off on the back and applied a little bit of Crystal Effects over the thread ends to keep them in place.


I cut both photos down to 5” x 7” and adhered them onto a 5-1/4” x 7-1/4” piece of Very Vanilla card stock. Both photos were adhered directly onto the page with Anywhere Glue Stick.

I cut out the word “SWEET” from Early Espresso card stock and adhered them onto the page with 2-Way Glue Pen. Then I repeated the process to cut out the name “SASSIE” from Silver Glimmer Paper and adhered the letters onto the page. I really love how the letters overlap in the center.


Then I used my Melon Mambo marker to add in the journaling. I made a bit of a spelling mistake about half –way down so I covered it up with a layered heart punched from the Owl Builder Punch and the Small Heart punch in Silver Glimmer Paper and Melon Mambo card stock. I adhered the heart on with half a Stampin’ Dimensional. 


I really love this page. I am definitely going to have to make another to put in my scrapbook! 


Monday, July 22, 2013

Flying Non Winning Artisan Entry 7

This scrapbook page has a log going on. It features my hubby and his dream of being a pilot. This is the second scrapbook page that I entered in the Artisan Award Contest.


  • Stamps: Word Play
  • DSP: Basic Black, Midnight Muse, Comfort Cafe
  • Card Stock: Basic Gray, Basic Black, Midnight Muse, Pool Party, Summer Starfruit, Whisper White
  • Ink: Basic Black, Midnight Muse, Pacific Point, Tempting Turquoise, Pool Party, Versamark
  • Accessories: Stamping Sponges, Brayer, Silver Basic Designer Buttons, Linen Thread, Silver embossing powder, Heat Tool, Embossing Buddy, Stampin’ Dimensionals, Paper-Piercing Tool, Stampin’ Pierce Mat, Essentials Paper-Piercing Pack, 3/16” Metallic Brads, Midnight Muse Marker

I started off with a 12” x 12” piece of Basic Black card stock. I cut a piece of the Basic Black text DSP from the Neutrals DSP Stack 11-7/8” x 11-7/8”. I sponged around the edges with Basic Black ink and adhered it onto the Basic Black card stock. 

Next I cut a piece of Midnight Muse card stock 1-1/4” x124” and sponged one edge with Night of Navy ink. I adhered this strip onto a 1-3/8” x 12” piece of Basic Gray card stock, then adhered this layer onto a 3” x 12” piece of Basic Black card stock. Finally this strip was adhered in the center of the scrapbook page.


The upper right photo was 5” x 7” and was adhered onto a 5-1/8” x 7-1/8” piece of Midnight Muse card stock. I adhered this one directly onto the scrapbook page. On the left side I cut a piece of Midnight Muse DSP 7/8” x 4” and adhered it onto a 1” x 4-1/8” piece of Summer Starfruit card stock. I used my Paper Piercer and Stampin’ Pierce Mat to pierce three holes on the left side of the DSP and added three Silver Brads. I adhered this onto the page with Stampin’ Dimensionals.

Directly below the DSP was a photo that was cut at 3-7/8” x 3-7/8” and adhered onto a 4” x 4” piece of Pool Party card stock then was adhered onto the scrapbook page.

I cut a piece of Comfort Café DSP 2” x 6-1/8”. I added my journaling to this piece in Midnight Muse ink then adhered this onto a 2-1/8” x 6-1/4” piece of Whisper White card stock before adhering it onto the scrapbook page.


Next I cut a 2” x 3” piece of Whisper White card stock. I wanted to mimic the sky in the top picture so I brayered on some Pool Party, then Tempting Turquoise, then Pacific Point ink to create the fade. I allowed that to dry completely then stamped the image from Word Play onto the card stock in Versamark ink, covered it with Silver embossing powder, tapped off the excess, and heated it with my Heat Tool. I adhered this onto a 2-1/8” x 3-1/8” piece of Summer Starfruit card stock then adhered this onto the scrapbook page with Stampin’ Dimensionals.

The bottom two photos were cut at 4” x 5”. I adhered one on Summer Starfruit and one on Pool Party that was cut at 4-1/8” x 5-1/8”. The left was adhered with Stampin’ Dimensionals and the right was adhered directly onto the scrapbook page with Anywhere Glue Stick.


Finally I wanted to fill in the blank space on the center stripe so I added some linen thread in one of the large Silver Buttons and tied it into a bow. I adhered the button onto the page with a Stampin’ Dimensional.


This page definitely took quite a bit of time to create. But I think it presents my hubby’s dream so perfectly! 


Sunday, July 21, 2013

Craft Project Central!

Dry Erase Memo Board:

This beautiful picture is really a memo board to help you organize your week. You can write on the glass with a dry erase marker. There is even a corkboard with a notepad at the bottom. Keep it for yourself or give it as gift with the matching card. You will be surprised at how easy this is to create!


This fun and useful project was designed byChris! If you have a chance head on over to Chris’s blog and let her know how wonderful her project is!

If you would like to subscribe to the July edition of Craft Project Central and get 10 wonderful tutorials for only $10 then click HERE!

Falling Leaves Non Winning Artisan Entry 6

This is a fun fall scrapbook page featuring my wonderful nieces and some pretty leaves. It’s also my first Artisan entry scrapbook page. I am really proud of myself for the scrapbook pages I came up with. I don’t normally scrapbook so it took me FOREVER to plan out the pages and make them. Now I just need to make another for myself to add into my album!

  • Stamps: French Foliage
  • Card Stock: Cherry Cobber, Crumb Cake, So Saffron, Early Espresso, Very Vanilla, Pumpkin Pie, Cajun Craze
  • Ink: Crumb Cake, More Mustard, Cajun Craze, Pumpkin Pie, Cherry Cobbler, Early Espresso
  • Accessories: Champagne Glimmer Paper, Tasteful Trim Bigz Die, Autumn Accents Die, Woodgrain embossing folder, Paper Snips, Stampin’ Dimensionals, Early Espresso Marker, Stamping Sponges, MDS


I started off with a 12” x 12” piece of Crumb Cake card stock. I stamped the water droplet image from French Foliage all over the card stock in Crumb Cake ink. Next I cut a piece of So Saffron card stock 4-1/4” x 12”. I adhered this onto a 4-3/8” x 12” piece of Early Espresso card stock. I added three 3-5/8” x 4” photos onto this strip. I adhered this layer onto the right side of the page.


I use My Digital Studio to make the banner. I just used Harrington Font at 58pts in Cherry Cobber and printed it on Very Vanilla card stock. The banner is 1-7/8” x 6-1/2”. I used Paper Snips to trim in the dove-tail on the left end then adhered it right next to the Early Espresso card stock extending to the left.


Next I cut a piece of Champagne Glimmer Paper 1” x 12” and ran it through the Big Shot with the Tasteful Trim die to cut out the large scallops. I adhered this right next to the Early Espresso card stock on the page and trimmed the ends to match the Early Espresso card stock.


For the larger photo I cut it at 5” x 6” and adhered it onto a 5-1/8” x 6-1/8” Very Vanilla mat which was then adhered onto a 5-3/8” x 6-3/8” Early Espresso mat. I adhered this layer onto the page with Stampin’ Dimensionals.


The leaves were made the same way as in this TUTORIAL and adhered all over the page with Stampin’ Dimensionals. The journaling was added onto the bottom with the fine point end of my Early Espresso marker. 


Saturday, July 20, 2013

Convention 2013!

My first time at convention was so wonderful! I met so many nice people and had a blast at all the sessions!


This really is a fun group of ladies and gents!

I learned so much and have come away completely inspired to better my business and share some gorgeous creations with my customers!


There were so many display boards with lovely creations including FOUR of my Artisan Entry cards!!! Can you believe it? Four of them!


My 3D picture on the display boards!!!


I even won Prize Patrol!


I will share the other boards later after I have the chance to edit my photos. My hubby and I have headed off to Las Vegas for a couple of days before heading home.

I just really want to point out that convention is such a wonderful experience. You learn techniques, get inspiration, learn really helpful and inspiring business tips, and meet so many new people. It really is worth the trip if you can!

I had such a great time, and now I am just totally exhausted form all the excitement and travel. Now we are off to get to our hotel and sleep...

Bright Flower Non Winning Artisan Entry 5

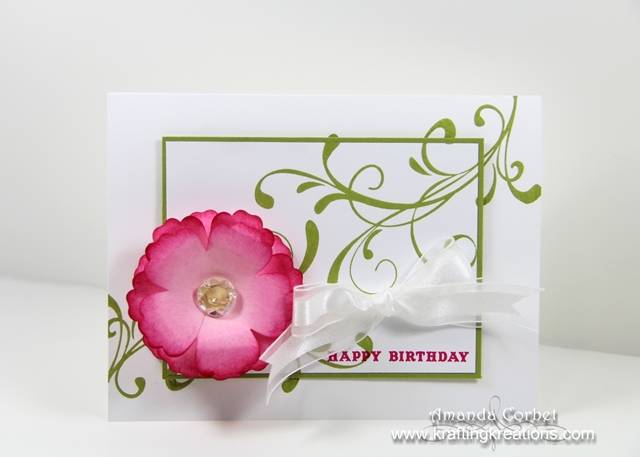
This is my final card entry for the Artisan contest. I really wanted to showcase the Triple-Time Stamping concept. So This is the card I created!


  • Stamps: Everything Eleanor, From my Heart
  • Card Stock: Whisper White, Lucky Limeade, Pink Pirouette, So Saffron
  • Ink: Lucky Limeade, Melon Mambo 
  • Accessories: Blossom Punch, Stamping Sponges, Paper Snips, Multipurpose Liquid Adhesive, Stampin’ Dimensionals, 5/8” Whisper White Organza Ribbon, Designer Vintage Faceted Buttons, Itty Bitty Shapes Punch Pack, Bone Folder, 2-Way Glue Pen


I started off by cutting a piece of Whisper White card stock 5-1/2” X 8-1/2” and scored it at 4-1/4”. I cut another piece of Whisper White card stock 3” x 4-1/4”. I put three lines of 2-Way Glue Pen onto the back of the Whisper White card stock, allowed the glue to dry until it was clear, then adhered it onto the center of the card front. I stamped the Swirls from Everything Eleanor onto the card front in Lucky Limeade ink so the swirls start at the top right corner and trial down to the bottom left corner.


I pulled up the small piece of Whisper White card stock off the card front and adhered it onto a 3-1/8” x 4-1/8” piece of Lucky Limeade card stock. I stamped the greeting from From my Heart onto the bottom right corner of the Whisper White panel in Melon Mambo ink. Then I wrapped a piece of Whisper White Organza ribbon around the card front and tied it into a bow. I adhered this layer onto the card front with Stampin’ Dimensionals.

For the flower I used my Blossom Punch to punch three flowers from Pink Pirouette card stock. I sponged the edges of all three flowers with Melon Mambo ink. The bottom two flowers I just curled the petals with my bone folder and adhered them one on top of the other. For the third flower I cut a slit between two of the petals towards the center. I applied some Multipurpose Liquid Adhesive onto one petal next to the slit and adhered it behind the petal on the other side of the slit making this flower slightly smaller than the other two. I cut the point off the center of the flower with Paper Snips and used more Liquid Glue to adhere this flower onto the other two.


I used the 3/8” circle punch from the Itty Bitty Shapes Punch Pack on a scrap of So Saffron card stock. I placed this in the center of the flower on the glue that was exposed. Then I used a Glue Dot to adhere one of the smaller Vintage Designer Faceted Buttons into the center of the flower. The So Saffron circle covers up the glue in the center and shows a pretty yellow center behind the shiny button. Then I simply adhered the flower onto the card front with a couple Stampin’ Dimensionals.


That’s it! This card definitely wouldn’t fit in an envelope, but it is so pretty! I just love that pop of pink against the white layers!