Thursday, May 27, 2010

Father's Day Silhouettes - May Make and Take 4

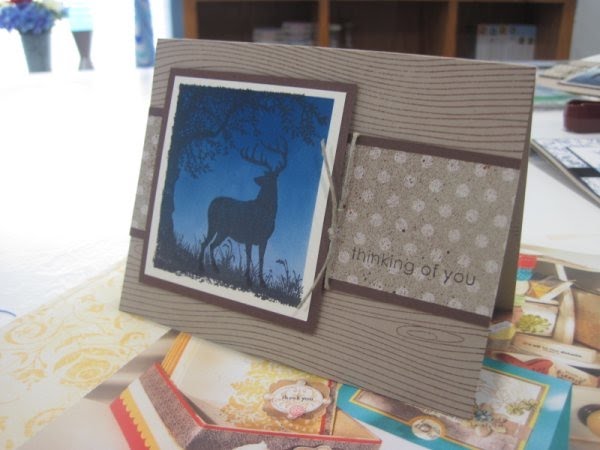
Since Father’s Day is coming up it is almost required to make a Father’s Day card. So this is what I came up with.

I would say this is definitely the most difficult of the cards that my guests made. I generally try to have one more difficult card and the rest relatively easy that way there is a good range for people to enjoy and even experienced stampers still have fun. Currently my group of Make & Take guests are all new stampers and it was so much fun teaching them how to use the great tools and products that Stampin’ Up offers such as Smooch Spritz and the Stamp-A-Ma-Jig. For those of you who do not know how to use the Stamp-A-Ma-Jig I will have a tutorial on it for you later this weekend as my first tutorial. Now on to the card supplies and instructions!


Stamps: Nature Silhouettes, Trendy Trees, Wood Grain Background
Cardstock: Kraft, Chocolate Chip, Very Vanilla
Paper: Thoroughly Modern DSP
Ink: Basic Black, Black Stazon, Bashful Blue, Not Quite Navy
Accessories: Natural Hemp Twine, Log Cabin Smooch Spritz, Stamp-A-Ma-Jig, Post-It notes, Sponge Daubers, Stampin’ Dimensionals

The card base is Kraft cardstock cut at 5 ½” x 8 ½” and scored at 4 ¼”. The card front was stamped using the Wood Grain background stamp with Chocolate Chip ink. The Thoroughly Modern DSP with the polka-dots was cut at 1 ¾” x 5 ½”. The “thinking of you” stamp from Trendy Trees was used with Basic Black ink to stamp in the bottom right hand corner of the patterned paper. This was then sprayed with Smooch Spritz using the Color Catcher and set aside to dry. This is so much fun because people can spray it as light or as heavy as they want to. After the DSP is dry it is adhered to a piece of Chocolate Chip cardstock cut at 2” x 5 ½”. Some Natural Hemp Twine was tied around the layers and into a knot. These layers were then adhered to the card front in the center.

The main image panel is Very Vanilla cardstock cut at 2 ¾” x 3”. The tree from Nature Silhouettes was stamped in Black Stazon using the Stamp-A-Ma-Jig to get the image centered. Four Post-It notes were adhered to the panel using the edge of the tree image as a guideline with the sticky end of the post it on the Very Vanilla cardstock. This creates a mask for sponging. Sponge Daubers were used to sponge on Bashful Blue ink over the entire image and then to add some Not Quite Navy ink blended in to make a night sky. The Post-It notes are removed (definitely a WOW moment!) and the Stamp-A-Ma-Jig to position the deer or wolf (I left the choice up to them, but I chose to use the deer) and stamped the image in Black Stazon. This image panel was adhered to a 3 ¼” x 3” piece of Chocolate Chip cardstock and this was adhered to the card front using Stampin’ Dimensionals. That’s all there is to it! It really doesn’t take much to make a pretty sponged scene! Thanks for stopping by! Come back tomorrow to see the 2-5-7-10 box that was the 3D project for May!

Wednesday, May 26, 2010

Amethyst Expressions - May Make and Take 3

This card was completely cased from a card I received in the All About Color Swap 2 for Soft Subtles. The original artist is: Sandy Carlson. For my Make & Takes I like to have various other cards on display to inspire my guests or show off new/current products. I will have to take a picture of my display before the next make and take to show you. Well this card that I received in a swap was displayed during my very first Make & Take and a couple of my guests requested that it be one of the cards that we make at the next one. Well, here it is!


Stamps: Herb Expressions
Cardstock: Almost Amethyst, Basic Grey, Whisper White
Ink: Black Stazon
Accessories: Almost Amethyst and Certainly Celery markers, Whisper White Taffeta Ribbon, Big Shot, Perfect Polka Dots Embossing Folder

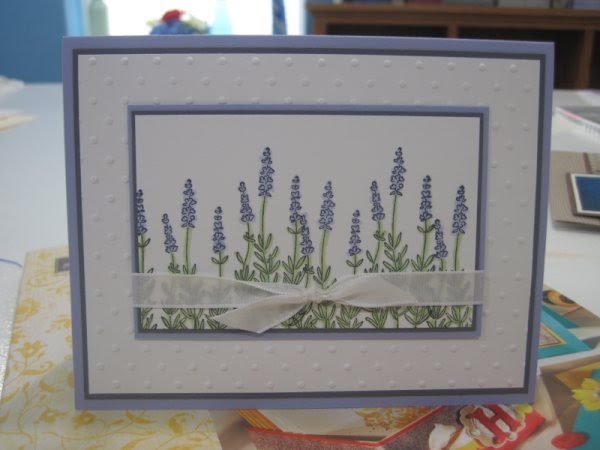
The card base is Almost Amethyst cut at 5 ½” x 8 ½” and scored at 4 ¼”. The next panel is Basic Grey cut at 5 ¼” x 4” and adhered to the card front. The panel on top of that is Whisper White cut at 5 1/8” x 3 13/16”. The Whisper White panel was embossed in the Big Shot using the Perfect Polka Dots Embossing Folder and adhered to the card front on top of the Basic Grey panel. The image panel is Whisper White cut at 2 3/8” x 3 ¾”. The lavender from Herb Expressions was stamped in Black Stazon several times across the bottom of the cardstock.


Tip: Stazon ink works well for images that will be colored in using markers or watercolor because it will not smear and is not water soluble. This also works great on non-porous surfaces such as glass or window sheets.

The tops of the lavender were colored in with an Almost Amethyst marker and the stems/leaves were colored in with a Certainly Celery marker. This panel was adhered to a 2 ½” x 3 7/8” Basic Grey panel. These layers were then adhered to a 2 5/8” x 4” Almost Amethyst panel. Whisper White Taffeta Ribbon was added around the image panel layers and tied into a knot with the ribbon ends neatly trimmed. This was then adhered to the card front and you’re done. This is a pretty easy and quick card to make even though it looks time consuming and difficult. I hope you come back tomorrow to see the Father’s Day card that included a sponged scene!

Tuesday, May 25, 2010

Blue Rose China - May Make And Take 2

Here is the second card that my guests made at the May Make & Take. Enjoy!


This card was inspired by this wonderful creation by Tina Dyck: http://mytherapymycreations.blogspot.com/2010/05/all-rain-and-no-gain.html
Once I saw this I just knew I HAD to re-create it for my Make & Take because the ladies would love it! It reminds me so much of the china dish set that my Mother gave my husband and I as a wedding present. You can see the resemblance:


Stamps: Elements of Style
Cardstock: Kraft, Whisper White, Night Of Navy
Ink: Night of Navy
Accessories: Square Lattice Embossing Folder, 5/8” Basic Black Stain Ribbon, Designer Label Punch, Bashful Blue Marker, Blender Pen


The card base is Kraft cardstock (soon to be known as Crumb Cake) cut at 4 ¼” x 11” and scored at 5 ½”. A 3 7/8” x 5 1/8” piece of Whisper White was stamped with the flowers from Elements of Style in Night of Navy ink to create a patterned paper. This was then run through the Big Shot with the Square Lattice embossing folder and adhered to a 4” x 5 ¼” piece of Night of Navy cardstock. A piece of 5/8” Basic Black Satin Ribbon was added around the middle and these layers were then adhered to the card base.


A 2 3/8” x 3 3/8” piece of Whisper White cardstock was stamped with the flowers from Elements of Style in Night of Navy ink. The flowers were then colored in with a Bashful Blue marker. Then I used the Night of Navy ink pad and the blender pen to add shadows to the flowers. To do this, squeeze the pad in the middle when it is closed. Open the pad up halfway and you will see ink on the lid of the case, use the blender pen to pick up this ink and add it to your flowers. This beautiful flower piece is adhered to a 2 ½” x 3 ½” piece of Night of Navy cardstock and then to the card front.


The sentiment was stamped in Night of Navy ink on a scrap piece of Whisper White cardstock. I then used the Designer Label Punch to punch out the sentiment and another label from Night of Navy cardstock. The Night of Navy label was cut in half lengthwise and adhered to the back of the sentiment label to add a shadow on either side. This was adhered to the card using Stampin Dimensionals and you’re done! I hope you enjoy this beautiful card as much as all the other ladies did. Come back tomorrow to see more!

Monday, May 24, 2010

Razzleberry Medallion - May Make and Take 1

The Make & Take for May was wonderful! The ladies all had a wonderful time making the projects and seemed excited to come back again! Throughout this week I will be posting the projects that my guests made this month. So come back each day this week to see them all!


Stamps: Medallion, Watercolor Trio
Cardstock: Rich Razzleberry, Whisper White, Basic Black
Ink: Rich Razzleberry, Sahara Sand, Basic Black
Accessories: Silver Hodgepodge Hardware, 5/8” Bashful Blue Stain Ribbon


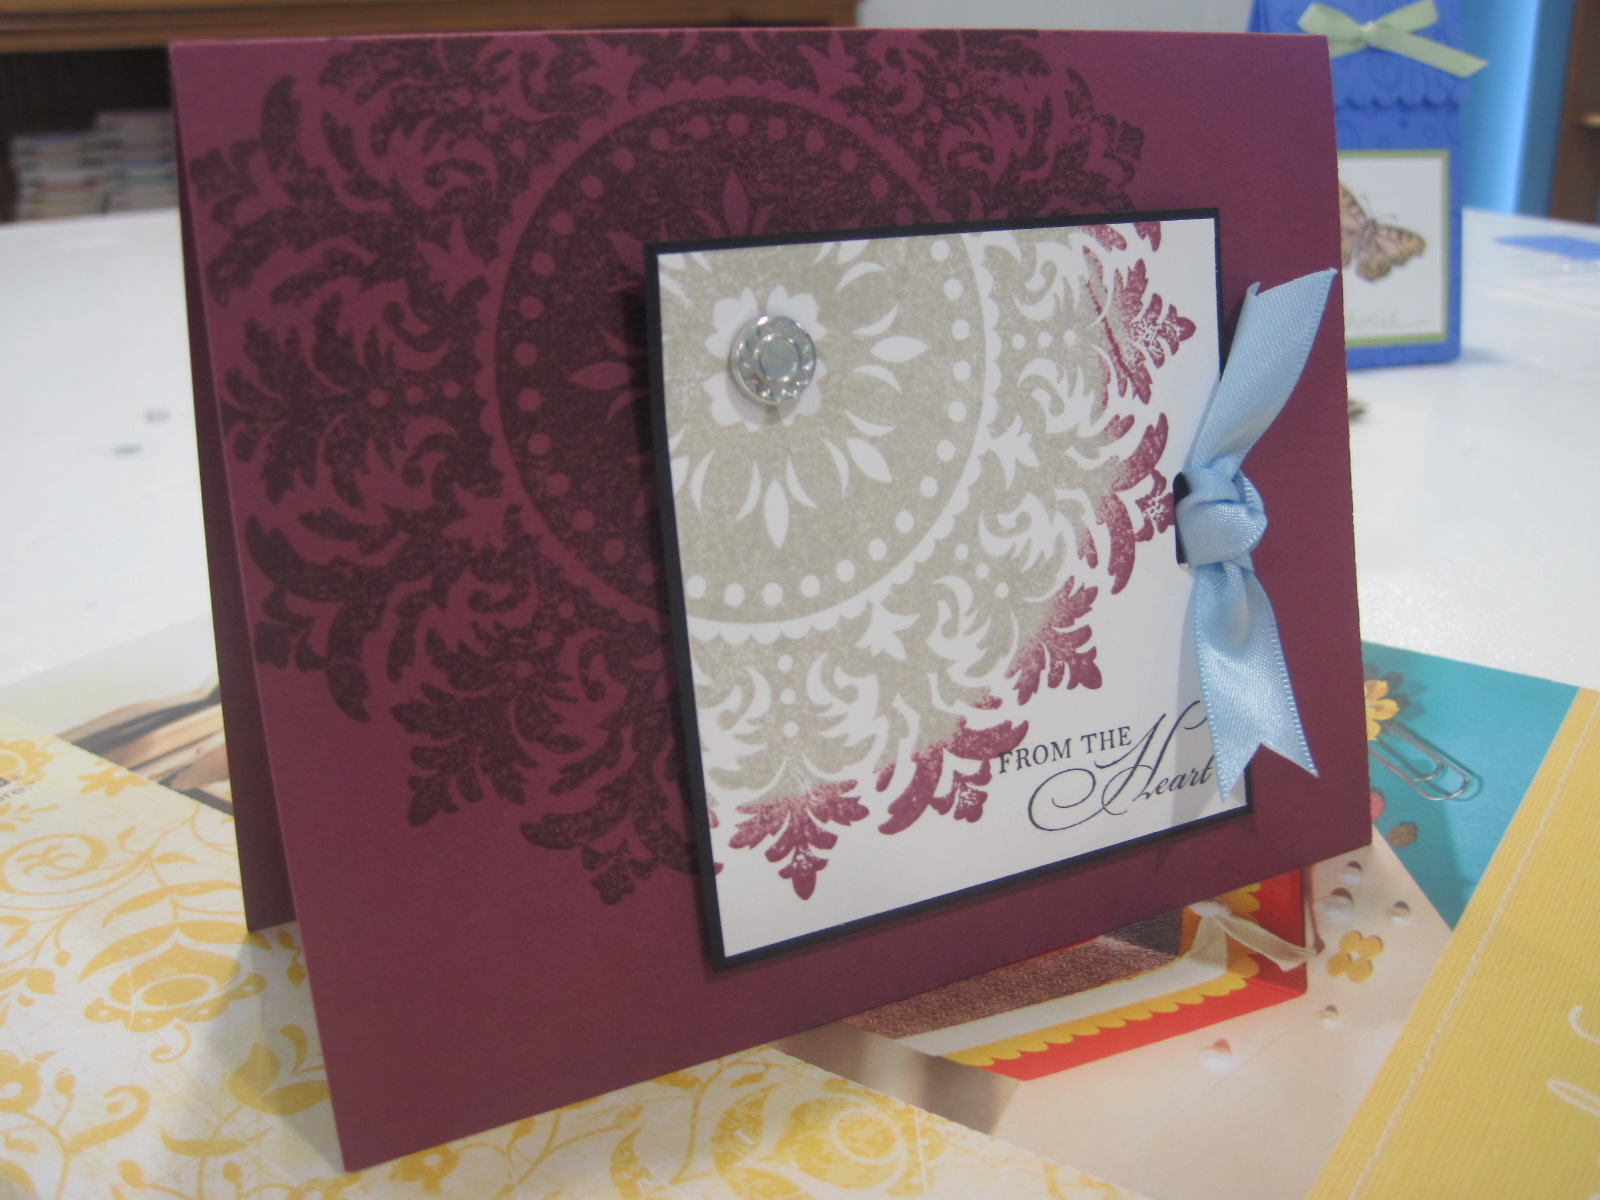
This card was inspired by a card created by Kirsten Davies on Stampin Connection. The card base is Rich Razzleberry cardstock cut to 5 ½” x 8 ½” and scored at 4 ¼”. The medallion was stamped in Rich Razzleberry ink on the card base. Then a portion of the medallion was stamped on a 2 7/8” x 2 7/8” piece of Whisper White cardstock using the Rock-N-Roll technique with Sahara Sand and Rich Razzleberry ink. (For the tutorial on this technique click here). When stamping you want to make sure that you get the center of the medallion onto your Whisper White cardstock. http://www.splitcoaststampers.com/resources/tutorials/rock_n_roll/


The sentiment from Watercolor Trio was stamped in the bottom right corner of the stamped Whisper White cardstock in Basic Black ink. This panel was adhered to a piece of 3” x 3” Basic Black cardstock. The Slot Punch was used in the middle on the right side of the image panel to punch through both layers and a piece of 5/8” Bashful Blue Satin Ribbon was tied into a knot and the ends trimmed. A large brad from the Silver Hodgepodge Hardware kit was put in the center of the medallion and Stampin Dimensionals were used to adhere this panel to the card front lining up the medallion image. Make sure to come back tomorrow to see the second Make & Take project that uses the Elements of Style set from the summer mini.

Sunday, May 23, 2010

Amethyst Awash With Flowers

This card was CASED from Candy Rattray’s beautiful creation which can be found on Stampin’ Connection. For those of you who don’t have access to Stampin’ Connection I have copied the picture here:


Now here is my version:


Stamps: Awash With Flowers, Well Scripted
Ink: Basic Black, Lavender Lace, Lovely Lilac, Pretty In Pink, Positively Pink, Certainly Celery, and Old Olive
Cardstock: Lavender Lace, Lovely Lilac, Whisper White
Accessories: Scallop Trim Border Punch, ½” Circle Punch, Extra Large Grommet (white), 5/8” Old Olive Grosgrain ribbon, Two-way glue pen, Dazzling Diamonds Glitter

The card base is Almost Amethyst cardstock cut at 4 ¼” x 11” and scored at 5 ½”. The Whisper White cardstock was cut at 4” x 4”. I stamped the outlines first using Basic Black ink and then stamped the flower and leaf images with the other colors of ink. The clear mount stamps make it really easy to get the flower images lined up with the outlines, which is one of the reasons that I will purchase the clear mount stamps from now on. Not to mention I could use the extra storage space! Now, back to the card…I used the Two-Way Glue Pen and some Dazzling Diamonds glitter to add some sparkle to my flowers. The stamped Whisper White image panel is adhered to the Lovely Lilac cardstock cut at 4 ¼” x 4 ¼”. A small strip of Whisper White was punched with the Scallop Trim Border Punch and adhered to the back of the Lovely Lilac cardstock so that just the scallop trim shows.

I then used the ½” Circle Punch to punch a hole in the lower right hand corner for the Extra Large Grommet to go through. The 5/8” Old Olive Grosgrain Ribbon (I just love this ribbon!) was wrapped around the image panel. Thread the two ends of the ribbon through the center of the Extra Large Grommet and then push the grommet through the ½” hole. It will take a little bit of fiddling to get the grommet “spikes” to punch through the ribbon then flatten the “spikes” out to secure the grommet. I bent them over with my fingers and then used a very small craft hammer to flatten them out completely. Tie the ribbon ends into a knot and trim off the ends to clean them up.

Then I stamped “Happy Birthday” from Well Scripted (I can always use more birthday cards) in Lovely Lilac ink on the bottom left corner of the Lavender Lace card base and adhered the image panel. I just love how this card turned out with all the different colors. It’s just very cheerful! Thank you Cathy Rattray for the wonderful inspiration! Come back tomorrow to see the first of the cards from the May Make & Take! My guests liked them and I hope you do too!

Saturday, May 22, 2010

Snowflake Wreath - April Christmas Cards

Splitcoaststampers has a monthly challenge to create 10 Christmas cards per month. That way you have all of your Christmas cards completed long before Christmas. Well…here are my cards for April. Hope you like them!


Stamps: Berry Christmas (retired), Heard from the Heart, Snow Burst (retired)
Cardstock: Kraft, Ivory Naturals, Bravo Burgundy, Very Vanilla
Ink: Old Olive, Certainly Celery, Real Red, Sahara Sand, Versamark
Accessories: Mistletoe Ribbon Originals (retired), Scorpal, Embossing gun, Gold Glory Embossing Power, Embossing Buddy, Stampin Dimensionals

These cards I made for the Christmas Card Challenge on Splitcoaststampers.com. The card base is Kraft cardstock (which after July will be called Crumb Cake) cut at 4 ¼” x 11” and scored at 5 ½”. I used the Scorpal to add two score lines on the card front at 1 ¼” and 2”. The greeting from Heard from the Heart was stamped in Old Olive ink on the bottom portion of the card under the 1 ¼” score line.

I then cut a piece of Ivory Naturals cardstock to 2 1/8” x 5 3/8” and the Big Shot with the Petals A Plenty embossing folder to add some texture. Then I used a brayer with Old Olive ink to ink up the raised images that the embossing folder created. This was adhered to the card front above the 2” score line.

A hobby blade was used to cut the fold in the card between the two score lines and the Mistletoe Ribbon Originals ribbon was inserted through the slot in the fold of the card and tied around the card front in a knot. For the main image panel I cut a piece of Very Vanilla cardstock 2 ¼” x 2 ¼” The small snowflake from Snow Burst was stamped several times in a circular pattern using Certainly Celery ink to form a wreath. The berries from Berry Christmas were stamped randomly around the wreath in Real Red ink. The embossing buddy and Versamark were used to stamp the poinsettia and ribbon from Berry Christmas at the top of the wreath and this was heat embossed using Gold Glory embossing powder.


The edges of this panel were sponged with Sahara Sand ink. The image panel was then adhered to a 2 3/8” x 2 3/8” piece of Bravo Burgundy cardstock and the panels were adhered to the card front using Stampin Dimensionals to pop it up. Of course I had to stamp matching envelopes so I used the same poinsetta and ribbon from Berry Christams and stamped it in Real Red on the bottom left corner of the envelopes. Thats it! What do you think? Come back tomorrow to see a card made with the set Awash With Flowers which will be in the new 2010-2011 Idea Book & Catalog!