Tuesday, December 4, 2012

Craft Project Central!

12 Days of Christmas Tree Countdown:
November Bonus Project
Christmas is just around the corner!  Get the little ones excited with a tree filled with candy and treats!  Watch their excitement as they countdown the 12 Days of Christmas on their way to December 25th!  Why not mix things up and add holiday activities with the treats?  Spending the holidays through the eyes of the kids will bring wonderful memories for everyone to cherish!  This project is also a fun holiday class project!


To get the instructions for Melissa’s project, just subscribe to November and meet one of the bonus project requirements of subscribing to two or months in a row, putting the Craft Project Central badge on your blog, or referring a friend and when they subscribe, letting us know.


Snowflake Gift Box Tutorial

I've finally got the video finished to show you how to make one of these: 


Take a look: 


What do you think? 


Dare to … Give Handmade!

Today I’m going to share with you my project for this week’s Dare to DIY. I’m kind of cheating a little bit. I’m sure some of my family would love to see what I’m making for Christmas, but I can’t share that here until after Christmas. No peeking! But I participated in the Craftaholics Anonymous Handmade Gift Exchange this year. So I’m going to share with you what I made for Jodi, my swap partner.


First is a stack of four stamped and colored stone coasters. I used the Medallion stamp with Timber Brown Stazon ink and some alcohol ink to stamp and color these lovely stones. Then I added some felt on the bottom, so they don’t scratch the table top, and wrapped them up in some tulle. While I was making these I also made a set in bright pink that is in my Etsy shop. 


Next is a candy jar made from a candle stick, mason jar, and some E6000 adhesive. I spray painted the rim of the jar with some turquoise spray paint. Then I added some fabric and batting over the lid. Drilled a hole, and added a glass drawer pull in the top. I glued this inside the jar ring. Then I added a simple white vinyl monogram on the front of the jar and filled it up with some Lindt truffles (some of my favorite chocolate).


Finally, I asked what Jodi’s favorite quote or saying was and she gave me a quote from scripture. So I printed this quote on some Whisper White card stock. I stamped the swirls from Everything Eleanor a couple times onto the card stock in Tempting Turquoise ink and sprayed the card stock with Vanilla Smooch Spritz. I inserted this into an inexpensive frame that I had lying around that I painted with the same turquoise spray paint as the candy jar lid.


I also made her some sparkly green and clear cracked glass earrings. 


So now Jodi can decorate her desk space in turquoise, have a sweet snack, and be inspired!

What do you think?

I’m sharing this at the Dare to DIY party hosted by Decor and the Dog, Maybe Matilda, Newly Woodwards, and Two Twenty One!


Friday, November 30, 2012

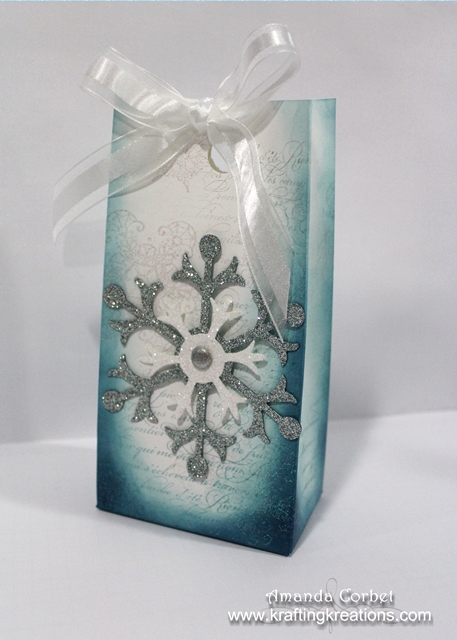
Snowflake Gift Box Tutorial Friday Mashup 88

It’s Friday again! That means it’s time for another Friday Mashup challenge! This time we have a photo inspiration, but first take a look at what I made.


  • Stamps: En Francais, Snowflake Soiree
  • Card Stock: Whisper White
  • Ink: Baja Breeze, Midnight Muse, Versamark
  • Accessories: Snow Flurry Die, Silver Glimmer Paper, Iridescent Ice embossing powder, Heat tool, Embossing Buddy, Stampin’ Sponge, Sponge Dauber, Glimmer Brad, Paper Piercer, Stampin’ Pierce Mat, Stampin’ Dimensionals, 1/2” Circle Punch, Whisper White Organza Ribbon, Sticky Strip, Simply Scored
Photo Source

So here is the "Mashup" Challenge:
  1. Make a project using "the inspiration photo".
  2. Or Make a "Gift project". 
  3. Or "Mash it Up" and create a "project for a gift using the inspiration photo above".


What do you think? I'm working on putting together a video to show you exactly how I made it. Hopefully I will have it done tomorrow for you. 

Update: Take a look at the video HERE


Thursday, November 29, 2012

Christmas Punches

I've been having fun with sketch challenges again! This time it’s the Create Pretty Cards challenge CPC17 at Craft Project Central. When I saw this sketch I knew exactly which set I wanted to use! I've been itching to play with these fabulous mini punches since I got them. Take a look.


  • Stamps: More Merry Messages
  • Card Stock: Crumb Cake, Gumball Green, Very Vanilla, Early Espresso Core’dinations
  • Ink: Early Espresso
  • Accessories: Merry Minis Punch Pack, 1-1/4” Scalloped Circle Punch, Champagne Glimmer Paper, Red Glimmer Paper, Silver Glimmer Paper, Paper Snips, Scallop Edge Border Punch, Stampin’ Dimensionals, Sanding Block, Lacy Brocade Embossing Folder, 3/4” Circle Punch
Here is the CPC17 Sketch:


I started off by cutting a piece of Crumb Cake card stock 5-1/2” x 8-1/2” and scored it at 4-1/4”. Next I took a scrap of Very Vanilla card stock that was about 2” wide and cut it 5-1/2” long. I punched one long edge with the Scallop Edge Border Punch.

Next I cut a piece of Early Espresso Core’Dinations card stock 2-1/4” x 5-1/2”. I ran this through the Big Shot in the Lacy Brocade embossing folder. I used the sanding block to reveal the Crumb Cake inner core which really makes the texture stand out nicely. I adhered the strip of Very Vanilla card stock behind the embossed Early Espresso, then adhered this layer onto the card front. I thought it needed just a little bit more color, so I cut a piece of Gumball Green card stock 1/4” x 5-1/2” and adhered it just below the Early Espresso card stock.


Now for the cute punches! I used the Merry Minis punches on a scrap of Very Vanilla card stock and then punched out the punched shapes with the 1-1/4” Scalloped Circle. Next I used the 3/4” Circle punch once on each of the colors of Glimmer Paper. I adhered the Glimmer paper directly onto the textured card stock. Then I adhered the scalloped circle “windows” on top with half of a dimensional on either side of the opening. That way the little “windows” are raised up above the glimmer circle.


Finally I stamped the greeting onto a scrap of Very Vanilla card stock that was about 3/8” x 4” and used Paper Snips to cut the dove-tail in one end. I adhered this behind the edge of the center scalloped circle.

What do you think? 


Wednesday, November 28, 2012

Christmas Present Card

I have another sketch challenge card for you! This one was created for SCCSC147 on Stampin’ Connection. Take a look!


  • Stamps: Tags Till Christmas
  • DSP: Candlelight Christmas
  • Card Stock: Crumb Cake, Very Vanilla, Real Red
  • Ink: Real Red, Early Espresso
  • Accessories: Real Red Stitched Grosgrain ribbon, Tag Punch, Stampin’ Sponge, Stampin’ Dimensionals, Cherry Cobbler Dazzling Details, 1” Square Punch, craft knife

Here is the sketch that was created by yours truly: 


I started off by cutting a piece of Crumb Cake card stock 4-1/4” x 11” and scored it at 11”. Next I cut a piece of Candlelight Christmas DSP 4” x 5-1/4” and sponged all four sides with Early Espresso ink. I adhered this onto the card front. Then I took a craft knife and cut a small slit in the fold of the card just wide enough for the ribbon to pass through.

I threaded the ribbon through the slit and around the card front. Then, just like you would on a present, I crossed the ribbon ends twisted it to wrap around the card in the other direction, bringing the ribbon ends back to the front, and tied the ribbon into a bow. Now it looks like the whole card is a present!


I stamped the greeting from Tags ‘Till Christmas on a scrap of Very Vanilla card stock in Real Red in and punched it out with the 1” Square Punch. I used my Tag Punch, which I think is the small tag punch that is retired, on a scrap of Real Red card stock. I adhered the greeting square onto the label, then added some Cherry Cobbler Dazzling Details around the edge of the Very Vanilla card stock. After the Dazzling Details dried I adhered the tag onto the card front with a Stampin’ Dimensional positioning it so that it looks like the tag is attached to the ribbon.

Pretty cute I think. Not to mention quick to make! These would make super cute Christmas cards if you had to make a bunch really fast.