Tuesday, November 27, 2012

3D Christmas Tree Place Card

How cute would it be to have one of these lovely little Christmas trees as name place cards at your next holiday party? They are pretty simple to make and oh so cute! This sweet little tree is ** inches tall.
Now here is how you make it!


  • Stamps: Bright Hopes
  • Card Stock: Very Vanilla 
  • DSP: Be of Good Cheer DSP
  • Ink: Garden Green, Real Red
  • Accessories: Real Red Stitched Grosgrain Ribbon, Simply Scored, Sticky Strip, Paper Snips, Multipurpose Liquid Adhesive, Champagne Glimmer Paper, 1-1/4” Scalloped Circle Punch, hot glue gun, wire, Stampin' Sponge, Gold Smooch Spritz

1. Cut one piece of DSP 4” x 12”, one piece 3-1/2” x 12”, and one piece 1-1/2” x 12”.

2. With the 12” side of your DSP at the top of your Simply Scored, score at 1/4” along the entire length of all three pieces of DSP.

3. Place a piece of Sticky Strip on one end of the paper. 


4. Fold the paper up accordion-style.


5. Remove the liner and adhere it onto the other end of the DSP creating an accordion loop of paper.


6. Now this part is just a little tricky. I held my paper loop over the top of a bottle and pinched one end together tightly, applied a little hot glue on top of the point and held the top of the paper together until the glue set. Repeat this for the 3-1/2" tall piece of DSP. Now sponge the ridges of your tree with a Stampin' Sponge and Garden Green ink.


7. For the star I cut two pieces of DSP 2” x 2”. Score at 1” on both sides of the card stock, then score from corner to corner on both corners. Your DSP should be scored like this. (The idea for the star came from Jenni at Pauline's Papier. She has a wonderful video HERE that shows you how to make the star. But here is the cliff-notes version in English).


8. Fold on all score lines. Now cut a slit half-way up the score line in the center of the sides on all four sides.
Now fold the paper up so that it lines up with the center score line of the point. Repeat on the remaining three points.


9. Now with just a tiny drop of Multipurpose Liquid Adhesive glue one flap of the point behind the other flap. This makes the point three dimensional. Repeat on the other three points of the paper.
Repeat to make a second star.

10. Use the 1-1/4” Scalloped Circle punch on a piece of Champagne Glimmer Paper twice. Adhere each glimmer circle behind the DSP star with a little Multipurpose Liquid Adhesive.

11. Cut a length of wire 3" long. It doesn't have to be very thick wire. 26 gauge or so would work just fine. Fold the wire in half. Apply a lot of glue in the center of one of the glimmer circles. Add the wire in the glue, the press on the other star/glimmer scalloped circle. Allow this to dry for about 10 minutes.


12. Take a length of Real Red Stitched Grosgrain Ribbon about 18 inches long. Tie a bow around the wire that sticks out beneath the star. 


13. Now hot glue the end of your 1-1/2" tall accordion loop just like you did for the bottom two layers in step 6 but insert the wire for the star before the glue is set and then hold the top of the paper in place until the glue is set.


14. Now add a large glob of hot glue on the top of the tallest cone. Add the middle cone on top of the largest cone.


13. Add a large glob of hot glue on top of the middle cone. Add the smallest cone on top of the middle cone. This forms your tree.


14. Now stamp your greeting, or print your names onto a piece of Very Vanilla card stock. Cut them into strips and use Paper Snips to cut the left end into a sharp point. Now add just a tiny bit of hot glue onto the backside of the pointed end of the strip and adhere it between two of the "fins" on the top portion of the tree.

15. To add some shimmer spray the tree several times all the way around with Gold Smooch Spritz.


Your cute little Christmas tree is done!



Dare to... Entertain!

This week's challenge I really had to think about, and I struggled coming up with something. I would have done a pretty table-scape setup like some of the other people have, but since I'm currently using a folding table for a dining room table because the big one we have is broken, and really is way too big for the space. (tip: when you're buying furniture, measure your space and take a tape measure to the store with you to measure the potential furniture! At least if you have a somewhat small space like I do.)

So, what to do, what to do... after much thinking and playing around in my craft room with a few ideas I came up with this cute Christmas Tree place card holder. How cute would it be to have one of these at each seat at the table! This glistening Christmas tree is 7 inches tall and so fun to make! 


Come back a little later today to see the tutorial! 

I’m sharing this at the Dare to DIY party hosted by Decor and the Dog, Maybe Matilda, Newly Woodwards, and Two Twenty One!


Monday, November 26, 2012

Blog Candy Winner!!!

Sorry for the delay in drawing a winner for the free subscription of Craft Project Central. Last week was crazy busy with getting ready for Thanksgiving. Thank you everyone for the lovely comments on my Gingerbread House Box and Card. 


The winner of the free November subscription to Craft Project Central is...

"I LOVE this box!! I so want to CASE it and make one for everyone I know.
Thanks"


I have sent you an e-mail Heidi! 

Make sure to stop by tomorrow for a fun tutorial! 


Craft Project Central!

Snowflake Cards and Box: 
Are you looking for a pretty little set of card with a coordinating box to put them in?  Look no further!  This box  and cards set makes a great gift for a special person this holiday season and is a fun class project!


 This fun project comes to you designed by Heidi!


Scentsational Season Gift Bags and Tags: 
Make these Scentsational Season Gift Bags filled with simple yet special treats this holiday season.  These little gift bags are perfect for the people you want to give a little something to this holiday season.  This tutorial is complete with directions on how to make the cute window gift bags as well as directions/recipes for the fun treats to fill these bags.  What fun things fill these bags?  Each gift was designed to coordinate with the bag it goes in; homemade Hot Cocoa mix, Chocolate Gingerbread Cookies, Black and White Peppermint Bark, and Felt Ornaments.  As a bonus, you’ll use the cut out pieces from the window gift bags to make gift tags!


This scentsational project comes to you designed by Carrie!


We Believe Wall Art:
What’s Christmas without a little bit of magic?  With this wall art and decorations, you’ll be able to spruce up your mantle at Christmas, and let the world know you believe!  Believe in the magic of Christmas, the love and friendship, and the joy and hope!


This beautiful holiday project comes to you designed by Tara!

If you would like to subscribe to the November edition of Craft Project central and get 10 fabulous tutorials for just $10 then click HERE


Friday, November 23, 2012

Christmas Doily Friday Mashup 86

It’s Friday Mashup time again! This one was definitely a challenge! Take a look at the card I made.


  • Stamps: Hello Doily, Greetings of the Season
  • DSP: Be of Good Cheer
  • Card Stock: Cherry Cobbler, Very Vanilla, Early Espresso
  • Ink: Crumb Cake, Versamark
  • Accessories: Scallop Circle Die, Merry Minis Punch Pack, Champagne Glimmer Paper, Cherry Cobbler Dazzling Details, Crumb Cake Taffeta Ribbon, Cherry Cobbler Embossing Powder, Stampin’ Sponge, Stampin’ Dimensional, Glue Dots, Gold Smooch Spritz


So here is the "Mashup" Challenge:
  1. Make a holiday project using "Non-Holiday Image(s)".
  2. Or Make a project with a "Messy Technique", such as spritzing, smooching, shimmer painting, or splattering with an aquapainter.
  3. Or "Mash it Up" and create a "Holiday Project from Non-Holiday Stamps and a Messy Technique".

For this card I started by cutting a piece of Cherry Cobbler card stock 5-1/2” x 8-1/2” and scored it at 4-1/4”. I cut a piece of Very Vanilla card stock 4” x 5-1/4” and stamped the image from Hello Doily onto the background in Crumb Cake ink. Next I stamped the greeting from Greetings of the Season onto the Very Vanilla card stock in the upper right hand corner in Versamark ink. I covered the stamped image with Cherry Cobbler embossing powder, tapped off the excess, and heated it with the heat tool.

To make the greeting stand out a little more I sponged around the greeting with Crumb Cake ink. To add some shimmer to the card I sprayed the stamped Very Vanilla card stock with some Gold Smooch Spritz and adhered it onto the card front. I cut a piece of Crumb Cake taffeta ribbon, wrapped it around the card front, and tied it into a knot.


For the tree I cut a piece of Be of Good Cheer DSP 5-1/2” x 5-1/2” and ran it through the Big Shot on the Scallop Circle die. Then I cut the scalloped circle in half on my paper cutter. I folded the DSP back and forth to make the tree shape and adhered each flap in place. I adhered a scrap strip of Early Espresso card stock behind the tree for the trunk then adhered the tree onto the card front with a couple Stampin’ Dimensionals.


I used the star punch from the Merry Minis Punch Pack on a piece of Champagne Glimmer Paper and adhered the sparkly star onto the top of the tree with a Glue Dot. As if the card didn’t have enough sparkle, I added some Cherry Cobbler Dazzling Details onto the scallops of the tree.

I kind of cheated. I used a holiday stamp set for the greeting. But it’s still cute… and sparkly! 


Tuesday, November 20, 2012

Dare to... Be Thankful!

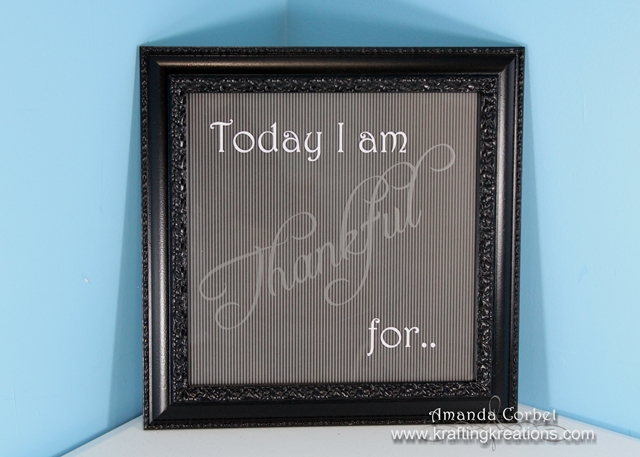
I’m participating in the Dare to DIY link party and this week’s theme is to Be Thankful. I wanted to create a framed message that I will hang over my Kitchen message center (when I get it put together).
After some black spray paint and matte sealer, some Basic Black striped DSP, white vinyl, and etching cream I came up with this beauty.


Here is the frame I started with.


I sprayed the frame with black satin spray paint and some matte sealer spray. This is just what I already had on hand.

Next I went to my computer and cut the font out of white vinyl on my Silhouette. I used the letters for the “Today I am for…” and the negative for the “Thankful”. The negative I applied onto the glass from the frame and used some etching cream to etch the letters in the glass following the instructions on the bottle of etching cream. Then I removed the vinyl. I cleaned the glass and added the white vinyl letters.  Then I simply put the glass and a piece of Basic Black designer paper in the frame. It had to be a dark color to show off the etched letters.
 

Now when I walk by this in my kitchen it will make me think of something I am thankful for each time I see it. Thinking of one way you are thankful each day really shows how blessed you are!


I’m sharing this at the Dare to DIY party hosted by Decor and the Dog, Maybe Matilda, Newly Woodwards, and Two Twenty One!