Saturday, August 11, 2012

Beautiful Butterflies

Good morning! I have some Make and Takes from June to share with you! Today I’ll start off with the first one and will share the rest later in the next several days. June was a month of excitement! The new catalog was just released and there was just so much fun new stuff to choose from. How, oh how could I just narrow it down to five projects? But I did have to choose.  It helped that my bank account wouldn’t allow me to get all the new goodies I wanted at once!


  • Stamps: Papillion Potpourri, Layered Labels
  • Card Stock: Sahara Sand, Midnight Muse, Whisper White, Summer Starfruit
  • DSP: Summer Starfruit
  • Ink: Sahara Sand, Basic Black
  • Accessories: Apothecary Accents Framelits, Delicate Butterfly punch, Stampin’ Dimensionals, Mini Glue Dots

For this card I started off with a 5-1/2” x 8-1/2” piece of Sahara Sand card stock and scored it at 4-1/4”. I cut a strip of Midnight Muse card stock 3/4” x 5-1/2”, a strip of Whisper White 1/4” x 5-1/2”, and a strip of Summer Starfruit DSP 1/2” x 5-1/2”. I adhered the strips onto the left side of the card front one right next to the other.


I stamped the greeting from Layered Labels onto a scrap of Whisper White card stock in Sahara Sand ink and cut it out with the Apothecary Accents Frameilts on the Big Shot. I just love all the new framelits! I used the same framelit again on a scrap of Whisper White card stock. I cut the Whisper White label in half length-wise with Paper Snips and adhered it behind the stamped label to give it a mat. I used the Paper Snips to trim off the little points that stuck out past the rounded ends of the label and adhered the label onto the card front with a couple Stampin’ Dimensionals.


Now for the butterflies! I stamped the butterfly image from Papillion Potpourri in Basic Black ink once onto Sahara Sand, Summer Starfruit, and Midnight Muse card stock. I punched out each of the butterflies with the Delicate Butterfly punch and adhered the butterflies onto the card front with a Mini Glue Dot under each. I really like how it looks like they are floating up the card front!


So what is your favorite new catalog item? Mine is definitely all the framelits that coordinate with stamps!


Friday, August 10, 2012

Black and White Friday Mashup 71

It’s Friday again! Are you ready for another Friday Mashup challenge? Well, first here is the card that I made. I know a couple of people getting married this fall so I figured I would go ahead and make this card for one of them. The simple black and white is such a striking combination.


  • Stamps: Well Scripted (retired)
  • Card Stock: Basic Black, Whisper White
  • DSP: Basic Black
  • Ink: Versamark
  • Accessories: Fun Flowers die, Fancy Fan embossing folder, Lacy Brocade embossing folder, Woodgrain embossing folder, Paper Piercer, Stampin’ Pierce Mat, Antique Brads, White Embossing Powder, Embossing Buddy, Heat Tool, Rhinestones, Sponge Dauber, Frost White Shimmer Paint, Stampin’ Dimensionals


So here is the "Mashup" Challenge:
  1. Make a project using " Black N' White Only ."
  2. Or Make a project with " Some Bling ".
  3. Or "Mash it Up" and create a " Black N' White Project with some Bling! "

I knew right away that with such a simple color combination I wanted to add lots of texture. Stampin’ Up has so many great embossing folders that it was difficult to decide on which ones to use. I wanted to use my Perfect Polka Dots embossing folder, but it is nowhere to be found. I’m sure it’s buried somewhere on my work table. I guess I’ll actually have to take the time to clean up so I can try to find it!

So to start on this card I cut a piece of Whisper White card stock 5-1/2” x 8-1/2” and scored it at 4-1/4”. Next I cut a piece of Basic Black card stock 3-3/4” x 5”. I cut a piece of Basic Black striped DSP 2” x 4-7/8” and adhered it onto the top of the Basic Black card stock. For the bottom I cut another piece of Basic Black card stock , but this time it was 1-7/8” x 4-7/8”. I ran this through the Big Shot in the Fancy Fan embossing folder. Then I used a Sponge Dauber with Frost White Shimmer Paint to color just the raised texture. You really don’t need a lot of paint on your Sponge Dauber to do this. Just a tiny bit goes a long way!  I adhered this onto the Basic Black card stock below the DSP then adhered this panel onto the card front.

It needed something in the middle to separate the black patterns, so I took a scrap strip of Whisper White card stock that was probably 1/4” wide and cut it to 4-7/8” long. I adhered this just above the textured Basic Black card stock.

For the greeting I had to pull out Well Scripted. It has been retired for quite some time now, but I just love how curly the text is! I stamped “congratulations” onto the DSP in Versamark, covered the stamped image with White embossing powder, tapped off the excess, and heated it with the heat tool.


Now for the flower! I took a piece of Whisper White card stock that was 5-1/5” x 8-1/2” and ran it through the Big Shot on my Fun Flowers die. I ran the blossoms through the Big Shot in different embossing folders to add a variety of texture. For the largest I used Lacy Brocade, the middle was Woodgrain, and the smallest was Fancy Fan. You can’t really tell in the picture, but I used the Sponge Dauber and Frost White Shimmer paint again on the texture just to give the textured areas some sparkle.  Then I just used my bone folder to curl the flower petals up to give them some shape.


I layered the flowers together and used my Paper Piercer and Stampin’ Pierce Mat to pierce a hole in the center and added the Antique Brad in the middle. The brad brings the black color into the center of the flower really well. I adhered the flower onto the card front with a few Stampin’ Dimensionals.


The final part of the challenge was to add some bling. Well that’s easy enough for me… I love sparkle!  So I pulled out my rhinestones and added a strip of rhinestones onto the exposed section of the Whisper White card stock strip. Finally, to make the flower match, I added one small rhinestone onto the center of the brad.

I really LOVE how this card turned out! It’s definitely a special one for a special occasion! I think the Fancy Fan is my favorite embossing folder right now. What is your favorite Stampin’ Up embossing folder? 

Thursday, August 9, 2012

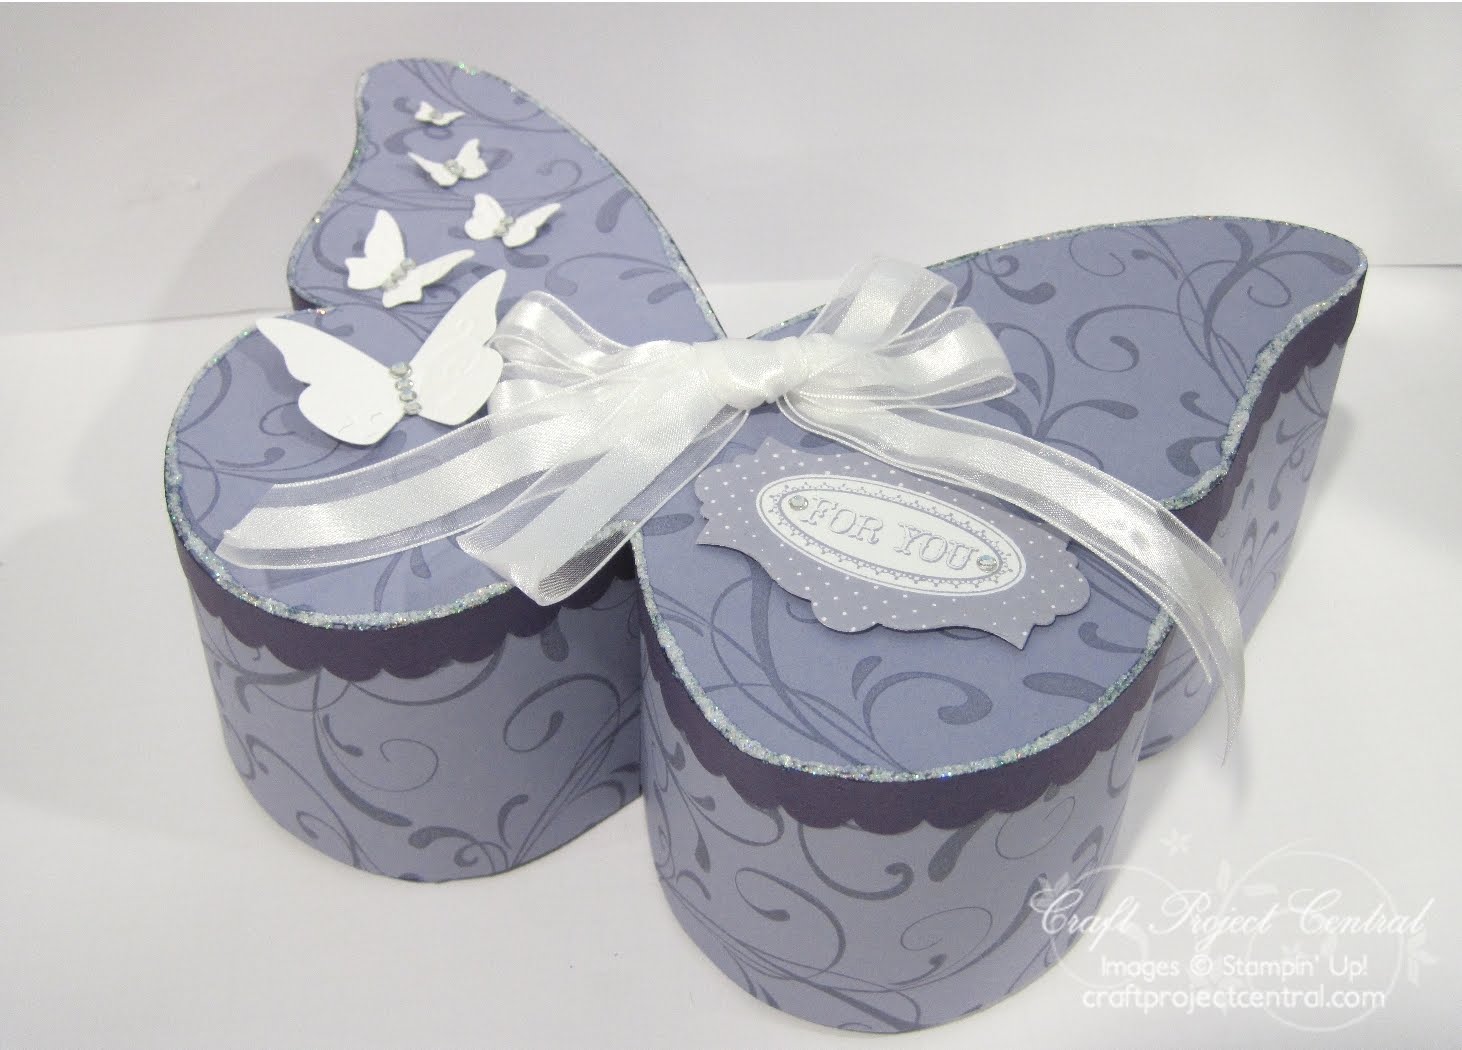
Butterfly Box

I have another Craft Project Central tutorial for you!

Butterfly Box:

Do you love butterflies or know someone who does?  Here is an extra special gift box that would be perfect for an extra special person!  This butterfly shaped box is large enough to fit a nice gift or some yummy candy!  You’ll have fun putting this beautiful box together and have even more fun when you see the delight in the eyes of the recipient!


If you would like to subscribe to the August edition of Craft Project Central and get 10 fabulous tutorials for just $10 then click HERE!

Or you can enter for a chance to win a FREE August subscription to Craft Project Central!
You can get one entry for each of the following. Please leave a comment on this post for each entry!

Leave a comment on this post.
Follow my Krafting Kreations Pinterest board.
Follow Krafting Kreations by e-mail or Blogger.
Follow Krafting Kreations on Facebook.

I will draw the winner next Thursday at noon! Good luck!


Wednesday, August 8, 2012

Sailing Away on Father's Day

Good morning everyone! Here is the other Father’s Day card that I made more than a month ago.


  • Stamps: Sailing Away (retired), Delightful Dozen
  • Card Stock: Sahara Sand, Midnight Muse, Whisper White
  • Ink: Basic Black, Stazon
  • Accessories: Versamarker (retired), Paper Snips, Stampin’ Dimensionals, Chevron embossing folder, Simply Scored, Basic Black Stampin’ Spot


For this super simple and quick Father’s Day card I started off with a 4-1/4” x 11” piece of Sahara Sand card stock. I placed the 11” side at the top of my Simply Scored and scored it at 1-1/8”, 1-1/4”, 1-3/8”, and 5-1/2”. I stamped the greeting from Delightful Dozen on the bottom of the card front below the three score lines in Basic Black ink.

Next I cut a piece of Midnight Muse card stock 4” x 4-1/4” and ran it through the big shot in the Chevron embossing folder. I had a Basic Black stampin’ spot handy so I just ran the tiny ink pad over the raised texture on the card stock. You could achieve the same look by using a brayer or a sponge to apply the ink on the texture. I adhered the chevron card stock onto the card front just above the row of score lines.

I cut a piece of Sahara Sand card stock 2-1/4” x 3-1/4” and stamped the Sail Away image onto the card stock in Black Stazon ink. I used my Versamarker to add some shadow to the waves and sails. I also colored in the outlined letters in the greeting to make them stand out more.

To finish it off I stamped the Sail Away image onto a piece of Whisper White card stock in Black Stazon ink and cut out just the sails with Paper Snips. I adhered the sails over the sails on the Sahara Sand panel with a couple Stampin’ Dimensionals.


I was so sad to see Sail Away retire. It is one of my absolute favorite masculine stamps! What retired stamp do you miss the most?


Tuesday, August 7, 2012

Craft Project Central!


Ladybug Treat Box and Card: 


This project was designed by Monika! If you have a chance please head on over to Craft Project Central and leave Monika a comment on her project! 

If you would like to subscribe to the August edition of Craft Project Central and get 10 fabulous tutorials for just $10.00 then click HERE


Monday, August 6, 2012

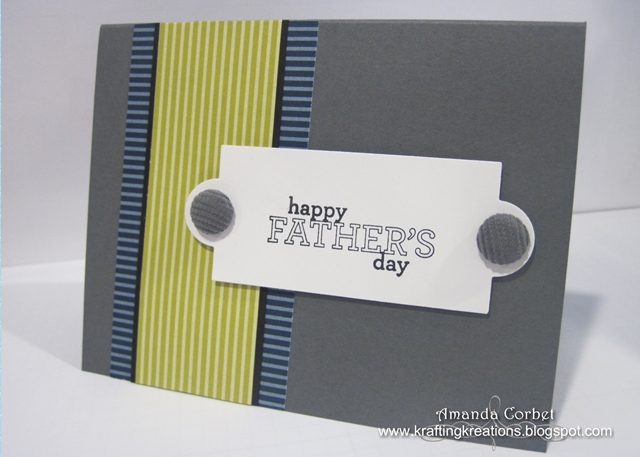
Simple Father's Day

Okay…I know Father’s Day was a long time ago, but I never got around to posting the cards I made. I would have posted them before Father’s Day except I didn’t get them done until the morning of. I sometimes procrastinate…but here is the first one.


  • Stamps: Delightful Dozen
  • Card Stock: Whisper White, Basic Gray, Basic Black
  • DSP: Midnight Muse, Summer Starfruit
  • Ink: Basic Black
  • Accessories: Stampin’ Pierce Mat, Paper Piercer, Stampin’ Dimensionals, Basic Gray Corduroy Brads (retired), Apothecary Accents Framelits


This card was really fast and easy. I started off with a piece of Basic Gray card stock cut at 5-1/2” x 8-1/2” and scored at 4-1/4”. I cut a piece of Summer Starfruit striped DSP 1-1/2” x 4-1/4” and adhered it onto a 1-3/8” x 4-1/4” piece of Basic Black card stock. Then I cut a piece of Midnight Muse striped DSP 2-1/4” x 4-1/4” and adhered it onto the left side of the card front. I adhered the Summer Starfruit and Basic Black layer on top of the Midnight Muse DSP. I love how the stripes go different directions!

Now for the greeting I stamped the image from Delightful Dozen onto a scrap of Whisper White card stock in Basic Black ink. I cut out the greeting with the Apothecary Accents framelit. I used my Stampin’ Pierce Mat and Paper Piercer to pierce a hole in each of the rounded tabs and added a Basic Gray Corduroy brad into each hole. I adhered the greeting panel onto the card front with Stampin’ Dimensionals.


So simple, but so striking I think. What about you? Do you like to procrastinate too? Sometimes I find I work much better under pressure. I don’t know why.