Monday, May 16, 2011

Paisley Petals

Today I have to share with a card that I made for the SCCSC61 sketch challenge. Here is the sketch:

And here is my card:


Stamps: Build A Blossom, Teeny Tiny Wishes
Cardstock: Cherry Cobbler
DSP: Paisley Petals DSP
Ink: Early Espresso, Cherry Cobbler, Baja Breeze
Accessories: Bold Blossom punch, Decorative Label punch, Glimmer brad, Stampin’ Sponge, Two-Way Glue Pen, Needle Tool, Mat Pack

The card base is Cherry Cobbler cardstock cut at 5 ½” x 8 ½” and scored at 4 ¼”. Next I cut various patterns from the wonderful Paisley Petals DSP into the following sizes: 1 ½” x 3 3/8”, 1 ½” x 1 ¾”, 1 3/4” x 2 5/8”, 2 5/8” x 3 3/8”. If you haven’t seen the Paisley Petals DSP there was as special during April where you could buy this DSP pack and the Four Frames stamp set. Although that special is expired you will be able to get these products after July 1st because they will be included in the new catalog! So the special in April was a wonderful sneak peak of what is to come in the new catty. I really LOVE all of the patterns in this DSP pack and you will see many more projects created with it.

Now…back to the card. The 1 ¼” x 1 ¾” piece of DSP was adhered to the card front in the upper left hand corner. The 1 ¼” x 3 3/8” piece of DSP was adhered in the bottom left hand corner of the card front. The 1 ¾” x 2 5/8” piece of DSP was adhered in the upper right hand corner of the card front. Finally the 2 5/8” x 3 3/8” piece of DSP was adhered in the bottom right hand corner of the card front. This card was a bit of a puzzle to figure out the DSP sizes, but I really like the effect.

Next I stamped the greeting from Teeny Tiny wishes in Early Espresso ink on a scrap of Marina Mist cardstock and then punched it out with the Decorative Label punch. The label edges were then sponged with Early Espresso ink. I also punched another decorative label from a scrap of Pear Pizzaz. The Pear Pizzaz label was cut in half length-wise and the points that were in the middle of the short sides were trimmed off. The label halves were then adhered behind the Marina Mist label to create a mat. The label was adhered to the card front.

For the flower I used the Rock-N-Roll technique with Baja Breeze and Cherry Cobbler ink to stamp six of the small flower petals. The petals were punched out with the Bold Blossom punch and adhered together with the Two-Way Glue Pen. The Needle Tool and Mat Pack were then used to pierce a hole into the center of the flower and a red Glimmer Brad was added. The flower was adhered to the card front with a Stampin’ Dimensional.

That’s it! I hope you look forward to seeing more creations made with this DSP because it is absolutely wonderful! If you are a Stampin' Up Demonstrator you can find the sketch challenge thread HERE. If you are not a Demonstrator I would still love to see your creations. Please post a link to your project in the comments section of this post. Have fun stamping!

Saturday, May 14, 2011

Top Note Gift Box Tutorial

Today I'm sharing with you the tutorial for the Top Note Gift Box that I made for my Mom's Mother's Day gift. I hope you like it! Click HERE to see the one I made for her.


For this box you will need: Top Note Die, Big Shot, Beautiful Butterflies Die, Paper Snips, Ribbon, 1 sheet of cardstock (Baja Breeze in this case), Marker coordinating with the DSP color, Two patterns of DSP, Sticky Strip, Large Buttons, cardboard. For the cardboard I just used the cardboard that comes in the package of DSP.

1. Cut two pieces of cardboard 4" x 5" and cut four pieces of DSP 4" x 5".

2. Adhere one piece of DSP to each side of both of the cardboard pieces.

3. Run each cardboard piece through the Big Shot with the Top Note die.

4. Color the edge of each top note with the coordinating marker. This makes the cardboard edge blend in with your DSP.

5. Cut a piece of cardstock 6 1/2" x 8". On the long side score at 2 1/2", 4", and 6 1/2".

6. On the short side score at 1 1/2" and 5". Please disregard the actual score line at 1". That was my mistake. It really does need to be at 1 1/2".

7. Cut on the score lines and remove the pieces as shown.

8. Fold on all of the score lines. Cut two pieces of DSP at 1 1/4" x 3 1/4" and adhere to the longer sides. Cut two pieces of DSP at 1 1/4" x 2 1/4" and adhere to the shorter sides. Cut two pieces of DSP 2 1/4" x 3 1/4" and adhere to the center and to the extended flap. I forgot to add the other largest piece of DSP on the extending flap. You can do it later, but it's easier to add it now.

9. Add sticky strip in the locations shown. Then remove the liner and fold the flaps in one at a time. The seam of your flaps will be on the outside of the box. 

10. Now your box will look like this, except it will have DSP on the top flap already.

11. Now flip your box over and add sticky strip as shown to the bottom and the top of the box.

12. Remove the liner from the sticky strip on the bottom of your box and carefully place it in the center of one of your top note.

13. Remove the liner from the sticky strip on the top of the box and carefully adhere the top note to your box.

14. For the sides cut two pieces of Whisper White 1 1/4" x 3 1/4" and two pieces of DSP 1 1/8" x 3 1/8". Adhere the DSP to the Whipser White and then adhere this to the long sides of the box. Cut two more pieces of Whisper White 1 1/4" x 2 1/4" and two pieces of DSP 1 1/8" x 2 1/8". Adhere the DSP to the Whisper White and then adhere this to the short sides of the box.

15. Add your ribbon around the box and tie it into a bow and trim the ends. I used a little bit of Snail Adhesive to stick the ribbon to the back and sides of the box so it would stay centered and then tied the bow.

16. For the big butterfly you will need: Beautiful Butterflies Die, Big Shot, Stazon ink, Stamp Set (Elements of Style), Markers (Optional, I used Baja Breeze, Marina Mist, Pear Pizzaz, and Old Olive), Basic Pearls Jewel Accents, Frost White Shimmer Paint, Plastic Wrap, Container, Baja Breeze cardstock, Whisper White cardstock, Vellum, Sticky Strip, inks for sponging (I used Crumb Cake and Early Espresso), paper towel.

17. Cut a piece of Baja Breeze cardstock, Whisper White cardstock, and Vellum 3 1/2" x 5". Score each one at 2 1/2". Fold on the score line and stack the folded cardstock together with the vellum in the middle. Place your cardstock onto your Beautiful Butterflies die and run it through the Big Shot. Set aside the colored cardstock and the vellum.

18. Stamp the desired image onto the Whisper White butterfly in Stazon ink and color in as desired.


19. Shake up your Frost White Shimmer Paint and add one drop into the bottom of a container or on a paper plate.

20. Dab your balled up plastic wrap into the shimmer paint to pick up the paint.

21. Dab the paint all over your butterfly.

Now your butterfly will look like this.

22. After the shimmer paint has dried (which only takes a minute or two) sponge the desired color all over the butterfly. Here is used Crumb Cake. After your finished sponging wipe the ink off the shimmer paint with a paper towel.

23. I added some Early Espresso sponging around the edges of the butterfly. Use a small piece of sticky strip in the center of the butterfly to adhere the Vellum to the Baja Breeze butterfly, then use another small piece of sticky strip to adhere your stamped butterfly to the Vellum. Curl the wings of the butterfly by rolling them around a marker or using your bone folder. Add some pearls to the center to create the butterfly body. 

22. Add sticky strip to the back of the butterfly to adhere it to the top of your box.


I also stamped the butterfly from Thanks for Caring in Baja Breeze ink on a scrap of Whisper White cardstock, then stamped the greeting in Basic Black ink and punched out the greeting with the Decorative Label punch. This I adhered to the top of the box with some glue stick.

Here is the finished outside of the box.


And the inside. If you folded your score lines good enough you will have no problem keeping the lid shut. If the lid does not want to stay closed all of the way add some ribbon to a button and adhere the button to the inside of the box lid with some sticky strip. This is just enough weight to keep the lid of the box closed. It also makes it look prettier on the inside.


Mother's Day Gift Box

Today I am going to share with you the gift box I made to hold the jewelry set I made for my Mom for Mother’s Day. Well…here are the photos of the box:


Here is a close-up of the butterfly:


The inside of the box:


Stamps: Elements of Style, Thanks for Caring
Cardstock: Daffodil Delight, Whisper White
DSP: Greenhouse Gala, Pear Pizzaz
Ink: Crumb Cake, Early Espresso, Stazon, Daffodil Delight
Markers: Pear Pizzaz, Daffodil Delight, So Saffron, Peach Parfait, Old Olive
Accessories: Top Note Die, Cardboard, Beautiful Butterflies Die, Vellum, Stampin’ Sponge, Sticky Strip, Frost White Shimmer Paint, 5/8” Daffodil Delight Grosgrain ribbon, Basic Pearls Jewel Accents, Hobby Blade, Decorative Label punch, Glue Dots

Instead of trying to just describe how I created this box I will do a complete tutorial for you. Some portions would be too difficult to describe. So come back soon to see the tutorial on this wonderful little gift box!

Friday, May 13, 2011

Mom's Flower

Today I’m sharing with you the card that I created for my Mom for Mother’s Day. Her favorite color is yellow so I used a lot of Daffodil Delight on this card and the gift box I made (that will be in another post). I also knew I wanted to use the new Triple Layer Blossom Bouquet punch. So here is the card:


Stamps: Messages for Mom
Cardstock: Whisper White, Poppy Parade, Old Olive
DSP: Greenhouse Gala
Ink: Peach Parfait, Poppy Parade
Accessories: Blossom Bouquet Triple Layer punch, Glimmer Brads, Needle Tool, Mat Pack, Stampin’ Dimensionals, Paper Snips, 5/8” Daffodil Delight Grosgrain ribbon

The card base is Whisper White cardstock cut at 5 ½” x 8 ½” and scored at 4 ¼”. Next I cut a piece of Greenhouse Gala DSP at 2 ¾” x 5 ½” and adhered that to a piece of Poppy Parade cardstock cut at 3” x 5 ½”. The Needle Tool and Mat Pack were used to pierce three holes in the upper right hand corner of the panel and three Peach Parfait Glimmer Brads were added. This panel was adhered to the card front.

Another piece of coordinating Greenhouse Gala DSP was cut at 2 ¼” x 4 ¼” and adhered to a piece of Old Olive cardstock that was cut at 2 ½” x 4 ¼”. A piece of 5/8” Daffodil Delight Grosgrain ribbon was tied around the bottom of this panel and into a knot. After the ribbon ends were trimmed the panel was adhered to the card front.

Next a piece of Whisper White cardstock was cut at 1 7/8” x 3 3/8” and adhered to a piece of Poppy Parade cardstock that was cut at 2” x 3 ½”. For the greeting I inked up the MOM stamp from Messages from Mom in Peach Parfait ink and the touched just the bottom edge into the Poppy Parade ink pad to give the image a gradient effect and stamped the image onto a scrap of Whisper White cardstock. This is the same as the Rock-N-Roll technique but I only did one side. The two M’s were cut out with Paper Snips. I didn’t need the O so that went into my scrap bin.

Now for the really fun part…I used the Blossom Bouquet Triple Layer Punch and punched Layer 1 (least detailed layer) from Daffodil Delight cardstock. Layer 2 (middle layer) was punched from Peach Parfait cardstock. Layer 3 (most detailed layer) was punched from a scrap of Shimmery White cardstock.

Now that I have all my wonderful punched pieces I adhered the Shimmery White layer on top of the Peach Parfait layer with the Two-Way Glue Pen. Then I used the Needle Tool and Mat Pack to pierce a hole in the center of the blossom and added an Old Olive Glimmer Brad. I used a Stampin’ Dimensional to adhere the Whisper White/Peach Parfait layer of the flower to the Daffodil Delight flower.

The flower was adhered into the center of the Whisper White/Poppy Parade panel with a Stampin’ Dimensional. The M’s were adhered next to the flower with Stampin’ Dimensionals. The MOM panel was adhered to the card front with more Stampin’ Dimensionals. I would not suggest mailing a card that is this bulky because it could get damaged. I hand delivered this card so I made it as wonderfully dimensioned as possible!

My Mom loved the card! I hope everyone had a wonderful Mother’s Day! Come back tomorrow to see the gift box I made for her. Have fun stamping!

Tuesday, May 3, 2011

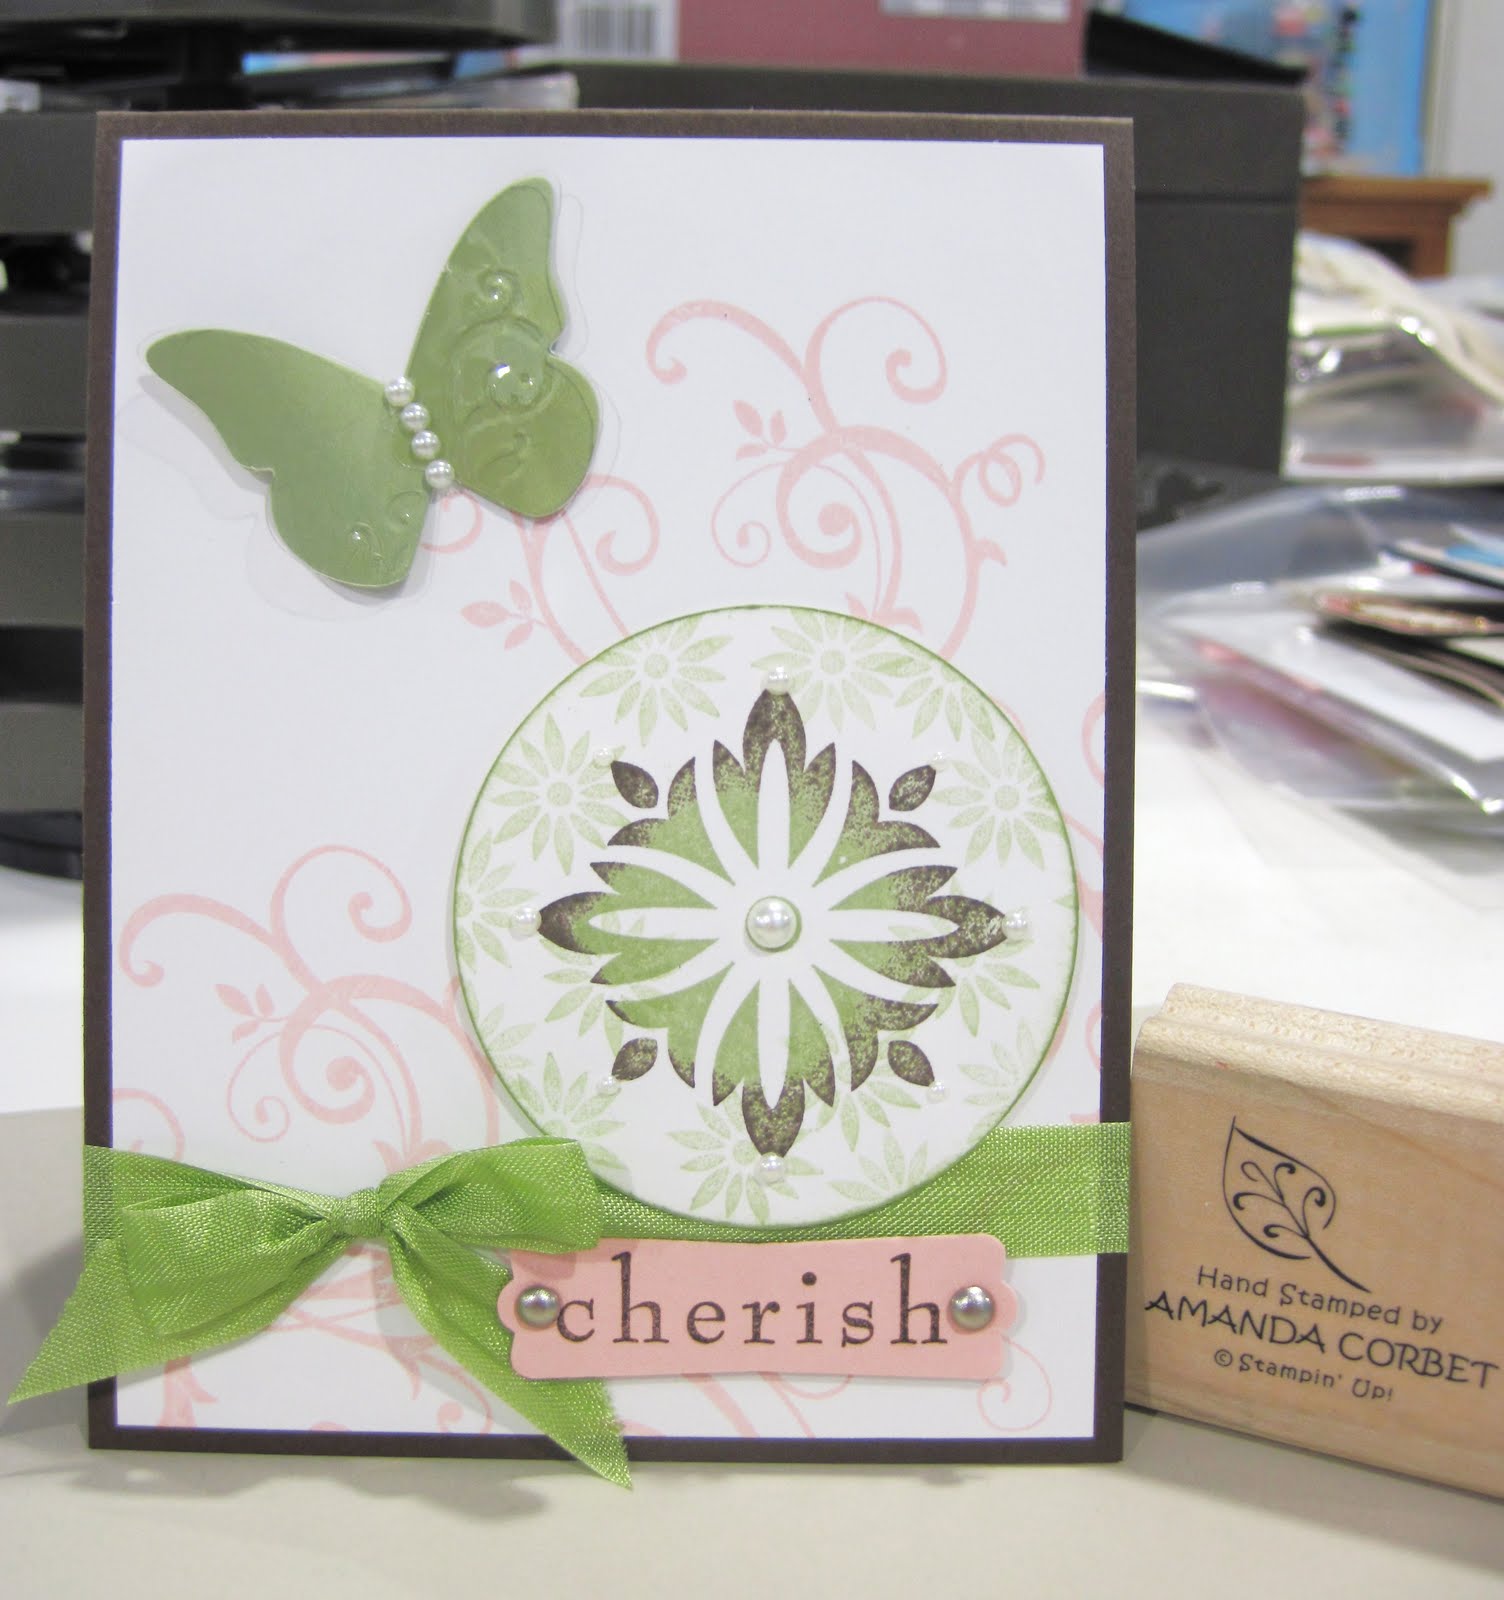
Cherish

I had so much fun creating the first card for this sketch that I decided to make a second one. I noticed lately that almost every card I make I seem to reach for some form of blue. Well…blue is my favorite color. But I have decided to make an effort to reach out of my comfort zone some more and not use a bit of blue on this next card. You can find the sketch that inspired this card in THIS post.


Stamps: Baroque Motifs
Cardstock: Early Espresso, Whisper White, Blushing Bride, Pear Pizzaz
Ink: Blushing Bride, Pear Pizzaz, Early Espresso
Accessories: Beautiful Wings Sizzlit, Silver Brads, Acetate, Pear Pizzaz Seam Binding ribbon, Basic Pearls Jewel Accents, 2 ½” Circle punch, Modern Label punch, Glue Dots

The card base is Early Espresso cardstock cut at 4 ¼” x 11” and scored at 5 ½”. Next a piece of Whisper White was cut at 4” x 5 ¼”. The swirls from Baroque Motifs were stamped twice onto the Whisper White cardstock in Blushing Bride ink and then this stamped cardstock was adhered to the card front. A piece of Pear Pizzaz Seam Binding ribbon was tied around the card front and into a bow.
The 2 ½” Circle punch was used to punch a circle from a scrap of Whisper White cardstock. The small flower was stamped all over the background of the circle by stamping off onto a scrap piece of paper before stamping onto my circle. Next I inked up the square image from Baroque Motifs first in Pear Pizzaz ink and then used the Rock-N-Roll technique with some Early Espresso ink and stamped it into the center of the circle. The edges of the circle were sponged with Early Espresso ink to make it stand out more on the card front. Pearls were added to decorate the square stamped image on all of the points (you can’t really see them well in the photo).The stamped circle was adhered to the card front with Stampin’ Dimensionals.
Next the greeting was stamped in Early Espresso ink on a scrap of Blushing Bride cardstock. The greeting was punched out with the Modern Label punch and the Needle tool and Mat pack were used to pierce holes for the brads. Two silver brads were added and the label was adhered to the card front with Stampin’ Dimensionals.
The next step was to cut out two butterflies using the Beautiful Wings Sizzlit in the Big Shot. One butterfly was cut from Pear Pizzaz cardstock and the second was cut from Acetate. I used a glue dot to adhere the acetate to the Pear Pizzaz butterfly then added four pearls for the butterfly’s body. The butterfly was adhered to the card front with a couple glue dots.

Even though this isn’t the most current sketch there is no time limit on the sketch challenges. Feel free to participate whenever you get a chance! If you are a Stampin’ Up Demonstrator you can find the SCCSC63 sketch challenge thread HERE. If you are not a Stampin’ Up Demonstrator I would still love to see your creation. Please post a link to your project in the comments section of this post! Have fun stamping!

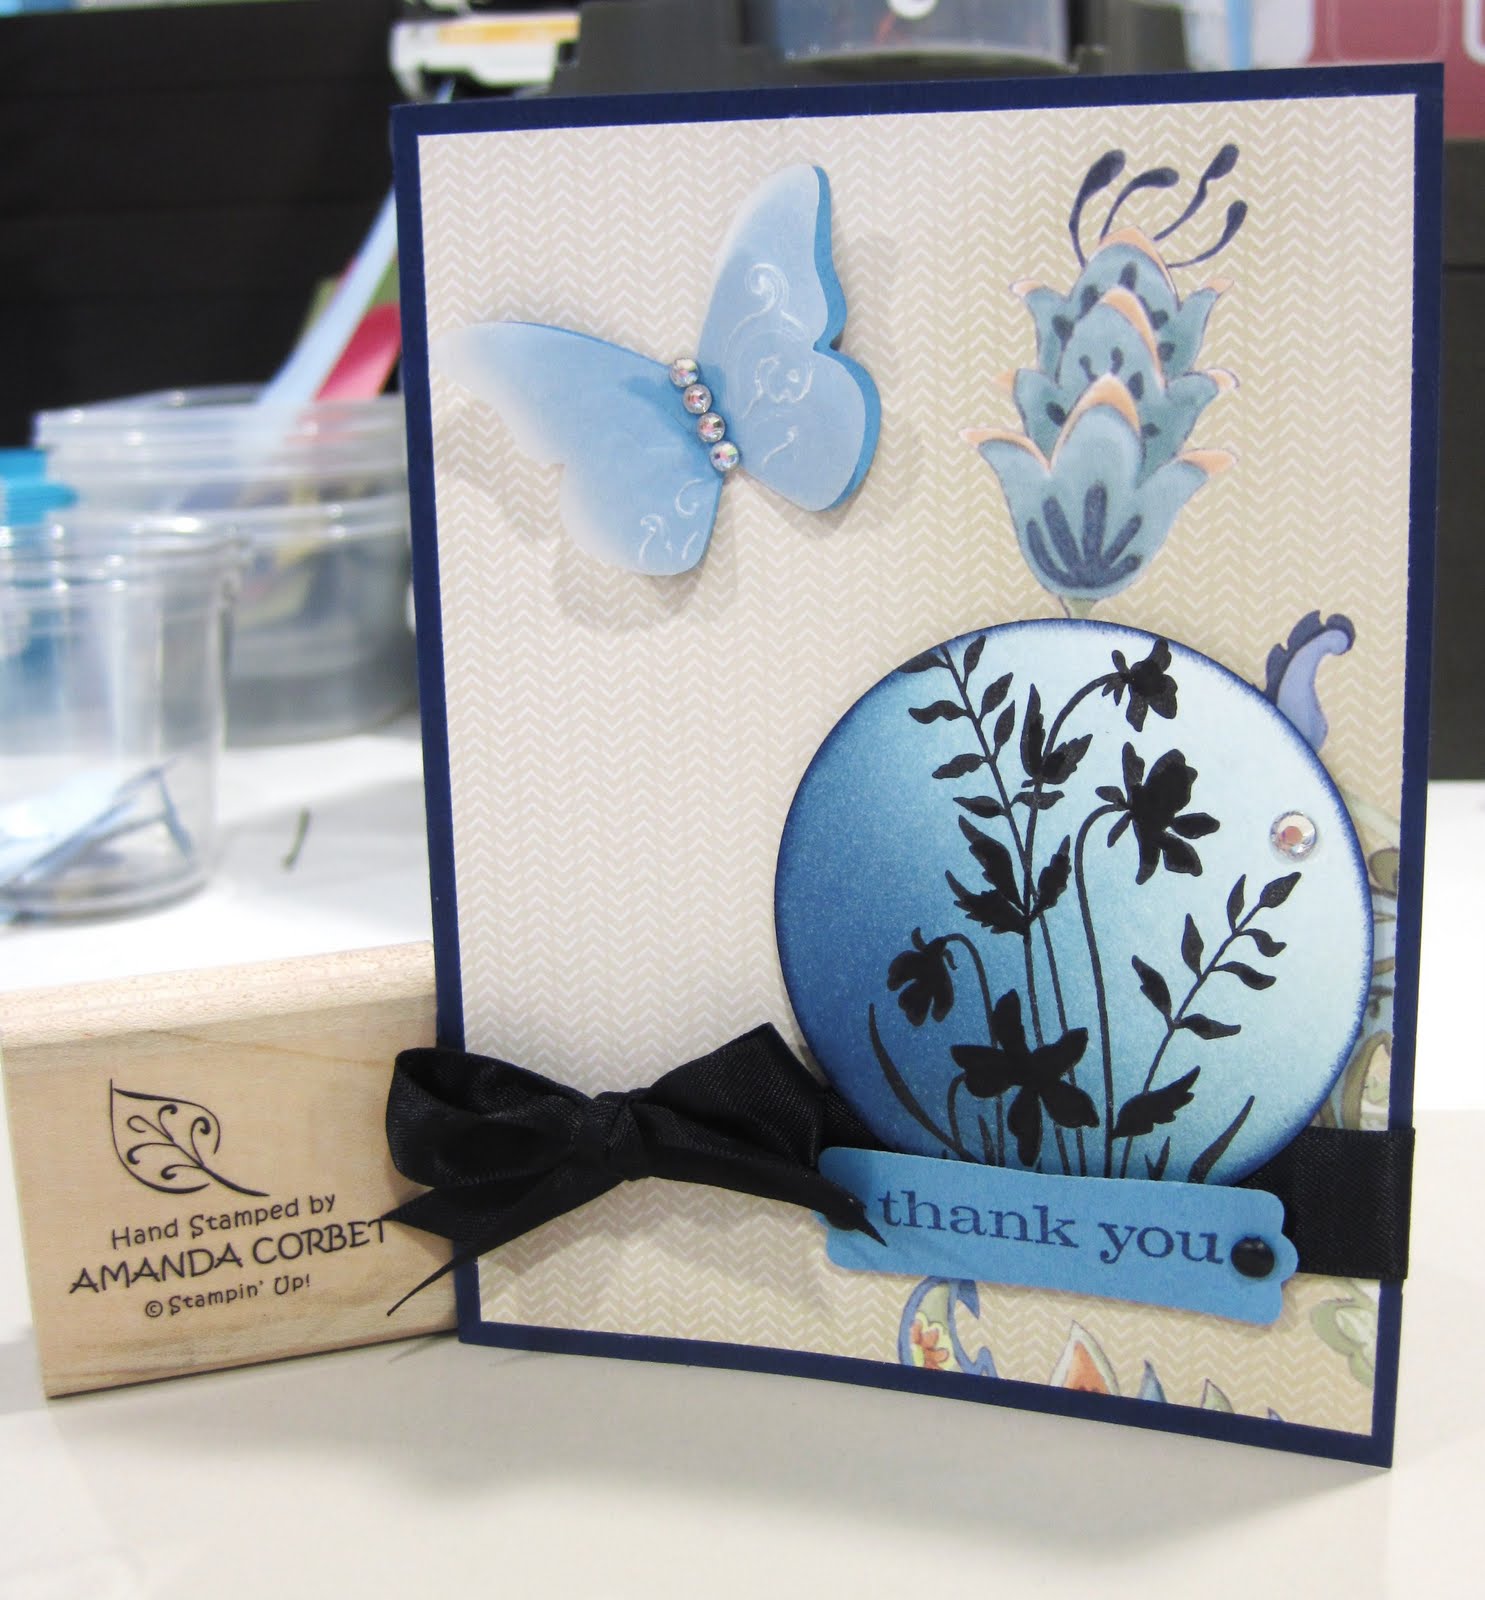
Just Believe Thank You

I’m still working on catching up on all my posts. Here is the sketch challenge from Stampin Connection SCCSC63 from two weeks ago. This fabulous sketch was created by Liz Goldhawk. Here is the sketch:


And here is my card:


Stamps: Just Believe
Cardstock: Night of Navy, Whisper White scrap, Marina Mist scrap
DSP: Paisley Petals DSP
Ink: Marina Mist, Night of Navy, Basic Black
Accessories: Black Brads, Dimensionals, Glue Dots, Vellum, Beautiful Wings Sizzlit, Brayer, Needle Tool, Mat Pack, Basic Rhinestones Jewel Accents, 2 ½” Circle Punch, Modern Label Punch, Hobby Blade, 5/8” Basic Black Satin ribbon, Tombow Multi-purpose Adhesive

The card base is Night of Navy cardstock cut at 5 ½” x 8 ½” and scored at 4 ¼”. A piece of Paisley Petals DSP was cut at 4” x 5 ¼” so that the flowers were extending towards the top of the rectangle. This was adhered to the card front. I used the Hobby Blade to cut a slit in the fold of the card and threaded my ribbon through the hole and tied it into a bow around the card front.

Next I used the 2 ½” Circle Punch on a scrap of Whisper White cardstock. I placed the Whisper White circle onto my work surface with copy paper beneath it and brayered first Marina Mist ink and then Night of Navy ink onto the circle to get the gradient color. The image from Just Believe was stamped in Basic Black ink and the edges of the circle were sponged with Night of Navy ink all the way around. A single rhinestone was added and the circle was adhered to the card front with Stampin’ Dimensionals.

The greeting was stamped in Night of Navy ink onto a scrap of Marina Mist cardstock and punched out with the Modern Label punch. The Needle Tool and Mat Pack were used to pierce a hole in each end of the punched label and a Black Brad was added in each hole. After the brads were fastened the label was then adhered to the card front with Stampin’ Dimensionals.

Now for the pretty little butterfly…I used the Beautiful Wings Sizzlit in the Big Shot with both Marina Mist cardstock and Vellum. Next I adhered the Vellum butterfly to the Marina Mist butterfly with Tombow Multi-purpose Adhesive. I tried to keep the adhesive right in the center of the butterfly because you can see where the vellum was glued down. I added four rhinestones for the butterfly’s body and then adhered the butterfly to the card front with a couple Mini Glue dots.

That’s all there is to it! Even though this isn’t the most current sketch there is no time limit on the sketch challenges. Feel free to participate whenever you get a chance! If you are a Stampin’ Up Demonstrator you can find the SCCSC63 sketch challenge thread HERE. If you are not a Stampin’ Up Demonstrator I would still love to see your creation. Please post a link to your project in the comments section of this post! Have fun stamping!