
I’m still working on catching up on all my posts. Here is the sketch challenge from Stampin Connection SCCSC63 from two weeks ago. This fabulous sketch was created by Liz Goldhawk. Here is the sketch:


Stamps: Just Believe
Cardstock: Night of Navy, Whisper White scrap, Marina Mist scrap
DSP: Paisley Petals DSP
Ink: Marina Mist, Night of Navy, Basic Black
Accessories: Black Brads, Dimensionals, Glue Dots, Vellum, Beautiful Wings Sizzlit, Brayer, Needle Tool, Mat Pack, Basic Rhinestones Jewel Accents, 2 ½” Circle Punch, Modern Label Punch, Hobby Blade, 5/8” Basic Black Satin ribbon, Tombow Multi-purpose Adhesive
The card base is Night of Navy cardstock cut at 5 ½” x 8 ½” and scored at 4 ¼”. A piece of Paisley Petals DSP was cut at 4” x 5 ¼” so that the flowers were extending towards the top of the rectangle. This was adhered to the card front. I used the Hobby Blade to cut a slit in the fold of the card and threaded my ribbon through the hole and tied it into a bow around the card front.
Next I used the 2 ½” Circle Punch on a scrap of Whisper White cardstock. I placed the Whisper White circle onto my work surface with copy paper beneath it and brayered first Marina Mist ink and then Night of Navy ink onto the circle to get the gradient color. The image from Just Believe was stamped in Basic Black ink and the edges of the circle were sponged with Night of Navy ink all the way around. A single rhinestone was added and the circle was adhered to the card front with Stampin’ Dimensionals.
The greeting was stamped in Night of Navy ink onto a scrap of Marina Mist cardstock and punched out with the Modern Label punch. The Needle Tool and Mat Pack were used to pierce a hole in each end of the punched label and a Black Brad was added in each hole. After the brads were fastened the label was then adhered to the card front with Stampin’ Dimensionals.
Now for the pretty little butterfly…I used the Beautiful Wings Sizzlit in the Big Shot with both Marina Mist cardstock and Vellum. Next I adhered the Vellum butterfly to the Marina Mist butterfly with Tombow Multi-purpose Adhesive. I tried to keep the adhesive right in the center of the butterfly because you can see where the vellum was glued down. I added four rhinestones for the butterfly’s body and then adhered the butterfly to the card front with a couple Mini Glue dots.
That’s all there is to it! Even though this isn’t the most current sketch there is no time limit on the sketch challenges. Feel free to participate whenever you get a chance! If you are a Stampin’ Up Demonstrator you can find the SCCSC63 sketch challenge thread HERE. If you are not a Stampin’ Up Demonstrator I would still love to see your creation. Please post a link to your project in the comments section of this post! Have fun stamping!

And here is my card:
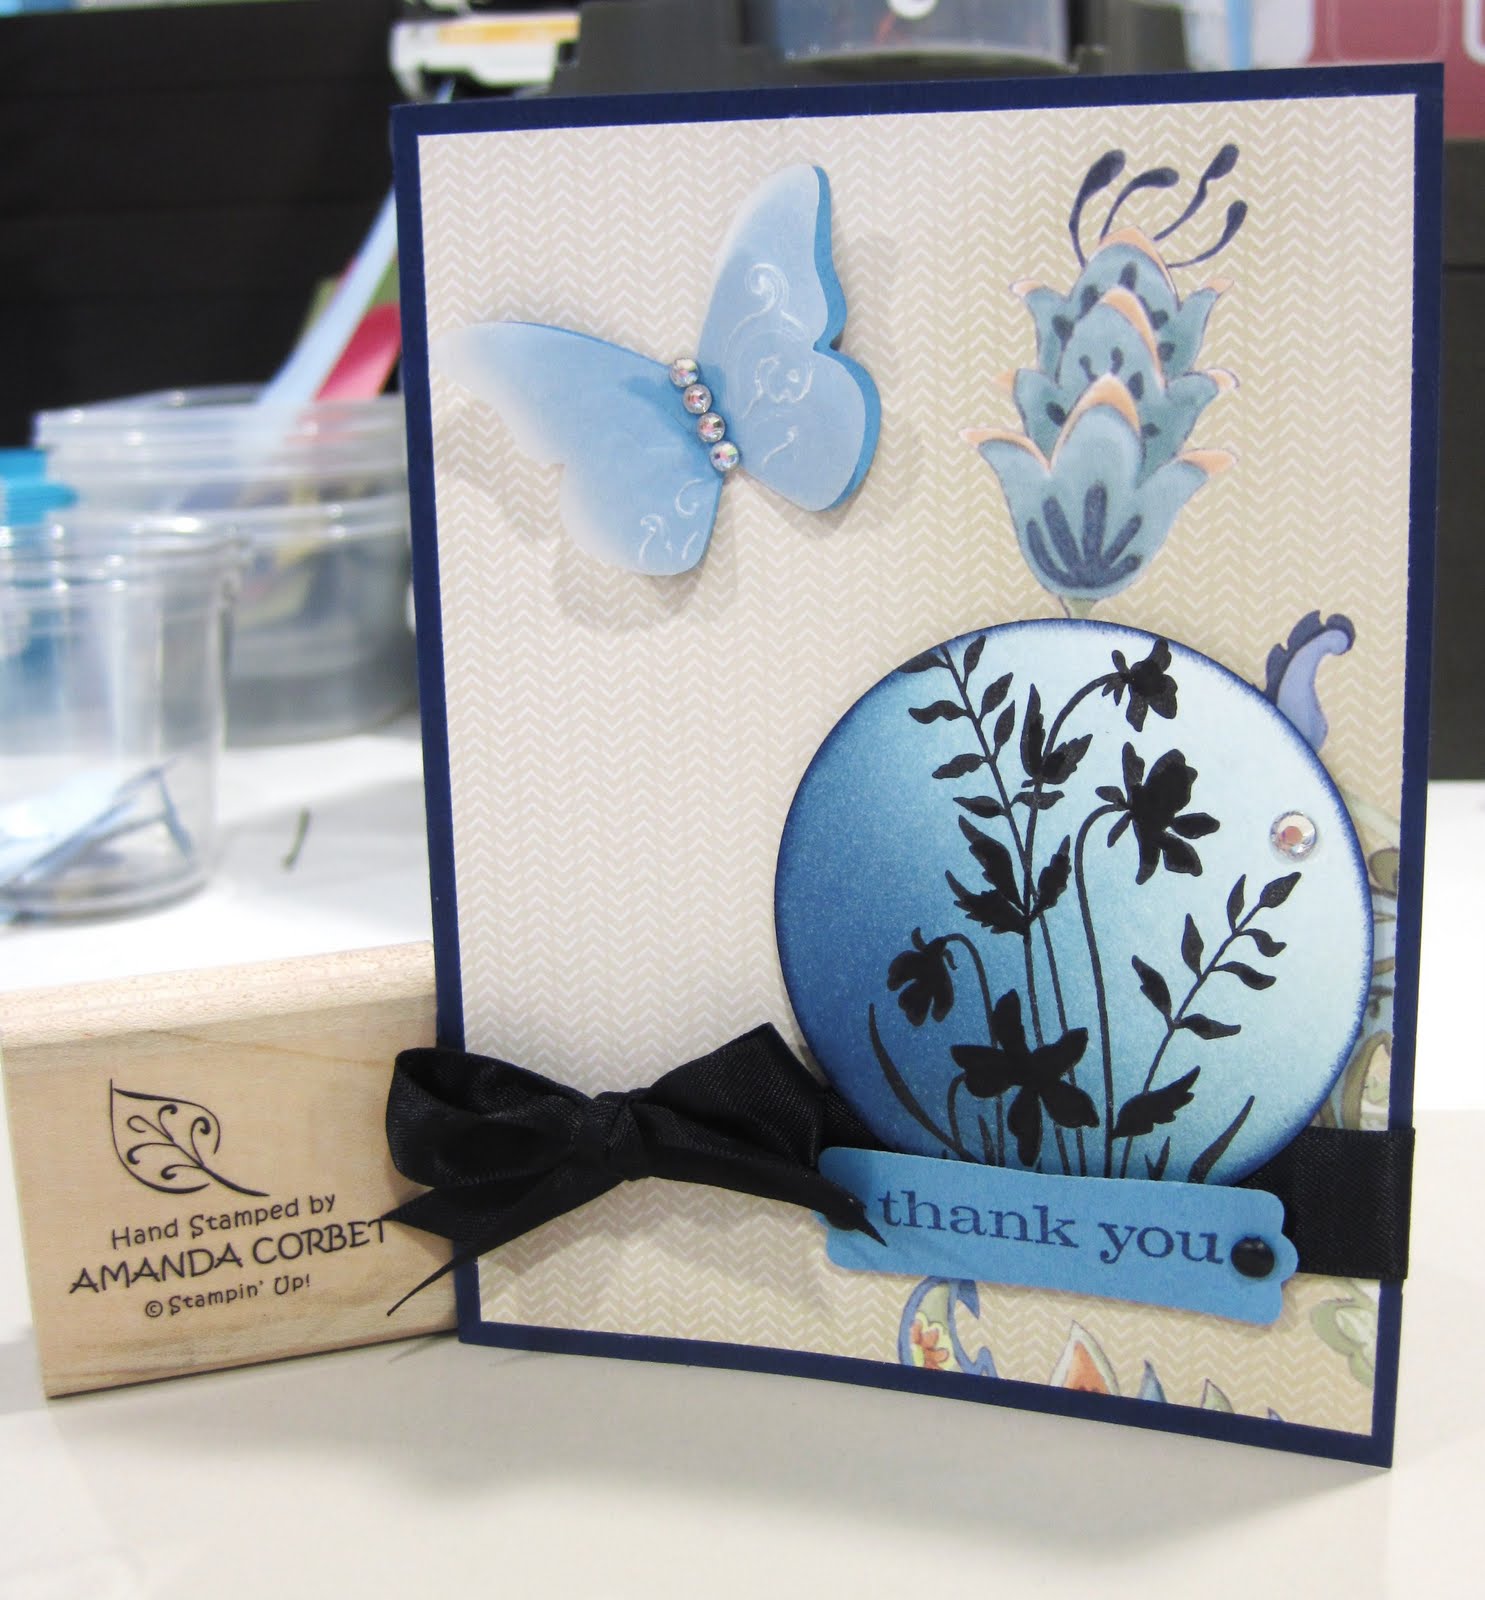
Stamps: Just Believe
Cardstock: Night of Navy, Whisper White scrap, Marina Mist scrap
DSP: Paisley Petals DSP
Ink: Marina Mist, Night of Navy, Basic Black
Accessories: Black Brads, Dimensionals, Glue Dots, Vellum, Beautiful Wings Sizzlit, Brayer, Needle Tool, Mat Pack, Basic Rhinestones Jewel Accents, 2 ½” Circle Punch, Modern Label Punch, Hobby Blade, 5/8” Basic Black Satin ribbon, Tombow Multi-purpose Adhesive
The card base is Night of Navy cardstock cut at 5 ½” x 8 ½” and scored at 4 ¼”. A piece of Paisley Petals DSP was cut at 4” x 5 ¼” so that the flowers were extending towards the top of the rectangle. This was adhered to the card front. I used the Hobby Blade to cut a slit in the fold of the card and threaded my ribbon through the hole and tied it into a bow around the card front.
Next I used the 2 ½” Circle Punch on a scrap of Whisper White cardstock. I placed the Whisper White circle onto my work surface with copy paper beneath it and brayered first Marina Mist ink and then Night of Navy ink onto the circle to get the gradient color. The image from Just Believe was stamped in Basic Black ink and the edges of the circle were sponged with Night of Navy ink all the way around. A single rhinestone was added and the circle was adhered to the card front with Stampin’ Dimensionals.
The greeting was stamped in Night of Navy ink onto a scrap of Marina Mist cardstock and punched out with the Modern Label punch. The Needle Tool and Mat Pack were used to pierce a hole in each end of the punched label and a Black Brad was added in each hole. After the brads were fastened the label was then adhered to the card front with Stampin’ Dimensionals.
Now for the pretty little butterfly…I used the Beautiful Wings Sizzlit in the Big Shot with both Marina Mist cardstock and Vellum. Next I adhered the Vellum butterfly to the Marina Mist butterfly with Tombow Multi-purpose Adhesive. I tried to keep the adhesive right in the center of the butterfly because you can see where the vellum was glued down. I added four rhinestones for the butterfly’s body and then adhered the butterfly to the card front with a couple Mini Glue dots.
That’s all there is to it! Even though this isn’t the most current sketch there is no time limit on the sketch challenges. Feel free to participate whenever you get a chance! If you are a Stampin’ Up Demonstrator you can find the SCCSC63 sketch challenge thread HERE. If you are not a Stampin’ Up Demonstrator I would still love to see your creation. Please post a link to your project in the comments section of this post! Have fun stamping!