Wednesday, June 30, 2010

Trendy Trees Card - June Make and Take 3

I try to do at least one more masculine card per make and take, because masculine cards are always harder to create for me. So here is the masculine card for June. This card was inspired by a card posted by Susan Kirk on Stampin’ Connection.


Stamps: Trendy Trees
Cardstock: Old Olive, Whisper White, Pumpkin Pie, Chocolate Chip
Ink: Old Olive, Pumpkin Pie, Chocolate Chip, Always Artichoke
Accessories: 5/8” Chocolate Chip Satin ribbon, 5/8” Old Olive Grosgrain ribbon, Perfect Polka Dots Texture Impressions die

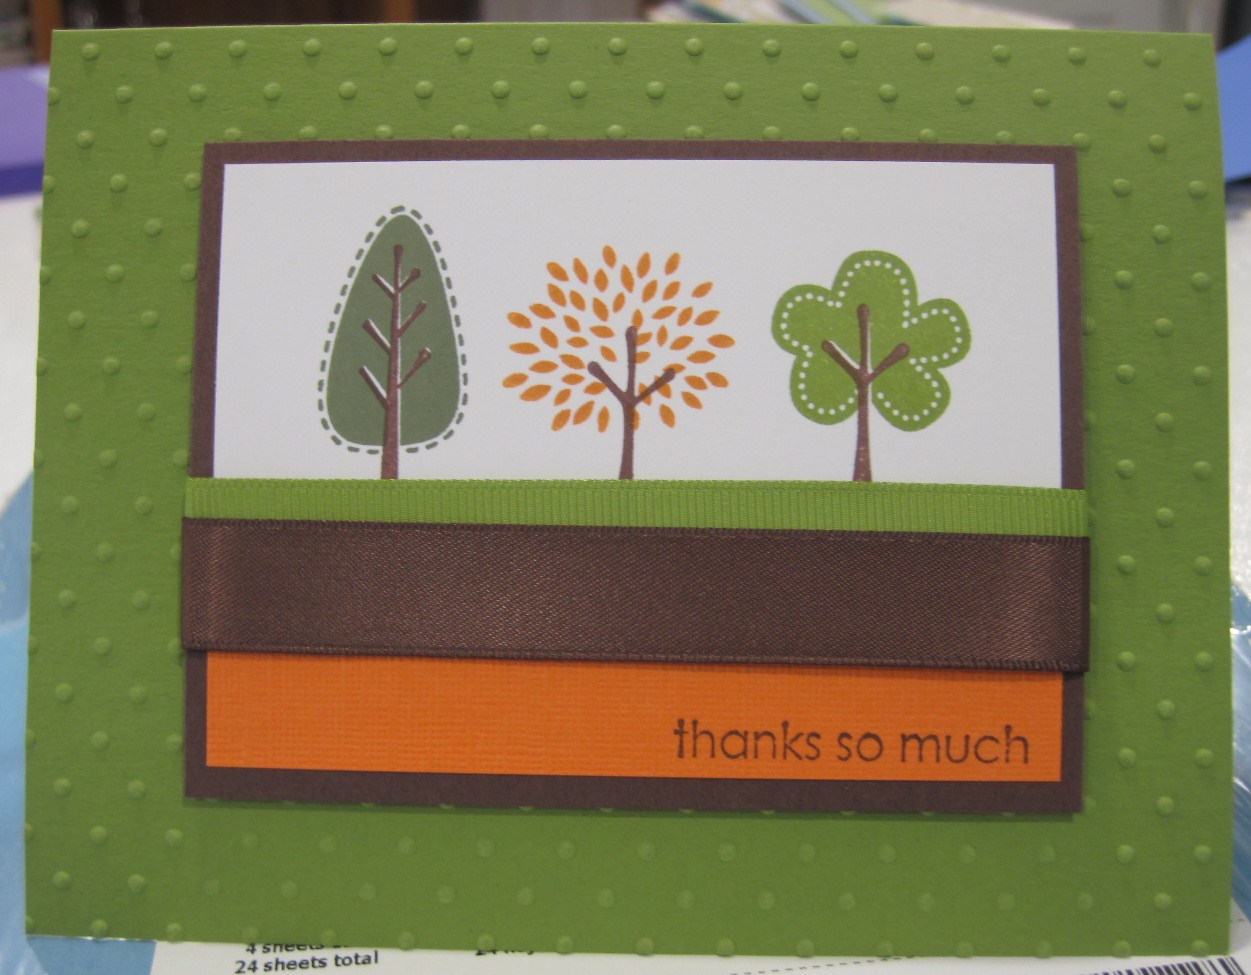
The card base is Old Olive cardstock cut at 5 ½” x 8 ½” and scored at 4 ¼”. The front of the card was run through the Big Shot with the Perfect Polka Dots Texture Impressions die. I really love all of the different Texture Impressions dies because it really adds wonderful pattern and texture. There are so many beautiful techniques that can be done using them as well. But for now let’s get back to the card.

The tree Tops from Trendy Trees were stamped on a 2” x 3 ¾” piece of Whisper White cardstock in Always Artichoke, Old Olive, and Pumpkin Pie. The tree trunks were stamped in Chocolate Chip. The sentiment was stamped in Chocolate Chip ink on a 1” x 3 ¾” piece of textured Pumpkin Pie cardstock. These two pieces were adhered to a 3” x 4” piece of Chocolate Chip cardstock.

A piece of 5/8” Chocolate Chip Satin ribbon and a piece of 5/8” Old Olive Grosgrain ribbon finish off the image panel which is then adhered to the card using Stampin Dimensionals. That’s it! I hope you enjoyed seeing this relatively simple masculine card.

Come back tomorrow to see a Very Vanilla card using the set Watercolor Trio!

Tuesday, June 29, 2010

Fiery Butterfly Card - June Make and Take 2

This is the second project that my guests made at the June Make and Take. This project features the Presto Patterns designer series paper. This paper is absolutely wonderful! It has a clear raised heat embossed like images on white paper that allow you to stamp or add ink to color it in any way you want. Its super easy and makes an absolutely gorgeous additions to any card or project!!!


Stamps: All A Flutter, Elements of Style
Cardstock: Basic Black, Kraft, Real Red, Very Vanilla
Paper: Presto Patterns DSP
Ink: So Saffron, Pumpkin Pie, Rose Red, Black Stazon
Accessories: Square Lattice Texture impressions die, Brayer, Markers: So Saffron, Pumpkin Pie, Rose Red

The card base is 5 ½” x 8 ½” Basic Black cardstock scored at 4 ¼”. The front of the card was run through the Big Shot with the Square Lattice Texture impressions die. A piece of Presto Patterns designer series paper was cut at 3 ¼” x 4 ¼”. This was brayered completely with So Saffron ink, then sponged in various areas with Pumpkin Pie and Rose Red ink. A tissue is used to wipe the extra ink off the raised images on the paper. This is layered on a piece of Real Red cardstock cut at 3 5/16” x 4 ¼” which is then layered on a piece of Kraft cardstock cut at 3 ½” x 4 ¼”. This is adhered to the center of the card front.
The image panel is a 1 ½” x 2 1/8” piece of Very Vanilla cardstock. The butterfly from All a Flutter is stamped in Black Stazon. So Saffron, Pumpkin Pie, and Rose Red markers are used to color in the butterfly.

Tip: If you color the whole image first with So Saffron, then add Pumpkin Pie and Rose Red to the edges of the wings, then go over the entire thing again with the So Saffron marker. This will blend the colors a little bit more without contaminating the marker because the previous layers of color have already dried.

This panel is layered on a 1 5/8” x 2 ¼” piece of Real Red cardstock and then a 1 ¾” x 2 5/16” piece of Kraft cardstock. This is adhered to the center of the card front.

Stamp the sentiment from Elements of Style in Black Stazon on the bottom of the DSP. The reason you have to use Stazon for this part is because the pattern on the paper resists the ink from the classic ink pads. So to get an image to “stick” on the pattern you have to use an alcohol ink like Stazon. Alcohol inks are great for stamping on non-porous materials because the image is permanent. You could compare it to writing with a regular marker or pen to writing with a permanent marker. It’s a great ink to have in your stash for those projects using non-porous stamping surfaces. Anyway… now your card is done! So enjoy!

Come back tomorrow to see a masculine card using Trendy Trees!

Monday, June 28, 2010

Perfect Pillow Box - June Make and Take 1


Stamps: Upsy Daisy, Baroque Motifs
Cardstock: Apricot Appeal
Ink: Melon Mambo, Apricot Appeal
Accessories: Sticky strip, Pillow Box Die, ¼” Pretty In Pink grosgrain ribbon

This cute little box was made by cutting a piece of Apricot Appeal cardstock 5” x 5 ½” (or large enough to cover the blades on the die). This was run through the Big Shot with the Pillow Box die. This is such a quick and easy way to make party favors or a small gift box because the die cuts the shape and scores all the lines for you at once!

After the box is cut out I stamped the swirls from Baroque Motifs in Apricot Appeal ink. Then the daisies from Upsy Daisy were used with Melon Mambo ink on top of the Apricot Appeal swirls.
The side of the box and one end are adhered with sticky strip. This is a super strong double-sided tape that is perfect for making boxes or other three dimensional projects. Fold the other end over and tie a piece of ¼” Pretty In Pink grosgrain around the box to keep the other end closed. You want someone to be able to open the box without destroying it after all. That’s it! It really is that easy!

Come back tomorrow to see the Fiery Butterfly Card that my guests made this month!

Sunday, June 27, 2010

Sahara Sand Friends Floral

This card I actually started making for the All About Color Swap for the Earth Elements color family. I had the layout planned, all the pieces cut, the hand-made DSP pieces done, the flowers stamped, water colored, and cut out…then I realized that I was using the wrong color. You can image how upset I was. I needed to use Not Quite Navy for the swap, but I had used Night of Navy. So now I have 11 gorgeous cards sitting around with nowhere to go. But I do really like how they turned out. That’s just my luck though. Anyway…here are the cards I made by mistake.


Stamps: Friends 24-7, Heard From The Heart, Fifth Avenue Floral
Cardstock: Whisper White, Night of Navy, Sahara Sand
Paper: Night of Navy DSP (Designer Series Paper Patterns Pack III)
Ink: Sahara Sand, Night of Navy, Black Stazon
Accessories: Scallop Border Punch, Antique Brass Build-A-Brads, Stamp-A-Ma-Jig, ½” Circle punch, Night of Navy watercolor crayon, Night of Navy marker, Crystal Effects, Dazzling Diamonds Glitter, Whisper White Organza ribbon.

The Whisper White card base was cut at 4 ¼” x 11” and scored at 5 ½”. I then added decorative score lines ¼” and 3/8” from the top of the card and 1 ¼” from the bottom of the card. The sentiment from Heard from the Heart was stamped below the 1 ¼” score line in Night of Navy ink. The Night of Navy panel was cut at 4 ¾” x 4 ¼” and punched with the Scallop Border punch on both sides.

The Whisper White panel was cut at 3 7/8” x 4 ¼”. I used my Stamp-A-Ma-Jig to stamp the flourish from Friends 24-7 in Sahara Sand ink all across the paper to make my own DSP. This was then layered on a piece of Sahara Sand cardstock cut at 4” x 4 ¼”. I added an Antique Brass Build-A-Brad in the upper right hand corner of the panel and Whisper White Organza ribbon close to the bottom of the panel. This was then layered on the scalloped Night of Navy cardstock and adhered to the card front.

I punched a ½” circle from a piece of Night of Navy DSP that comes in the Designer Series Paper Patterns Pack III which is a Level 1 hostess reward. This was glued into the Build-A-Brad using some Crystal Effects, then the clear dot was added over the top of the paper to seal it in.

I then stamped the flower from Fifth Avenue Floral in Black Stazon on watercolor paper. I used the Night of Navy watercolor crayon and marker to color in the flower. The flowers were cut out using Paper Snips (these are absolutely fantastic for cutting out stamped images). Crystal effects and Dazzling Diamonds glitter were added to the stamens of each flower to give them some sparkle. I just love Dazzling Diamonds…or anything sparkly really. The flowers were added to the card front using a Stampin’ Dimensional. Now they just sit in a box like so many other wonderful artistic creations to wait until the time is right to pull them out and give one to someone.

Come back tomorrow to see the Make and Take projects that my guests made for June. I just know you’ll love them!

Saturday, June 26, 2010

Summer Mini Swap

I made several of these cards for the Summer Mini Swap on Stampin' Connection. This is such a wonderful way to combine and play with several of the wonderful new products and stamps in the Summer Mini Catalogs. I hope you enjoy!


Stamps: Watercolor Trio

Cardstock: Rich Razzleberry, Whisper White, Basic Grey, Certainly Celery
Paper: Presto Patterns DSP
Ink: Bashful Blue, Basic Grey, Rich Razzleberry
Accessories: 5/8” Basic Black Satin ribbon, White Extra Large Grommet, Brayer, ½” Circle punch, Square Lattice Texture impressions dies, Vanilla Smooch Spritz, Markers: Certainly Celery, Old Olive, Bashful Blue, Almost Amethyst.

The card base is Basic Grey cardstock cut at 4 ¼” x 11” and scored at 5 ½”. I used the Corner Rounder punch on the bottom corners of the card. The next panel is Rich Razzleberry cardstock cut at 4” x 5 ¼” with the bottom corners rounded with the Corner Rounder punch. I stamped the leaves from Watercolor Trio in Rich Razzleberry ink all across the bottom of the cardstock. This piece was then run through the Big Shot in the Square Lattice Texture Impressions die and adhered to the card front.
The Whisper White image panel was cut at 2 ½” x 2 7/8”. I used the flower with leaves stamp from Watercolor Trio and used the Certainly Celery, Old Olive, Bashful Blue, and Almost Amethyst markers to color in the leaves and flowers. Breathed on the stamp and stamped twice after inking it up once. This is called stamping off. It gives you one darker image and one lighter image. I did this a second time to add the remaining flowers. The sentiment was stamped in the top left corner of the image panel in Rich Razzleberry ink. The completed image panel was then sprayed with Vanilla Smooch Spritz to give it a nice subtle sparkle.

For the piece below the image panel I use a piece of Presto Patterns DSP cut at 1 ¼” x 2 7/8”. The brayer was used with Bashful Blue ink to completely color the patterned paper. I just have to take a second to say that this patterned paper is abolutely AWESOME!!! The pattern is like clear embossing so it resists your ink so you can color the paper however you want and the pattern will show through. Okay…back to the card. Basic Grey ink was then sponged on the bottom of the DSP. The image panel and the colored DSP panel were adhered to a piece of Certainly Celery cardstock cut at 3”x 4”.

The ½” Circle punch was used to punch a circle on the right side right along the seam of the two top panels of cardstock. Then 5/8” Basic Black Satin ribbon was wrapped around the panels. Thread the two ends through the center of a White Extra Large Grommet and push the grommet through the hole and the grommet spikes through the ribbon. This took some fiddling around with to get the spikes to punch through the ribbon. I then used a small craft hammer to flatten out the grommet spikes on the back. Tie the ribbon ends in a knot and trim the ends. This panel was adhered to the card front using Stampin’ Dimensionals. That’s it!

Come back tomorrow to see a card that I was making for a swap but messed up. It's fabulous. Trust me.

Friday, June 25, 2010

May Make and Take 5: 2-5-7-10 box tutorial

I know it's been a long time since I've posted and I apologize. Life has been very busy lately. I have so many wonderful projects to show you from some of the swaps I've made to the June Make and Take projects, and a tutorial! I just have to get the posts typed up. Well here is the tutorial I promised so long ago for the All A Flutter 2-5-7-10 box that my guests made at the May Make and Take.

All A Flutter Box:


This is the final project that my guests made at the May Make & Take. It is a cute little box that would be great to put some candy in or jewelry or any other small gift and it’s easy to make!
Stamps: All A Flutter, Warm Words, Whimsy Jumbo Wheel
Cardstock: Ballet Blue (retiring June 30), Certainly Celery, Whisper White
Ink: Ballet Blue (retiring June 30), Timber Brown Stazon, Certainly Celery
Accessories: ¼” Certainly Celery Grosgrain Ribbon, Blush Blossom and Apricot Appeal markers, Hobby Blade, Jumbo Wheel Handle, Sticky Strip, Scor-Pal, Paper Snips, Scallop Edge Border Punch

I started off with an 8 ½” x 11” piece of Ballet Blue cardstock. With the 11” side of the cardstock along the top of the Scor-Pal score at 2”, 5”, 7”, and 10”. Turn the cardstock so that the 8 ½” side is along the top of the Scor-Pal and score at 2” and 7”. Use the Whimsy Jumbo Wheel with a large Ballet Blue ink cartridge to stamp the cardstock making your own patterned paper. Use the Paper Snips to cut the cardstock along the score lines in the locations shown in the picture below.


Add Sticky Strip to the 1” wide flap along the side on the stamped side of the cardstock as shown in the photo above.


Add Sticky Strip to the edge of one of the flaps on the bottom edge on the side of the cardstock that is not stamped as shown in the photo above.

Use the Scallop Edge Border Punch to punch the edge of the remaining tab at the top.
This is optional. I forgot to do this when taking the pictures for this tutorial, but the sample at the top shows what it looks like with the scallop edge on the flap of the box.

Fold the cardstock on all the score lines. Remove the liner from the sticky strip on the 1” side flap and adhere the sides together with the 1” flap on the inside.


On the bottom of the box fold in the small flap and the large flap without the adhesive, remove the liner from the Sticky Strip and adhere to the box bottom.


At the top of the box use your fingers to pinch in the sides while squeezing the front of the box to the back of the box.


While holding the box closed, use a hobby blade to cut two slits through both the lid of the box and the front of the box. Set aside.


The image panel is Whisper White cardstock cut at 2 1/4" x 2 1/4". Stamp the butterfly from All A Flutter in Timber Brown Stazon on the cardstock leaving room at the bottom for your sentiment. Stamp the sentiment from Warm Words in Certainly Celery ink at the bottom of the panel. Color in the butterfly using the Blush Blossom and Apricot Appeal markers. This image panel is then adhered to a piece of Certainly Celery cardstock cut at 2 1/2" x 2 1/2". This is then adhered to the front of the box.

Thread your ¼” Certainly Celery Grosgrain ribbon through the slits on the inside of the box and then through the slits in the lid. Tie in a bow to keep the box closed and trim the ends. You’re done!


You now have a cute box to use to give someone special a small gift. These would also work great as party favors! Thanks for stopping by! Come back tomorrow to see a card that I made for the Summer Mini Swap on Stampin Connection!