Tuesday, March 25, 2014

Welcome to our Firepit

Another project finished! My sister had mentioned a while ago that she wanted to get a sign for outside near their pinspired firepit. She found this one and saved it to her outdoor Pinterest board. I said it was totally do-able without spending the big bucks on the ones on Etsy which happened to be much smaller than what my sis had in mind. 

I was going to see if I could swipe a pallet from work and deconstruct it to make the sign. But then my husband wanted to clean out the utility room and remove a shelf that was probably built in 1950 at the same time as the house. It was old and would sway if you pushed it with your finger on one of the sides. So we moved it outside of the garage to be taken to the curb the next trash day. 

Well one day shortly after coming home and seeing the shelf outside of the garage a little light bulb popped up. Why not tear apart the shelf and use the boards from the shelves to make the sign! So I went outside with a hammer and took the shelf apart to get the shelf boards. The sides were 2 x 8 and I'm not sure what to do with them right now. 


No, this was not finished in the fall. I finished it up just last Friday. We have oak trees in our yard that don't really lose all their leaves until spring when the new ones come out. So we don't bother cleaning up leaves until spring. And by cleaning up leaves I mean running them over with the lawn mower and a mulching blade... But the leaves cover up the dead brown grass pretty well.

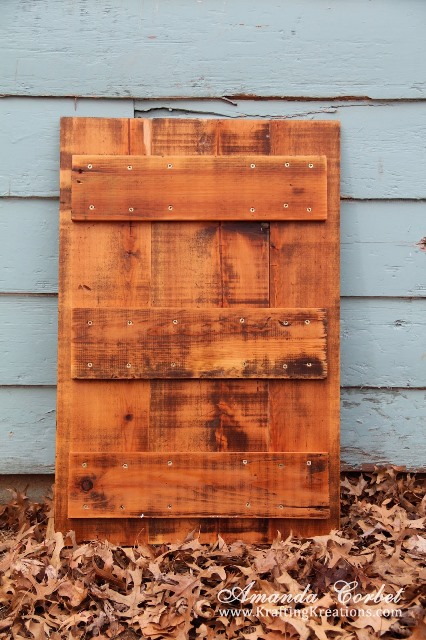
So I basically cut three of the shelves to the same length and used the saw table to rip down the edges of two of the boards so that the finished sign was 20" wide. I cut three boards for the back then went to town sanding off the old paint with an orbital sander. I sanded it almost all the way but loved the dark lines that were left. 

Then I applied some wood glue to the edges and placed the boards next to each other (making sure the perfect cut edges were against the center board so the old edges were on the outside). Then I placed the boards across the back and put in 1" long screws to hold everything secure. I'm just loving the look of the old wood! 


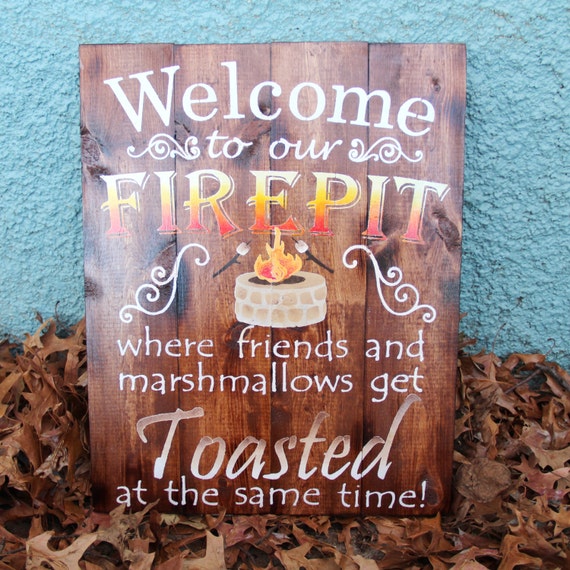
Then it was ready for some paint! I used my Silhouette to cut out a variety of fonts and the fire pit shape in some 12" x 12" card stock. I held the card stock stencils onto the board with some painter's tape and used a small sponge to dab the paint inside the stencil. 


I had initially painted the word "firepit" in white but after I had everything else done I thought it could use some more color so I added some light yellow and darker yellow to the letters.


Then I toasted "toasted" with two shades of a cream colored paint and some brown paint. After the paint dried I covered the front, edges, and back with about 6 coats of a matte finish Rustoleum sealer.


It's not perfect. The spacing on some of the words could have been closer and there were some spots where the paint bled under the stencil, but I love those imperfections. They show the love that went into making this lovely sign.

The finished sign is about 20" x 30". The best part about this project? It cost a whopping $4.00 for a can of spray sealer. Everything else I already had at home. Not to mention it recycled an old shelf that was just headed for the landfill. And I still have a couple beautifully sanded boards for some other project in the future. I'm thinking maybe a Corbet Family Est. 2005 sign.

Now Kelly and Eric just have to figure out how they want to hang it!

Any ideas on what I can make with the two 2 x 8 boards I have left? They are about 4-1/2 feet long. I'm thinking maybe a bench for outside? Any thoughts?

Updated to add:
A smaller version of this sign is for sale in my Etsy shop! Just click HERE to view all my hand painted signs. Looking for a custom size? Just send me a message via Etsy or E-mail and I build it as large as you like. Just be advised that pricing and shipping costs are more with a larger sign.

Welcome to our Firepit Hand Painted Sign


Linking up here:
Tuesday Talent Show at Chef in Training
Create Link Inspire at The Crafty Blog Stalker
Fabulously Creative Friday at Jennifer Rizzo
Wow Me Wednesday at Gingersnap Crafts
Your Whims Wednesday at My Girlish Whims
T.G.I.F. Linky Party at Mamas Blog Central
Thrifty Thursday at Living Well Spending Less
Fabulously Creative Friday at Jennifer Rizzo
Inspiration Exchange April Link Party at Clean and Scentsible
Monday Funday at C.R.A.F.T.
Saturday Sharefest at The SITS Girls
April Before and After at The Thrifty Decor Chick
Show Me What Ya Got at Not Just a Housewife


Monday, March 24, 2014

Spring Wreath

It's finally spring!!! Now if only Mother Nature would decide for it to be spring and actually stay above freezing for more than a day at a time...


A little over a week ago I got out all my Easter and spring decorations (which isn't very much) and put them on display around the house. I've known for a while now that I wanted a simple grapevine wreath to hang on the front door that I can easily change up for the different seasons with some fake flowers. 


I picked up all these lovely flowers at Joann's. They were in bunches so I took some wire cutters and cut each flower stem apart then just stuck the stem into the wreath form. No glue because I want to be able to pull these out and switch out the flowers for each season. 


I tied a quick bow with some burlap ribbon from Stampin' Up! then stuck a wire through the ribbon and poked the wire into the wreath form. I took some more wire and made a loop to hang the wreath from, weaved it through the wreath form then wrapped the wire ends around the base of the loop. Then the wreath was hung onto the front door with a brushed nickel looking command hook.


I just now realized that the brushed nickel hook totally clashes with the brass in the window of the door. Oops. Oh well.


Here I'm just playing around with different angles and I couldn't decide which one I liked more so you get both! 


Yes, I totally just posted 6 pictures of a simple wreath that took a whopping 10 minutes to put together. And 5 of that was trying to tie a burlap bow that was visually appealing.

Also, after editing the 34 photos I took of the wreath down to the six you see above I realized just how dirty our front door was and promptly took the wreath down to take a mr. clean sponge to the door and put the wreath back up.

I'm thinking that our door needs a fresh coat of paint. But what color??? Maybe I should just play it safe and stick with the white...


Sunday, March 23, 2014

I Am...

Here is another fun Mixed Media Monday inspired project! I followed along with Tracy and painted this lovely last week.


  • Paint (DecoArt): Whispering Turquoise, Citron Green, Titanium White, Turquoise Waters, Decou Page
  • Paper: Basic Gray
  • Stencil: Heidi Swapp butterflies
  • Other: molding past, fine point sharpie, pan pastels, Basic Black stampin' spot, black pastel pencil, The Paper Studio gemstones, workable fixative, flat brush, and round brush


The chevron patterned paper in the background that you can barely see is Basic Gray from one of my Frosted Designs kits. That's all I know. I was too happy to work on something fun that I didn't pay attention to the collection it came from. That was stuck down with some decoupage.


I painted on the blue and green thinned down with a little bit of water to make it kind of a wash. Once that dried I took the lacy laser cut paper from the retired Stampin' Up Flirtatious DSP pack that I could never figure out how to use and I placed it over the paper and sprayed Maya Mist in White Out then picked up the lacy paper.

This stuff takes FOREVER to dry and I am one impatient crafter. I let it sit and just cleaned up around by craft room for about 10 minutes but it still wasn't dry so I heated it up with my heat tool for about five more minutes and some places still weren't dry. Maybe I'm spraying it on too heavy?

Next I painted on some loopy flowers in titanium white. Then I took the end of my paint brush (not the brush end) dabbed it in white paint, and added lots and lots of white dots around the inside and outside of my flower petals.


I took some Pan Pastel in a bright pink shade and added that inside my flower petals. That really made those dots pop! Some yellow Pan Pastel was used to add color to the flower centers. Next up some doodling with a sharpie. Then i used some molding paste to add these butterflies with a stencil. I heated that with my heat tool to speed up the drying process and they puffed up creating some wonderful texture. More Pan Pastel here in the same pink. Then I laid the stencil back over the butterflies and sprayed on some gold mist.


The large I Am was free handed with a flat brush and some citron paint. Then I went around the letters and the butterflies with my pastel pencil to add some shadows and grunginess. 


I took a fine point sharpie to add some words of what I am around the flower on the bottom. Then I went around the edges of the paper with a Basic Black Stampin' Spot to grunge it up some more.


Finally I added a nice coat of workable fixative to make sure that my pastels didn't wipe off. Once that dried I added the three gemstones for my dot dot dot.


I am totally loving this page and I was so happy to get the time just to paint along with Tracy and have some fun. I'm linking this to Tracy's March Creative Dare. Hop on over to see what some of the other ladies have made!

Linking up here:
Art Journal Every Day at Balzer Designs


Saturday, March 22, 2014

Bloom

I took the time to play with some paint last week and painted along with Tracy in her re-run of the Mixed Media Monday from February 25th. I have no idea what paints I used. Tracy goes FAST! If it weren't for the pause button on my tablet I would never have been able to keep up! 


The paint is all acrylic and mostly DecoArt brand. I used a fine point sharpie to add the doodling and a Signo Gel Pen for the white in the doodles. The buttons are retired from Stampin' Up. I also used a black pastel pencil to add the shadows. 

Oh and the background was all done with a wadded up paper towel by dabbing it into the paint and dabbing it all over the canvas. 

Note to self ~ When dabbing paint onto anything..... wear gloves or your hands will be completely covered in paint. Messy painter here! 


The word "Bloom" was free handed with a flat brush and white paint. Then doodled over with a fine point sharpie and shadow added with the pastel pencil. 


I had such a great time! Not to mention I really love this page!

Linking up here:
Art Journal Every Day at Balzer Designs


Friday, March 21, 2014

Tag Punch Treat Holder

I really wanted to showcase both of the Tag Topper Punches at the February Make and Take. So I made this lovely little treat box which happens to be the perfect size to hold two Ghirardelli chocolates (Yum!). I love those! Especially the dark chocolate sea salt caramel! I've seen a number of these floating around in blog land lately and wanted to add my own spin on it. So here is a fun tutorial for you! 


  • Cherry Cobbler Card Stock 2” x 7-7/8”
  • Retro Fresh DSP 1” x 7-7/8”
  • Retro Fresh DSP 1-1/4” x 5-1/4”
  • 16” Whisper White Baker’s Twine
  • 13” Coastal Cabana Sweet Sorbet Twine
  • Stamps: Banner Blast
  • Ink: Cherry Cobbler, Calypso Coral, Crushed Curry
  • Accessories: Stampin’ Dimensionals, Cherry Cobbler Dazzling Details, Scalloped Tag Topper Punch, Banner Punch, Simply Scored
Take the Cherry Cobbler card stock and place it on your Simply Scored with the 7-7/8" edge against the top. Now score at 3-1/2" and 4-1/8". Use some glue stick to add your 1" wide strip of DSP onto the Cherry Cobbler card stock and fold on the score lines. Now punch both ends of your card stock strip with the Scalloped Tag Topper Punch.


Take the 1-1/4" x 5-1/4" piece of Retro Fresh DSP and place it on your Simply Scored with the 5-1/4" edge against the top. Score at 1”, 1-5/8”, 3-5/8”, and 4-1/4”. Use some glue stick to glue one end of the strip onto the inside of the tag punched shape as shown. Line up the bottom edge of the DSP with the score line on the tag. Also line up the score line in the DSP with the edge of the tag. 


Fold the DSP around and glue the other end onto the inside of the tag as shown.


Now add a little bit of glue stick onto the other end of the tag shape and press it down onto the DSP to close the little box.


Insert your chocolates into the lovely little pocket then thread the twine through the slot at the top and tie it into a bow. Take the white baker's twine and wrap it around the top of the tag twice and tie it into a knot. Then use Paper Snips to trim the ends of the twine close to the knot. 


Stamp three of the banners from Banner Blast onto a scrap of Very Vanilla card stock in Cherry Cobbler, Calypso Coral, and Crushed Curry ink. Take the small heart image and stamp it onto the love banner in Cherry Cobbler ink. Then punch out the banners with the Banner Punch and stick each banner onto the treat holder with a Stampin' Dimensional. 


Just for a little added glam add some Cherry Cobbler Dazzling Details into the heart stamped on the love banner.


Super cute and a super sweet little gift to give a special someone.


Thursday, March 20, 2014

You Make Me Happy

Here is the final card from the February Make and Take. It's got lots and lots of arrows!


  • Crumb Cake card stock 5-1/2” x 8-1/2”, scored at 4-1/4"
  • Early Espresso Coredinations 4” x 5-1/4”
  • Retro Fresh DSP (arrows) 1-3/4” x 4”
  • Retro Fresh DSP (diamonds) 1-1/2” x 2-1/2”
  • Coastal Cabana card stock 1-1/4” x 2-1/2”
  • 10” Night of Navy Stitched Grosgrain Ribbon
  • Stamps: Hello Lovely
  • Ink: Night of Navy
  • Accessories: Paper Snips, Dimensionals, Arrows embossing folder, Sanding Block, Banners Framelits
As always I started off by folding the Crumb Cake card base on the score line. Next I ran the Early Espresso Core'dinations card stock through the Big Shot in the Arrows embossing folder. Use the sanding block to rough  up the raised arrows. Stick this layer onto the card front with Glue Stick.


Take the 4th from smallest Banners framelit. Use a ruler to measure up 3" from the points and mark the die with a fine point permanent marker on both sides. Now take the DSP piece with the arrows on it and position it on the Big Shot with the end of the DSP lined up with your marks. Run it through the Big Shot. 


Now take the diamonds piece of Retro Fresh DSP and run it through the Big Shot with the 2nd from smallest Banners framelit. Take Paper Snips and cut the Diamonds banner in half and glue it onto the backside of the arrows banner as shown below.


This is what it looks like from the front side. Oooh pretty!


Wrap the piece of Night of Navy ribbon around the top of the banner and tie it into a knot. Sick this lovely layered banner onto the card front with a few Stampin' Dimensionals. Next stamp the greeting from Hello Lovely onto the Coastal Cabana card stock in Night of Navy ink. Trim around the image with Paper Snips and stick it onto the banner layer with a couple Stampin' Dimensionals.


You're card front is done! Now for the inside stamp the arrow from Hello Lovely (because we totally don't have enough arrows yet) in Night of Navy ink. Now take the other piece of diamond patterned DSP and run it through the Big Show with the 2nd from smallest Banners framelit. Glue the banner inside the card with some glue stick. Then take the scrap from cutting your larger banner earlier and glue that down on top of the smaller banner.


That's it! Another fun and somewhat funky card complete! What do you think? Too many arrows?


Wednesday, March 19, 2014

I (heart) You

I have another project from the February Make and Take to share with you today! Yay! When I started working on this one I was trying to come up with a masculine Valentine's card. But as I was working on it I just wanted that bright pop of the Strawberry Slush behind the die cut I heart u. So this ended up being what I would consider a girly Valentine. 

Label Card Thinlits, Hardwood, Gorgeous Grunge

  • Whisper White card stock 4-1/4” x 11”, scored at 5-1/2"
  • Crumb Cake card stock 4” x 5-1/2”
  • Whisper White card stock 3-1/2” x 4”
  • Strawberry Slush card stock 3-1/2” x 4”
  • Strawberry Slush card stock 4” x 5-1/4”
  • 17” Cherry Cobbler Chevron Ribbon
  • Stamps: Hardwood, Gorgeous Grunge
  • Ink: Early Espresso, Strawberry Slush, Bermuda Bay
  • Accessories: Labels Framelits, Label Card Thinlits, Stampin’ Dimensionals, 2-Way Glue Pen, Small Heart Punch, Red Glimmer Paper, Paper Snips
This one isn't very difficult, but there are several steps so just hang in there with me okay? I folded the Whisper White card stock on the score line. Then I stamped the oh so fabulous Hardwood background stamp onto the Crumb Cake card stock in Early Espresso ink. I glued this onto the card front with some glue stick.

Next I took the piece of Whisper White card stock and stamped the splotch image from Gorgeous Grunge twice close to each other in Bermuda Bay ink. I took this over to the Big Shot and used the I heart u thinlit from the Label Card Thinlits to cut the greeting into those grungy splotches. I followed that up by cutting out the greeting with the 3rd from smallest Labels Framelit.

You really want to die cut the greeting first. That way if the die moves or slips or something you can still have it centered in your label shape when it's done. Now take the small piece of Strawberry Slush card stock and use the same 3rd from smallest Labels Framelit on that piece. Glue the Strawberry Slush label onto the card front with some glue stick. Then stick the grungy greeting label on top of the Strawberry Slush label with a few Stampin' Dimensionals.

Label Card Thinlits, Hardwood, Gorgeous Grunge

Next take your Small Heart Punch and use it on some Red Glimmer Paper. Then take your glimmery heart and stick it inside the greeting heart with half a Stampin' Dimensional. Just wrap the Cherry Cobbler chevron ribbon around the card front and tie it into a knot and your card front is finished! 

Now onto the inside...
Take the larger piece of Strawberry Slush card stock and stamp the lines image from Gorgeous Grunge several times across the top of the card stock in Strawberry Slush ink then stick this piece inside the card with some glue stick. We're not wasteful here so glue the cut out greeting from the label you made for the front onto the card stock with some 2-Way Glue Pen. Now just punch another small glimmery heart and glue it inside the larger heart with some more 2-Way Glue Pen.

Label Card Thinlits, Hardwood, Gorgeous Grunge

Now you have a bright, fun, cheerful Valentine for someone who loves pink and turquoise. In other news... I've been super busy crafting away lately and I'm super excited to show you what I've been doing. 


Friday, March 14, 2014

Love You Manly Valentine

Today I want to share with you one of the Valentine's cards that my guests made at the February Make and Take. I usually try to have both a girly valentine and a manly valentine. The girly ones are easy to come up with, but a manly valentine??? Those are quite a bit harder to design. 

When you're creating things for Valentine's Day you just want to reach for those pinks and reds. Especially with all the fun things you see on Pinterest around that time. So it's much harder to stay away from those girly colors and not come up with something that isn't five different shades of pink with lace and pearls and bling and over the top girly. 

So this is what I came up with and I'm pretty darn pleased with it! Although I think it took me an hour to design just this card! I kept hemming and hawing about how to place that stripey DSP and what stamp to use to fill up all that gray space on the right and where to add what greeting all while trying to keep the red to a reasonable amount.


  • Smoky Slate card stock 5-1/2" x 8-1/2", scored at 4-1/4". 
  • Coastal Cabana card stock 1-3/4" x 5-1/2"
  • Fresh Prints DSP 1-1/2" x 5-1/2"
  • Stamps: Best of Love, Off the Grid
  • Ink: Coastal Cabana, Basic Gray
  • Accessories: Chevron Border Punch, Large Oval Punch, Red Glimmer Paper, Label Card Thinlits, Neutrals Buttons, Linen Thread, Stampin' Dimensionals, 2-Way Glue Pen

First off fold the Smoky Slate card stock on the score line and stamp the Off the Grid image onto the card front twice in Basic Gray ink. Next up glue the strip of Fresh Prints DSP onto the strip of Coastal Cabana card stock. Use the Chevron Border Punch just on one end to punch those three lovely chevrons at the bottom of the strip. It takes a little more oomph to punch through the DSP and the card stock, but it's totally doable. Then stick this layer onto the left side of the card front with a few Stampin' Dimensionals. 


Next up stamp the greeting from Best of Love onto a scrap of Whisper White card stock in your Coastal Cabana ink then punch out the greeting with the Large Oval Punch. Stick the greeting onto the card front with a couple more Stampin' Dimensionals.


To get the glimmery red arrow use the arrow die from the Label Card Thinlits pack with a scrap of Red Glimmer Paper in the Big Shot. Glue this onto the DSP with a little 2-Way Glue Pen. To finish it off take some linen thread and run it through a nice big Basic Black button from the Neutrals button pack and tie the twine into a bow (easier said than done). Then stick the button onto the card front with another Stampin' Dimensional. This card really has a lot of dimension with all those dimensionals!


Now open up the card and stamp the Off the Grid image again in Basic Gray ink. Then take the chevrons that you punched out earlier and glue them inside the card with some more 2-Way Glue Pen. No wasting chevrons on this card! 

That's it! A cute and fun, yet still manly, Valentine's card! Or anniversary... or anytime you want to say "I love you".