
I made several of these cards for the Summer Mini Swap on Stampin' Connection. This is such a wonderful way to combine and play with several of the wonderful new products and stamps in the Summer Mini Catalogs. I hope you enjoy!
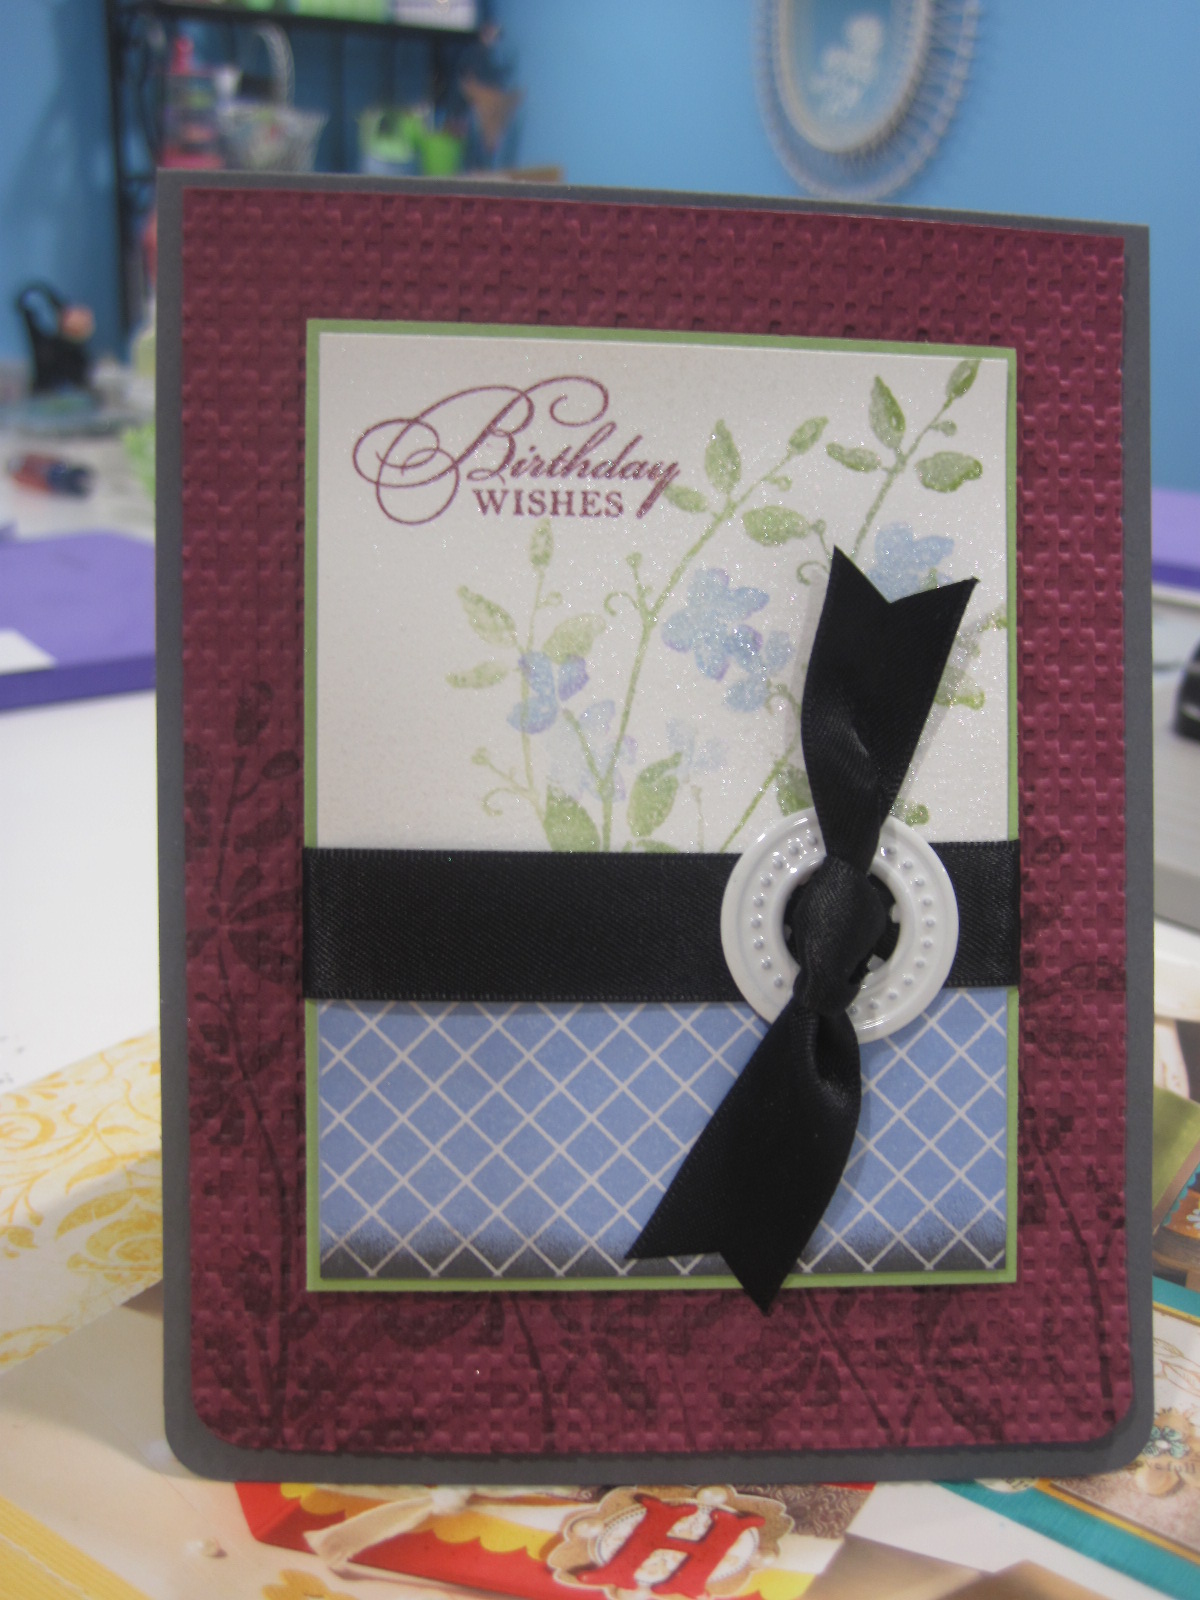
Stamps: Watercolor Trio
Cardstock: Rich Razzleberry, Whisper White, Basic Grey, Certainly Celery
Paper: Presto Patterns DSP
Ink: Bashful Blue, Basic Grey, Rich Razzleberry
Accessories: 5/8” Basic Black Satin ribbon, White Extra Large Grommet, Brayer, ½” Circle punch, Square Lattice Texture impressions dies, Vanilla Smooch Spritz, Markers: Certainly Celery, Old Olive, Bashful Blue, Almost Amethyst.
The card base is Basic Grey cardstock cut at 4 ¼” x 11” and scored at 5 ½”. I used the Corner Rounder punch on the bottom corners of the card. The next panel is Rich Razzleberry cardstock cut at 4” x 5 ¼” with the bottom corners rounded with the Corner Rounder punch. I stamped the leaves from Watercolor Trio in Rich Razzleberry ink all across the bottom of the cardstock. This piece was then run through the Big Shot in the Square Lattice Texture Impressions die and adhered to the card front.
The Whisper White image panel was cut at 2 ½” x 2 7/8”. I used the flower with leaves stamp from Watercolor Trio and used the Certainly Celery, Old Olive, Bashful Blue, and Almost Amethyst markers to color in the leaves and flowers. Breathed on the stamp and stamped twice after inking it up once. This is called stamping off. It gives you one darker image and one lighter image. I did this a second time to add the remaining flowers. The sentiment was stamped in the top left corner of the image panel in Rich Razzleberry ink. The completed image panel was then sprayed with Vanilla Smooch Spritz to give it a nice subtle sparkle.
For the piece below the image panel I use a piece of Presto Patterns DSP cut at 1 ¼” x 2 7/8”. The brayer was used with Bashful Blue ink to completely color the patterned paper. I just have to take a second to say that this patterned paper is abolutely AWESOME!!! The pattern is like clear embossing so it resists your ink so you can color the paper however you want and the pattern will show through. Okay…back to the card. Basic Grey ink was then sponged on the bottom of the DSP. The image panel and the colored DSP panel were adhered to a piece of Certainly Celery cardstock cut at 3”x 4”.
The ½” Circle punch was used to punch a circle on the right side right along the seam of the two top panels of cardstock. Then 5/8” Basic Black Satin ribbon was wrapped around the panels. Thread the two ends through the center of a White Extra Large Grommet and push the grommet through the hole and the grommet spikes through the ribbon. This took some fiddling around with to get the spikes to punch through the ribbon. I then used a small craft hammer to flatten out the grommet spikes on the back. Tie the ribbon ends in a knot and trim the ends. This panel was adhered to the card front using Stampin’ Dimensionals. That’s it!
Come back tomorrow to see a card that I was making for a swap but messed up. It's fabulous. Trust me.