Monday, July 29, 2013

Love You Much Mini Brag Book Tutorial

This sweet little brag book was the 3D project at one of my recent Make and Take classes. I really wanted to have a 3D item that could be put to use right away. So this is what I came up with! I love the bright fun colors and using a stamp in a slightly different way than you would normally think to use it. This is a fun and easy little brag book to make. It’s sized to perfectly hold wallet sized photos! All you have to do is glue in your photos or add some journaling and you're all set with a lovely gift or just a pretty brag book that will fit easily into your purse! 


  • Stamps: Best of Love, Oh Hello, Sweetly Framed
  • DSP: Coastal Cabana
  • Card Stock: Strawberry Slush, Pistachio Pudding, Whisper White
  • Ink: Strawberry Slush, Coastal Cabana
  • Accessories: Sticky Strip, Simply Scored, Stampin’ Dimensionals, Decorative Label Punch


Cut a piece of Strawberry Slush card stock 4” x 6-1/4”. With the 6-1/4” side against the top of your Simply Scored, score at 3” and 3-1/4”. Fold on both score lines.


Cut one piece Coastal Cabana polka dot DSP 2-5/8” x 3-5/8”. Cut one piece Whisper White card stock 2-3/4” x 3-3/4”. Adhere the DSP onto the Whisper White card stock. Adhere this layer onto the front of your Strawberry Slush book.


Cut two pieces of Pistachio Pudding card stock 3-3/4” x 11”. With the 11” side against the top of your Simply Scored, score at 2-3/4”, 5-1/2”, 8-1/4”. Fold on the score lines like an accordion. Repeat on the other piece of Pistachio Pudding card stock.

Adhere one side of the accordion inside the Strawberry Slush book.


For the belly band cut one piece of Pistachio Pudding card stock 1” x 7-1/4”. With the 7-1/4” side against the top of your Simply Scored, score at 2”, 2-3/8”, 5-3/8”, and 5-3/4”. Fold on all the score lines.

Add a piece of Sticky Strip against the 1” edge of the strip at one end.

Remove the Sticky Strip liner. Place the belly band around your closed brag book and adhere the Sticky Strip onto the other end of the Pistachio Pudding belly band. This will make sure that you get the band the correct size. Make sure that the ends overlap on the front of the brag book. 


Stamp the chevron oval from Oh Hello onto a scrap of Strawberry Slush card stock in Strawberry Slush ink. Use the Decorative Label punch to punch out a chevron label. Stamp the greeting frame from Sweetly Framed onto a scrap of Whisper White card stock in Coastal Cabana ink.  Stamp the greeting from Best of Love in the center of the frame with Strawberry Slush ink. Punch out the label with the Decorative Label punch.


Adhere the greeting label on top of the stamped chevron label.


Adhere the layered labels onto just the belly band with a couple Stampin’ Dimensionals.


Now just add pictures or journaling to the inside pages and you have a sweet little brag book to keep  with you or give as a gift! 

Saturday, July 27, 2013

Craft Project Central!

Yummy Bread & Jelly Gifts:

Summertime means lots of in season garden goodies like, rhubarb, zucchini, green beans and strawberries!  It’s fun to share with these summertime goodies with neighbors, friends and family.  Giving these gifts in pretty packaging makes them almost too good to eat!  This project includes packaging for these goodies as well as recipes wrapped up in a pretty sack, too!


This beautiful gift set was created by Jen! If you have a chance head on over to Jen’s blog and let her know how wonderful her project is!

If you would like to subscribe to the July edition of Craft Project Central and get 10 wonderful tutorials for only $10 then click HERE!

Christmas for the Birds Friday Mashup 120!

It's Christmas in July! I know... it's still the middle of summer and who wants to start thinking about Christmas already? With all the holiday stamp sets removed from the big catalog this year I wanted to show you a Christmas card made with a stamp set still in the big catalog. So this Christmas card is simply for the birds!


  • Stamps: For the Birds
  • DSP: Smoky Slate
  • Card Stock: Smoky Slate, Midnight Muse, Pool Party, Whisper White
  • Ink: Soft Sky, Stazon
  • Markers: Marina Mist, Real Red, Pear Pizzaz
  • Accessories: Dazzling Details, Stampin' Dimensionals, Midnight Muse Stitched Satin Ribbon


Here's your Mashup Challenge:
  1. Create a project for "Christmas / Hanukkah".
  2. Create a project with "Stripes".
  3. Or Mash it Up and create a "Christmas / Hanukkah project with Stripes".

I started off by cutting a piece of Smoky Slate card stock 5-1/2" x 8-1/2" and scored it at 4-1/4". Next I cut a piece of Smoky Slate chevron DSP 3-7/8" x 5-1/8" and adhered this onto a 4" x 5-1/4" piece of Midnight Muse card stock. I adhered this layer onto the card front with some glue stick and moved on to the scene with the bird. 

I cut a piece of Whisper White card stock 2-1/8" x 3" and stamped the skating bird onto the card stock in black Stazon ink. I took a Post-It Note and cut one edge into a curve. I placed the Post-It Note over the bottom portion and lightly sponged around the top of the curved Post-It edge. I moved the Post-It Note up and very lightly sponged across the top of it to create little hills of snow behind the ice pond. Then sponged some more in the pond area to make it darker. 
I used my markers to color in the adorable little bird and added some Dazzling Details lined around the edge and through the ice pond to make it sparkly. It's kinda hard to see the shimmer in the photograph, but it is there. 


I adhered my adorable little birdie onto a 2-3/8" x 3-1/4" piece of Pool Party card stock then adhered it onto the card front with a few Stampin' Dimensionals. Finally, just to finish it off, I wrapped a piece of Midnight Muse Stitched Satin ribbon around the card front and tied it into a bow. 


I love this for a very non-traditional Christmas card! If you have a chance head on over to the Friday Mashup to see what the rest of the design team has created! 


Thursday, July 25, 2013

Garden Trellis Lantern Non Winning Artisan Entry 10

Today I share with you my final Artisan entry project. This 3D project has been brewing in my brain for more than a year and it came out better than I could have ever imagined!


You can also get this tutorial for FREE by ordering from my online store between now and September 30th!


This is a lantern that you can set a battery powered tea light into. It is quite large, 11” tall! And it follows the shape of the Window Frames Framelits!


This concludes my Artisan Entry posts for this year. Congratulations to those of you that were chosen as finalists and had your projects shared at Convention and a big congratulations to those who won the Artisan Award! Maybe I’ll have better luck next year!


I am offering a complete tutorial of Both of my 3D project entries for FREE to anyone who orders through my Online Store. For the remainder of July through the end of September I will give away the tutorials from my 3D Artisan projects. So click below to start ordering and get your FREE tutorials!  


Wednesday, July 24, 2013

Craft Project Central!

Naturally Summer Garden Gift Set:

Summer is here, and this set of projects brings the sunshine of summer gardens and the beauty of nature into a lovely handmade gift complete with coordinating gift bag and card.  Use the mini album for your summer photos or as a perfect gardening journal. 


This beautiful garden set was created by Candy! If you have a chance head on over to Candy’s blog and let her know how wonderful her project is!

If you would like to subscribe to the July edition of Craft Project Central and get 10 wonderful tutorials for only $10 then click HERE!

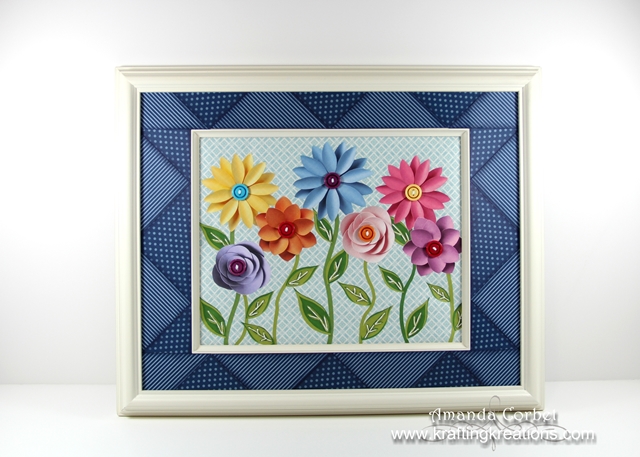
My Digital Studio Wall Art Non Winning Artisan Entry 9

Today I have the first of my two 3D Artisan entries to share with you! This is one of the projects that you can get a FREE tutorial by just ordering from my Online store between now and September 30th!


I am offering a complete tutorial of Both of my 3D project entries for FREE to anyone who orders through my Online Store. For the remainder of July through the end of September I will give away the tutorials from my 3D Artisan projects. So click below to start ordering and get your FREE tutorials!