Wednesday, October 5, 2011

Mottled Leaves

With this tutorial you will learn how to make leaves with the mottled look (blotchy spots) around the edge. It's really fun!


For this project you will need a two-step stamp set. I used Gently Falling here, which works really well for this technique. Light ink color, darker ink color (Pool Party, Lucky Limeade, and Early Espresso used here), Versamark, Embossing Buddy, Heat Tool, Gold Embossing Powder, Aqua-Painter, re-inkers (optional), Paper Snips, Very Vanilla cardstock.


Ink up the first step image by inking it completely in the lighter color and using the Rock-N-Roll technique in the darker color. If you are not familiar with the Rock-N-Roll techique you can find a tutorial on it HERE.


Stamp the image onto the Very Vanilla cardstock.


Repeat with the other first step image if you are doing more that one at a time.


Stamp the other image onto the Very Vanilla cardstock.


Rub the Embossing Buddy over both of your leaves, stamp the second step image (line image) in Versamark.  


Cover with Gold Embossing Powder and tap off the excess.


Now heat the powder with the Heat Tool to reveal pretty shiny gold lines.


For this part you can either use a drop of re-inker on a piece of plastic, or you can squeeze your closed ink pad in the middle, open it up half-way.  I used the same ink color to brush on as I did to stamp the image. Pick up the ink  with an Aquapainter.


Color the ink over the stamped image by scrubbing a little bit in the darker areas. Set aside to dry completely.


Repeat with the other leaf in a coordinating ink color.


After your cardstock has dried completely cut out the shapes with paper snips.


Now you have some pretty leaf accents to add to any project!

Tuesday, October 4, 2011

Pumpkin or Apple Tutorial

This tutorial will show you how you can create a 3D creation using punches. Here I have shown how to create a pumpkin, but you can also create an apple. I will have more details at the bottom on how to use the same steps to create the apple shown just below the pumpkin that we are creating today.

Pumpkin:


Apple:


You will need: Pumpkin Pie cardstock (2 sheets of 8 1/2" x 11"), a 2" x 4" piece of Very Vanilla cardstock, a 1" x 3" piece of Chocoalte Chip cardstock, scrap of Lucky Limeade cardstock, Cajun Craze Ink, Chocolate Chip Ink, Old Olive Ink, Stampin' Sponges, 2 1/2" Circle Punch, Bird Punch, Paper Snips, Paper Piercer, Bone Folder, Two-Way Glue Pen, Glue Stick, Simply Score, and Tombow Multipurpose Adhesive

Punch twenty five 2 1/2" circles from Pumpkin Pie cardstock.

Score those pumpkins in half on the Simply Score. Notice, I put Post-It Notes on either side of where I'm scoring so I know that I have it centered. I also colored in the 6" groove on my Simply Score with a fine point sharpie so I can use it for projects like this where I need to line things up properly.


Fold all your circles in half on the score line.


Trim about 1/4" off one end of the circle to create a flat bottom for the pumpkin to stand on.


While holding your circles folded in half, sponge both sides with Cajun Craze ink.


While holding the circle folded in half, sponge just the bottom half with Chocoalte Chip ink.


Fold all of your circles the opposite way so that the sponged edges are on the inside. Add glue stick to one half of the folded circle and adhere another circle half on top.


This is what it looks like after you've adhered two of the circles together. Make sure you adhere all of them with the flat ends matching so your pumpkin will stand up.


Adhere half of the circles together and then set it aside and start from two again. Adhere the rest of your circles together. Now you have two pumpkin halves.


Cut at 1/2" x 4" piece of Whisper White cardstock and stamp a greeting. (Here I used Teeny Tiny Wishes in Chocoalte Chip Ink). You could also print out people's names onto Whisper White cardstock and cut out the strips to make place cards. One end is cut all the way across at an angle. This is the end that will be adhered inside your pumpkin. The other end is cut into a dove-tail.

I curled the strip by sliding it over by bone folder from the middle to the end in one direction, then flipped it over and did the same thing the other direction.


I took a scrap of Lucky Limeade cardstock and randomly sponged two areas first with Old Olive ink and then with Chocoalte Chip ink. However, unlike me, make sure to sponge both sides. This will give your leaves a pretty varigated color after they are punched.


Punch out as many leaves as you would like to use. I used four here.

Adhere your leaves inside the pumpkin half with glue stick.  


Adhere your label to the other pumpkin half. (Yes, I know this one is upside-down. I just didn't realize it until later. It's stamped right-side-up on the other side.)


Now put plenty of glue stick on one half and adhere one half to the other pressing to make sure they are adhered well. Now when you stand it up there is a hole in the middle.


To fix that I cut a scrap piece of cardstock 2" x 4". I just happened to have Very Vanilla out, but it doesn't matter what color because you won't see it. Start rolling it by rolling the end of the paper around the narrow end of a Paper Piercer. After you've got the roll started you can finish the rest without the Paper Piercer.


Adhere the end to the side of the roll with the Two-Way Glue Pen to create your paper dowel.


Then insert the rolled paper dowel into the center of the pumpkin.


Push it all the way down.


Now fill the cavity with a bunch of Tombow Multipurpose Adhesive. This is a liquid adhesive that applies on white, but dries clear. (For the apple this is where you would be done.)

(Optional: You can take a needle and a little re-inker to color in the glue on top. Then it will dry to a translucent color. For the apple I used Lucky Limeade to add color to the glue. For the pumpkin I used Peach Parfait. You could use Pumpkin Pie, I just don't have the re-inker in that color.)


Now we're going to take a piece of Chocolate Chip cardstock that is 1" x 3" and roll it up just like we did for the center dowel.


I loosened up the roll and rolled it again at an angle to get one narrower end. If you look at the picture it makes more sense.


Now bend the narrow end over a bit so it looks more like a stem. Then trim off about 1/4" from the wider end (the non cone end).


Insert the stem into the center of the pimpkin and set aside so the glue can dry completely.


That's it! You're done!


To create the apple just punch 25 hearts using the large heart punch instead of the circle punch. Still cut off about 1/4" at the bottom. Then sponge the top of the heart with Lucky Limeade and the bottom with Cherry Cobbler. Assemble the same way as for the pumpkin except just punch one branch from Chocolate Chip cardstock. Adhere it to the center upside down so only the stem shows. Adhere the apple halves together just like the pumpkin. Punch two wings from the Bird Punch in Very Vanilla cardstock and sponge with Lucky Limeade, Cherry Cobbler, and Early Espresso. Then adhere the wings to the branch to create the leaf.

This same technique can be used on a number of different punched shapes to create fabulous 3D projects. Try it out!  

Kelly's Birthday Present

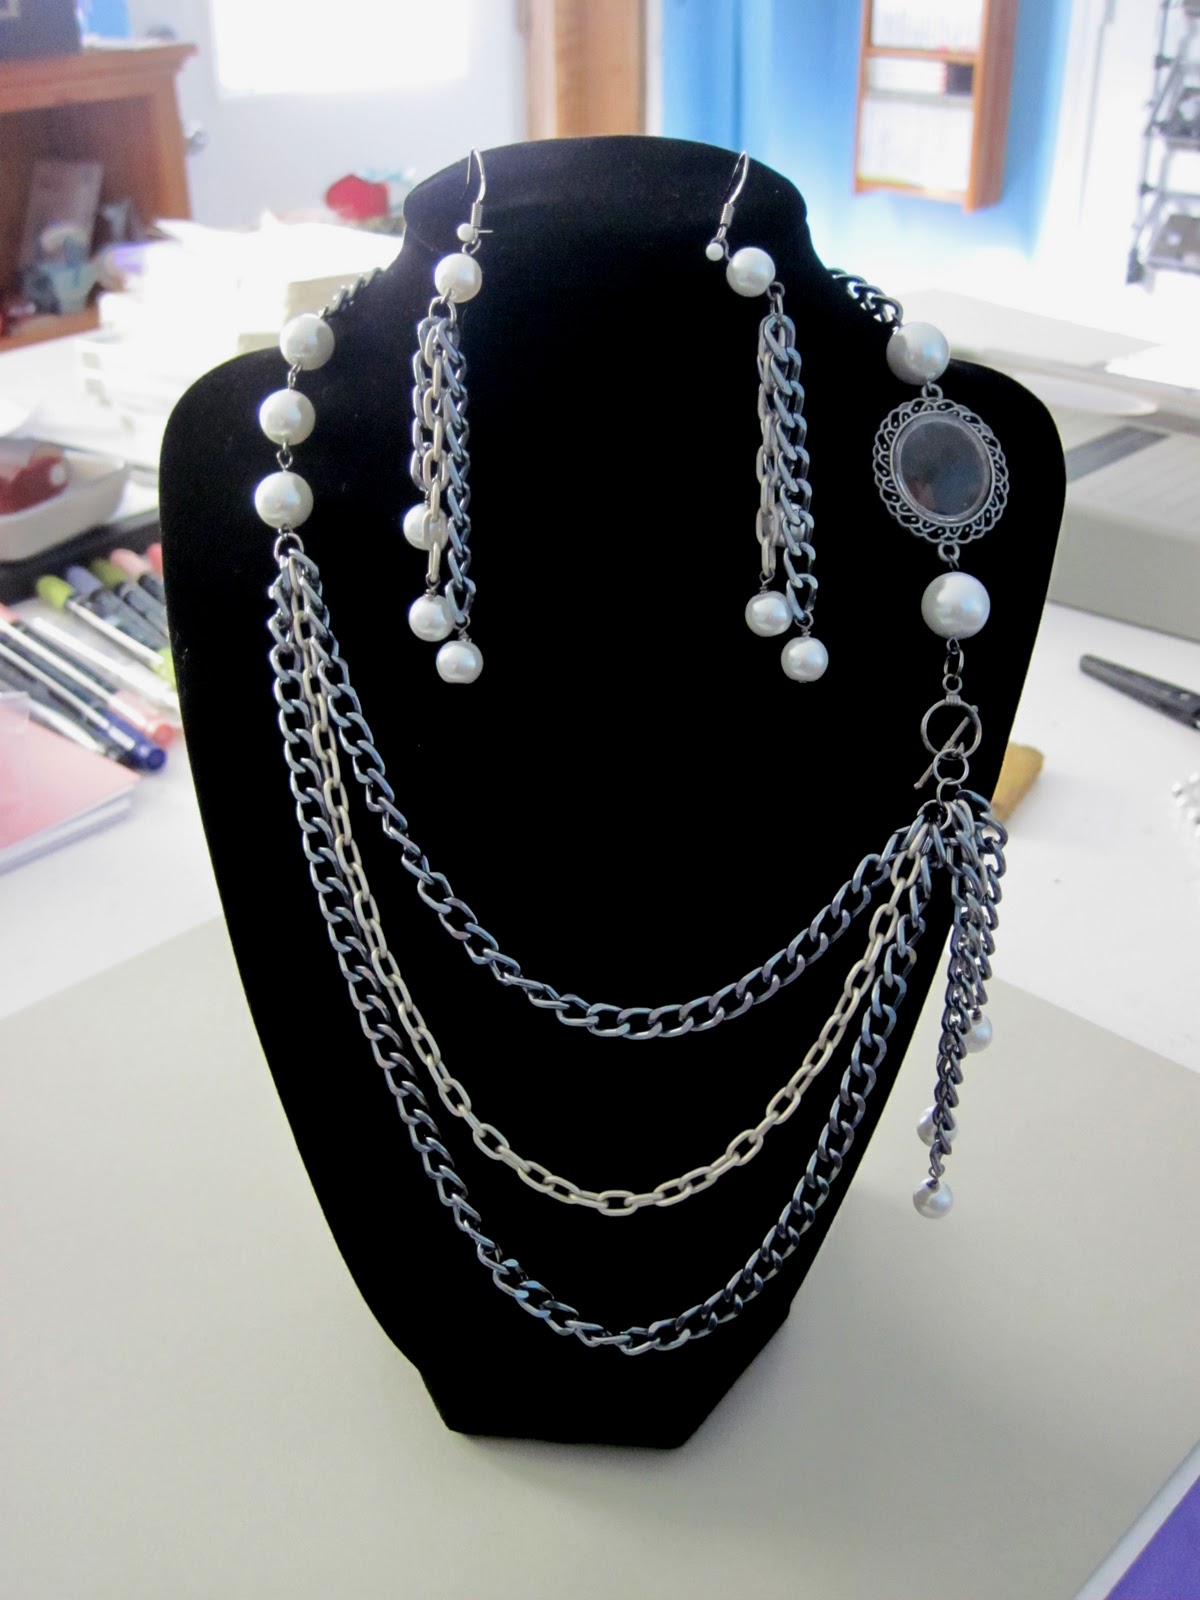
Today I'm going to share with you the gift I made for my sister Kelly for her birthday. For her gift I gave her a handmade necklace, earrings, and bracelet set. I couldn't get a good picture of the bracelet, but here is the necklace and earrings. The jewelry was from a kit and I just put it together.

There are three things that my sister absolutely loves! Pink, glitter, and polka dots! She comes to my Make and Takes regularly and is always saying that this needs sparkle, or that needs some bling. So I wanted to make sure that her card and gift box had lots and lots of sparkle and bling! I think I succeeded.


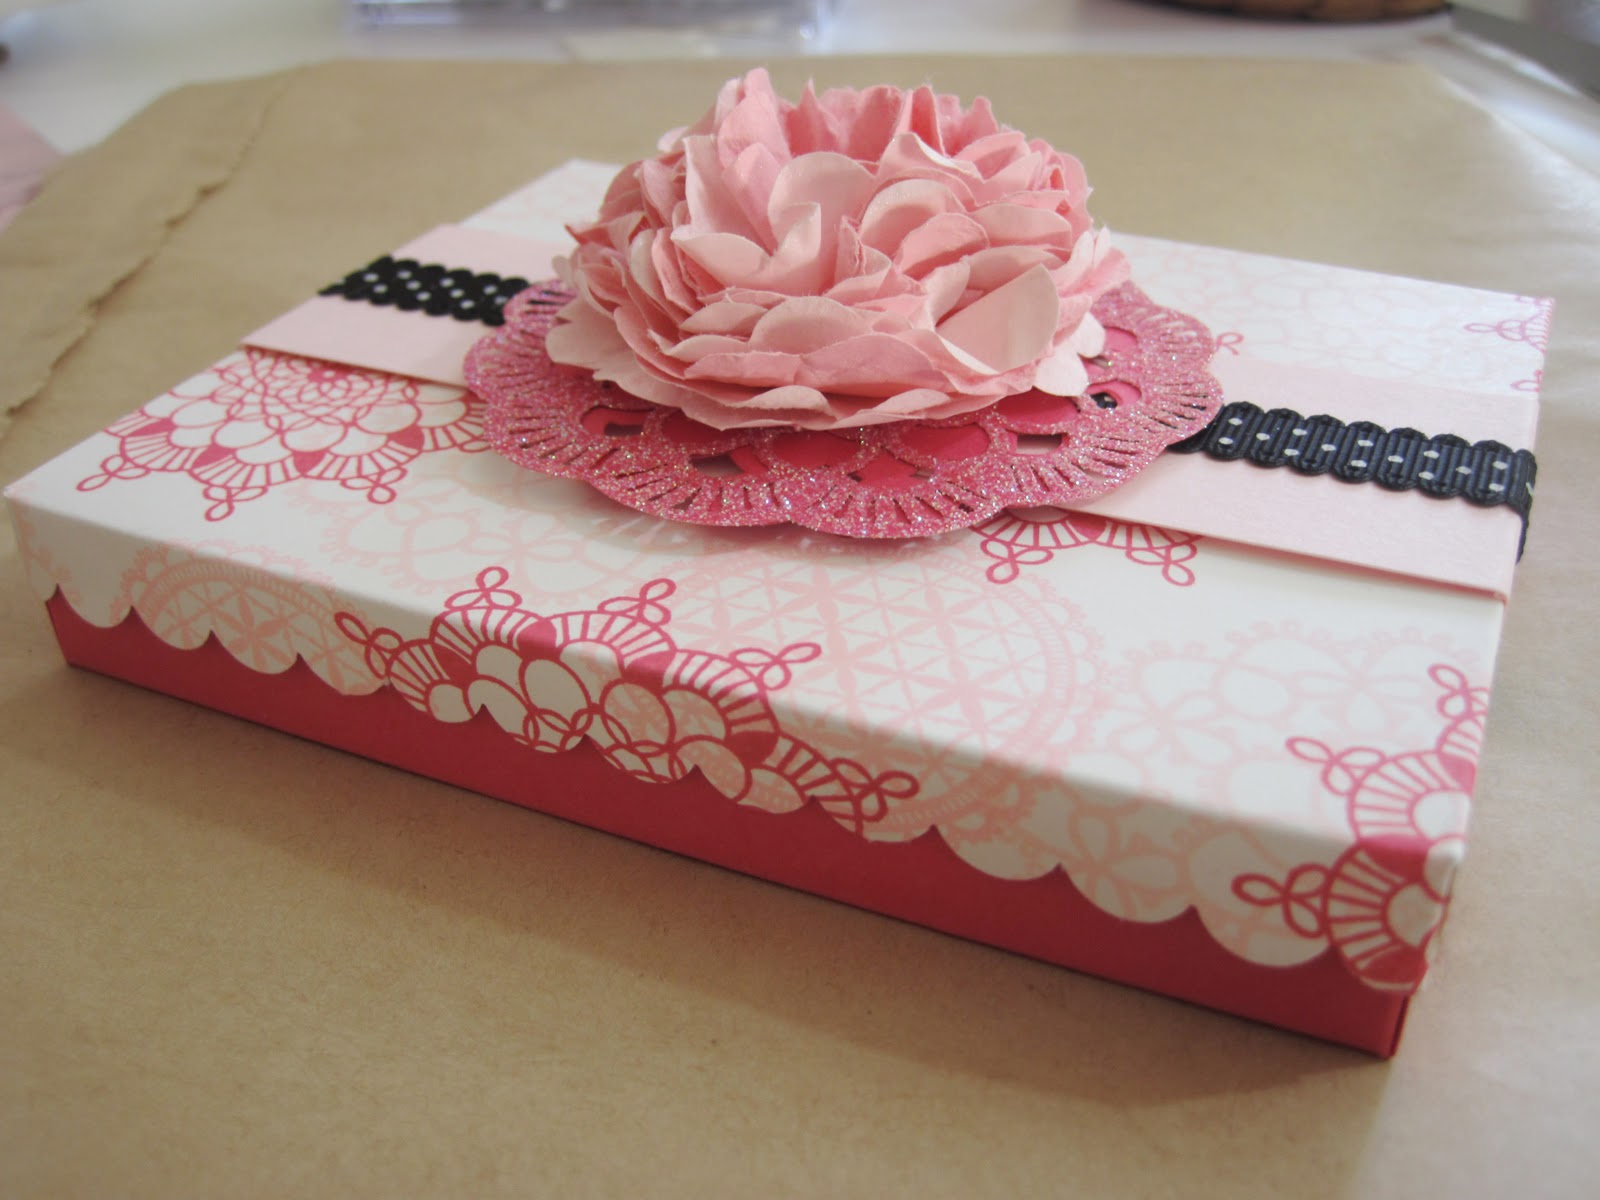
Here is the box that I made for her jewelry to go in.


I will do a tutorial on the box later this week so you can see how it went together. Here are the supplies I used.

Stamps: Delicate Doilies
Cardstock: Whisper White, Pink Pirouette, Melon Mambo, Pretty in Pink
DSP: Flirtatious
Ink: Pink Pirouette, Pretty in Pink, Melon Mambo, Versamark
Accessories: Heat & Stick Powder, Dazzling Dimaonds glitter, 2 3/8" Scalloped Circle Punch, Paper Piercer, Brad, Crimper, Basic Black Dotted Scalloped Ribbon, Simply Score, Scallop Edge Border Punch, Paper Snips, Sticky Strip, Vanilla Smooch Spritz, Pennant Die

I have to share a funny story about this box. I was running out of time Friday and needed to finish the flower for the top of the box. I had everything else done but that flower. So I had everything punched and crimped and put the rest of the tools in a stamp box and took it with me to finish in the truck on the way to the party. Talk about last minute right?

Well they were having a shrimp boil for dinner (which was absolutely fabulous!) but my husband doesn't eat seafood so he was going by Burger King to get him something for dinner. I get the flower assembled and wanted to add some Vanilla Smooch to make the flower glittery too. It had to have lots of bling remember? So here we are in the drive through while he is waiting for his food. I open the door and have the flower in my hand holding it out so I can spray the smooch spritz on. I wonder what the people behind us were thinking.... Oh well.

So we arrive at the party and the box is JUST finished, I have glitter all over my hand from spraying the flower while holding it and I still need to get pictures of everything to share with you! So I rush into Kelly's craft room and quickly snap the shots of the gift box and the card. Phew! But I got it done in time!
Kelly got a kick out of the story that involved the flower and the Burger King drive through. Maybe I'm just crazy, but I really wanted that flower on that box and it HAD to be sparkly. Yep.....I'm crazy. Oh well.

Here is the card:

Of course the card just HAD to match the box! Oh! Did I mention that she likes owls too? She is also a paper crafter so I wanted to make sure her card was over the top!


Stamps: Delicate Doilies, Happiest Birthday Wishes
Cardstock: Melon Mambo, Whisper White, Pink Pirouette
DSP: Flirtatious
Ink: Pink Pirouette, Pretty in Pink, Melon Mambo, Versamark
Accessories: Owl Punch, Pennant Die, Bitty Flower Punch, Basic Rhinestones Jewel Accents, Embossing Buddy, Silver Embossing Powder, Heat Tool, Heat & Stick Powder, Dazzling Diamonds, Stampin' Dimensionals, Silver Glimmer Paper, Stampin' Sponge, Basic Black Dotted Scallop Ribbon, Hobby Blade, Mini Glue Dots

The card base is Melon Mambo cardstock cut at 5 1/2" x 8 1/2" and scored at 4 1/4". Next a piece of Whisper White cardstock was cut at 3 3/4" x 5". The images from Delicate Doilies were stamped in Pink Pirouette, Pretty in Pink, and Melon Mambo to create the pattern. The Embossing Buddy was rubbed over the bottom portion of the stamped Whisper White cardstock. The greeting from Happiest Birthday Wishes was stamped in Versamark ink and Silver Embossing Powder was poured over the stamped image. After the excess powder was tapped off the embossing powder was heated with the Heat Tool.

The stamped Whisper White cardstock was adhered to a 4" x 5 1/4" piece of Pink Pirouette cardstock. Then this panel was adhered to the card front. The Hobby Blade was used to cut a slit in the fold of the card where I wanted the ribbon. Then a piece of Basic Black Dotted Scallop Ribbon was inserted through the slit, wrapped around the card front, and tied into a knot. The back of the knot was then glued to the card front with a couple Mini Glue Dots.


Now for the doily. A piece of Melon Mambo cardstock was run through the Big Shot on the Perfect Pennants die to get one of the scalloped circles. This was set aside. Next I got out my piece of Flirtatious DSP that has the laser cut doilies on it and cut out one of the doilies with Paper Snips. I applied Versamark by patting the ink pad directly onto the paper doily several times until it was covered with ink. Then I poured some Heat & Stick powder over the inked paper doily. The Heat & Stick powder was melted with the Heat Tool and Dazzling Dimonds glitter was quickly poured over the warm Heat & Stick. The excess glitter is tapped off and the image is heated again with the heat tool quickly just to set the glitter in the adhesive powder. Now you have a really glitter doily! I adhered the glittery doily on top of the Melon Mambo die cut scalloped circle doily from the pennant die. Stampin' Dimensionals were added to the back and this was adhered to card front.  


The owl body was punched from Whisper White cardstock. The Eyes are Very Vanilla, Whisper White, and Basic Grey. The belly is Silver Glimmer Paper that was sponged with Pink Pirouette and heated with the Heat Tool to set the ink. Then the belly was punched out and adhered to the owl body. The flower was created by punching two Pink Pirouette flowers using the flower punch from the Punch Pack. The edges of the flowers were sponged with Melon Mambo ink and were adhered together. The basic rhinestones strip was added to the owl's head and the flower was adhered on top of the owls ear. A single basic rhinestone was added in the center of the flower. The owl was adhered to the center of the glittery doily with Stampin' Dimensionals.

Monday, October 3, 2011

Blue Snowflakes

Good afternoon all! I hope you had a fabulous weekend! I got to spend plenty of time in my craft room and created a bunch of cards! First off is the card for this week's sketch challenge on Stampin' Connection. Yes! I'm right on time for once! Usually I don't get a chance to create the sketch card until later in the week. Anyway...here it is:


Stamps: Four the Holidays
Cardstock: Marina Mist, Night of Navy, Whisper White, Bashful Blue
Ink: Marina Mist
Accessories: Northern Flurries Die, Snow Burst Textured Impressions Embossing Folder, Simply Score, Glimmer Brad, Silver Brads, Paper Piercer, Mat Pack, 5/8" Basic Black Satin Ribbon, Stampin' Dimensionals, Vanilla Smooch Spritz

Here is the sketch that was created by yours truly:


The card base is Marina Mist cardstock cut at 5 1/2" x 8 1/2" and scored at 4 1/4". Next a piece of Whisper White cardstock was cut at 3 7/8" x 5 1/8". The greeting from Four the Holidays was stamped in Marina Mist ink in the upper left hand corner of the cardstock. The cardstock was put onto the Simply Score with the greeting facing the down and to the left with the short side at the top. I scored a line 1" from the left hand side to create the line under the greeting. Then I ran the cardstock through the Big Shot in the Snow Burst Textured Impressions Embossing Folder by placing the cardstock into the folder only up to the score line. That way only the bottom portion of the cardstock was textured.

This panel was adhered to a 4" x 5 1/4" piece of Night of Navy cardstock and this was adhered to the card front. A piece of 5/8" Basic Black Satin ribbon was tied around the card front and into a bow. Three snowflakes were cut from scraps of Bashful Blue cardstock that was run through the Big Shot on the Northern Flurries strip die. The snowflakes were sprayed with Vanilla Smooch Spritz to give them a little shimmer. The smaller snowflakes were placed onto the card front and a Paper Piercer and Mat Pack were used to pierce holes in the snowflake centers and a silver brad was added. The large snowflake was pierced in the center and a Glimmer Brad was added. A Stampin' Dimensional was used to adhere the large snowflake to the card front.


I hope you've enjoyed my christams card from this sketch! If you are a Stampin' Up Demonstrator you can find the sketch challenge thread HERE. If you are not a Stampin' Up Demonstrator I would still love to see your creations. Please post a link to your project in the comments section of this post!

Thanks for stopping by!