Tuesday, July 20, 2010

Golden Watercolor Trio

This is the second card that my guests made at the Make and Take last week. This card was inspired by a card created by Gabrielle Whiting.


Stamps: Watercolor Trio, Perfect Punches
Cardstock: Daffodil Delight, Whisper White, Basic Black
Ink: Daffodil Delight, Basic Black
Accessories: Scallop Trim Border punch, 5/8" Basic Black Satin ribbon, Scalloped Oval punch

The card base is Daffodil Delight cut at 5 1/2" x 8 1/2" and scored at 4 1/4". A piece of Basic Black cardstock was cut at 2 3/4" x 5 1/2" and punched on both 5 1/2" sides with the Scallop Trim Border punch.
The image panel is Whisper White cardstock cut at 2 1/4"x 5 1/2".

To get the varied colors in the background you want to use a technique called Stamping Off. I inked the leaves from Watercolor Trio in Daffodil Delight ink and stamped once on scrap paper before stamping on the Whisper White cardstock, then stamp on the cardstock twice before inking again. Repeat this until it is filled in how you like it. Then stamp the flowers with leaves and the flowers like you normaly would with Daffodil Delight ink. This gives you a pretty tone-on-tone image.

The butterfly from Watercolor Trio was stamped with Basic Black in the upper left hand corner. This panel is then adhered to the punched Basic Black cardstock, and then to the card front. A piece of 5/8" Basic Black ribbon was tied around the bottom of the card and into a knot. I really like how elegant the satin ribbon looks on any card. I just can't get enough of it!

The thanks from perfect Punches was stamped in Basic Black ink on a scrap of Whisper White cardstock and punched out with the Scalloped Oval punch. This was adhered to the card with Stampin' Dimensionals. Thats it! This is a quick and fun card to make.

Come back tomorrow to see the masculine card we made this month! Have fun stamping!


Monday, July 19, 2010

Because I Care - July Make and Take 1

This is the first card that my guests made at the July Make & Take. It uses one of the new Hostess sets. To get a Hostess Set you have to hold a workshop and sell at least $150 worth of merchandise and you will earn one Level 1 Hostess Set and $15.00 of FREE merchandise! Contact me or your local demonstrator for more information on holding a workshop. Now for the card that we made. Take a look:


Stamps: Because I Care
Cardstock: Marina Mist, Whisper White, Early Espresso
Ink: Black Stazon, Early Espresso
Accessories: Vintage Wallpaper Textured Impressions Die, Stampin Dimensionals, White Gel Pen, Crystal Effects, Dazzling Diamonds Glitter, Stampin Dimensionals, Stampin Up Markers: Certainly Celery, Old Olive, Bashful Blue, Tempting Turquoise


The card base is Marina Mist cardstock cut at 5 1/2" x 8 1/2" and scored at 4 1/4". A piece of Whisper White cardstock cut at 4 " x 5 1/4" was run through the Big Shot with the Vintage Wallpaper Textured Impressions die and adhered to the card front.

The image panel is a 2 1/2" x 3 3/4" piece of Whisper White cardstock. The hydrangea image from Because I Care was stamped in Black Stazon. Since we are coloring this in you want to use Stazon because it is a permanent ink and the lines won't bleed when you go to color in your image with the markers. If you used the classic Basic Black ink you might have trouble with the lines bleeding when coloring in your image.

I used Certainly Celery, Old Olive, Bashful Blue, and Tempting Turquoise markers to color in the flower.

Note: When using Stampin Up markers start coloring with the lightest color, then add your darker shadows, and after the ink has dried go over the entire thing again with the lightest color. This helps to blend the colors on your image better. If you let the ink dry completely before repeating the lighter color you won't have any problems with the color on the image contaminating your marker.

The White Gel Pen was used to highlight the centers of the hydrangea blooms. Then little dots of Crystal Effects were placed over each of the White Gel Pen dots and Dazzling Diamonds glitter was added. I knew if I didn't put glitter on this card one of my guests would say "It needs some sparkle!". The sentiment was stamped in Early Espresso ink in the bottom right hand corner of the card.

This image panel was then adhered to a piece of Maria Mist cardstock cut at 2 3/4" x 4" and then to a panel of Early Espresso cardstock cut at 2 7/8" x 4 1/8". This was adhered to the card front using Stampin Dimensionals.

I love using this beautiful new Hostess Set and plan on making lots of cards with it. Come back tomorrow to see another Make and Take! Have fun stamping!

Sunday, July 18, 2010

Elegant Butterflies

This is the card I made using the heat embossed butterflies I made during the Heat Embossing tutorial. If you missed the tutorial you can find it here.


Stamps: All A Flutter, Oval All
Paper: Presto Patterns DSP
Cardstock: Elegant Eggplant, Basic Black, Old Olive
Ink: Elegant Eggplant, Old Olive, Basic Black, Sahara Sand, Versamark
Accessories: 5/8" Basic Black Satin ribbon, Scallop Oval punch, Black Embossing Powder, Heat Gun, Embossing Buddy

The card base is Elegant Eggplant cardstock cut at 5 1/2" x 8 1/2" and scored at 4 1/4". The Presto Patterns DSP was cut at 3 1/2" x 4 1/4" and sponged with Kraft, Old Olive, and Elegant Eggplant ink. This was layered on a piece of Old Olive cardstock cut at 3 5/8" x 4 1/4" and a piece of Basic Black cardstock cut at 3 3/4" x 4 1/4".

Some 5/8" Basic Black Satin ribbon was tied around the panel and the panel was added to the card front. A scrap of Whisper White cardstock was sponged half way with Old Olive ink and the other half with Elegant Eggplant ink. The image from Oval All was stamped in Basic Black ink and then it was punced out with the scallop oval punch, then sponged around the edge with Basic Black ink and adhered to the card front with Stampin' Dimensionals. I then used some Crystal Effects and Dazzling Diamonds glitter to add some sparkle to the flower on the sentiment and used the white gel pen to color in the center of the flower.

The butterfly from All A Flutter was stamped in Versamark and heat embossed with black embossing powder on a scrap piece of Whisper White cardstock. Then I used the Marina Mist, Pacific Point, Old Olive, Kraft, Rose Red, and Elegant Eggplant ink pads with the Aquapainter by squeezing the ink pads in the center while they are closed and opening them half way to pick up the ink off of the lid with the Aquapainter.

The butterflies were cut out with Paper Snips and adhered to the card front with Stampin Dimensionals. What do you think?

Come back tomorrow to see the first of the projects that my guests made at the Make & Take last Friday!


Saturday, July 17, 2010

Heat Embossing Tutorial

Sorry I didn't have anything for you yesterday. After working in the morning I spent the afternoon and evening preparing for the Make & Take. All of the ladies had a wonderful time making the creations that I will be showing you next week. My husband and I are currently remodeling the sun room which I usually use for my Make & Takes and we had to use it anyway. It was and interesting sight having an unfinished room set up for this class, but it was fun anyway.

Well for today I have a tutorial on heat embossing. I will try to give you a tutorial of some sort every Saturday.

For this tutorial you will need an embossing gun, stamp, versamark ink, embossing buddy, embossing powder, cardstock and two coffee filters.


First you are going to want to rub your embossing buddy on the cardsock that you are embossing. The embossing buddy is a litte linen pouch with powder inside. When on your cardstock the powder prevents the embossing powder from sticking in places where you don't want it.


Stamp your image onto the cardstock using Versamark Ink. Versamark is a clear ink dries slowly and is slightly sticky. It grabs and holds onto the embossing powder easier. For heat embossing you should either use Versamark or Craft ink because classic ink dries too quickly to hold onto the embossing powder.


Hold your cardstock over the coffee filter or if it is small enough set the cardstock in the coffee filter and pour the embossing powder over the stamped images.


Lift up your cardstock and let the excess embossing powder slide off into the coffee filter.


Give the cardstock a good flick on the back to get all of the extra little grains of embossing powder off your cardstock.


Use the top coffee filter to pour the embossing powder back into the container. By having a second coffee filter below the container it will catch the powder that you spill instead of spilling it onto your work table.


Use the heat gun to melt the embossing powder. The heat gun is not a hair dryer, do not move it around back and fourth. Hold the heat gun steady until the powder raises and turns shiny. Make sure the image is completely heated before turning off the heat gun.


Once you are finished embossing let the cardstock cool a little bit before picking it up. It will be hot.


You now have a shiny raised image. This is great for coloring to keep the watercolor or marker ink in the lines. Here I have used black embossing powder. You can also get Gold, Silver, Clear, White, or Irridescent Ice (this is like clear embossing powder with glitter in it).

Heat embossing is lots of fun and gives you a really nice shiny image. Come back tomorrow to see the card that I used these embossed butterflies on. Have fun stamping!

Thursday, July 15, 2010

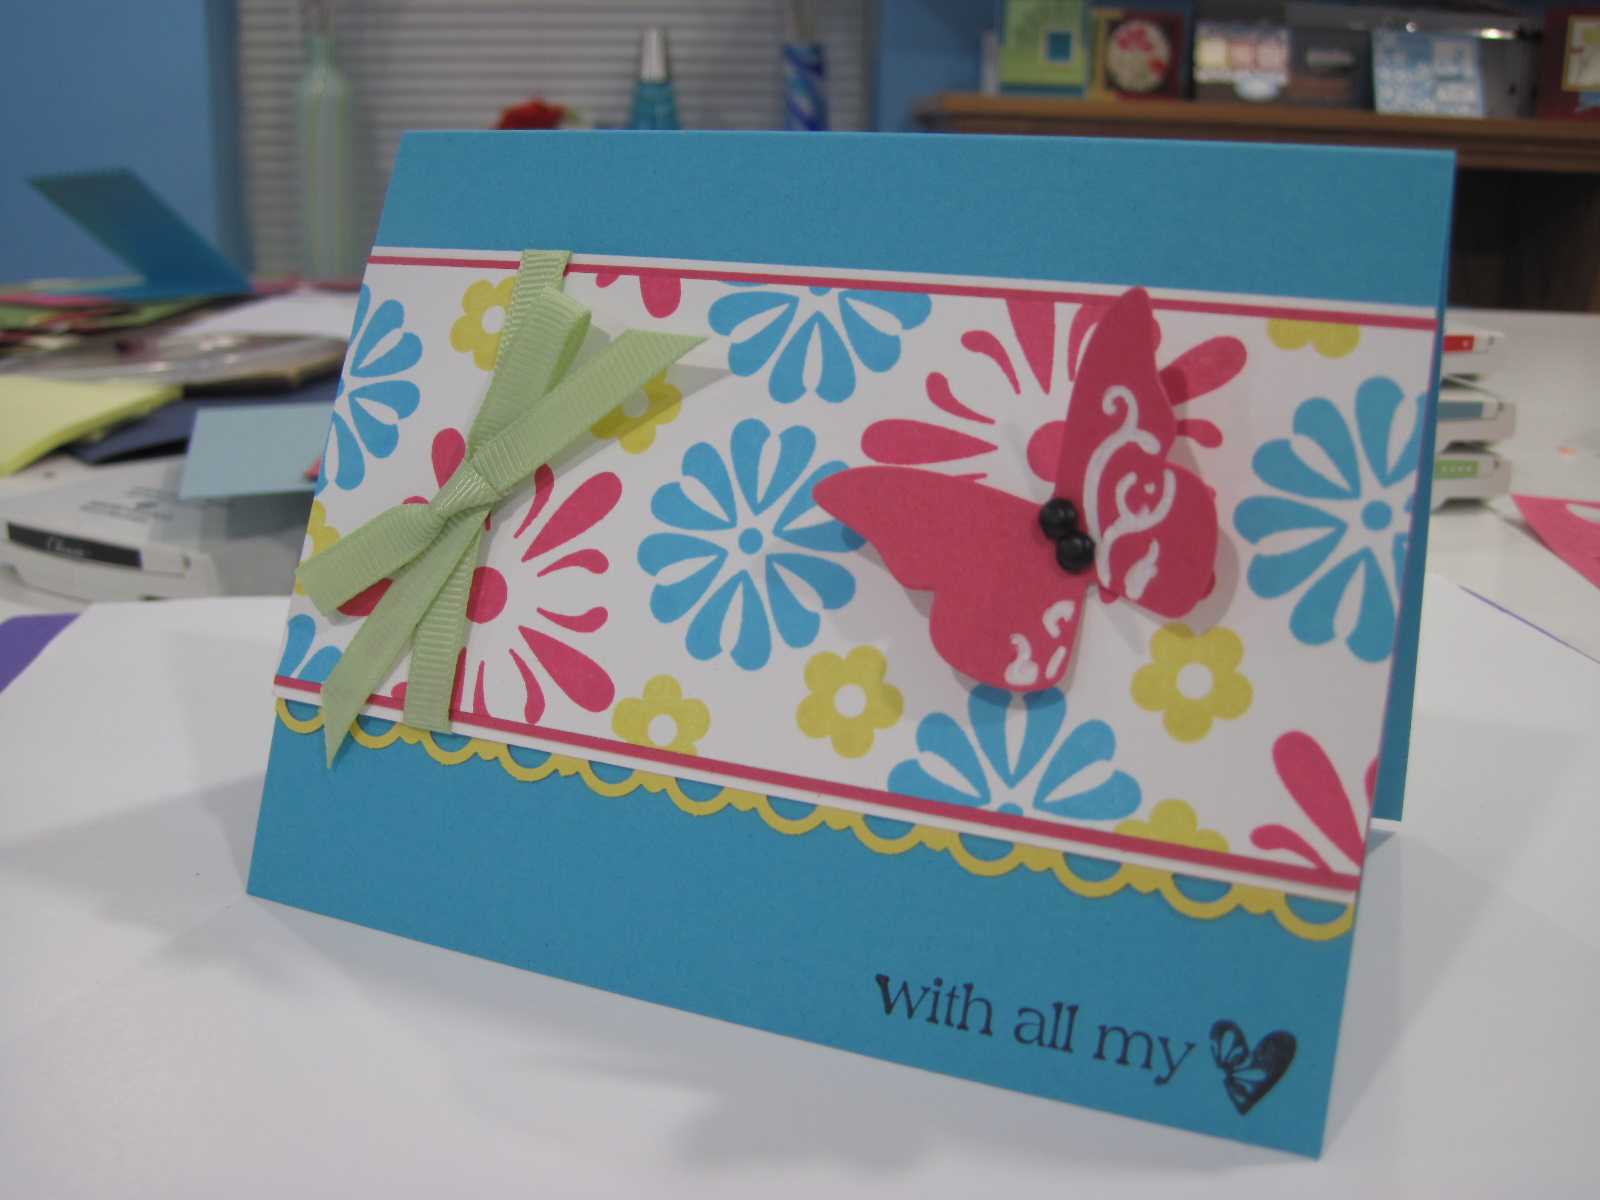
With All My Heart

Last night after preparting for the Make & Take this Friday I had a chance to just play around. No birthday cards that need made, no swaps that need made, so what do I do? Well I decided I wanted to make something bright and fun that uses Melon Mambo. Now this is a color that I really haven't used that much. I have a bad habit of sticking to a few color combos. So instead I pulled out my wonderful new Color Coach and went to the Melon Mambo tab. One of the suggested color combinations on the back of the card was Melon Mambo, Tempting Turquoise, and Daffodil Delight. So here is what I made with those colors.


Stamps: With All My Heart
Cardstock: Whisper White, Tempting Turquoise, Melon Mambo, Daffodil Delight
Ink: Tempting Turquoise, Melon Mambo, Daffodil Delight, Basic Black
Accessories: Scallop Trim punch, Certainly Celery 1/4" Grosgrain ribbon, Beautiful Wings Embosslit, White Gel Pen, Basic Black brads, Needle Tool, Mini Glue Dots

The card base is Tempting Turquoise cardstock cut at 5 1/2" x 8 1/2" and scored at 4 1/4". I used the sentiment from With All My Heart and stamped it in the bottom right corner of the card front in Basic Black ink.

The image panel is Whisper White cardstock cut at 2 1/4" x 5 1/2". This was stamped with the various flowers from With All My Heart in Melon Mambo, Tempting Turquoise, and Daffodil Delight. This panel was then layered on a piece of Melon Mambo cardstock cut at 2 3/8" x 5 1/2". Then another Whisper White panel cut at 2 1/2" x 5 1/2" was added. A piece of Certainly Celery 1/4" Grosgrain ribbon was added around the panel and tied into a bow. I just couldn't resist adding some sort of ribbon and I didn't have any ribbon in the colors used. I will have to fix that....anyway back to the card.

A piece of Daffodil Delight cardstock was cut at 2" x 5 1/2" and punched with the Scallop Trim border punch. This was adhered behind the image panel layeres leaving just the scallops showing. The stack of layeres was adhered to the card front. It could have been done here but I just kept looking at it and thinking that something was missing. Then I spotted by Beautiful Butterfly Embosslit on the table. A butterfly! Perfect!

So I used my Big Shot and the Beautiful Butterfly Embosslit and cut a Melon Mambo butterfly. The white gel pen was used to color in the embossed swirls on the butterfly and the needle tool was used to add holes for two Basic Black brads. Mini Glue Dots were used to adhere the butterfly to the card front.

That's it! This fun and bright card is done! I will have to try using more bright colors in my crafting and the new Color Coach will help me find wonderful new color combinations. If you haven't seen the new Color Coach you can check it out here.
Come back tomorrow to see what else I have created! Also, don't miss the new tutorial this Saturday!

Wednesday, July 14, 2010

Fancy Favor Boxes

These boxes were so much fun and so easy to make! And so fast too! I can just image these filled with candy as wonderful party favors or even wedding favors.


Stamps: Baroque Motifs, Elements of Style

Cardstock: Bashful Blue, Old Olive, Whisper White
Ink: Night of Navy, Bashful Blue, Old Olive, Early Espresso
Accessories: Big Shot, Fancy Favors Die, Whisper White Organza ribbon

I stamped the cardstock with coordinating ink using the swirls from Baroque Motifs several times across the center of the cardstock. One box was made with Bashful Blue cardstock and Bashful Blue ink. The other box was made with textured Old Olive cardstock and Old Olive ink.

Then the Big Shot was used with the Fancy Favors die. This wonderful die cuts and scores at the same time! So all you have to do is fold on the score lines and adhere the bottom together with some sticky strip.

I used the Crop-A-Dile to punch two 3/16" holes in the center of the front and back of the box. I stamped the "For You" from Elements of Style in Night of Navy for the blue box and Early Espresso for the green box on a scrap piece of Whipser White cardstock. Then the Curly Label punch was used to punch out the sentiment and the Crop-A-Dile was used to punch a hole in the top of the label.

Whisper White Organza ribbon was threaded through the holes in the box and on the label and then the ribbon was tied into a bow. That was really it! So super quick and fun! You could easily mass produce boxes like these!

Come back tomorrow to see a pretty Elegant Eggplant card!