Saturday, June 9, 2012

Butterfly Congratulations!

Good morning everyone! I hope you're having a fabulous weekend! Today I will have plenty of time to spend in my craft room playing with all my new catalog goodies! I'll have lots of great things to show you this week! Here is a card that I created for the Stampin Connection SCCSC121 sketch challenge. 
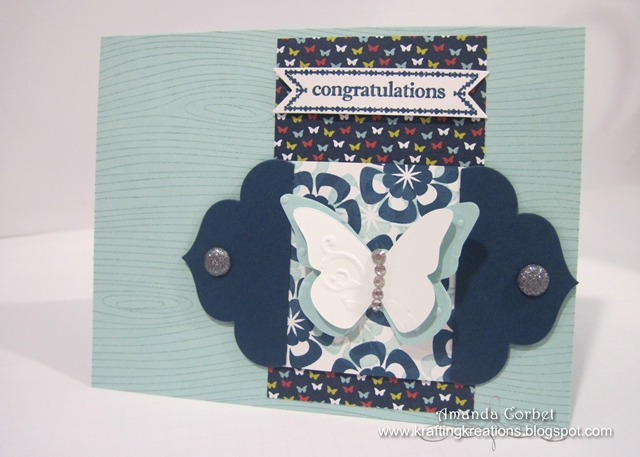


  • Stamps: Betsy's Blossoms, Itty Bitty Banners, Woodgrain
  • Card Stock: Pool Party, Midnight Muse, Whisper White
  • DSP: Patio Party
  • Ink: Pool Party, Midnight Muse
  • Accessories: Beautiful Butterflies die, Beautiful Wings sizzlit, Apothecarty Accents framelit, Bitty Banners framelit, Glimmer Brads, Mini Glue Dots, Rhinestones, Stampin' Dimensionals. 
Here is the sketch that was created by Liz Goldhawk:


I started off with a piece of Pool Party card stock cut at 5-1/2" x 8-1/2" and scored at 4-1/4". I stamped the Woodgrain background image onto the card front in Pool Party ink. This adds a subtle background pattern. I've been loving the woodgrain look lately...don't know why.

Next I cut a piece of Patio Party DSP 2-1/4" x 4" and adhered it onto the card front. Then I cut a piece of Whisper White card stock 2-1/4" x 2-1/4". I stamped the blossom from Betsy's Blossoms in Midnight Muse ink and Pool Party ink. Can you see how solid and dark those Midnight Muse flowers are? I LOVE the new ink pads! My Pool Party ink pad is still the old felt style and you can tell. I stamped the Midnight Muse flowers first, then the Pool Party flowers not really paying attention to the order. I think it's interesting how you can clearly see the Pool Party flowers on top of the darker Midnight Muse ones.


Next I cut a piece of Midnight Muse card stock 3-1/4" x 5-1/4" and ran it through the Big Shot on the Apothecary Accents framelit. I uses Paper Snips to cut the die cut shape to get just the ends of the label. I adhered the labels on top of the sides of the stamped Whisper White card stock. Then I used the Paper Piercer and Mat Pack to pierce a hole in each end of the label and added a Glimmer Brad. I ordered the new Paper Piercing Tool and Stampin' Pierce Mat, but they hadn't arrived when I made this card.

I adhered this label panel onto the card front with Stampin' Dimensionals. I had these two butterflies already sitting in a box of scraps so I pulled them out, adhered them together with a Mini Glue Dot and adhered it onto the stamped panel with a Mini Glue Dot. I added some Rhinestones to create the butterfly's body and add some more sparkle. What can I say...I love sparkle and bling!

Now for the greeting. I stamped the banner from Itty Bitty Banners in Midnight Muse ink and then used the Bitty Banners framelits to cut out the stamped image. I adhered the banner onto the card front with a couple Stampin' Dimensionals.

I just love how this turned out. I'm loving all the wonderful new framelits in the new catty. They were at the top of my list for my first order and you will see some creations using them later this week!

Thanks for stopping by!


Friday, June 8, 2012

Blog Candy Winner!!!!!

I'm so sorry this post is late. I had intended on getting it up this afternoon, but it has been a busy day. With work in the morning, picking up an awesome desk/hutch at a garage sale and getting it home, and signing closing documents for refinancing our house. Yay!


So the winner of the free subscription to the June edition of Craft Project Central is.....

Comment #11: Judy Garza
"The cover is very enticing! I want to OPEN it and look through it! Bet it is fabulous on the inside too. Thanks for sharing. 
Judy"

I have sent you an e-mail Judy! 

Thank you everyone who entered! Check back next month to see what my Craft Project Central project is and have a chance to with a free July subscription! 

Thanks for stopping by!

For the Birds - Friday Mashup 62!

Good morning everyone! Today I have another Friday Mashup challenge to share with you! This week is all for the birds! The challenge was to make a card using the sketch below, make a project featuring birds, or mash it up and create a card with the sketch featuring birds! 


So here is my mashed up card! 


  • Stamps: Papaya Collage, Friendly Phrases, Language of Friendship
  • Card Stock: Summer Starfruit, Basic Gray, Whisper White, Gumball Green
  • DSP: Titterpated
  • Ink: Summer Starfruit, Gumball Green, Basic Black, Basic Gray
  • Accessories: Bird Punch, Stampin' Dimensionals, Silver Glimmer Paper, Stampin' Sponge, Rhinestones
Summer Starfruit is such an interesting color. When I first saw it I thought I would have to force myself to use it, but now I find I'm drawn to it when reaching for colors to start a new card. So for this card I started with a 5-1/2" x 8-1/2" piece of Summer Starfruit card stock that was scored at 4-1/4. Next I cut a piece of Twitterpated DSP 1-1/4" x 5-1/2" and adhered it in the center of the card front.

For the vertical strips I used Gumball Green cut at 3/4" x 4-1/4" and adhered them onto the card front. Just to add a little bit of sparkle I cut two pieces of Silver Glimmer Paper 1/4" x 4-1/4" and adhered them on top of the Gumball Green strips.

For the main image panel I started off with a piece of Whisper White card stock cut at 2-1/4" x 3-1/4". I stamped the leaves from Papaya Collage in Summer Starfruit and Gumball Green. I'm still getting used to these new ink pads, but so far I love them! I wanted to stick with something simple for the greeting so I pulled out Friendly Phrases and stamped the greeting onto the Whisper White card stock in Basic Black ink. Then I adhered this panel onto a 2-3/8" x 3-3/8" piece of Basic Gray card stock and then I adhered this onto the card front with Stampin' Dimensionals.


I couldn't resist adding just another little bit of sparkle so I added a small Rhinestone onto the greeting.

Now for the bird...I stamped the bird image from Language of Friendship in Basic Black ink onto Basic Gray card stock. Then I punched out the bird with the Bird Punch and sponged around the edges with Basic Gray ink. I adhered the wing onto the bird with a Stampin' Dimensional. I punched a branch from Gumball Green card stock with the Bird Punch and adhered it behind the bird. I adhered the bird to the card front with a Stampin' Dimensional just to make it pop!


If you have a chance head on over to the Friday Mashup! and play along! Head on over there to see what else the design team has created!

Thanks for stopping by! 

Wednesday, June 6, 2012

New Promotions!

I just updated my Promotions page with all the great new promotions from Stampin' Up! Take a look! You really won't want to miss out on some of these!


Thanks for stopping by! 

Pay It Forward


While browsing through the blogs that I follow this morning I noticed that Julie was doing a Pay It Forward. I really like the idea of this and it sounds like fun. Basically you receive a gift in the mail from me and in return you send a gift out. So I am going to Pay It Forward to the first three people that leave a comment on this post! 
RULES:
  1. I will create a crafty gift for each of the first three people who comment on this post. The gift is a total surprise and will arrive on your doorstep anytime within the next 365 days.
  2. In signing up for Pay it Forward, you are committing yourself to the project...someone pays it forward to you, so you pay it forward to others! Post these rules, or something very similar so others can get involved. You will create your own post where you create gifts for 3 people, and so forth.
  3. You must have an active blog of your own, or some way to post up your PIF info like a Flickr, Pinterest, or Facebook account. Essentially, you'll need a place to announce your own PIF.
  4. After commenting on this post, should you be one of the lucky ones, post something similar on your blog...so you can spread the Pay It Forward love. I will email you asking for your mailing address, and the online address where you are posting your PIF info, so I can get your crafty treat in the mail. Please make sure your email address is visible on your profile or leave it in the comment.
That's all there is to it! Comment if you would like to be one of the lucky three to receive a gift handmade by me! 

Craft Project Central!

Here are the next two projects for the June edition of Craft Project Central!

Notes, Box, and Pen Set: 

This pretty note cards, box, and matching pen set are the perfect gift for any busy lady!  The box has stamped note paper, four cards with stamped envelopes, and a handy matching pen.  When the paper is gone and the note cards are sent, the front rosette can easily be removed to use as a decoration for a card, a gift bag, or even a scrapbook page!


This beautiful project was designed by Chris! If you have a chance please head on over to Craft Project Central and leave Chris a comment on her project! 


Betsy's Blossoms Cards and Holder: 

This quick and easy project makes a perfect gift!  Great for teachers, co-workers or as a thank you for a special neighbor!  The box holds 4-6 cards and envelopes and is a great item to make for craft or vendor shows as well as making for a class, club, or stamp camp!


This wonderful project was designed by Laurie! If you have a chance please head on over to Craft Project Central and leave Laurie a comment on her project! 

If you would like to subscribe to the June edition of Craft Project Central and get 10 fantastic tutorials for just $10.00 then click HERE

If you would like to enter for a chance to win a free June subscription please enter in my blog candy in THIS post! Make sure to enter before Friday at noon! 

Also, if you have a chance take a look at the June Creating Pretty Cards sketch challenge at Craft Project Central. It's fun to play along with the sketch and you have another chance to win a free month's subscription! 


Thanks for stopping by!