
Good morning! I'm sure you're wondering just what a Fish Extender is. No, it's not something you use when you're fishing. It is something unique to Disney Cruise Line and the guests that set sail on their beautiful ships. Basically each stateroom on the ship has a clip next to the door in the shape of a fish. The cruise line uses the clip to deliver documents and such to the room guests. However, it has a dual purpose.
When you book a Disney Cruise Line vacation you can go to www.disboards.com and find the discussion board for your cruise date. This gives you a chance to chat with people that you will be sailing with. There is also an opportunity to sign up for a Fish Exchange. This is where people sign up and agree to leave a little gift for each other person who signs up. In return they receive a gift from everyone else that signed up for the exchange. The gift can be absolutely anything! It's up to you to decide what to give. Sounds like fun right? I just can't wait!
But to receive the gifts. you have to have something for everyone to leave them in. So you have to have a Fish Extender to hold the gifts. Basically a Fish Extender is 8" x 24" approximately and has pockets for each person in the stateroom and is meant to hang from the fish clip. Does it make sense now? I have seen a few tutorials for creating a Fish Extender with straight pockets, but I really wanted my pockets to have elastic at the top to hold the gifts in well. So here is what I came up with. Please note that I am by no means a seamstress or expert at sewing. Some of the methods I have used may not be "correct", but it's how I managed to sew mine together.
1. I started off by cutting two pieces of fabric and one piece of batting 8" x 24". I layered them with the fabric right sides out and the batting between the fabric and sewed around the edges to hold them together.


2. Next I cut two pieces of my red fabric 8" x 15". Then I lined up my ruler with the top corner and 2-1/2" in from the corner at the bottom and cut. Repeat on the other side.

3. I cut two pieces of my polka dot fabric 10" x 15". For this one I lined up my ruler 1" down from the top corner and 3" in from the side at the bottom. Repeat on the other side.

4. I pinned my pocket pieces together with the red on top, polka dot on bottom, and the right sides facing each other.

5. I sewed a line 1" from the top all the way across.

6. Then I folded the polka dot around so that the wrong sides of the fabric were facing each other, and pressed the top . Here is what it looks like from the back.

And here is what it looks like from the front.

7. Now I took it back to the sewing machine and sewed right along the top edge as close as I could get. This creates the pocket for the elastic to go in. Then I took the fabric back to my cutting mat and trimmed the fabric so that it matched the edges of the polka dot fabric. Just to clean things up a little bit.

8. I took a red marker and put a mark 1" up from the bottom on both of the bottom sides of the piece I put together in Step 1.

9. I lined up the bottom of the pocket with the two 1" marks on the sides and pinned it in place so that the polka dot side was facing up. Then I stitched across the pocket 1/4" from the raw edge. Flip the fabric up and you can start to get an idea of what the finished Fish Extender will look like.

10. I repeated Step 9 to place the other pocket except I put a mark at 8" from the bottom.

11. I didn't get a picture of this step, but I cut two pieces of 5/8" wide elastic 10" long and inserted a piece through each pocket top. Then I pinned the pocket to the side of the Fish Extender lining up the cut edge of the pocket with the edge of the fish extender. When I got up to the elastic I pinned it in place so that approximately 1" was sticking out past the edge. Then I sewed up the sides to close the pockets and I sewed over the elastic portions twice to make sure it was good and strong. Then I just cut off the extra elastic and I was ready for the next step.
12. Next I cut my pieces for the straps. I cut two pieces of my trim fabric 3" x 10". I folded both of them in half with the right side on the inside and sewed the long edge.

13. I turned the straps right side out, and pressed them flat.


14. I pinned one end of the straps onto the back of the Fish Extender at the top and sewed them in place.

15. Now on to making my Bias Tape. You could buy bias tape, but I wanted mine to match my pocket liner pattern, so I just made my own. There may be an easier way to do this, but I didn't find my way too difficult. I cut three pieces of fabric 2" x 36" (or whatever the fabric width is). I folded it in half and pressed all along the strip as shown below:

16. Then I unfolded it and folded the fabric edge in and lined it up with the middle line that I made in Step 15.

17. Then I folded it in half again and pressed it down really well.

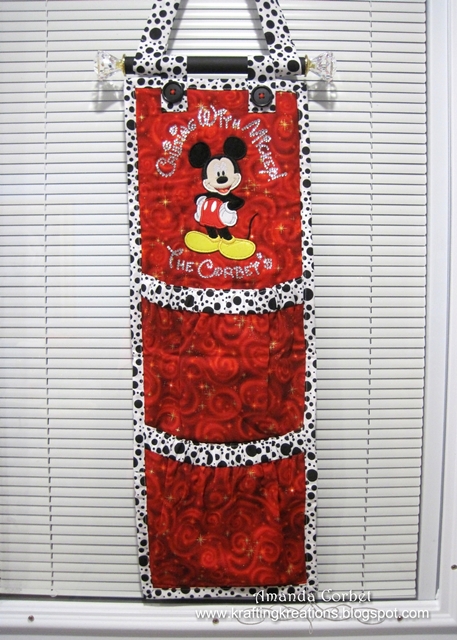
19. Then I simply trimmed my strap pieces that I added in Step 14 to the length I needed them. I turned in the raw ends of the fabric, and sewed along the bottom. Then I just sewed them in place onto the front of the Fish Extender. I also sewed on some big black buttons with red embroidery floss just for some added decoration.

20. The hanger piece was just like the straps except I made just one that was 20' long. I turned in the raw ends and just sewed the end to the strap so that the opening was just large enough for the 3/4" dowel rod.
21. Next I decorated the remaining top portion of my Fish Extender. I used a Mickey iron on applique and hand sewed it in place with clear thread. Then I added the letters in rhinestones for "Cruising With Mickey" and "The Corbets". Let me add that the rhinestones were a royal pain in the but to put on! I highly suggest purchasing a personalized iron on from Etsy. It will save you several hours of frustration!
22. For the rod I bought a piece of 3/4" dowel rod and cut it down to 8". I painted it black with acrylic paint. I bought two of the crystal looking drawer pulls from the hardware store and just glued one onto the end of the dowel rod with E6000 glue. Let the glue cure, slit on my handle and Fish Extender, and glued on the other drawer pull with E6000 glue and let the glue cure.

And here is my finished masterpiece! Although it took A LOT longer than I thought it would, I am totally pleased and proud of my Fish Extender! Now, since I signed up for the Fish Exchange months ago I've been working on my gifts. I also have a couple family only gifts that I've made since we will be vacationing on the beautiful Disney Fantasy together. So be prepared for a week full of fun Mickey inspired gifts!