
Since the Mini Milk Carton die has been available I've seen several of these adorable Bird House boxes made with them. The only problem with the ones I've seen made though is that you have to either; use a clip for the top, leave the hole in the front open, or glue the top closed and the box gets destroyed getting the treat out. Well none of those options were going to work for me. I'm not going to spend that much time creating a pretty little box for it to get destroyed while getting the candy or present out. So here is what I came up with!
Here are the supplies that we will be using:
- Stamps: French Filigree, Woodgrain, Language of Friendship
- Card Stock: Wisteria Wonder, Crumb Cake, Lucky Limeade, Bashful Blue
- Ink: Wisteria Wonder, Early Espresso, Pacific Point
- Accessories: Scallop Edge Border Punch, 1" Circle Punch, Bird Punch, Sticky Strip, Paper Snips, Acetate, Stampin' Dimensionals, Stampin' Sponge, Two-Way Glue Pen, Big Shot, Mini Milk Carton Die

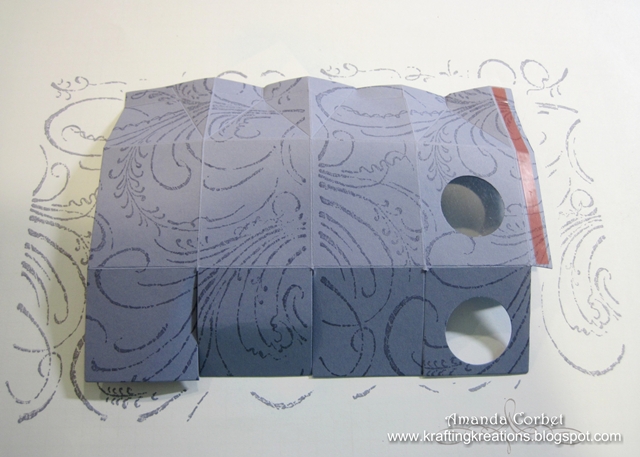
1. Cut a piece of Wisteria Wonder card stock 5-1/2" x 8-1/2" and run it through the Big Shot on the Mini Milk Carton Die.

2. Stamp the card stock with the French Filigree background stamp in Wisteria Wonder ink.

3. Fold under the first bottom tab from the right.

4. Use the 1" Circle punch and center it in the score lines for the first side of the mini milk carton and punch.

5. There will be a hole in the bottom tab, don't worry about that. It will be covered up later.

6. Cut a piece of Window Sheet 1-1/2" x 1-3/4". I used a scrap of Acetate that I already had, but Window Sheets would work great for this too! Apply Sticky Strip onto the 1-1/2" wide top and bottom of the acetate.

7. Flip over your Wisteria Wonder card stock. Remove the Sticky Strip liner from the Window Sheet and adhere it on the inside of the section of the box with the hole. This will keep the candy from falling out of the box.

8. Now place a piece of Sticky Strip on the bottom tab as shown in the picture below.

9. Now flip your card stock back over so the stamped side is up and Apply Sticky Strip onto the side tab.

10. Fold on all of the score lines.
11. Remove the Sticky Strip liner from the side tab and adhere the tab inside the panel on the other end of the card stock to form your box.

12. Now fold in one of the solid bottom tabs, then the tab with the hole, then the tab opposite the tab with the hole.

13. Now remove the liner from the Sticky Strip on the last bottom tab and fold it down to adhere the box bottom in place.


14. Now you have this:

15. Cut a piece of Crumb Cake card stock 1-1/2" x 3-1/2" and score it at 2" as shown in the picture below.

16. Cut another piece of Crumb Cake card stock 1-1/2" x 2". Then stamp both Crumb Cake pieces with the Woodgrain background stamp in Early Espresso ink.

17. Punch one end of the 1-1/2" x 2" piece and the long end of the 1-1/2" x 3-1/2" piece with the Scallop Edge border punch.

18. Sponge around the edges and on either side of the fold with Early Espresso ink.

19. Now use Paper Snips to trim the short end of the longer piece as shown in the picture below.

20. Flip over both pieces of Crumb Cake card stock and apply Sticky Strip as shown in the picture below.

21. Remove the Sticky Strip from the smaller piece of Crumb Cake card stock and adhere it onto the right side of the top of the milk carton box as shown in the picture below.

22. Now remove the Sticky Strip liner from the other piece of Crumb Cake card stock and adhere it onto the left side of the roof so that the fold lines up with the edge of the card stock on the milk carton as shown in the picture below.

23. To close the box curl the flap of the Crumb Cake card stock around your finger or bone folder a little bit. Insert the end of the card stock into the milk carton box on the other side of the middle crease.

24. Slowly slide the tab inside the box. The tab will be held between the sides of the fold on the top of the box and keep the box closed. So now the box can be opened and closed and still look pretty!


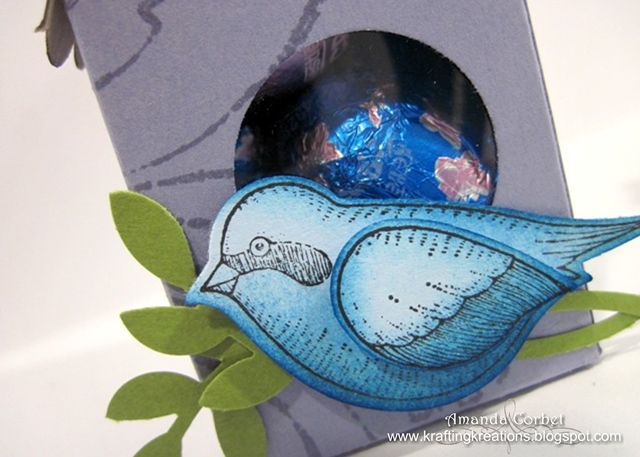
26. Stamp the bird image from Language of Friendship in Basic Black ink onto Bashful Blue card stock.

27. Punch out the bird image with the Bird Punch.

28. Sponge around the edges of the bird with Pacific Point ink. Adhere the wing onto the bird with a Stampin' Dimensional.

29. Punch two branches from Lucky Limeade card stock with the Bird Punch and glue them onto the front of the milk carton under the hole with the Two-Way Glue Pen.

30. Adhere the bird onto the branch with a Stampin' Dimensional.

That's it! Now you have a pretty Bird House gift box that you can give to someone with a little present inside. I had this as the 3D project at the Easter Class so we filled these sweet little boxes with chocolate eggs.
I hope you get a chance to make your own sweet little Bird House Mini Milk Carton!
Thanks for stopping by!